Early installation
vue cli installation
sudo npm install -g @vue/cli
function:
vue ui
The localhost:8000 page opens automatically
mysql installation (optional)
- Download address: https://dev.mysql.com/downloads/mysql/5.6.html , find the appropriate dmg version to download
- Click dmg to install step by step
- Configure environment variables (optional)
Starting with the Mac OS Catalina version, your Mac will use zsh as the default login Shell and interactive Shell. You can also set zsh as the default Shell in earlier versions of macOS
# Open terminal and enter:
vi ~/.zshrc

# add to:
export PATH=${PATH}:/usr/local/mysql/bin

# Make environment variables effective:
source ~/.zshrc
After the configuration is completed, restart terminal to verify whether the environment variable is effective
mysql -u root -p
Create project
First create a python project, then create a vue project on the vue server, and store the path of the vue project under the newly created Python project
Approximate Directory:
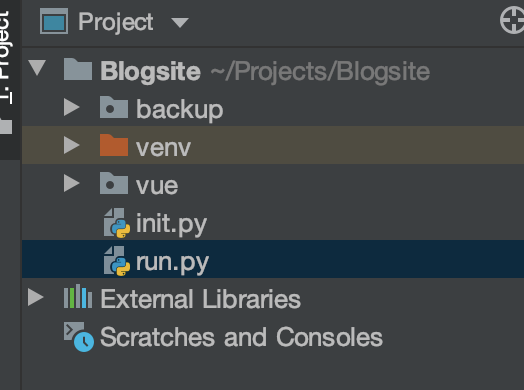
- backup: a folder created by yourself, which mainly stores py files
- vue: a project created visually after the vue service is started
- init: create it yourself and do some initialization operations
- run: create and write your own back-end route
Initialize app
New init Py file, the code is as follows:
from flask import Flask
from flask_cors import CORS


def create_app():
    """
    establish app object
    :return:
    """
    app = Flask(__name__,
                static_folder="./vue-project/dist/static",
                template_folder="./vue-project/dist")

    # Cross platform access
    cors = CORS(app, resources={r"/api/*": {"origins": "*"}})

    return app
Create a new run Py file, part of the code is as follows:
from flask import render_template, jsonify, request
import requests
from random import *
import init
from backup.database import Article, session
import json

app = init.create_app()


@app.route('/', defaults={'path': ''})
@app.route('/<path:path>')
def catch_all(path):
    if app.debug:
        return requests.get('http://localhost:8080/{}'.format(path)).text
    return render_template("index.html")


@app.route('/api/login', methods=['GET', 'POST'])
def login():
    username = request.values.get('username')
    password = request.values.get('password')
    if username == 'xxxxx' and password == 'xxxx':
        res = {
            'isLogin': '0',
            'msg': 'success'
        }
        return jsonify(res)
    else:
        res = {
            'isLogin': '-1',
            'msg': 'fail'
        }
        return jsonify(res)


if __name__ == '__main__':
    app.run(debug=True)
Connect to database (optional)
Download relevant modules first:
pip install flask-sqlalchemy pymysql
Create a new backup folder. Under the folder, create a new database Py file
from sqlalchemy.ext.declarative import declarative_base
from sqlalchemy.orm import sessionmaker, relationship
from sqlalchemy import create_engine, Integer, Text, DateTime
from sqlalchemy import Column, String
from datetime import datetime
import init

# Base = init.setup_db()
# app, db = init.create_app()

# Corresponding to the user name and password of the database you set
engine = create_engine('mysql+pymysql://user:password@127.0.0.1:3306/Blog_db?charset=utf8')
Session = sessionmaker(bind=engine)
session = Session()

Base = declarative_base()
Base.metadata.create_all(engine)


# Create table
class Article(Base):
    __tablename__ = 'article'
    id = Column(Integer, primary_key=True, autoincrement=True)
    title = Column(String(255), nullable=True)
    content = Column(Text, nullable=False)
    create_time = Column(DateTime, default=datetime.now)
    status = Column(String(255), nullable=True)

    def __init__(self, title, content, status):
        self.title = title
        self.content = content
        self.status = status
Write back-end routing
Take login as an example:
@app.route('/api/login', methods=['GET', 'POST'])
def login():
    username = request.values.get('username')
    password = request.values.get('password')
    if username == 'xxxxx' and password == 'xxxxx':
        res = {
            'isLogin': '0',
            'msg': 'success'
        }
        return jsonify(res)
    else:
        res = {
            'isLogin': '-1',
            'msg': 'fail'
        }
        return jsonify(res)
- request.values.get can get the parameter value passed from the front end
Write page routing
Rewrite app vue
<template>
  <div id="app">
    <router-view/>
  </div>
</template>

<script>
export default {
  name: 'App'
}
</script>

<style>

#app {
  width: 100%;
  height: 100%;
}
</style>
The UI component library used in the front end is iview. There are many materials on the Internet on how to configure it in the project, so we won't expand it here
Start writing page route:
- New login_form.vue (created under the components path) only refers to the Form component in iview
<template>
    <Form ref="formInline" :model="formInline" :rules="ruleInline" inline>
        <FormItem prop="user">
            <Input type="text" v-model="formInline.user" placeholder="Username">
                <Icon type="ios-person-outline" slot="prepend"></Icon>
            </Input>
        </FormItem>
        <FormItem prop="password">
            <Input type="password" v-model="formInline.password" placeholder="Password">
                <Icon type="ios-lock-outline" slot="prepend"></Icon>
            </Input>
        </FormItem>
        <FormItem>
            <Button type="primary" @click="sendToParent">Sign in</Button>
        </FormItem>
    </Form>
</template>
<script>
    export default {
        data () {
            return {
                formInline: {
                    user: '',
                    password: ''
                },
                ruleInline: {
                    user: [
                        { required: true, message: 'Please fill in the user name', trigger: 'blur' }
                    ],
                    password: [
                        { required: true, message: 'Please fill in the password.', trigger: 'blur' },
                        { type: 'string', min: 3, message: 'The password length cannot be less than 3 bits', trigger: 'blur' }
                    ]
                }
            }
        },
        methods: {

            // Use $emit to trigger the custom event of the parent component
           sendToParent(){
               this.$emit("listenChildEvent", {username: this.formInline.user, password: this.formInline.password})
           }
        }
    }
</script>
New login Vue (created under the views path)
<template>
<div class="login">
<div class="login-con">
<Card icon="log-in" title="Welcome to login" :bordered="false">
<div class="form-con">
<LoginForm v-on:listenChildEvent="checkLogin"/>
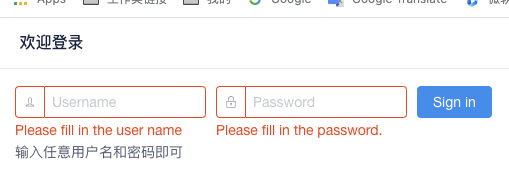
<p class="login-tip">Enter any user name and password</p>
</div>
</Card>
</div>
</div>
</template>
<script>
// @ is an alias to /src
import LoginForm from '@/components/Login_form.vue'
export default {
name: 'Home',
components: {
LoginForm
},
}
</script>
Configure Routing: find router > index JS file, add the route of login page
import Vue from 'vue'
import Router from 'vue-router'

Vue.use(Router)
import Home from '../views/Home.vue'
import About from '../views/About.vue'
import Login from '../views/Login.vue'
export default new Router({
  routes: [
    {
      path:"/",   // If path is set to "/", this page is displayed by default
      component:Home,
      name:"Home"
    },
    {
      path:"/about",   // If path is set to "/", this page is displayed by default
      component:About,
      name:"about"
    },
    {
      path: "/login",
      component: Login,
      name: "login"
    },


  ],
  mode:"history"    // Set mode to history and remove the # number on the address bar
})
Theoretically, you can now visit the localhost:8080/login page, as follows:
Bridge connecting front and rear ends
Download the module first: axios
npm install axios
Next, go to login In the Vue file, fill in the code for calling the back-end route in the scripts section
// Introducing axios module
import axios from "axios"

export default {
  name: 'Home',
  components: {
    LoginForm
  },

  methods: {
      checkLogin: function(data){
        console.log(data)

        var that = this
        var parms = new URLSearchParams()

        parms.append('username', data.username)
        parms.append('password', data.password)

		// Call the back-end route and verify the value returned by the interface
        axios.post('http://localhost:5000/api/login', parms).then(function (res) {
        if (res.data.isLogin == '-1') {
          alert('Wrong user name or password')
        } else {
          sessionStorage.setItem('userInfo', JSON.stringify(res.data))
          that.$router.push({ path: '/' })
        }
      })

      }

  },

}
The simple login function is completed. Oh, when I write this, I find that the database is not used. Hahaha, I directly write the login to death. It's okay. Some later functions need to use the database
In the current project, the login and the function of adding, deleting, checking and modifying articles are very simple and crude. For students interested in the source code, the portal is here: https://github.com/herbyhabi/Blogsite-flask-vue