1. Foundation
1. Basic knowledge
LVM (Logical Volume Manager) logical volume management is a logical layer added between the disk partition and the file system to shield the lower disk partition layout for the file system, provide an abstract disk volume, and establish the file system on the disk volume. With LVM, the administrator can dynamically adjust the size of the file system without re partitioning the disk, and the file system managed by LVM can span the disk. When the server adds a new disk, the administrator does not have to move the original file to the new disk, but can directly expand the file system to span the disk through LVM
It encapsulates the underlying physical hard disk and presents it to the upper application in the form of logical volume. In LVM, it encapsulates the underlying hard disk. When we operate the underlying physical hard disk, it no longer operates on the partition, but manages the underlying disk through something called logical volume
| term | explain | |
|---|---|---|
| The physical media | LVM storage media can be disk partitions, whole disks, RAID arrays or SAN disks. Devices must be initialized as LVM physical volumes before they can be used in combination with LVM | — |
| physical volume (PV) | Physical volume is the basic storage logical block of LVM, but compared with basic physical storage media (such as partition, disk, etc.), it contains management parameters related to LVM. It can be partitioned by hard disk or hard disk itself | — |
| Volume Group VG (Volume Group) | An LVM volume group consists of one or more physical volumes, which is equivalent to pool | Equivalent to a huge hard disk |
| logical volume (LV) | LV is built on VG, and the file system can be built on Lv | Can partition across hard disks |
| PE(physical extents) | The smallest storage unit that can be allocated in the PV physical volume. The size of PE can be specified. The default is 4MB | Block size of physical volume PV |
| LE(logical extent) | The smallest storage unit that can be allocated in LV logical volume. In the same volume group, the size of LE and PE are the same and correspond to each other one by one | Block size of logical volume LV |
RAID+LVM: LVM is the volume management mode of software, and RAID is the method of disk management. For important data, RAID is used to protect the physical disk from business interruption due to failure, and LVM is used to realize the benign management of volumes and make better use of disk resources
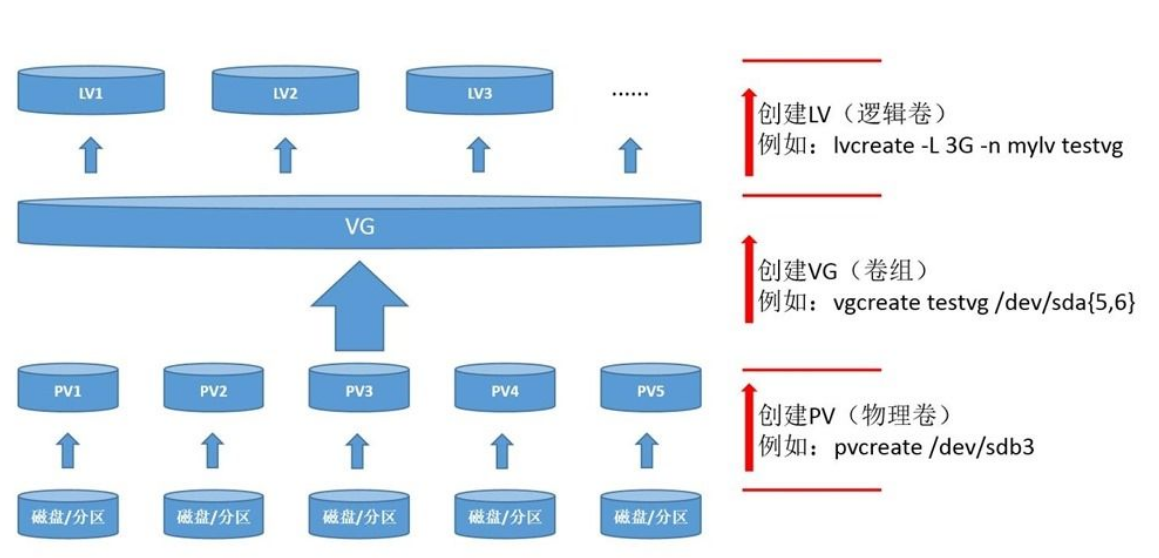
2. Create step
- The physical disk is formatted as PV (space is divided into PE)
- Add different physical volumes PV to the same volume group VG (all the block sizes PE of different physical volumes are added to the PE pool of volume group VG)
- Create LV logical volumes in volume group VG and create them based on PE (PE constituting LV may come from different physical disks)
- Logical volume LV can be directly formatted and mounted for use
- The change of the logical volume LV is actually the change of the block size PE number of the logical volume LV
3. LVM command
| function | PV management command | VG management command | LV management command |
|---|---|---|---|
| s view volume information | pvs | vgs | lvs |
| Scan scan all volumes | pvscan | vgscan | lvscan |
| Create create | pvcreate | vgcreate | lvcreate |
| Display display details | pvdisplay | vgdisplay | lvdisplay |
| Remove remove | pvremove | vgremove | lvremove |
| extend extension | — | vgextend | lvextend |
| reduce reduction | — | vgreduce | lvreduce |
4. LVM creation
1. Physical volume PV creation
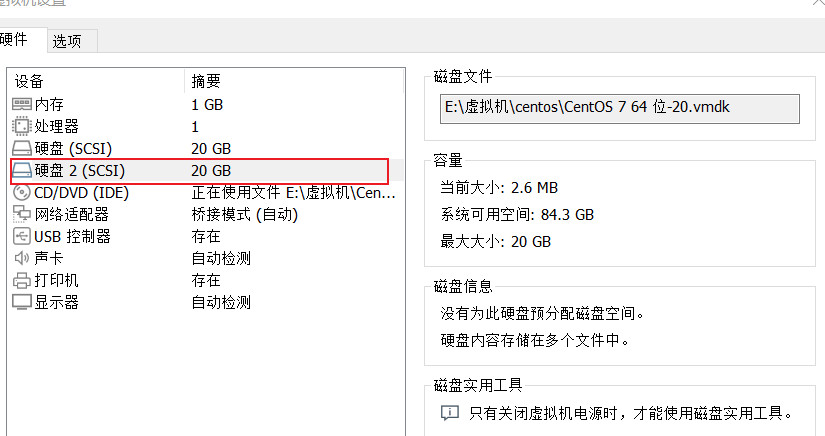
1. Add hard disk and partition
2. The partition is divided into four primary partitions, each with 1G space, and the four primary partitions are physical volumes LV
[root@qianshuiliyu ~]# fdisk /dev/sdb
Welcome fdisk (util-linux 2.23.2).

The changes remain in memory until you decide to write the changes to disk.
Think twice before using the write command.

Device does not contain a recognized partition table
 Use disk identifier 0 xfef180a0 Create a new DOS Disk label.

command(input m get help): n
Partition type:
   p   primary (0 primary, 0 extended, 4 free)
   e   extended
Select (default p): p
 Partition number (1-4,Default 1):
Start sector (2048-41943039,The default is 2048):
The default value 2048 will be used
Last a sector, +a sector or +size{K,M,G} (2048-41943039,The default is 41943039): +1G
 Partition 1 is set to Linux Type, size set to 1 GiB

command(input m get help): n
Partition type:
   p   primary (1 primary, 0 extended, 3 free)
   e   extended
Select (default p): p
 Partition number (2-4,Default 2):
Start sector (2099200-41943039,The default is 2099200):
The default value 2099200 will be used
Last a sector, +a sector or +size{K,M,G} (2099200-41943039,The default is 41943039): +1G
 Partition 2 is set to Linux Type, size set to 1 GiB

command(input m get help): n
Partition type:
   p   primary (2 primary, 0 extended, 2 free)
   e   extended
Select (default p): p
 Partition number (3,4,Default 3):
Start sector (4196352-41943039,The default is 4196352):
The default value 4196352 will be used
Last a sector, +a sector or +size{K,M,G} (4196352-41943039,The default is 41943039): +1G
 Partition 3 is set to Linux Type, size set to 1 GiB

command(input m get help): n
Partition type:
   p   primary (3 primary, 0 extended, 1 free)
   e   extended
Select (default e): p
 Partition 4 selected
 Start sector (6293504-41943039,The default is 6293504):
The default value 6293504 will be used
Last a sector, +a sector or +size{K,M,G} (6293504-41943039,The default is 41943039): +1G
 Partition 4 is set to Linux Type, size set to 1 GiB

command(input m get help): w
The partition table has been altered!

Calling ioctl() to re-read partition table.
Synchronizing disks.
3. Physical volume PV creation
[root@qianshuiliyu ~]# pvcreate /dev/sdb{1,2,3,4}
  Physical volume "/dev/sdb1" successfully created.
  Physical volume "/dev/sdb2" successfully created.
  Physical volume "/dev/sdb3" successfully created.
  Physical volume "/dev/sdb4" successfully created.
4. View information
root@qianshuiliyu ~]# pvdisplay /dev/sdb1
#pvdisplay /dev/sdb *, view all
  "/dev/sdb1" is a new physical volume of "1.00 GiB"
  --- NEW Physical volume ---
  PV Name               /dev/sdb1
  VG Name
  PV Size               1.00 GiB
  Allocatable           NO
  PE Size               0
  Total PE              0
  Free PE               0
  Allocated PE          0
  PV UUID               3561Dg-0yZi-A7f5-eSXE-5Ki3-1sV0-0TBORc


[root@qianshuiliyu ~]# pvs
  PV         VG       Fmt  Attr PSize    PFree
  /dev/sda2  centos   lvm2 a--   <19.00g       0
  /dev/sdb1           lvm2 ---     1.00g    1.00g
  /dev/sdb2           lvm2 ---     1.00g    1.00g
  /dev/sdb3           lvm2 ---     1.00g    1.00g
  /dev/sdb4           lvm2 ---     1.00g    1.00g
2. Volume group VG creation
Syntax: vgcreate (- s block size, default 4M) vg name pv name (multiple PVS can be written)
1. Create volume group VG
[root@qianshuiliyu ~]# vgcreate vgs_pool /dev/sdb[1,2]
  Volume group "vgs_pool" successfully created

[root@qianshuiliyu ~]# vgcreate  -s 16M vgs_pool /dev/sdb[1,2]
  Volume group "vgs_pool" successfully created
  #If the stored data are all large files, the PE should be as large as possible and read fast. The size of PE is only an idempotent of 2, and the maximum is 512M
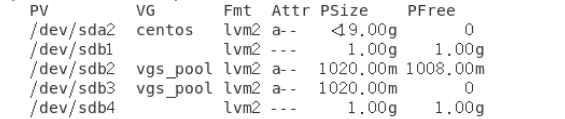
2. Check
[root@qianshuiliyu ~]# vgs
  VG       #PV #LV #SN Attr   VSize   VFree
  centos     1   2   0 wz--n- <19.00g    0
  vgs_pool   2   0   0 wz--n-   1.99g 1.99g


[root@qianshuiliyu ~]# pvs
  PV         VG       Fmt  Attr PSize    PFree
  /dev/sda2  centos   lvm2 a--   <19.00g       0
  /dev/sdb1  vgs_pool lvm2 a--  1020.00m 1020.00m
  /dev/sdb2  vgs_pool lvm2 a--  1020.00m 1020.00m
  /dev/sdb3           lvm2 ---     1.00g    1.00g
  /dev/sdb4           lvm2 ---     1.00g    1.00g
3. View volume group VG details
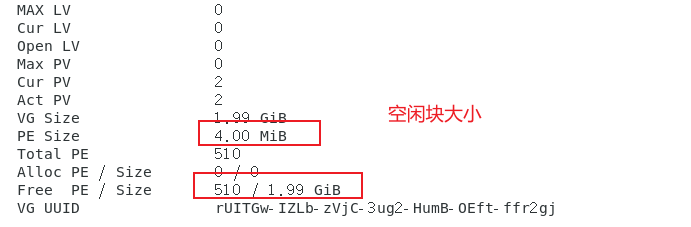
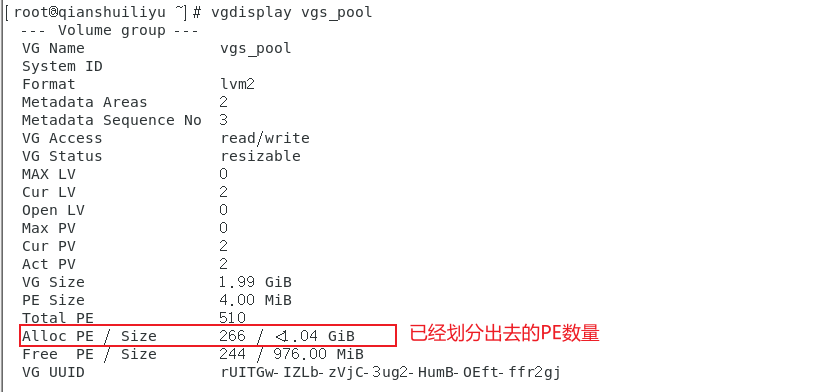
[root@qianshuiliyu ~]# vgdisplay vgs_pool
  --- Volume group ---
  VG Name               vgs_pool
  System ID
  Format                lvm2
  Metadata Areas        2
  Metadata Sequence No  1
  VG Access             read/write
  VG Status             resizable
  MAX LV                0
  Cur LV                0
  Open LV               0
  Max PV                0
  Cur PV                2
  Act PV                2
  VG Size               1.99 GiB
  PE Size               4.00 MiB
  Total PE              510
  Alloc PE / Size       0 / 0
  Free  PE / Size       510 / 1.99 GiB
  VG UUID               rUITGw-IZLb-zVjC-3ug2-HumB-OEft-ffr2gj
3. Logical volume LV creation
lvcreate -n name of logical volume - L specifies the SIZE(M,G) of lv size (- L: small l specifies the number of LE S) volume group name
The specified size is the specified quantity. When one is specified during creation, there is no need to specify the other
1. Create
[root@qianshuiliyu ~]# lvcreate -n lvm1 -L 1G vgs_pool
  Logical volume "lvm1" created.
2. Check

3. Specifies the size (number) of logical volumes
The specified quantity does not need to be in the specified size
[root@qianshuiliyu ~]# lvcreate -n lvm2 -l 10 vgs_pool
  Logical volume "lvm2" created.

4. View partition information
4. Format hanging and mounting
Where is the path of LVM? Check the logical volume information in the volume group VG. The result is a link
ianshuiliyu ~]# ll /dev/vgs_pool/
Total consumption 0
lrwxrwxrwx 1 root root 7 2 August 14:30 lvm1 -> ../dm-2
lrwxrwxrwx 1 root root 7 2 August 14:37 lvm2 -> ../dm-3
1. Format
[root@qianshuiliyu dev]# mkfs.ext4 /dev/vgs_pool/lvm1
mke2fs 1.42.9 (28-Dec-2013)
File system label=
OS type: Linux
 Block size=4096 (log=2)
Block size=4096 (log=2)
Stride=0 blocks, Stripe width=0 blocks
65536 inodes, 262144 blocks
13107 blocks (5.00%) reserved for the super user
 First data block=0
Maximum filesystem blocks=268435456
8 block groups
32768 blocks per group, 32768 fragments per group
8192 inodes per group
Superblock backups stored on blocks:
	32768, 98304, 163840, 229376

Allocating group tables: complete
Writing inode surface: complete
Creating journal (8192 blocks): complete
Writing superblocks and filesystem accounting information: complete
2. Mount
[root@qianshuiliyu ~]# mkdir /lvm1
[root@qianshuiliyu ~]# mount /dev/vgs_pool/lvm1 /lvm1/
[root@qianshuiliyu ~]# cp /etc/passwd /lvm1/
[root@qianshuiliyu ~]# echo '/dev/vgs_pool/lvm1 /lvm1 ext4 defaults 0 0' >> /etc/fstab
[root@qianshuiliyu ~]# reboot

see
```bash
[root@qianshuiliyu ~]# df -Th /dev/vgs_pool/lvm1
file system                  Type capacity used available used% Mount point
/dev/mapper/vgs_pool-lvm1 ext4  976M  2.6M  907M    1% /lvm1
5. LVM dynamic adjustment
1. LV expansion of logical volume
1. Check whether there is available expansion space, because the space is created from VG, and LV cannot expand across VG
[root@qianshuiliyu ~]# vgs vgs_pool
  VG       #PV #LV #SN Attr   VSize VFree
  vgs_pool   2   2   0 wz--n- 1.99g 976.00m
2. Capacity expansion, + 30M
Current size
[root@qianshuiliyu ~]# lvs /dev/vgs_pool/lvm1
  LV   VG       Attr       LSize Pool Origin Data%  Meta%  Move Log Cpy%Sync Convert
  lvm1 vgs_pool -wi-ao---- 1.00g
Capacity expansion
[root@qianshuiliyu ~]# lvextend -L +30M /dev/vgs_pool/lvm1
#+30M is to increase the original capacity by 30M. If you don't write +, it means how much to expand the capacity
  Rounding size to boundary between physical extents: 32.00 MiB.
  Size of logical volume vgs_pool/lvm1 changed from 1.00 GiB (256 extents) to 1.03 GiB (264 extents).
  Logical volume vgs_pool/lvm1 successfully resized.
View size
[root@qianshuiliyu ~]# lvs /dev/vgs_pool/lvm1
  LV   VG       Attr       LSize Pool Origin Data%  Meta%  Move Log Cpy%Sync Convert
  lvm1 vgs_pool -wi-ao---- 1.03g
3. File system expansion
Although the LV is successfully expanded, the file system is still the original size
ext4 file system expansion command syntax: resize2fs logical volume name
xfs file system expansion command syntax: xfs_growfs mount point
Resize2fs and xfs_ The difference between growfs and xfs is that the parameters passed are different. xfs_growfs is the mount point adopted; Resize2fs is a logical volume name, and the resize2fs command cannot be used on xfs type file systems
[root@qianshuiliyu ~]# df -Th /lvm1/
file system                  Type capacity used available used% Mount point
/dev/mapper/vgs_pool-lvm1 ext4  976M  2.6M  907M    1% /lvm1
[root@qianshuiliyu ~]# resize2fs /dev/vgs_pool/lvm1
resize2fs 1.42.9 (28-Dec-2013)
Filesystem at /dev/vgs_pool/lvm1 is mounted on /lvm1; on-line resizing required
old_desc_blocks = 1, new_desc_blocks = 1
The filesystem on /dev/vgs_pool/lvm1 is now 270336 blocks long.

[root@qianshuiliyu ~]# df -Th /lvm1/
file system                  Type capacity used available used% Mount point
/dev/mapper/vgs_pool-lvm1 ext4 1006M#Capacity increased by 2.6m 935m 1% / lvm1
2. Volume group VG expansion
Add sdb3 partition of hard disk to VG
Current size
[root@qianshuiliyu ~]# vgs vgs_pool
  VG       #PV #LV #SN Attr   VSize VFree
  vgs_pool   2   2   0 wz--n- 1.99g 944.00m
Capacity expansion
[root@qianshuiliyu ~]# vgextend vgs_pool /dev/sdb3
  Volume group "vgs_pool" successfully extended
see
[root@qianshuiliyu ~]# vgs
  VG       #PV #LV #SN Attr   VSize   VFree
  centos     1   2   0 wz--n- <19.00g     0
  vgs_pool   3   2   0 wz--n-  <2.99g <1.92g
3. LVM reduction
LVM can be dynamically increased or reduced, but XFS does not support dynamic reduction, so we cannot realize dynamic reduction based on XFS. btrfs file system supports online reduction
For the reduction of volume group VG, ensure whether your physical volume is used or not, because it cannot reduce a PV in use
1. Logical volume LV shrink
[root@qianshuiliyu ~]# lvreduce -L -30M /dev/vgs_pool/lvm1
  Rounding size to boundary between physical extents: 28.00 MiB.
  WARNING: Reducing active and open logical volume to 1.00 GiB.
  THIS MAY DESTROY YOUR DATA (filesystem etc.)
Do you really want to reduce vgs_pool/lvm1? [y/n]: y
  Size of logical volume vgs_pool/lvm1 changed from 1.03 GiB (264 extents) to 1.00 GiB (257 extents).
  Logical volume vgs_pool/lvm1 successfully resized.
But the size of the file system has not changed
[root@qianshuiliyu ~]# df -Th /lvm1/
file system                  Type capacity used available used% Mount point
/dev/mapper/vgs_pool-lvm1 ext4 1006M  2.6M  935M    1% /lvm1
Don't uninstall or restart here. It's easy to cause problems. Removing the data before operation, restarting or uninstalling can indeed reduce the size, but if the file system becomes unknown, you may need to reformat to use the logical volume LV, so it's generally not reduced,
2. Volume group VG shrink
PV in use cannot be removed, and PV not in use can be removed
[root@qianshuiliyu ~]# vgreduce vgs_pool /dev/sdb1
  Physical volume "/dev/sdb1" still in use

[root@qianshuiliyu ~]# vgreduce vgs_pool /dev/sdb3
  Removed "/dev/sdb3" from volume group "vgs_pool"
4. Mobile data
[root@qianshuiliyu ~]# cp /etc/passwd /lvm1/
1. Mobile data
Move data from the old hard drive to the new hard drive
[root@qianshuiliyu ~]# pvmove /dev/sdb1 /dev/sdb3
  /dev/sdb1: Moved: 18.43%
  /dev/sdb1: Moved: 100.00%
2. Remove old hard disk
[root@qianshuiliyu ~]# vgreduce vgs_pool /dev/sdb1
  Removed "/dev/sdb1" from volume group "vgs_pool"
3. Add a hard disk to see VG expansion
5. Delete LVM
step
- umount uninstall
- Lvremove alllv (remove all logical volumes)
- Vgremove VG (remove volume group)
- Pvremove PV (remove physical volume)
1. Unload
[root@qianshuiliyu ~]# umount /lvm1
2. Remove logical volume LV
[root@qianshuiliyu ~]# lvremove /dev/vgs_pool/lvm1
Do you really want to remove active logical volume vgs_pool/lvm1? [y/n]: y
  Logical volume "lvm1" successfully removed
3. Remove volume group VG
If there are LVS in the volume group, you will be prompted whether to move them out too
[root@qianshuiliyu ~]# vgremove vgs_pool
  Volume group "vgs_pool" successfully removed
4. Remove physical volume pv
Viewing physical volumes
[root@qianshuiliyu ~]# pvs
  PV         VG     Fmt  Attr PSize   PFree
  /dev/sda2  centos lvm2 a--  <19.00g    0
  /dev/sdb1         lvm2 ---    1.00g 1.00g
  /dev/sdb2         lvm2 ---    1.00g 1.00g
  /dev/sdb3         lvm2 ---    1.00g 1.00g
  /dev/sdb4         lvm2 ---    1.00g 1.00g

remove
[root@qianshuiliyu ~]# pvremove /dev/sdb1
  Labels on physical volume "/dev/sdb1" successfully wiped.
[root@qianshuiliyu ~]# pvremove /dev/sdb2
  Labels on physical volume "/dev/sdb2" successfully wiped.
[root@qianshuiliyu ~]# pvremove /dev/sdb3
  Labels on physical volume "/dev/sdb3" successfully wiped.
6. Use of ssm tools
Create environment: use sdb1 and sdb2 to create LVM
SSM: check information about available hard drives and LVM volumes. Displays information about existing disk storage devices, storage pools, LVM volumes, and storage snapshots. View disk information, etc
Syntax: ssm create -s lv size - n lv name -- fstype lv file system type - p volume group name device mount point
install
[root@qianshuiliyu ~]# yum -y install system-storage-manager
1. Create, complete all operations in one step, automatically create mount points, and automatically mount
[root@qianshuiliyu ~]# ssm create -s 1G -n lv01 --fstype xfs -p vgs_pool /dev/sdb[1,2] /lv01
  Physical volume "/dev/sdb1" successfully created.
  Physical volume "/dev/sdb2" successfully created.
  Volume group "vgs_pool" successfully created
WARNING: ext4 signature detected on /dev/vgs_pool/lv01 at offset 1080. Wipe it? [y/n]: y
  Wiping ext4 signature on /dev/vgs_pool/lv01.
  Logical volume "lv01" created.
meta-data=/dev/vgs_pool/lv01     isize=512    agcount=4, agsize=65536 blks
         =                       sectsz=512   attr=2, projid32bit=1
         =                       crc=1        finobt=0, sparse=0
data     =                       bsize=4096   blocks=262144, imaxpct=25
         =                       sunit=0      swidth=0 blks
naming   =version 2              bsize=4096   ascii-ci=0 ftype=1
log      =internal log           bsize=4096   blocks=2560, version=2
         =                       sectsz=512   sunit=0 blks, lazy-count=1
realtime =none                   extsz=4096   blocks=0, rtextents=0
Directory '/lv01' does not exist! Create (Y/n/q) ? Y
2. Check
[root@qianshuiliyu ~]# df -Th /lv01/
file system                  Type capacity used available used% Mount point
/dev/mapper/vgs_pool-lv01 xfs  1014M   33M  982M    4% /lv01
1. View device information
[root@qianshuiliyu ~]# ssm list dev
------------------------------------------------------------------
Device           Free        Used     Total  Pool      Mount point
------------------------------------------------------------------
/dev/sda                           20.00 GB
/dev/sda1                           1.00 GB            /boot
/dev/sda2     0.00 KB    19.00 GB  19.00 GB  centos
/dev/sdb                           20.00 GB
/dev/sdb1     0.00 KB  1020.00 MB   1.00 GB  vgs_pool
/dev/sdb2  1016.00 MB     4.00 MB   1.00 GB  vgs_pool
/dev/sdb3                           1.00 GB
/dev/sdb4                           1.00 GB
------------------------------------------------------------------
2. View pool information
[root@qianshuiliyu ~]# ssm list pool
-------------------------------------------------------
Pool      Type  Devices        Free      Used     Total
-------------------------------------------------------
centos    lvm   1           0.00 KB  19.00 GB  19.00 GB
vgs_pool  lvm   2        1016.00 MB   1.00 GB   1.99 GB
-------------------------------------------------------