Introduction to LVS
LVS (Linux Virtual Server), the Linux virtual server, is an open source load balancing project led by Dr. Zhang Wensong. At present, LVS has been integrated into the Linux kernel module.The project implements an IP-based load balancing scheduling scheme for data requests in the Linux kernel. The architecture of the scheme is shown in Figure 1. End Internet users access the company's external load balancing server from outside. The end user's Web requests are sent to the LVS scheduler, which decides to send the request to a back-end Web server based on its own preset algorithm, such as wheels.Query algorithms distribute external requests evenly to all servers in the back-end. Although an end-user's access to the LVS scheduler is forwarded to the real server in the back-end, if the real server connects to the same storage, the services provided are the same. No matter which real server the end-user visits, the content of the services is the same and the entire cluster is the same.It is transparent to users.Finally, depending on the working mode of LVS, the real server will choose different ways to send the data users need to the end user. The working mode of LVS is divided into NAT mode, TUN mode, and DR mode.
Understanding the principles of load balancing clustering
The Meaning of Clusters
**Cluster, Cluster, Cluster**
 Composed of multiple hosts, but external as a whole
 In Internet applications, as the site demands higher and higher hardware performance, response speed, service stability, data reliability, etc., a single server is unable to meet the requirements
 **Solutions**
 Use expensive small, mainframe computers
 Building a service cluster with a regular server
Cluster Classification
There are three types of clusters based on the target differences they target
 Load Balance Cluster
 High Performance Operational Cluster
 ** Load Balance Cluster **
To improve the responsiveness of the application system, to process as many access requests as possible, and to reduce latency as possible, to achieve high concurrent, high load LB overall performance
 Load allocation in LB depends on shunting algorithm of primary node
 **Highly Available Clusters**
To improve the reliability of the application system and minimize interruption time to ensure high availability of services
 Fault Tolerance Effect of HA
 HA works in duplex and master-slave modes
 **High Performance Operations Cluster**
To increase the CPU speed of the application system, expand hardware resources and analysis capabilities, and obtain HPC capabilities equivalent to those of large, supercomputers
 High performance computing clusters rely on distributed computing, parallel computing, and the integration of CPU, memory and other resources from multiple servers through dedicated hardware and software enables computing power that only, large, supercomputers can have
Load Balancing Cluster Mode Analysis and Mode of Work
Load Balancing Cluster is the most popular cluster type used by enterprises at present
 Cluster load scheduling technology has three working modes
 **Address Translation**
 **IP Tunnel**
 **Direct Routing**
NAT mode (Network Address Translation)
**NAT mode**, similar to the private network structure of a firewall, a load dispatcher acts as a gateway to all server nodes, which acts as an access gateway to the client and an access exit for each node to respond to the client
 Server nodes use private IP addresses and are on a physical network with the load dispatcher in copper, which provides better security than the other two methods
TUN mode (IP Tunnel)
**TUM mode**, with an open network architecture, the load dispatcher serves only as an access gateway to the client, and each node responds directly to the client through its own network connection without passing through the load dispatcher
 Server nodes are scattered across different locations in the Internet, have separate public network IP addresses, and communicate with each other through dedicated IP tunnels.All environments are public network environments
DR mode (Direct Routing)
Direct Routing
**DR mode**, which uses a semi-open network structure similar to TUN mode, but the nodes are not scattered, but are in the same physical network as the scheduler
 Load dispatcher connects to each node server over a local network without establishing a dedicated IP tunnel
 In LAN
Load Scheduling Algorithm for LVS
**Round Robin**
Allocate the installation sequence of received access requests to each node (the real server) in the cluster in turn, treating each server equally, regardless of the actual number of connections and system load on the server
 ** Weighted Round Robin**
The dispatcher can automatically query each node's load and dynamically adjust its weight based on the ability of the real server to allocate incoming access requests in turn
 Ensure that servers with high processing power take on more access traffic
 **Least Connections**
Allocate access requests received to nodes with the least number of connections based on the connection transports established by the real server
 ** Weighted Least Connections **
Automatically adjust for real servers when there is a large performance difference between server nodes
 weight
 Nodes with higher weights will bear a larger proportion of active connection load
Let's do the experiment
Experimental structure:
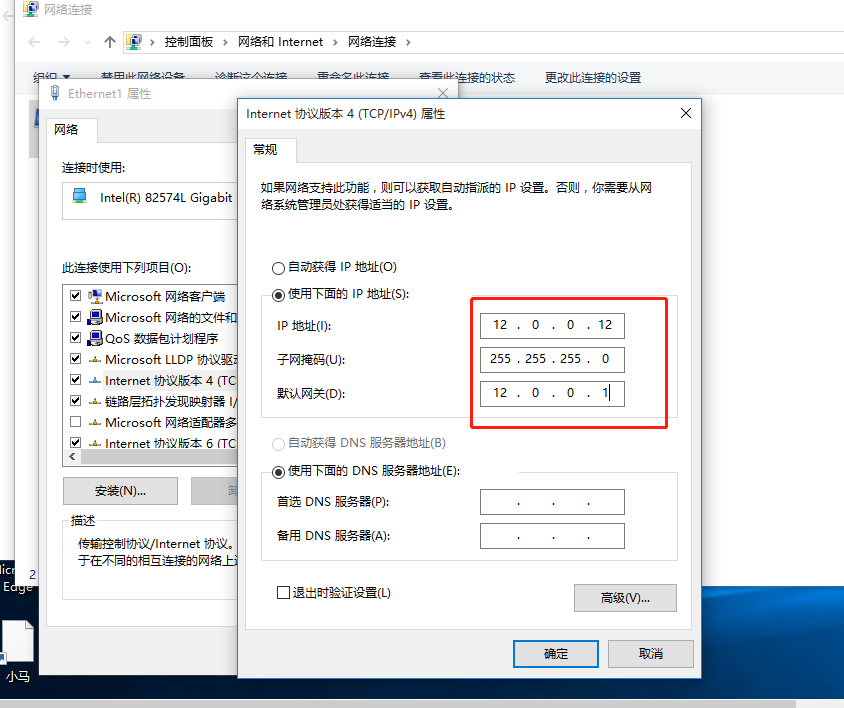
We need five virtual machines
 1 as Load Balance Scheduler Outside Network Address: 12.0.0.1 Intranet: 192.168.200.1
 4 Web server apache node: 192.168.200.110
5 Site Server Node: 192.168.200.120
 6 nfs shared storage node: 192.168.200.130
 7 Client 12.0.0.12
First to 6 install ngs and remote call packages
[root@localhost ~]# yum install nfs-utils rpcbind -y
4,5 Install web Services
[root@localhost ~]# yum install httpd -y
1 Install LVS Load Balance Scheduler
[root@localhost ~]# yum install ipvsadm -y
Configure 6nfs Server
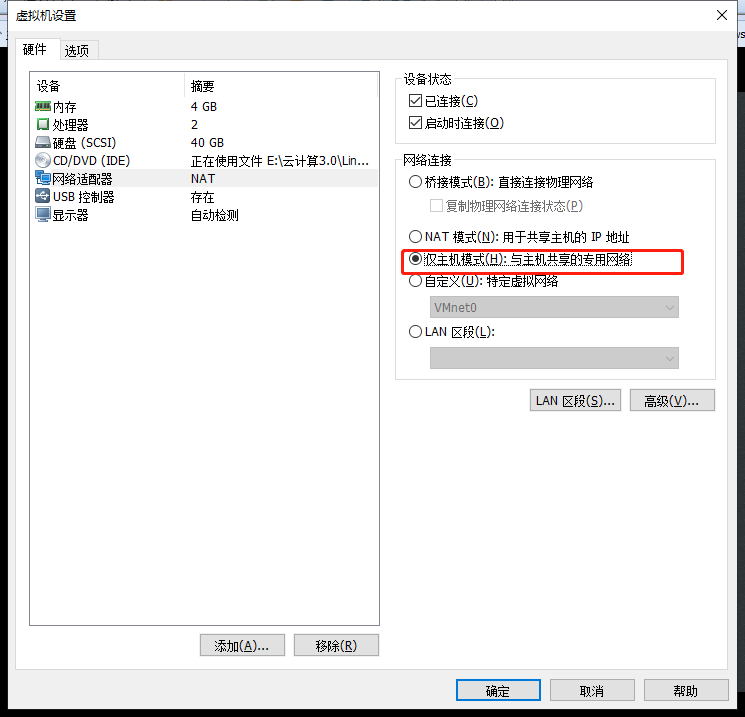
Host-only mode Our servers need to be in a local area network
Configure Fixed IP
[root@localhost ~]# vim /etc/sysconfig/network-scripts/ifcfg-ens33 #Configure ens33 network card
BOOTPROTO=static #static state
DEFROUTE=yes
IPV4_FAILURE_FATAL=no
IPV6INIT=yes
IPV6_AUTOCONF=yes
IPV6_DEFROUTE=yes
IPV6_FAILURE_FATAL=no
IPV6_ADDR_GEN_MODE=stable-privacy
NAME=ens33
UUID=66a1e3d6-5c57-42ab-9996-b942b049ef85
DEVICE=ens33
ONBOOT=yes
IPADDR=192.168.200.130 #IP Address
NETMASK=255.255.255.0 #Subnet Mask
GATEWAY=192.168.200.1 #gateway
Open Service
[root@localhost ~]# systemctl stop firewalld.service
s[root@localhost ~]# setenforce 0
[root@localhost ~]# systemctl start nfs.service
[root@localhost ~]# systemctl status nfs.service
● nfs-server.service - NFS server and services
   Loaded: loaded (/usr/lib/systemd/system/nfs-server.service; disabled; vendor preset: disabled)
   Active: active (exited) since 2 2019-11-26 1
[root@localhost ~]# systemctl start rpcbind.service
[root@localhost ~]# systemctl status rpcbind.service
● rpcbind.service - RPC bind service
   Loaded: loaded (/usr/lib/systemd/system/rpcbind.service
Configure shared directories, giving 777 permissions
[root@localhost ~]# vim /etc/exports
/usr/share *(ro,sync) #Read-only, sync all servers accessible
/opt/accp 192.168.200.0/24(rw,sync) #Shared to 200 accessible, readable, writable, synchronized
/opt/benet 192.168.200.0/24(rw,sync)

[root@localhost ~]# cd /opt/
[root@localhost opt]# mkdir benet accp
[root@localhost opt]# chmod 777 accp/ benet/ #Give Readable Writable Executable
[root@localhost opt]# ls -l
//Total dosage 0
drwxrwxrwx. 2 root root 6 11 February 2617:13 accp
drwxrwxrwx. 2 root root 6 11 February 2617:13 benet
drwxr-xr-x. 2 root root 6 3 February 26, 2015 rh
Publish Sharing
[root@localhost opt]# exportfs -rv
exporting 192.168.200.0/24:/opt/benet
exporting 192.168.200.0/24:/opt/accp
exporting *:/usr/share
4, web server host-only mode, configure fixed IP

[root@localhost ~]# vim /etc/sysconfig/network-scripts/ifcfg-ens33

BOOTPROTO=static
DEFROUTE=yes
IPV4_FAILURE_FATAL=no
IPV6INIT=yes
IPV6_AUTOCONF=yes
IPV6_DEFROUTE=yes
IPV6_FAILURE_FATAL=no
IPV6_ADDR_GEN_MODE=stable-privacy
NAME=ens33
UUID=c3f0a196-6819-4702-9b54-7cad18402591
DEVICE=ens33
ONBOOT=yes
IPADDR=192.168.200.110
NETMASK=255.255.255.0
GATEWAY=192.168.200.1
Open services to test connectivity with 6nfs servers
[root@localhost ~]# systemctl restart network

[root@localhost ~]# systemctl stop firewalld.service
[root@localhost ~]# setenforce 0

[root@localhost ~]# systemctl start httpd.service
[root@localhost ~]# netstat -ntap | grep 80
tcp6       0      0 :::80                   :::*                    LISTEN      100863/httpd
[root@localhost ~]# ping 192.168.200.130
PING 192.168.200.130 (192.168.200.130) 56(84) bytes of data.
64 bytes from 192.168.200.130: icmp_seq=1 ttl=64 time=0.724 ms
64 bytes from 192.168.200.130: icmp_seq=2 ttl=64 time=0.356 ms
Mount, write a file in web4, test if 6nfs server has stored this file
[root@localhost ~]# showmount -e 192.168.200.130 #Test 6 Server Shared Directory
Export list for 192.168.200.130:
/usr/share *
/opt/benet 192.168.200.0/24
/opt/accp  192.168.200.0/24

[root@localhost ~]# mount.nfs 192.168.200.130:/opt/accp /var/www/html/ #mount
[root@localhost ~]# df -h
//Question System Capacity Used Available%Mountpoint
/dev/mapper/centos-root     20G  3.4G   17G   17% /
devtmpfs                   897M     0  897M    0% /dev
tmpfs                      912M     0  912M    0% /dev/shm
tmpfs                      912M  9.6M  903M    2% /run
tmpfs                      912M     0  912M    0% /sys/fs/cgroup
/dev/sda1                  6.0G  179M  5.9G    3% /boot
/dev/mapper/centos-home     10G   37M   10G    1% /home
tmpfs                      183M   40K  183M    1% /run/user/0
tmpfs                      183M  4.0K  183M    1% /run/user/42
192.168.200.130:/opt/accp   20G  3.8G   17G   19% /var/www/html

[root@localhost ~]# cd /var/www/html/
[root@localhost html]# echo "THII IS ACCP WEB" > index.html

#6 Servers to test
[root@localhost opt]# cd accp/
[root@localhost accp]# ls
index.html
The same is true for 5web servers, in host mode only, with fixed IP bound

[root@localhost ~]# vim /etc/sysconfig/network-scripts/ifcfg-ens33

BOOTPROTO=static
DEFROUTE=yes
IPV4_FAILURE_FATAL=no
IPV6INIT=yes
IPV6_AUTOCONF=yes
IPV6_DEFROUTE=yes
IPV6_FAILURE_FATAL=no
IPV6_ADDR_GEN_MODE=stable-privacy
NAME=ens33
UUID=a6cf69fe-eb42-4a99-9239-0da4cdeae0c7
DEVICE=ens33
ONBOOT=yes
IPADDR=192.168.200.120
NATMASK=255.255.255.0
GATEWAT=192.168.200.1

[root@localhost ~]# systemctl restart network
[root@localhost ~]# systemctl stop firewalld.service
[root@localhost ~]# setenforce 0
Mount, write a file in web4, test if 6nfs server has stored this file
[root@localhost ~]# mount.nfs 192.168.200.130:/opt/benet /var/www/html/
[root@localhost ~]# df -h
//Question System Capacity Used Available%Mountpoint
/dev/mapper/centos-root      20G  4.3G   16G   22% /
devtmpfs                    897M     0  897M    0% /dev
tmpfs                       912M     0  912M    0% /dev/shm
tmpfs                       912M  9.5M  903M    2% /run
tmpfs                       912M     0  912M    0% /sys/fs/cgroup
/dev/sda1                   6.0G  179M  5.9G    3% /boot
/dev/mapper/centos-home      10G   36M   10G    1% /home
tmpfs                       183M   44K  183M    1% /run/user/0
192.168.200.130:/opt/benet   20G  3.8G   17G   19% /var/www/html

[root@localhost ~]# cd /var/www/html/
[root@localhost html]# echo "this is benet web" > index.html
[root@localhost html]# systemctl start httpd.service
#6 to test
[root@localhost accp]# cd ../
[root@localhost opt]# cd benet/
[root@localhost benet]# ls
index.html
1 Load Balance Scheduler Host-only mode, bind two network cards, configure network cards
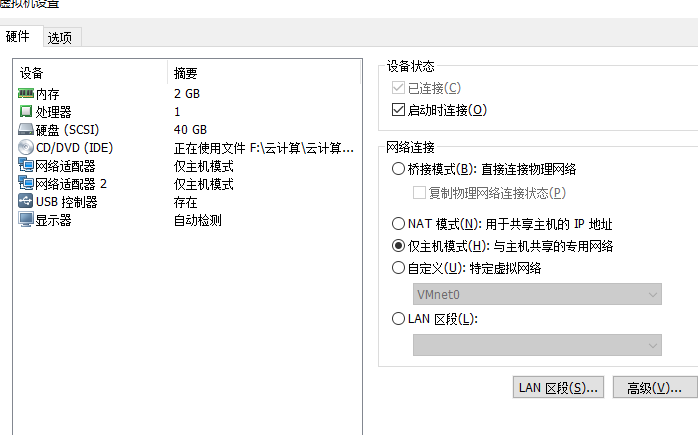
TYPE=Ethernet
PROXY_METHOD=none
BROWSER_ONLY=no
BOOTPROTO=static
DEFROUTE=yes
IPV4_FAILURE_FATAL=no
IPV6INIT=yes
IPV6_AUTOCONF=yes
IPV6_DEFROUTE=yes
IPV6_FAILURE_FATAL=no
IPV6_ADDR_GEN_MODE=stable-privacy
NAME=ens36
DEVICE=ens36
ONBOOT=yes
IPADDR=12.0.0.1
NETMASK=255.255.255.0

BOOTPROTO=static
DEFROUTE=yes
IPV4_FAILURE_FATAL=no
IPV6INIT=yes
IPV6_AUTOCONF=yes
IPV6_DEFROUTE=yes
IPV6_FAILURE_FATAL=no
IPV6_ADDR_GEN_MODE=stable-privacy
NAME=ens33
UUID=849aa04e-1874-490f-8cb0-b2fde4b9a6f8
DEVICE=ens33
ONBOOT=yes
IPADDR=192.168.200.1
NETMASK=255.255.255.0

[root@localhost ~]# systemctl restart network #service network restart
Turn on routing forwarding, NAT conversion
vim /etc/sysctl.conf #Modify Profile
net.ipv4.ip_forward=1 #Add one

[root@localhost ~]# sysctl -p #Effective Routing Forwarding
net.ipv4.ip_forward = 1

[root@localhost ~]# iptables -t nat -F #Clear NAT Table
[root@localhost ~]# iptables -F #Clear Forwarding Table

[root@localhost ~]# iptables -t nat -A POSTROUTING -o ens36 -s 192.168.200.0/24 -j SNAT --to-source 12.0.0.1
#In the nat table - A in the POSTROUTING column - o specifies the export - s specifies the source address - j does the nat conversion to 12.0.0.1
De-7 Client Binding IP
Go to the 4web server to test if it can connect with the client
[root@localhost html]# ping 12.0.0.12
PING 12.0.0.12 (12.0.0.12) 56(84) bytes of data.
64 bytes from 12.0.0.12: icmp_seq=1 ttl=127 time=0.815 ms
64 bytes from 12.0.0.12: icmp_seq=2 ttl=127 time=0.752 ms
64 bytes from 12.0.0.12: icmp_seq=3 ttl=127 time=0.727 ms
64 bytes from 12.0.0.12: icmp_seq=4 ttl=127 time=0.712 ms
Loading LVS Kernel Modules
[root@localhost ~]# modprobe ip_vs
[root@localhost ~]# cat /proc/net/ip_vs #View LVS Kernel Version
IP Virtual Server version 1.2.1 (size=4096)
Prot LocalAddress:Port Scheduler Flags
  -> RemoteAddress:Port Forward Weight ActiveConn InActConn
Open LVS Kernel
Save first
[root@localhost ~]# ipvsadm --save > /etc/sysconfig/ipvsadm
[root@localhost ~]# systemctl start ipvsadm.service
[root@localhost ~]# systemctl status ipvsadm.service
● ipvsadm.service - Initialise the Linux Virtual Server
   Loaded: loaded (/usr/lib/systemd/system/ipvsadm.service; disabled; vendor preset: disabled)
   Active: active (exited) since 2 2019-11-26 17:59:41 CST; 9s ago
Write LVS Virtual Server script, launch script
[root@localhost ~]# cd /opt/
[root@localhost opt]# vim nat.sh

#!/bin/bash
ipvsadm -C #Clear Cache
ipvsadm -A -t 12.0.0.1:80 -s rr #Add Virtual Server, -A-t Specify Port-s Specify Algorithmic Polling
ipvsadm -a -t 12.0.0.1:80 -r 192.168.200.110:80 -m #-a-t Specify Port-r Specify Real Node Server-m Specify NAT
ipvsadm -a -t 12.0.0.1:80 -r 192.168.200.120:80 -m
ipvsadm
[root@localhost opt]# source nat.sh #Startup script
IP Virtual Server version 1.2.1 (size=4096)
Prot LocalAddress:Port Scheduler Flags
  -> RemoteAddress:Port           Forward Weight ActiveConn InActConn
TCP  localhost.localdomain:http rr
  -> 192.168.200.110:http         Masq    1      0          0
  -> 192.168.200.120:http         Masq    1      0          0
NAT Address Translation
[root@localhost opt]# iptables -F #Clear Forwarding Table
[root@localhost opt]# iptables -t nat -F #Clear Forwarding Table
[root@localhost opt]# iptables -t nat -A POSTROUTING -o ens36 -s 192.168.200.0/24 -j SNAT --to-source 12.0.0.1
#In the nat table - A in the POSTROUTING column - o specifies the export - s specifies the source address - j does the nat conversion to 12.0.0.1
Go to the client to test if you can access the content of the web server through an external network address