Level 1: manually implement simple kNN algorithm
1 Introduction to KNN algorithm
1.1 algorithm flow of KNN algorithm
kNN algorithm is actually the simplest of many machine learning algorithms, because the idea of the algorithm can be summarized in eight words: "he who is near is red, and he who is near is black".
Suppose there is such a sample space, in which there are two categories: otaku and literary youth, in which the red circle represents otaku and the green circle represents literary youth. As shown in the figure below:

In fact, the process of constructing such a sample space is the training process of kNN algorithm. It can be imagined that kNN algorithm has no training process, so kNN algorithm belongs to lazy learning algorithm.
Suppose I use a yellow circle in this sample space, as shown in the following figure:

Now use kNN algorithm to identify whether I am a otaku or a literary youth. First, I need to calculate the distance between me and all samples in the sample space. Assuming that the calculated distance is as follows:
| Sample number | 1 | 2 | ... | 13 | 14 |
|---|---|---|---|---|---|
| label | Otaku | Otaku | ... | artistic young people | artistic young people |
| distance | 11.2 | 9.5 | ... | 23.3 | 37.6 |
Then find the K samples with the smallest distance from me (k is a super parameter, which needs to be set by yourself, and generally defaults to 5). Suppose that the labels and distances of the 5 samples closest to me are as follows:
| Sample number | 4 | 5 | 6 | 7 | 8 |
|---|---|---|---|---|---|
| label | Otaku | Otaku | Otaku | artistic young people | artistic young people |
| distance | 11.2 | 9.5 | 7.7 | 5.8 | 15.2 |
Finally, only the labels of these five samples need to be counted, and the label with the largest number of votes can be used as the prediction result. In the above table, there are 4 votes for otaku and 1 vote for literary and artistic youth, so I am otaku.
Note: sometimes the number of votes may be the same. For example, when k=4, the sample closest to me is as follows:
| Sample number | 4 | 9 | 11 | 13 |
|---|---|---|---|---|
| label | Otaku | Otaku | artistic young people | artistic young people |
| distance | 4.2 | 9.5 | 7.7 | 5.8 |
It can be seen that the score between otaku and literary youth is 2:2, so you can try to compare the total distance between the two samples belonging to otaku and me and the total distance between the two samples belonging to literary youth and me. Then select the label with the smallest total distance as the prediction result. In this example, the predicted result is literary and artistic youth (the total distance of otaku men is 4.2 + 9.5, and the total distance of literary and artistic youth is 7.7 + 5.8).
1.2 advantages and disadvantages of KNN algorithm
It can be seen from the algorithm flow that the advantages of kNN algorithm are:
- Simple principle and implementation;
- It naturally supports multi classification. Unlike other two classification algorithms, OvO and OvR strategies should be used in multi classification.
The disadvantages are also obvious:
- When the amount of data is large or there are many data characteristics, the time efficiency of the prediction process is too low.
1.3 programming requirements + parameter interpretation
According to the prompt, supplement the code in the begin end area of the editor on the right to complete the fit function and predict function in the kNNClassifier class.
fit function is used in the training process of kNN algorithm, where:
- feature: training set data, type: ndarray;
- Label: training set label, type: ndarray.
The predict function is used to implement the prediction process of the kNN algorithm. The function returns the prediction label, where:
- Feature: test set data, type: ndarray. (PS: there are multiple pieces of data in the feature)
Just complete the fit and predict functions. The program will call the fit function you completed to build the model and call the predict function to predict the data. If the accuracy rate of prediction is higher than 0.9, it is regarded as passing the test.
2. Code implementation
# encoding=utf8
import numpy as np

class kNNClassifier(object):
    def __init__(self, k):
        '''
        Initialization function
        :param k:kNN In algorithm k
        '''
        self.k = k
        # It is used to store training data. The type is ndarray
        self.train_feature = None
        # It is used to store training tags. The type is ndarray
        self.train_label = None

    def fit(self, feature, label):
        '''
        kNN Algorithm training process
        :param feature: Training set data, type ndarray
        :param label: Training set label, type ndarray
        :return: No return
        '''

        # ********* Begin *********#

        # self.train_feature = np.array(feature)
        # self.train_label = np.array(label)
        self.train_feature = np.array(feature)
        self.train_label = np.array(label)

        # ********* End *********#

    def predict(self, feature):
        '''
        kNN Prediction process of algorithm
        :param feature: Test set data, type ndarray
        :return: Forecast results, type ndarray or list
        '''

        '''
        def _predict(test_data):
            distances = [np.sqrt(np.sum((test_data - vec) ** 2)) for vec in self.train_feature]

            nearest = np.argsort(distances)
            topK = [self.train_label[i] for i in nearest[:self.k]]
            votes = {}
            result = None
            max_count = 0
            for label in topK:
                if label in votes.keys():
                    votes[label] += 1
                    if votes[label] > max_count:
                        max_count = votes[label]
                        result = label
                else:
                    votes[label] = 1
                    if votes[label] > max_count:
                        max_count = votes[label]
                        result = label
            return result

        predict_result = [_predict(test_data) for test_data in feature]
        return predict_result
        '''

        # ********* Begin *********#

        def mypredict(test_data):
            # Calculate the Euclidean distance and sort in ascending order
            distances = []
            for i in self.train_feature:
                distances.append(np.sqrt(np.sum((test_data - i) ** 2)))
            nearest = np.argsort(distances)

            # Select the nearest k instances
            neighbors = []
            for i in nearest[:self.k]:
                neighbors.append(self.train_label[i])

            # Get the classification that accounts for a large proportion of the nearest k instances
            # This prediction is not good enough. If the possible votes of the classification are consistent, it needs to be processed and compared according to the nearest distance of the nearest k
            classVotes = {}
            max_count = 0
            result = None
            for label in neighbors:
                if label in classVotes.keys():
                    classVotes[label] += 1
                    if classVotes[label] > max_count:
                        max_count = classVotes[label]
                        result = label
                else:
                    classVotes[label] = 1
                    if classVotes[label] > max_count:
                        max_count = classVotes[label]
                        result = label

            # Return forecast results
            return result

        # Prediction process
        predict_result = []
        for test_data in feature:
            predict_result.append(mypredict(test_data))
        # Return forecast results
        return predict_result

        # ********* End *********#
3. Personal summary
3.1 numpy Library Learning
Good English look at this: Official documents
If your English is not good, look here: A good man lives safely
But the second link search is general
You can also refer to this: Rookie tutorial yyds
3.1.1 NumPy Ndarray object
One of the most important features of NumPy is its N-dimensional array object ndarray, which is a collection of data of the same type. It starts with the 0 subscript to index the elements in the collection.
The ndarray object is a multidimensional array used to store elements of the same type.
Each element in ndarray has an area of the same storage size in memory.
The internal of ndarray consists of the following contents:
- A pointer to data (a piece of data in memory or a memory mapped file).
- A data type or dtype that describes a lattice of fixed size values in an array.
- A tuple representing the shape of an array and the tuple representing the size of each dimension.
- A span tuple (stripe), in which the integer refers to the number of bytes that need to be "crossed" in order to advance to the next element of the current dimension.
- Specific description
3.2 basic Python syntax
Record when you are stupid... The basic syntax of python is really not proficient at present
- Do not write colons after the completion of syntax such as for, if and while, but write to write to write!!!
- Indent well
- Dictionary {} and list [] are indistinguishable
- To be added
3.3 handwriting knn to be improved
This is the disadvantage I mentioned in the code block. The basic idea is the second case mentioned in the 1.1 algorithm flow.
Level 2: classification of red wine
1. Basic knowledge
1.1 data set introduction
The data set is a red wine data. There are 178 samples in total, and each sample has 13 features. The label of red wine will not be provided here. You need to classify red wine according to these 13 features. Some data are shown in the figure below:

1.2 use of standardscaler
Because the standard deviation of some features in the data is relatively large, for example, the standard deviation of Proline is about 314. If we use kNN algorithm to classify such data, kNN algorithm will think that the last feature is more important. Because it is assumed that the last eigenvalue of two samples is 1 and 100 respectively, the distance between the two samples may be determined by the last characteristic. This is likely to affect the accuracy of kNN algorithm. In order to solve this problem, we can standardize the data.
There are many means of standardization, and the most commonly used is Z Score standardization. Z Score standardization normalizes the features by deleting the mean and scaling to the unit variance, and changes the mean of the standardized results to 0 and the standard deviation to 1.
The Z Score standardized interface StandardScaler has been provided in sklearn, and the use code is as follows:
from sklearn.preprocessing import StandardScaler
data = [[0, 0], [0, 0], [1, 1], [1, 1]]

# Instantiate a StandardScaler object
scaler = StandardScaler()
# Standardize with the mean and standard deviation of data, and save the results to after_scaler
after_scaler = scaler.fit_transform(data)
# Normalize with the StandardScaler object just
after_scaler2 = scaler.transform([[2, 2]])

print(after_scaler)
print(after_scaler2)
The printing results are as follows:
[[-1. -1.]
 [-1. -1.]
 [ 1.  1.]
 [ 1.  1.]]

[[3. 3.]]
It can be seen from the print results that after quasi transformation, the data has been scaled to a distribution with a mean value of 0 and a standard deviation of 1.
1.3 use of kneigborsclassifier
If you want to use kNN Algorithm in sklearn for classification, you only need the following code (where train_feature, train_label and test_feature represent training set data, training set label and test set data respectively):
from sklearn.neighbors import KNeighborsClassifier
#Generate K-nearest neighbor classifier
clf=KNeighborsClassifier()
#Training classifier
clf.fit(train_feature, train_label)
#Make predictions
predict_result=clf.predict(test_feature)
But when we need to adjust the parameters of kNN algorithm, the above code can not meet my needs. The changes that need to be made here are in the line CLF = kneigborsclassifier().
The constructor of kneigborsclassifier () contains some parameter settings. Common parameters are as follows:
- n_neighbors: the K value in the kNN algorithm. It is an integer, and the default value is 5;
- metric: distance function. The parameter can be a string (preset distance function) or a callable object. The default value is Minkowski distance;
- p: Available when metric is the Minkowski distance formula. It is an integer. The default value is 2, that is, the Euclidean distance.
1.4 programming requirements + test instructions
According to the prompt, supplement the code between begin end in the editor on the right to complete the classification function. The function needs to complete the test by using the kneigborsclassifier_ Classify features. The parameters of the function are as follows:
- train_feature: training set data, type: ndarray;
- train_label: training set label, type: ndarray;
- test_feature: test set data, type: ndarray.
The platform will calculate the accuracy of the prediction results you return. You just need to complete the classification function. If the accuracy rate is higher than 0.9, it is regarded as passing the test.
2. Code implementation
from sklearn.neighbors import KNeighborsClassifier
from sklearn.preprocessing import StandardScaler
import numpy as np


def classification(train_feature, train_label, test_feature):
    '''
    yes test_feature Classify red wine
    :param train_feature: Training set data, type ndarray
    :param train_label: Training set label, type ndarray
    :param test_feature: Test set data, type ndarray
    :return: Classification results of test set data
    '''
    # ********* Begin *********#

    # # Instantiate StandardScaler function
    # scaler = StandardScaler()
    # train_feature = scaler.fit_transform(np.array(train_feature).reshape(133, 13))
    # test_feature = scaler.transform(np.array(test_feature).reshape(45, 13))
    # # Generate K-nearest neighbor classifier
    # clf = KNeighborsClassifier()
    # # Training classifier
    # clf.fit(train_feature, train_label.astype('int'))
    # # Make predictions
    # predict_result = clf.predict(test_feature)
    # return predict_result

    # Instantiate a StandardScaler object
    scaler = StandardScaler()
    # np.array(train_feature).reshape(133, 13), i.e. the mean and standard deviation of the first 133 data, are used for standardization
    # And save the results to train_feature
    train_feature = scaler.fit_transform(np.array(train_feature).reshape(133, 13))
    # Normalize with the StandardScaler object just
    test_feature = scaler.transform(np.array(test_feature).reshape(45, 13))

    # Generate K-nearest neighbor classifier
    clf = KNeighborsClassifier()
    # Training classifier
    clf.fit(train_feature, train_label)
    # Make predictions
    predict_result = clf.predict(test_feature)
    return predict_result

    # # Instantiate a StandardScaler object
    # scaler = StandardScaler()
    # # scaler.fit_transform will standardize the data and record the mean and variance of the data, so as to perform the same standardization on the subsequent test data
    # std_train_feature = scaler.fit_transform(train_feature)
    #
    # # Instantiate a KNN classifier
    # classifier = KNeighborsClassifier()
    # # Train him with standardized data
    # classifier.fit(std_train_feature, train_label)
    #
    # # Return (results predicted (normalized data) using (trained classifier))
    # return classifier.predict(scaler.transform(test_feature))

    # ********* End **********#
3. Summary
3.1 python usage
Class instantiation:
    # Instantiate a StandardScaler object
    scaler = StandardScaler()

	# Generate K-nearest neighbor classifier
    clf = KNeighborsClassifier()
- Variable will become the public attribute of this class instance. All instances of this class can be accessed in the form of object. Attribute name
- Function will become the public method of this class instance. All instances of this class can call methods in the form of object. Method name ()
3.2 code problems
# And save the results to train_feature
    train_feature = scaler.fit_transform(np.array(train_feature).reshape(133, 13))
    # Normalize with the StandardScaler object just
    test_feature = scaler.transform(np.array(test_feature).reshape(45, 13))
I really don't understand why the parameter should be reshape like this. An error will be reported after changing the parameter
ValueError: cannot reshape array of size 1729 into shape (130,13)
In fact, the code basically depends on the second annotated process.
3.3 brief analysis of calling method
3.3.1 what does the standardscaler scale?
The random gradient descent method is sensitive to feature scaling, so it is strongly recommended that you scale your data. For example, scale each feature on the input vector X to [0,1] or [- 1, + 1], or standardize it so that its mean value is 0 and its variance is 1. Note that the same scaling must be applied to the corresponding test vector to obtain meaningful results. This can be easily done using StandardScaler
Feature Scaling
In the face of multi-dimensional feature problems, we should make sure that these features have similar scales, which can help the gradient converge faster.
Taking the two features as an example, one scale is 0-2000 and the other scale is 0-5, which is obviously very different
When the gradient descent method is used, the number of hits required is obviously large, so it will be fast when both features are scaled to 0-1

This is widely used

Methods supported by StandardScaler

3.3.2 fit and fit_transform and transform
- fit() function:
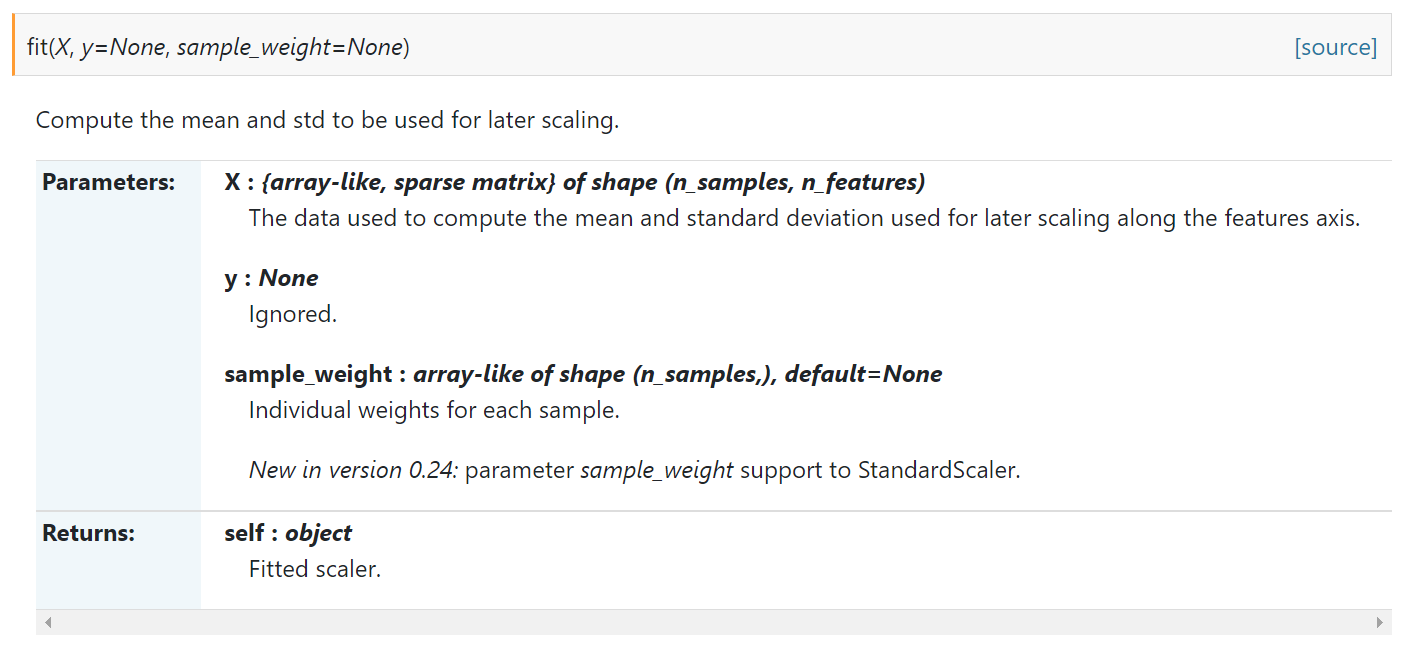
- fit_transform() function: first fit the data, then convert it to standard form
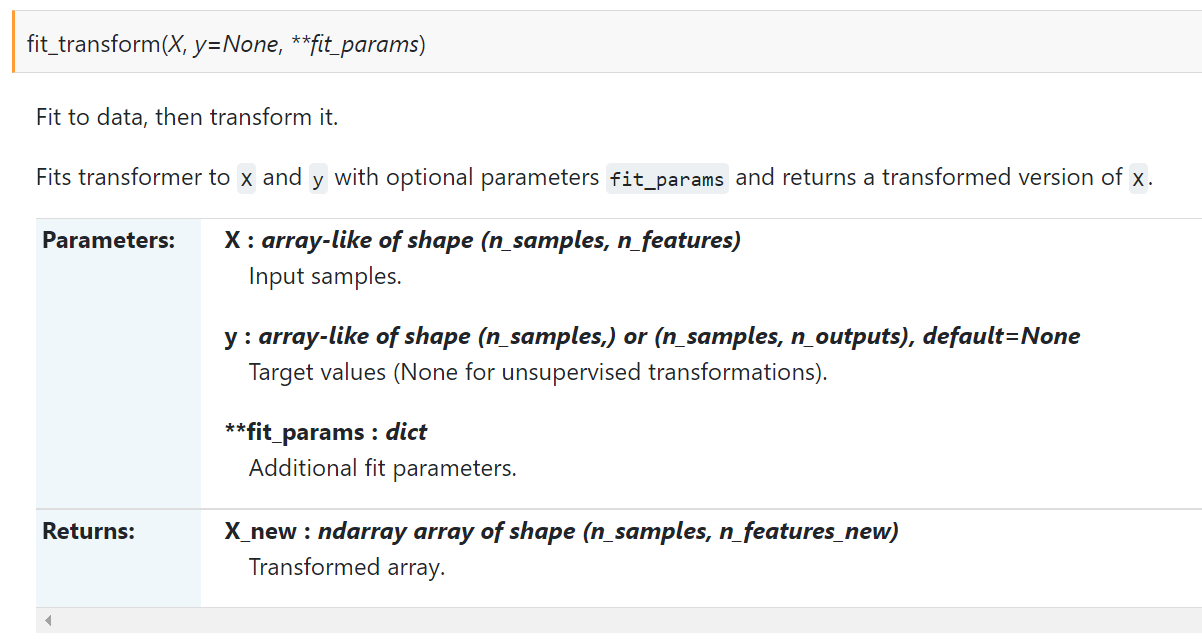
- transform() function: realize standardization by centering, scaling, etc.
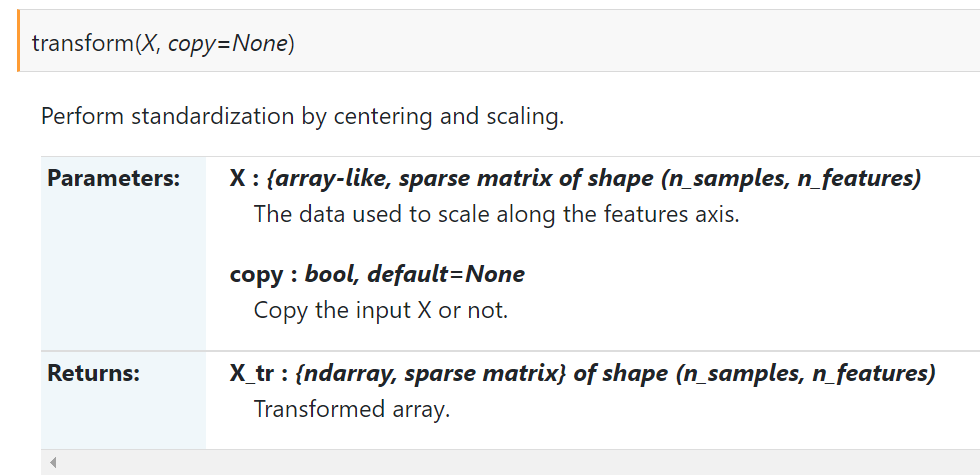
fit_ The difference between transform and transform
Here, we seem to know some differences between the two, like the difference in name. The former has one more step of fit data. Why is fit not applicable when standardizing data_ What about the transform () function?
The reasons are as follows:
In order to normalize the data (make the variance of characteristic data 1 and the mean value 0), we need to calculate the mean value of characteristic data μ And variance σ^ 2. Use the following formula for normalization:

We call fit on the training set_ Transform() actually found the mean value μ And variance σ^ 2. That is, we have found the conversion rule. We use this rule on the training set. Similarly, we can directly apply it to the test set (even the cross validation set). Therefore, for the processing on the test set, we only need to standardize the data without fitting the data again. Use a picture to show the following:

Fit and fit_ The difference between transform
Fit (x, y) is more common in novice examples, but here's fit_transform(x) has only one parameter in parentheses. Why?
fit(x,y) transmits two parameters of supervised learning algorithm, and fit(x) transmits one parameter of unsupervised learning algorithm, such as dimension reduction, feature extraction and standardization.
Level 3: inexplicably split the first two levels into six levels to write
1. KNN algorithm relearning
1.1 INTRODUCTION
kNN algorithm belongs to supervised learning. What supervised learning needs to do is to establish a model according to the characteristics and data of this part when a part of the data with features and labels is given. Then, when we input new features, the model can return the labels that should be attached to this feature.
- Calculate the distance between the data to be measured and the existing data;
- Sort according to the increasing relationship of distance;
- Select the K points with the smallest distance;
- Take the most category of these K points as the category of data to be measured.
Although there are four steps in the algorithm, it can be explained in one sentence. kNN algorithm determines which category the data to be tested belongs to based on the category of k points nearest to it. Which category has more, it belongs to which category. It deeply embodies the thought of "those who are close to Zhu are red and those who are close to ink are black".
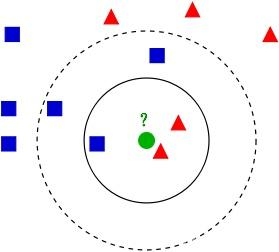
As shown in the figure, when we set K to 3, the categories of the three points closest to the green point to be measured are blue, red and red respectively. Because the score of blue and red is 1:2, the green points to be measured belong to the red category.
When K is set to 5, the categories of the five points closest to the green point to be measured are red, red, blue, blue and blue respectively. The score of blue and red is 3:2, so the green points to be tested belong to the blue category.
1.2 advantages and disadvantages of KNN algorithm
Everything has its advantages and disadvantages, and kNN algorithm is no exception. The advantages of kNN algorithm are:
- Simple understanding, basic mathematical knowledge is 0;
- It can be used for both separation and regression;
- Support multi classification.
kNN algorithm can be used for regression. The idea of regression is to take the average value of k points nearest to the point to be measured as the regression prediction result of the point to be measured.
In the test stage, kNN algorithm looks at the category score of k points closest to the point to be tested, so no matter how many categories there are in the training data, the category of the point to be tested can be determined by the category score.
Note: of course, the category score will be even. In this case, you can look at which category the measuring point is closest to, and select the nearest category as the prediction category of the point to be measured.
Of course, the disadvantage of kNN algorithm is also obvious, that is, when the amount of training set data is large, the efficiency of prediction process is very low. This is because the kNN algorithm needs to calculate the distance between the points to be measured and all points in the training set and sort them. It is conceivable that when the amount of data is relatively large, the efficiency will be extremely low. It is not suitable for time sensitive business.
2. Use the kNN Algorithm in sklearn for classification
2.1 learn more about K-nearest neighbor algorithm
In kNN algorithm, the category of samples to be analyzed is determined by the category of K samples nearest to it. Therefore, the historical data information considered by kNN algorithm is very little, which is basically determined by the selection of K value and distance function. When the K value is relatively large, the number of samples that can be considered will be more, but the original intention of kNN algorithm, the basic idea of "those who are close to Zhu are red and those who are close to ink are black", can not be used. When the K value is small, the number of samples that can be considered is very small. At this time, the effect of kNN algorithm is very poor in noisy data.
In addition to K value, another core parameter of kNN algorithm is the selection of distance function. Although in the description of the last training, we use pictures to illustrate the kNN algorithm. But in fact, the distance mentioned here is different from the distance we realize in our daily life. In daily life, the distance we call is often Euclidean distance, that is, the length of the line segment after two points are connected on the plane.
Euclidean distance is defined as follows:
In addition, there are several common distance definitions in machine learning:
- Hamming distance: the number of two strings with different corresponding positions. Hamming distance is named after Richard Wesley Hamming. In information theory, the Hamming distance between two equal length strings is the number of different characters in the corresponding position of two strings. In other words, it is the number of characters that need to be replaced to transform a string into another string;
- Mahalanobis distance: indicates the covariance distance of the data. Calculate the similarity distance between two sample sets;
- Cosine distance: the angle between two vectors is used as a measure of distance;
- Manhattan distance: the sum of the distances projected from two points onto each axis;
- Chebyshev distance: the maximum distance between two points projected on each axis;
- Normalized Euclidean distance: divide each term in Euclidean distance by standard deviation.
Another distance is called Minkowski distance, as follows:

Although we have introduced a lot at once, we must still feel that we are unclear, but don't worry. The definition of distance is a core concept in machine learning, and we will often encounter it in later learning. The purpose of introducing the distance here is to let you try to improve the performance of the k-nearest neighbor algorithm by using different distance definitions if you find that the effect is not very good.
2.2 understand the parameters of kneigborsclassifier in sklearn
To use the kNN Algorithm in sklearn, you only need the following code (where train_feature, train_label and test_feature represent training set data, training set label and test set data respectively):
from sklearn.neighbors import KNeighborsClassifier
clf=KNeighborsClassifier() #Generate K-nearest neighbor classifier
clf.fit(train_feature, train_label)               #Training classifier
predict_result=clf.predict(test_feature)           #Make predictions
When our kNN algorithm needs different parameters, the above code can not meet my needs. The change that needs to be made is in the line CLF = kneigborsclassifier(). The constructor of kneigborsclassifier () actually has other parameters.
Common parameters are as follows:
- n_neighbors, that is, the K value in the k-nearest neighbor algorithm, is an integer, and the default is 5;
- metric, distance function. The parameter can be a string (preset distance function) or a callable (callable object. What you don't understand can be understood as a function). The default value is Minkowski distance;
- p. When metric is the Minkowski distance formula, the above q value defaults to 2.
2.3 programming requirements + test instructions
Please read the code on the right carefully and supplement the code in the Begin - End area according to the tips in the method. The specific tasks are as follows:
- Complete the classification function. The function needs to complete the test by using the kneigborsclassifier_ Classify features. The parameters of the function are as follows:
- train_feature: training set data;
- train_label: training set label;
- test_feature: test set data.
After supplementing the code, click the evaluation, and the platform will test the code you wrote. When your result is consistent with the expected output, it is passed.
The platform will calculate the accuracy of the prediction results you return. You just need to complete the classification function. If the accuracy rate is higher than 0.75, it is regarded as passing the test.
Expected output: your accuracy is higher than 0.75
2.4 implementation code
from sklearn.neighbors import KNeighborsClassifier

def classification(train_feature, train_label, test_feature):
    '''
    use KNeighborsClassifier yes test_feature Classify
    :param train_feature: Training set data
    :param train_label: Training set label
    :param test_feature: Test set data
    :return: Test set prediction results
    '''

    #********* Begin *********#
    # Instantiate a KNN classifier
    classifier = KNeighborsClassifier()
    # Train him with standardized data
    classifier.fit(train_feature, train_label)

    # Return (results predicted (normalized data) using (trained classifier))
    return classifier.predict(test_feature)
    #********* End *********#
3. Use the kNN Algorithm in sklearn for regression
3.1 using kneigborsregressor in sklearn
When using kNN algorithm for classifier, we use sklearn library as follows:
from sklearn.neighbors import KNeighborsClassifier
clf=KNeighborsClassifier() #Generate K-nearest neighbor classifier
clf.fit(train_feature, train_label)               #Training classifier
predict_result=clf.predict(test_feature)           #Make predictions
Correspondingly, when we need to use kNN algorithm for regressor, we only need to replace the kneigborsclassifier with kneigborsregressor. The code is as follows:
from sklearn.neighbors import KNeighborsRegressor
clf=KNeighborsRegressor() #Generate K-nearest neighbor classifier
clf.fit(train_feature, train_label)               #Training classifier
predict_result=clf.predict(test_feature)           #Make predictions
The parameters of kneigborsregressor and kneigborsclassifier are exactly the same, so you can refer to the previous level when optimizing the model.
3.2 programming requirements + test instructions
Complete the region function. The function needs to complete the test by using kneigborsregressor_ Classify features. The parameters of the function are as follows:
- train_feature: training set data;
- train_label: training set label;
- test_feature: test set data.
The platform will calculate the accuracy of the prediction results you return. You just need to complete the region function. If r2 score is higher than 0.75, it is considered as passing the test.
Expected output: your r2 score is higher than 0.75.
3.3 code implementation
from sklearn.neighbors import KNeighborsRegressor

def regression(train_feature, train_label, test_feature):
    '''
    use KNeighborsRegressor yes test_feature Classify
    :param train_feature: Training set data
    :param train_label: Training set label
    :param test_feature: Test set data
    :return: Test set prediction results
    '''

    #********* Begin *********#

    # Generate K-nearest neighbor classifier
    clf=KNeighborsRegressor()

    # Training classifier
    clf.fit(train_feature, train_label)

    # Make predictions
    return clf.predict(test_feature)

    #********* End *********#
4. Analyze red wine data
4.1 background knowledge supplement
sklearn has built-in red wine data. The code for obtaining red wine data is as follows:
from sklearn.datasets import load_wine
wine_dataset = load_wine()
# Prints the name of the feature in the dataset
print(wine_dataset['feature_names'])
The printing results are as follows:
['alcohol', 'malic_acid', 'ash', 'alcalinity_of_ash', 'magnesium', 'total_phenols', 'flavanoids', 'nonflavanoid_phenols', 'proanthocyanins', 'color_intensity', 'hue', 'od280/od315_of_diluted_wines', 'proline']
It can be seen from the print results that the data set contains the alcohol content, malic acid content, color saturation and other information of red wine.
Similarly, we can look at the label name of red wine, and the code is as follows:
from sklearn.datasets import load_wine
wine_dataset = load_wine()
# Print the name of the label in the dataset
print(wine_dataset['target_names'])
The printing results are as follows:
['class_0' 'class_1' 'class_2']
It can be seen that there are three types of red wine in the data set. In other words, if machine learning algorithm is used to classify them, it belongs to multi classification problem. The kNN algorithm we learned can solve the multi classification problem.
4.2 programming requirements + test instructions
Please read the code on the right carefully and supplement the code in the Begin - End area according to the tips in the method to complete the alcohol_mean function. This function needs to be completed to return the average alcohol content in the red wine data. The parameters of the function are explained as follows:
- Data: data object.
After supplementing the code, click the evaluation, and the platform will test the code you wrote. When your result is consistent with the expected output, it is passed.
Expected output: the average alcohol content is calculated correctly.
4.3 code implementation
import numpy as np

def alcohol_mean(data):
    '''
    Returns the average alcohol content of red wine in red wine data
    :param data: Red wine data object
    :return: Average alcohol content, type float
    '''

    #********* Begin *********#
    # Take the first column of data and find the average
    return data.data[:,0].mean()
    # The dictionary is data['data'].mean(0)
    #********* End **********#
5. Standardize data
5.1 standardization related knowledge
We can calculate the mean and standard deviation corresponding to each feature in the following red wine data. The code is as follows:
from sklearn.datasets import load_wine
wine_dataset = load_wine()
print(wine_dataset.data.mean(0))
print(wine_dataset.data.std(0))
The printing results are as follows:
[1.30006180e+01 2.33634831e+00 2.36651685e+00 1.94949438e+01 9.97415730e+01 2.29511236e+00 2.02926966e+00 3.61853933e-01 1.59089888e+00 5.05808988e+00 9.57449438e-01 2.61168539e+00 7.46893258e+02]
[8.09542915e-01 1.11400363e+00 2.73572294e-01 3.33016976e+00 1.42423077e+01 6.24090564e-01 9.96048950e-01 1.24103260e-01 5.70748849e-01 2.31176466e+00 2.27928607e-01 7.07993265e-01 3.14021657e+02]
It can be seen from the print results that the mean and standard deviation of some features are relatively large, such as the last feature. If we use kNN algorithm to classify such data, kNN algorithm will think that the last feature is more important. Because it is assumed that the last eigenvalue of two samples is 1 and 100 respectively, the distance between the two samples may be determined by the last characteristic. This is likely to affect the accuracy of kNN algorithm. In order to solve this problem, we can standardize the data.
There are many means of standardization, and the most commonly used is the standard scaler. The StandardScaler standardizes the features by deleting the mean and scaling to the unit variance, and changes the mean of the standardized results to 0 and the standard deviation to 1.
It is assumed that the characteristic after standardization is z, the characteristic before standardization is x, and the mean value of the characteristic is μ, The variance is s. Then the StandardScaler can be expressed as z=(x −) μ)/ s.
The interface of StandardScaler has been provided in sklearn, and the use code is as follows:
from sklearn.preprocessing import StandardScaler
data = [[0, 0], [0, 0], [1, 1], [1, 1]]
# Instantiate a StandardScaler object
scaler = StandardScaler()
# Standardize with the mean and standard deviation of data, and save the results to after_scaler
after_scaler = scaler.fit_transform(data)
# Normalize with the StandardScaler object just
after_scaler2 = scaler.transform([[2, 2]])
print(after_scaler)
print(after_scaler2)
The printing results are as follows:
[[-1. -1.]
 [-1. -1.]
 [ 1.  1.]
 [ 1.  1.]]

[[3. 3.]]
5.2 programming requirements + test instructions
Please read the code on the right carefully. According to the prompts in the method, supplement the code in the Begin - End area to complete the scaler function. The function needs to be completed is to return standardized data. The parameters of the function are explained as follows:
- Data: data object.
After supplementing the code, click the evaluation, and the platform will test the code you wrote. When your result is consistent with the expected output, it is passed.
Expected output: successful standardization
5.3 code implementation
from sklearn.preprocessing import StandardScaler
import numpy as np

def scaler(data):
    '''
    Return standardized red wine data
    :param data: Red wine data object
    :return: Standardized red wine data, type: ndarray
    '''

    #********* Begin *********#
    # Instantiate a StandardScaler object
    scaler = StandardScaler()
    # Standardize and save the results
    return scaler.fit_transform(data['data'])

    #********* End **********#
6. Use kNN algorithm for prediction
6.1 programming requirements + test instructions
Please read the code on the right carefully. According to the prompts in the method, supplement the code in the Begin - End area and complete the classification function. The function needs to classify the test data and return the classification results. The parameters of the function are explained as follows:
- train_feature: training set data, type: ndarray;
- train_label: training set label, type: ndarray;
- test_feature: test set data. The type is ndarray.
After supplementing the code, click evaluation, and the platform will test the code you wrote. When your results are consistent with the expected output, that is, the classification accuracy is higher than 0.92, it is considered as passing the test.
Expected output: your classification accuracy is higher than 0.92.
6.2 code implementation
from sklearn.neighbors import KNeighborsClassifier
from sklearn.preprocessing import StandardScaler

def classification(train_feature, train_label, test_feature):
    '''
    yes test_feature Classify red wine
    :param train_feature: Training set data, type ndarray
    :param train_label: Training set label, type ndarray
    :param test_feature: Test set data, type ndarray
    :return: Classification results of test set data
    '''

    #********* Begin *********#

    # Instantiate a StandardScaler object
    scaler = StandardScaler()
    # Standardization, while recording the mean and variance of the data, so as to perform the same standardization on the subsequent test data
    tr_feature = scaler.fit_transform(train_feature)
    te_feature = scaler.transform(test_feature)

    # Generate K-nearest neighbor classifier
    clf = KNeighborsClassifier()
    # Training classifier
    clf.fit(tr_feature, train_label)
    # Make predictions
    predict_result = clf.predict(te_feature)
    return predict_result

    #********* End **********#