preface
convolutional neural network has made a breakthrough, and the effect is also very ideal. However, the learning process of convolutional neural network is difficult to explain theoretically, so it has been criticized by many people. Therefore, it is very important to visualize its learning process, and so is the purpose of DeepDream model. The DeepDearm model was proposed by Google in 2015 and its theoretical basis is visualization and understanding revolutionary neural networks proposed in 2013. This article proposes to use the gradient rise method to visualize the characteristics of each layer of the network, that is, input a noise image into the network, and update the pixel value of the initial image instead of updating the network weight during reverse update, The network is visualized in this way of training images. The cover of the classic textbook "deep learning", which lays a foundation in the field of deep learning, is generated using the DeepDream model.
1 DeepDream principle
DeepDream will use amplification to illustrate the significance of the features learned by CNN. Specifically, the gradient rise method is used to visualize the characteristics of each layer of the network, that is, a noise image is input into the network, but the network weight is not updated during reverse update, but the pixel value of the initial image is updated to visualize the network in this way of "training image". In addition, the input image can also be some normal images. In this case, it is to generate background images and the like.
how does DeepDream enlarge image features? For example, a network learned the task of classifying cats and dogs. Give the network a cloud image. The cloud may be more like a dog, and the features extracted by the machine may also be like a dog. Assuming that the last input probability corresponding to a feature is [0.6, 0.4], 0.6 represents the probability of dog and 0.4 represents the probability of cat, then
L
2
L_2
L2 ^ norm can achieve the effect of magnifying features. For such a feature,
L
2
=
x
1
2
+
x
2
2
L_2 = x_1^{2} + x_2^{2}
L2 = x12 + x22, if
x
1
x_1
x1. The bigger,
x
2
x_2
x2 smaller, then
L
2
L_2
L2 ^ the larger, so you just need to maximize
L
2
L_2
L2 , can ensure that when
x
1
x_1
x1 >
x
1
x_1
x1 , the more rounds of iteration
x
1
x_1
x1. The bigger,
x
2
x_2
x2 is smaller, so the image will be more and more like a dog. Each iteration is equivalent to calculation
L
2
L_2
L2 ^ norm, and then use the gradient rising method to adjust the image. The optimization is no longer to optimize the weight parameters, but the eigenvalues or pixels. Therefore, when constructing the loss function, the usual cross entropy is not used, but the L2 norm of maximizing the eigenvalues. Make the features extracted after the image passes through the network more like the hidden features of the network. The concrete implementation also needs to obtain better results through multi-scale, random movement and other methods.
2. Deepdream algorithm flow
use the basic image, which is input to the pre trained CNN. And propagate forward to a specific layer.
in order to better understand what has been learned in this layer, we need to maximize the activation value through this layer. Here we want to explain what is the activation value. The activation value represents the probability of belonging to a certain class. For example, in the second classification problem, we use [0,1] to represent the labels of two classes. We stipulate that when the output of the neural network is greater than 0, it will be classified as 1 (100% activated) and less than 0, it will be classified as 0 (not activated). Therefore, in this case, the activation value is only 100% or 0%, However, we hope that it can be an arbitrary value of 0% ~ 100% in ordinary multi classification tasks. The greater the activation value, the higher the activation degree. For classification, it means that it has a greater probability of belonging to this category. DeepDream takes the output of the layer as the gradient, and then completes the gradient rise on the input image to maximize the activation value of the layer. However, this alone does not produce a good image. In order to improve the training quality, some techniques need to be used to make the image better. Gaussian blur can usually be used to make the image smoother, and multi-scale (also known as octave) images are used for calculation. First, zoom in and out to a continuous image, and then zoom in and out to a continuous image.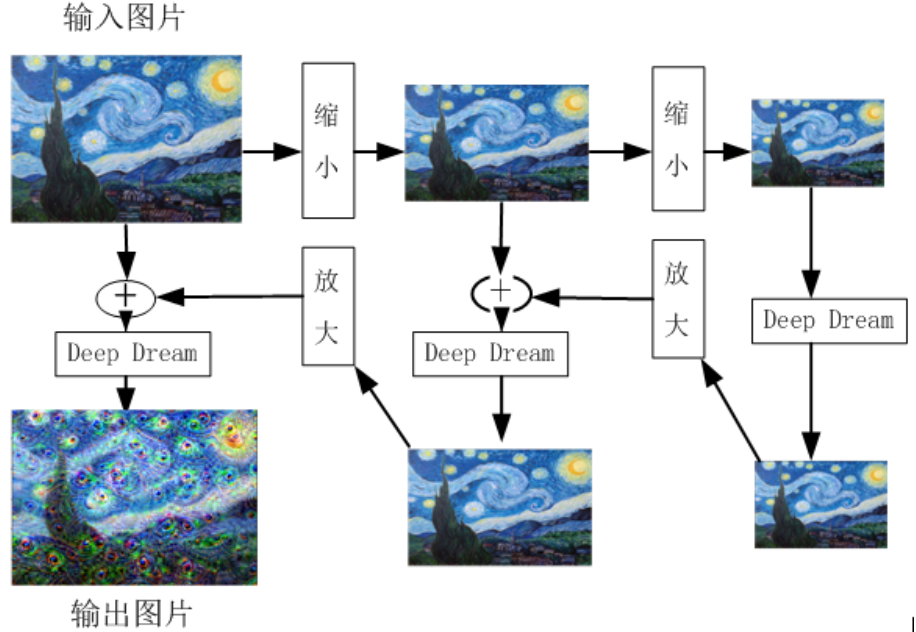
first, the image is continuously reduced by the second equal proportion, which is 1.5. The reason why the image is reduced is to make the resulting pattern displayed more smoothly after the pixel points of the image are adjusted. The process is mainly to suppress the high-frequency component of the image and enlarge the low-frequency component. After shrinking twice, take each pixel of the image as a parameter and calculate the partial derivative of them. In this way, we can know how to adjust the image pixel, which can maximize the stimulation to the output of a given network layer.
3 PyTorch implements DeepDream
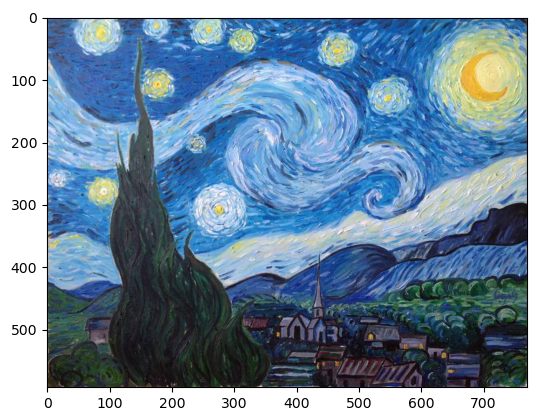
this implementation is to take VGG19 model as the pre training model, maximize the obtained features and display them on an ordinary image. This time, Van Gogh's star map is used. In order to make the training more effective, it is also used to zoom the image in different sizes.
1) Download the pre training model. VGG19 model includes three different modules. The first is feature extraction module with 36 layers, the second is avgpool with only one layer, and the third is classifier with 6 layers.
vgg = models.vgg19(pretrained = True).to(device)
modulelist = list(vgg.features.modules())
2) The main function of the function prod is to input the input image, forward propagate it to the specified layer of VGG19 (such as layer 8 or layer 32), and then update the eigenvalue of the input image with gradient rise.
def prod(image, feature_layers, iterations, lr, transform, device, vgg, modulelist) :
    input = transform(image).unsqueeze(0)
    input = input.to(device).requires_grad_(True)
    vgg.zero_grad()
    for i in range(iterations) :
        out = input
        for j in range(feature_layers) :
            out = modulelist[j + 1](out)
        loss = out.norm()
        loss.backward()

        with torch.no_grad() :
            input += lr * input.grad

    input = input.squeeze()
    # input = input.transpose(0, 1)
    # input = input.transpose(1, 2)
    input = input.permute(1, 2, 0)
    input = np.clip(deprocess(input, device).detach().cpu().numpy(), 0, 1)
    image = Image.fromarray(np.uint8(input * 255))
    return image
3) Function deep_dream_vgg is a recursive function that reduces the image many times and then calls the function prod. Then enlarge the result and mix it with the image according to a certain proportion, and finally get the output image of the same size as the input image.
def deep_dream_vgg(image, feature_layers, iterations, lr, transform, device, vgg, modulelist, octave_scale = 2, num_octaves = 100) :
    if num_octaves > 0 :
        image1 = image.filter(ImageFilter.GaussianBlur(2))
        if (image1.size[0] / octave_scale < 1 or image1.size[1] / octave_scale < 1) :
            size = image1.size
        else :
            size = (int(image1.size[0] / octave_scale), int(image1.size[1] / octave_scale))

        image1 = image1.resize(size, Image.ANTIALIAS)
        image1 = deep_dream_vgg(image1, feature_layers, iterations, lr, transform, device, vgg, modulelist, octave_scale, num_octaves - 1)
        size = (image.size[0], image.size[1])

        image1 = image1.resize(size, Image.ANTIALIAS)
        image = ImageChops.blend(image, image1, 0.6)
        # PIL.ImageChops.blend(image1, image2, alpha)
        # out = image1 * (1.0 - alpha) + image2 * alpha
    img_result = prod(image, feature_layers, iterations, lr, transform, device, vgg, modulelist)
    img_result = img_result.resize(image.size)
    return img_result
4 all codes (detailed notes)
import torch
import matplotlib.pyplot as plt
import numpy as np
from PIL import Image, ImageFilter, ImageChops
from torchvision import models
from torchvision import transforms

#Download pictures
def load_image(path) :
    img = Image.open(path)
    return img

#Because there is normalization operation in the process of image processing, it is necessary to "reverse normalization"
def deprocess(image, device):
    image = image * torch.tensor([0.229, 0.224, 0.225], device = device) + torch.tensor([0.485, 0.456, 0.406], device = device)
    return image

#The incoming input image is propagated forward to the specified layer of VGG19, and then the eigenvalue of the input image is updated with gradient rise.
def prod(image, feature_layers, iterations, lr, transform, device, vgg, modulelist) :
    input = transform(image).unsqueeze(0)         #resize the image, turn it into tensor and normalize it. Add a dimension to represent a sample, [1, C, H, W]
    input = input.to(device).requires_grad_(True) #Track the image and calculate the gradient
    vgg.zero_grad()                               #Gradient clearing
    for i in range(iterations) :
        out = input
        for j in range(feature_layers) :          #Traverse each layer of the features module
            out = modulelist[j + 1](out)          #The output characteristics of the upper layer are used as the input characteristics of the lower layer
        loss = out.norm()                         #Calculate the second norm of the characteristic
        loss.backward()                           #Back propagation calculates the gradient, where each pixel of the image is a parameter

        with torch.no_grad() :
            input += lr * input.grad              #Update the pixel value of the original image

    input = input.squeeze()                       #After training, remove the dimension representing the number of samples
    # Interaction dimension
    # input = input.transpose(0, 1)
    # input = input.transpose(1, 2)
    input = input.permute(1, 2, 0)                #Dimension conversion, because the dimension of tensor is (C, H, W) and the dimension of array is (H, W, C)
    input = np.clip(deprocess(input, device).detach().cpu().numpy(), 0, 1)#Limit pixel values between (0, 1)
    image = Image.fromarray(np.uint8(input * 255))#When converting an image of array type to an image of PIL type, it needs to be multiplied by 255 because the function automatically divides by 255 when converting to tensor
    return image

#Zoom down the image many times and then call the function prod. Then, the enlarged result is mixed with the image in a certain proportion, and finally the output image with the same size as the input image is obtained.
#octave_ The scale parameter determines how many scale images there are, num_ The octaves parameter determines how many images there are in total
#octave_scale and num_ The selection of two parameters of octaves has a great influence on the generated image.
def deep_dream_vgg(image, feature_layers, iterations, lr, transform, device, vgg, modulelist, octave_scale = 2, num_octaves = 100) :
    if num_octaves > 0 :
        image1 = image.filter(ImageFilter.GaussianBlur(2))#Gaussian blur
        if (image1.size[0] / octave_scale < 1 or image1.size[1] / octave_scale < 1) :#When the size of the image is smaller than octave_ The image scale does not change during scale
            size = image1.size
        else :
            size = (int(image1.size[0] / octave_scale), int(image1.size[1] / octave_scale))

        image1 = image1.resize(size, Image.ANTIALIAS)#Zoom out picture
        image1 = deep_dream_vgg(image1, feature_layers, iterations, lr, transform, device, vgg, modulelist, octave_scale, num_octaves - 1)#recursion
        size = (image.size[0], image.size[1])

        image1 = image1.resize(size, Image.ANTIALIAS)#Enlarge image
        image = ImageChops.blend(image, image1, 0.6) #Blend the images together in proportion
        # PIL.ImageChops.blend(image1, image2, alpha)
        # out = image1 * (1.0 - alpha) + image2 * alpha
    img_result = prod(image, feature_layers, iterations, lr, transform, device, vgg, modulelist)
    img_result = img_result.resize(image.size)
    return img_result

if __name__ == '__main__':
    #Preprocess the image
    tranform = transforms.Compose([
        transforms.Resize((224, 224)),
        transforms.ToTensor(), #Convert the PIL type to the tensor type. Note that the pixel value has been changed to between [0, 1] in the process again by dividing by 255
        transforms.Normalize(mean = [0.485, 0.456, 0.406], #normalization
                             std = [0.229, 0.224, 0.225])
    ])

    device = torch.device("cuda:0" if torch.cuda.is_available() else "cpu")
    vgg = models.vgg19(pretrained = True).to(device)

    modulelist = list(vgg.features.modules())#Note that after the network layer is converted into a list element, the first element is all the network layers, and the subscript starts from 1 to iterate the network layer, which is why the following is modulelist[j + 1]
    night_sky = load_image('starry_night.jpg')
    night_sky_30 = deep_dream_vgg(night_sky, 36, 6, 0.2, tranform, device, vgg, modulelist)
    plt.imshow(night_sky_30)
    plt.show()
Operation results:
Input image:
Features of layer 10 learning of VGG19:
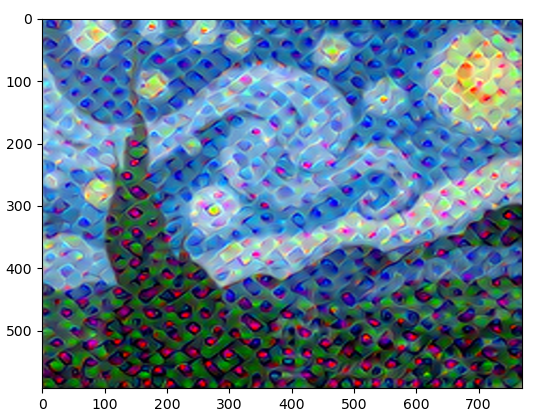
Features of VGG19 layer 20 learning: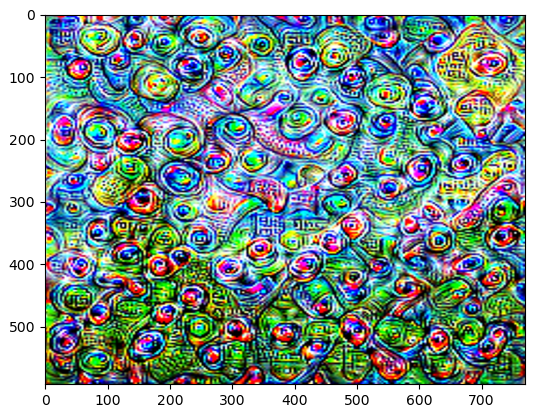
Features of VGG19 layer 30 learning:
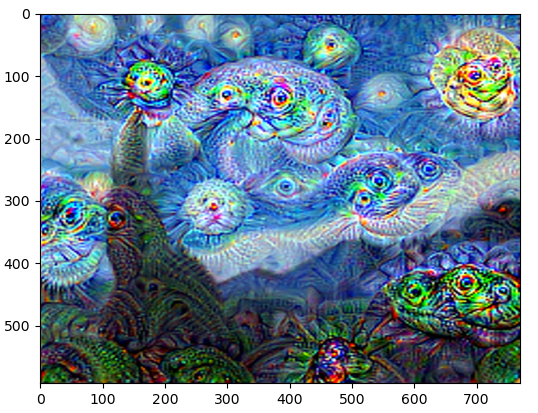
VGG19 pre training model is a training model based on ImageNet large data set, which has 1000 categories. From the above results, we can see that the closer to the top layer, the more comprehensive or abstract the activation value is, such as the patterns of some categories (such as dogs).