Level 1: style design of dynamic focus map page
Task description
This task: complete the style design of dynamic focus map page.
Relevant knowledge
In order to complete this level task, you need to master: 1 Box model style settings, 2 Element positioning 3 Special characters greater than and less than, 4 Transparency settings, 5 In line elements are converted to line block elements, 6 Z-axis attribute z-index, 7 Rounded border
Transparency settings
The attribute opacity is used to set the opacity level. The default value is 1. Its value can be taken from 0 to 1.
Use of special characters
The left and right keys for controlling image switching can be realized by using the special characters < and >.
- <:<
- >:>
Dot switch
For the li label, the rounded border area is filled with the corresponding background color, and the style code is as follows: border radius: 50%;
Use of z-index
In order to make the direction key and dot switch on the focus map, use the z-index attribute. The style code is as follows: z-index:1
Programming requirements
According to the prompt, supplement the code in the editor on the right. 1. Add a style to the span label (1) change the display type of the span label to line block (2) set the content area width to 40px, the high-order 80px (3) set the background color to #666 (4) set the opacity level to 0.5 (5) set the text font size to 50px, the color to white (6) and the z-axis level to 1.2 Set the style for the left key of the class name leftbtn so that the left positioning value is 5px and the top positioning value is 228px 3 Set the style for the right-click of the class name rightbtn so that the left positioning value is 820px and the top positioning value is 228px 4 Set the style (1) for ul label so that the left positioning value is 360px, the bottom positioning value is 20px (2) and the z-axis level is 1.5 Set the style for the li label (1) set the left floating of the element (2) the width of the content area is 20px, the height is 20px (3) the right outer margin is 12px (4) the opacity level is 0.5 (5) set the rounded border
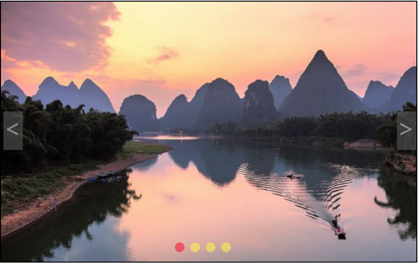
The final effect diagram is shown below
<!DOCTYPE html>
<html>
<head>
<meta charset="utf-8">
<title>Dynamic focus map page</title>
<!-- ********* Begin ********* -->
<style type="text/css">
* {margin:0; padding:0; border:0; list-style:none;}
div{
width:860px;
height:540px;
border:2px black solid;
margin:0px auto;
position:absolute;
left:0px;
top:0px;
}
span{
width:40px;
height:80px;
display:inline-block;
background-color:#666;
opacity:0.5;
font-size:50px;
color:white;
z-index:1;
}
#leftbtn{
position:absolute;
left:5px;
top:228px;
}
#rightbtn{
position:absolute;
left:820px;
top:228px;
}
ul{
position:absolute;
left:360px;
bottom:20Px;
z-index:1;
}
ul li{cursor:pointer;
float:left;
width:20px;
height:20px;
margin-right:12px;
opacity:0.5;
border-radius:50%;
}
</style>
<!-- ********* End ********* -->
</head>
<body>
<div id="div1">
<span id="leftbtn"><</span>
<span id="rightbtn">></span>
<ul>
<li></li>
<li></li>
<li></li>
<li></li>
</ul>
</div>
</body>
</html>
Level 2: script design of dynamic focus map page
Task description
This task: complete the script design of the dynamic focus map page.
Relevant knowledge
In order to complete this level task, you need to master: 1 Fundamentals of JavaScript programming, 2 Array objects and operations, 3 Definition of function, 4 Access to document objects, 5 event
array
An array object is an ordered collection of data that uses separate variable names to store a series of data. In JavaScript, there is no need to specify the data type of the array when defining an array, and different types of data can be stored in an array. Index numbers can be used to access arrays, such as array variable [i]
Select structure
The program format of double branch structure is as follows:
if (execution condition) {execute statement 1
}else {execute statement 2}
Cyclic structure
The program format of the for loop structure is as follows:
for (initialization expression; loop condition; operation expression) {loop body statement;}
Method onload of window object
The onload method of the window object allows the browser to execute the function specified by the script after the page is loaded. For example: window Onload = function() {function body}
Setting of document object properties
For example, the background image with the class name div1 is set as the image with index number I in the image array IMGs, which can be written with the following code. document.getElementById("div1").style.backgroundImage = "url(" + imgs[i] + ")"
Programming requirements
According to the prompts, supplement the script code in the editor on the right. 1. Set the background color of objdrop with index number i as "#ff0"i 2 Define the element of label < li > as object objdrop 3 Set the background color of the first objdrop object to "#f00" 4 Sets the background color of the current bjdrop object to "#f00" 5 Set the background image in the divPic object to the image corresponding to the current index number
6. Use the if statement to set the index number of the next graph to 0.7 when the key to the right is pressed to the fourth graph When the left button is set to the first graph, the index number of the next graph is IMGs The final effect diagram of length-1 is shown below

<!DOCTYPE html>
<html>
<head>
<meta charset="utf-8">
<title>Dynamic focus map page</title>
<link type="text/css" rel="stylesheet" href="https://www.educoder.net/api/attachments/2423157" />
<script type="text/javascript">
function set(objdrop) {
for (i = 0; i < objdrop.length; i++) {
/* *********** Begin *********** */
//Please set the background color of objdrop with index number i to yellow
objdrop[i].style.backgroundColor = "#ff0";
/* ************* end ************* */
}
}
window.onload = function () {
/* *********** Begin *********** */
//Please define the element labeled li as the object objdrop
var objdrop = document.getElementsByTagName("li");
/* ************* end ************* */
for (i = 0; i < objdrop.length; i++) {
/* *********** Begin *********** */
//Please define the background color of the first object objdrop as red
objdrop[0].style.backgroundColor = "#f00";
/* ************* end ************* */
objdrop[1].style.backgroundColor = "#ff0";
objdrop[2].style.backgroundColor = "#ff0";
objdrop[3].style.backgroundColor = "#ff0";
objdrop[i].index = i;
objdrop[i].onmouseover = function () {
set(objdrop);
/* *********** Begin *********** */
//Please set the background color of the current object objdrop to red
this.style.backgroundColor = "#f00";
/* ************* end ************* */
var divPic = document.getElementById("div1");
var imgs = ["https://www.educoder.net/api/attachments/2423182", "https://www.educoder.net/api/attachments/2423183", "https://www.educoder.net/api/attachments/2423184", "https://www.educoder.net/api/attachments/2423185"];
/* *********** Begin *********** */
//Set the background image in the divPic object to the image corresponding to the current index number
divPic.style.backgroundImage = "url(" + imgs[this.index] + ")";
/* ************* end ************* */
}
}
document.getElementById("div1").index = 0;
var imgs = ["https://www.educoder.net/api/attachments/2423182", "https://www.educoder.net/api/attachments/2423183", "https://www.educoder.net/api/attachments/2423184", "https://www.educoder.net/api/attachments/2423185"];
document.getElementById("div1").style.backgroundImage = "url(" + imgs[0] + ")";
var objrightbtn = document.getElementById("rightbtn");
objrightbtn.onclick = function () {
var picIndex = document.getElementById("div1").index;
/* *********** Begin *********** */
//When the key to the right is set to the fourth figure, the index number of the next figure is 0
if (picIndex == imgs.length-1) {
picIndex = 0;
}
/* ************* end ************* */
else {
picIndex++;
}
document.getElementById("div1").index = picIndex;
document.getElementById("div1").style.backgroundImage = "url(" + imgs[picIndex] + ")";
set(objdrop);
objdrop[picIndex].style.backgroundColor = "#f00";
}
var objleftbtn = document.getElementById("leftbtn");
objleftbtn.onclick = function () {
var picIndex = document.getElementById("div1").index;
/* *********** Begin *********** */
//When the left button is set to the first graph, the index number of the next graph is IMGs length-1
if (picIndex == 0) {
picIndex = imgs.length-1;
}
/* ************* end ************* */
else {
picIndex--;
}
document.getElementById("div1").index = picIndex;
document.getElementById("div1").style.backgroundImage = "url(" + imgs[picIndex] + ")";
set(objdrop);
objdrop[picIndex].style.backgroundColor = "#f00";
}
}
</script>
</head>
<body>
<div id="div1">
<span id="leftbtn"><</span>
<span id="rightbtn">></span>
<ul>
<li></li>
<li></li>
<li></li>
<li></li>
</ul>
</div>
</body>
</html>