Making heart-shaped photo wall with python
Hello ~ I'm 36 degrees. Life is short. I use python! Today, share how to make a beautiful heart-shaped photo wall in python
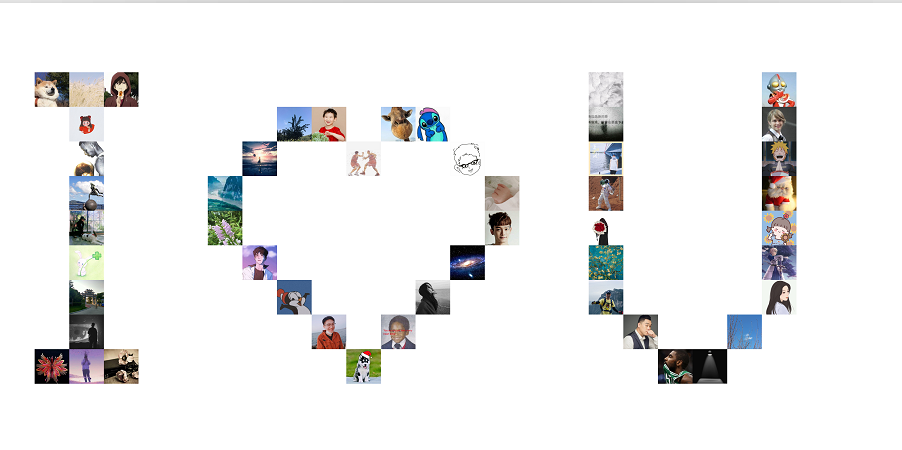
effect
Let's take a look at the renderings to understand what we need to do next. My renderings are as follows:

How do you feel? If you are still satisfied, please give me a praise after reading it, because you can also do it after reading it! It is also a kind of feedback to me
thinking
Before the code, let's clarify our ideas. Only when the process is clear can we get the desired results
I think the most difficult part of making this is how to calculate the position of each picture to form a heart shape. But it doesn't matter. We don't calculate. After all, my mathematics is very poor. I use the local method to write its position directly. Although it's a little troublesome, it's flexible~
We all know excel. The tables in it are composed of cells. Please also imagine the above figure as a table, which is composed of many cells. The size of the cells is the size of the picture, and the border is removed. Then to make this heart shape, just add a single picture in the cell and make the shape of the heart. This is the overall idea. Next, use code to realize this idea
get ready
Let me first talk about the python libraries to be used in the production process. The tools must be done well first, otherwise we can do something better~
1. PIL: a library used to process pictures. It belongs to a third-party library and requires additional installation of pip install PIL
2. os: used to get pictures. python comes with it without additional installation
3. math: used to calculate the number of pictures. python comes with it without additional installation
Just have the above three libraries. Take the next code and start
code
1. Guide library
from PIL import Image
import os
import math
2. Make shape
We determine the position of the picture through a two-dimensional array. Each element is equivalent to a cell in excel: 1 represents blank and 0 represents the picture. See the love composed of 0? Here is pure hand play (so you can change freely and make the shape you want. This is the place of flexibility ~)
Because I have 500 pictures, I want to make them bigger and put more pictures, so there will be more elements. The following is the size of 21x21.
Remember: the number of 0 must be less than or equal to the number of your pictures, otherwise it will not be a complete love!
map = [
    [1, 1, 1, 1, 1, 1, 1, 1, 1, 1, 1, 1, 1, 1, 1, 1, 1, 1, 1, 1, 1],
    [1, 1, 1, 1, 1, 1, 1, 1, 1, 1, 1, 1, 1, 1, 1, 1, 1, 1, 1, 1, 1],
    [1, 1, 1, 1, 1, 0, 0, 0, 1, 1, 1, 1, 1, 0, 0, 0, 1, 1, 1, 1, 1],
    [1, 1, 1, 1, 0, 0, 0, 0, 0, 1, 1, 1, 0, 0, 0, 0, 0, 1, 1, 1, 1],
    [1, 1, 1, 0, 0, 0, 0, 0, 0, 0, 1, 0, 0, 0, 0, 0, 0, 0, 1, 1, 1],
    [1, 1, 0, 0, 0, 0, 0, 0, 0, 0, 0, 0, 0, 0, 0, 0, 0, 0, 0, 1, 1],
    [1, 1, 0, 0, 0, 0, 0, 0, 0, 0, 0, 0, 0, 0, 0, 0, 0, 0, 0, 1, 1],
    [1, 1, 1, 0, 0, 0, 0, 0, 0, 0, 0, 0, 0, 0, 0, 0, 0, 0, 1, 1, 1],
    [1, 1, 1, 1, 0, 0, 0, 0, 0, 0, 0, 0, 0, 0, 0, 0, 0, 1, 1, 1, 1],
    [1, 1, 1, 1, 1, 0, 0, 0, 0, 0, 0, 0, 0, 0, 0, 0, 1, 1, 1, 1, 1],
    [1, 1, 1, 1, 1, 1, 0, 0, 0, 0, 0, 0, 0, 0, 0, 1, 1, 1, 1, 1, 1],
    [1, 1, 1, 1, 1, 1, 1, 0, 0, 0, 0, 0, 0, 0, 1, 1, 1, 1, 1, 1, 1],
    [1, 1, 1, 1, 1, 1, 1, 1, 0, 0, 0, 0, 0, 1, 1, 1, 1, 1, 1, 1, 1],
    [1, 1, 1, 1, 1, 1, 1, 1, 1, 0, 0, 0, 1, 1, 1, 1, 1, 1, 1, 1, 1],
    [1, 1, 1, 1, 1, 1, 1, 1, 1, 1, 0, 1, 1, 1, 1, 1, 1, 1, 1, 1, 1],
    [1, 1, 1, 1, 1, 1, 1, 1, 1, 1, 1, 1, 1, 1, 1, 1, 1, 1, 1, 1, 1],
    [1, 1, 1, 1, 1, 1, 1, 1, 1, 1, 1, 1, 1, 1, 1, 1, 1, 1, 1, 1, 1],
]
3. Import picture
The location is determined and start to get all the pictures
# This is the path of my picture
img_dir = r"C:\Users\admin\Desktop\head portrait"
# Get all the files under this file. Do not put non picture files because other types of files are not filtered
# A list is returned
imgs = os.listdir(img_dir)
# Set the size of the picture. The size of all pictures should be uniform, organized and disciplined
img_h = img_w = 192
# Calculate the number of rows, that is, the number of sub lists
rows = len(map)
# Calculate the number of columns, that is, the number of elements in the sub list
columns = len(map[0])
Drawing
The next step is to prepare a white background as a canvas. With the number of rows, columns and the width and height of the picture, you can calculate the size of the whole canvas
# The first parameter follows
# The second parameter needs to pass in a tuple. The first parameter of the tuple is the width of the canvas and the second is the height
# The third parameter is the color of the canvas
# Create a canvas using the Image.new() method
figure = Image.new("RGB", (img_w*columns, img_h*rows),"white")
So far, the picture and canvas have been prepared. Now it is time to place the picture in the corresponding position of the canvas, that is, the position where the element in the array is 0
# Indicates the subscript of the picture
count = 0
# Traversal row
for i in range(len(map)):
    # Traverse all elements in each row
    for j in range(len(map[i])):
        # If the element is 1, ignore it
        if map[i][j] == 1:
            continue
        # If the element is non-1, that is, 0, put it on the picture
        else:
            # Do an exception handling to prevent some pictures from opening failure, resulting in program interruption
            try:
                # Use the Image.open("picture path") method to get the picture object
                image = Image.open(os.path.join(img_dir, imgs[count]))
            except:
                continue
            # Resize ((new width, new height)) is used to change the size of the picture and receive a tuple
            image = image.resize((img_w, img_h))
            # Paste the modified image onto the canvas
            # The first parameter is the picture object
            # The second parameter is the position of the picture on the canvas, which is equivalent to the position of the cell
            figure.paste(image, (img_w*j, img_h*i))
            # After using one picture, record it and start using the next picture
            count += 1

# When the cycle ends, it means that the heart-shaped photo has been completed
# Display the painted canvas for you to see
figure.show()
# If you are not satisfied, you can adjust the position of 0 in the two-dimensional array. If you are satisfied, you can save it locally for loading
# You need to tell the program the path to save the picture
figure.save('Heart shaped photo wall.png')
Here, the heart-shaped photo wall is made. If you have a girlfriend, you can use your girlfriend's photo with the background in red, and then send it to your girlfriend to see if you love you more. I don't know. You can also write an i love you ~ (as shown below). Unfortunately, I'm not. I'm so angry!