Manually deploy ob triple-copy cluster
1. IP Address and Machine Planning
Machine os:centos 7.5 8c12g
| IP Address | host name | Machine Role | Explain |
|---|---|---|---|
| 192.168.32.111 | obce01 | observer+obproxy | |
| 192.168.32.112 | obce02 | observer | |
| 192.168.32.113 | obce03 | observer+obproxy | |
| 192.168.32.114 | obce04 | observer | Add, Expand |
| 192.168.32.115 | obce05 | observer+obproxy | Add, Expand |
Note: The machine has only one disk and only demonstrates deploying observer on a single disk.
2. Initialize the machine
2.1 Modify Kernel Parameters
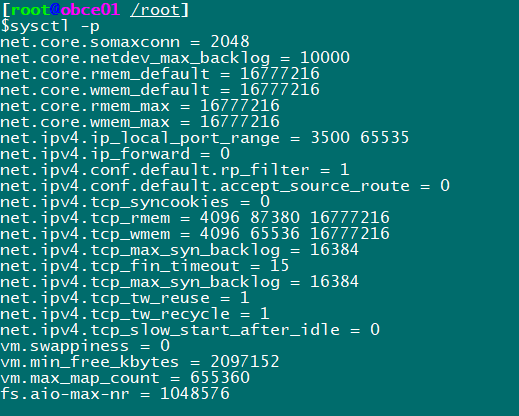
cat << EOF >> /etc/sysctl.conf

net.core.somaxconn = 2048
net.core.netdev_max_backlog = 10000
net.core.rmem_default = 16777216
net.core.wmem_default = 16777216
net.core.rmem_max = 16777216
net.core.wmem_max = 16777216

net.ipv4.ip_local_port_range = 3500 65535
net.ipv4.ip_forward = 0
net.ipv4.conf.default.rp_filter = 1
net.ipv4.conf.default.accept_source_route = 0
net.ipv4.tcp_syncookies = 0
net.ipv4.tcp_rmem = 4096 87380 16777216
net.ipv4.tcp_wmem = 4096 65536 16777216
net.ipv4.tcp_max_syn_backlog = 16384
net.ipv4.tcp_fin_timeout = 15
net.ipv4.tcp_max_syn_backlog = 16384
net.ipv4.tcp_tw_reuse = 1
net.ipv4.tcp_tw_recycle = 1
net.ipv4.tcp_slow_start_after_idle=0

vm.swappiness = 0
vm.min_free_kbytes = 2097152
vm.max_map_count=655360
fs.aio-max-nr=1048576
EOF
Then execute sysctl-p for the environment to take effect.
2.2 Modifying session variables
Set the maximum stack space size at session level to unlimited, the maximum number of file handles to 655350, and the Core file size to unlimited. Modify/etc/security/limits.conf configuration file, if the value already set is lower than this
/etc/security/limits.conf

cat << EOF >> /etc/security/limits.conf

* soft nofile 655360
* hard nofile 655360
* soft nproc 655360
* hard nproc 655360
* soft core unlimited
* hard core unlimited
* soft stack unlimited
* hard stack unlimited
EOF
2.3 Turn off firewalls and selinux
systemctl disable firewalld
systemctl stop firewalld
systemctl status firewalld

vi /etc/selinux/config

SELINUX=disabled

# Effective immediately
setenforce 0
# See
getenforce
2.4 Configure clock source
yum -y install chrony
Apply the configuration of the official document directly:
vi /etc/chrony.conf

# Server followed by time synchronization server
# Use pool. Ntp. Public servers in the org project. By server configuration, you can theoretically add as many servers as you want.
# Or use Ali Cloud's ntp server
# Please consider joining the pool (http://www.pool.ntp.org/join.html).
server ntp.cloud.aliyuncs.com minpoll 4 maxpoll 10 iburst
server ntp.aliyun.com minpoll 4 maxpoll 10 iburst
server ntp1.aliyun.com minpoll 4 maxpoll 10 iburst
server ntp1.cloud.aliyuncs.com minpoll 4 maxpoll 10 iburst
server ntp10.cloud.aliyuncs.com minpoll 4 maxpoll 10 iburst

# If you are in a test environment and do not have time to synchronize the server, select one that is configured as a time synchronization server.
# If native is selected, uncomment server below
#server 127.127.1.0

# Calculates the ratio of server increment to decrement based on actual time, and then records it to a file to make the best time compensation adjustment for the system after system restart.
driftfile /var/lib/chrony/drift

# chronyd slows down or accelerates time adjustments to meet demand.
# In some cases, the system clock may drift too fast, causing the time adjustment to take too long.
# This directive forces the chronyd adjustment period to step the system clock when it is greater than a threshold.
# Effective only if there are no more clock updates because the chronyd start time exceeds the specified limit (limit can be disabled using a negative value).
makestep 1.0 3

# A kernel mode is enabled in which system time is copied to the real-time clock (RTC) every 11 minutes.
rtcsync

# Enable hardware timestamping on all interfaces that support it.
# Enable hardware timestamps by using the hwtimestamp directive
#hwtimestamp eth0
#hwtimestamp eth1
#hwtimestamp *

# Increase the minimum number of selectable sources required to adjust
# the system clock.
#minsources 2

# Specify a host, subnet, or network to allow or deny NTP connections to machines acting as clock servers
#allow 192.168.0.0/16
#deny 192.168/16

# Service time even if not synchronized to a time source
local stratum 10

# Specifies the file that contains the NTP authentication key.
#keyfile /etc/chrony.keys

# Specify the directory for the log files.
logdir /var/log/chrony

# Select which information is logged.
#log measurements statistics tracking
Start Services
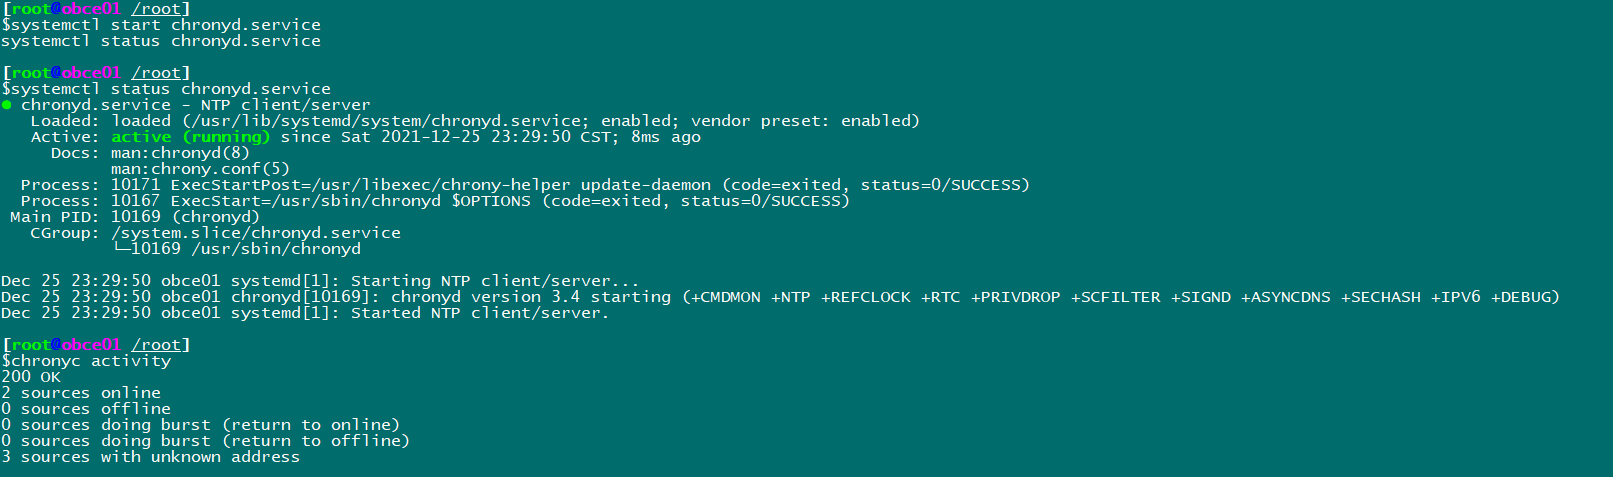
systemctl start chronyd.service
systemctl status chronyd.service
View time information
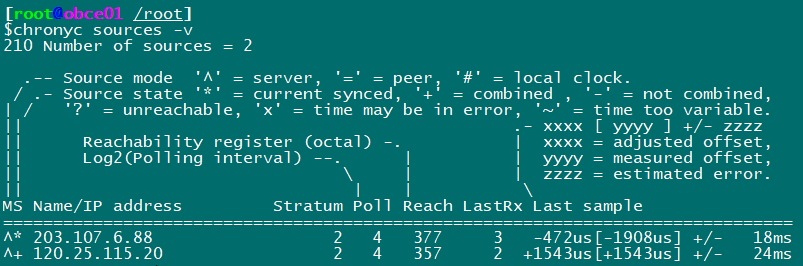
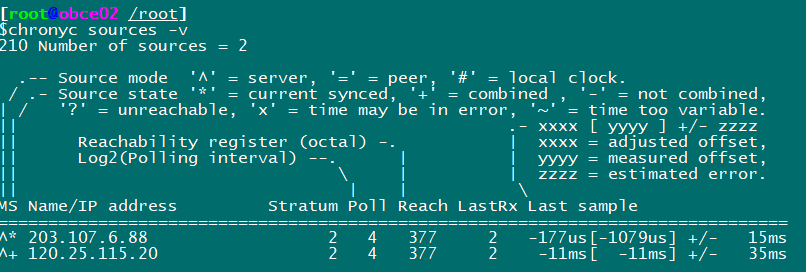
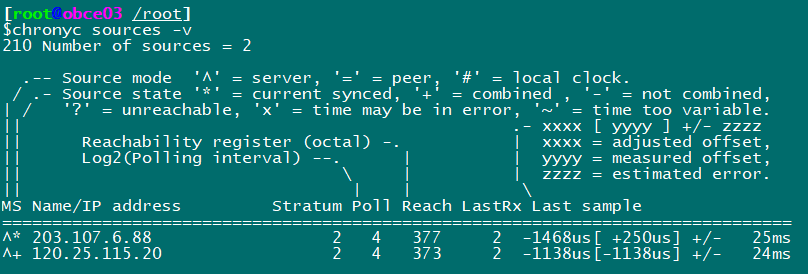
View time synchronization activities
chronyc activity

View Time Server
chronyc sources

View Synchronization Status
chronyc sources -v

Calibration time server:
chronyc tracking
Configured with time zone
timedatectl set-timezone Asia/Shanghai

chronyc -a makestep
2.5 Create users and initialize directories
Note configuring admin user sudo permissions
groupadd -g 500 admin
useradd -g 500 -u 500 admin
echo 'admin:admin' | chpasswd
sudo vi /etc/sudoers
# Add a new line
admin   ALL=(ALL)       ALL

mkdir /data
mkdir /redo
chown -R admin:admin /data
chown -R admin:admin /redo
su - admin
mkdir -p /home/admin/oceanbase/store/obcluster  /data/obcluster/{sstable,etc3} /redo/obcluster/{clog,ilog,slog,etc2}
for f in {clog,ilog,slog,etc2}; do ln -s /redo/obcluster/$f /home/admin/oceanbase/store/obcluster/$f ; done
for f in {sstable,etc3}; do ln -s /data/obcluster/$f /home/admin/oceanbase/store/obcluster/$f; done
3. Install observer
Download the rpm package and upload the installation (find download link from the official website)
yum install lrzsz -y
rpm -ivh oceanbase-ce-libs-3.1.1-4.el7.x86_64.rpm
rpm -ivh oceanbase-ce-3.1.1-4.el7.x86_64.rpm

su - admin
echo 'export LD_LIBRARY_PATH=$LD_LIBRARY_PATH:/home/admin/oceanbase/lib' >> ~/.bash_profile
. ~/.bash_profile

# Note: The name of the zone changes depending on the machine. Here is the start command for zone 1
cd /home/admin/oceanbase && bin/observer -i ens33 -p 2881 -P 2882 -z zone1 -d /home/admin/oceanbase/store/obcluster -r '192.168.32.111:2882:2881;192.168.32.112:2882:2881;192.168.32.113:2882:2881' -c 16384 -n obcluster -o "memory_limit=8G,cache_wash_threshold=1G,__min_full_resource_pool_memory=268435456,system_memory=3G,memory_chunk_cache_size=128M,cpu_count=16,net_thread_count=8,datafile_size=10G,stack_size=1536K,config_additional_dir=/data/obcluster/etc3;/redo/obcluster/etc2" -d /home/admin/oceanbase/store/obcluster
After startup, ps-ef| grep observer checks if the process is running properly and uses netstat-ntlp to check port opening
Interestingly, you can check the log to see what the observer did during the initialization boot process.
cd /home/admin/oceanbase/log
tail -f observer.log
# View logs above warning level
tail -n 20 observer.log.wf
Install obclient
Installation packages are downloaded from the official website and uploaded to the machine.
rpm -ivh libobclient-2.0.0-2.el7.x86_64.rpm
rpm -ivh obclient-2.0.0-2.el7.x86_64.rpm
4. cluster initialization (bootstrap)
If there is no password on the newly deployed machine, enter the password directly or remove the -p parameter
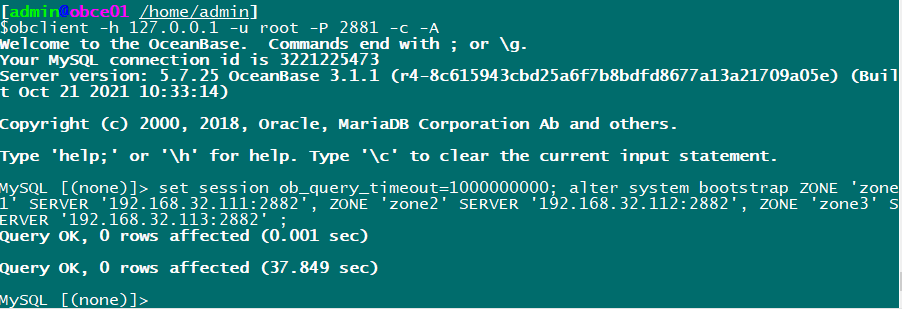
obclient -h 127.0.0.1 -u root -P 2881 -p -c -A

set session ob_query_timeout=1000000000; alter system bootstrap ZONE 'zone1' SERVER '192.168.32.111:2882', ZONE 'zone2' SERVER '192.168.32.112:2882', ZONE 'zone3' SERVER '192.168.32.113:2882' ;
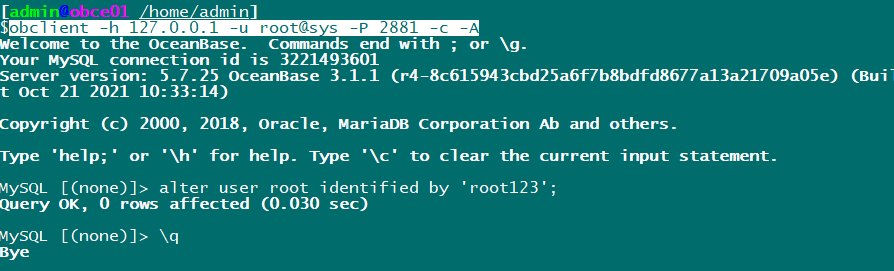
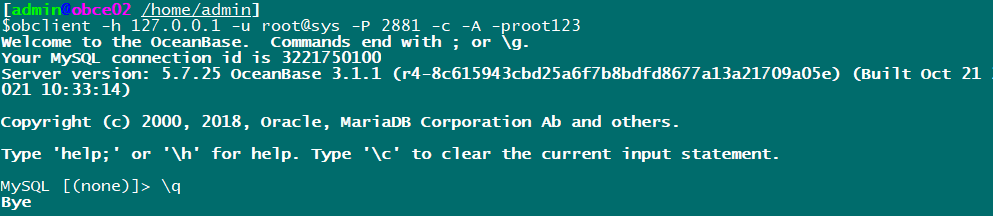
Use root@sys The user logs in to the database and sets the password:
obclient -h 127.0.0.1 -u root@sys -P 2881 -c -A
alter user root identified by 'root123';
Test on other machines:
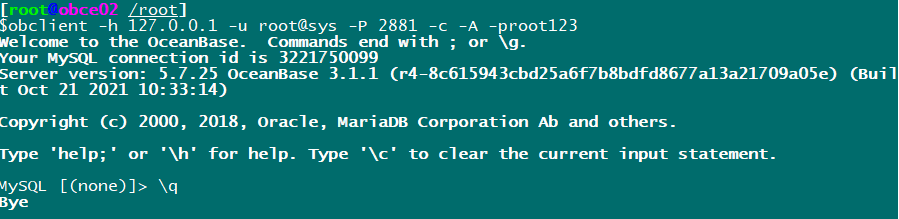
The test was successful.
5. Deploy obproxy (single node example)
Download and install the obproxy package from the official website
rpm -ivh obproxy-3.2.0-1.el7.x86_64.rpm
Start obproxy
cd /home/admin/obproxy-3.2.0 && bin/obproxy -r "192.168.32.111:2881;192.168.32.112:2881;192.168.32.113:2881" -p 2883 -o "enable_strict_kernel_release=false,enable_cluster_checkout=false,enable_metadb_used=false" -c obcluster

Trying to connect, classic error occurred again:
(Official documentation explains, here only simulated problems)
ERROR 2013 (HY000): Lost connection to MySQL server at 'reading authorization packet', system error: 11

Port 2881 is now available:
The problem is the communication between obproxy and observer.
Settings required root@proxysys Password.
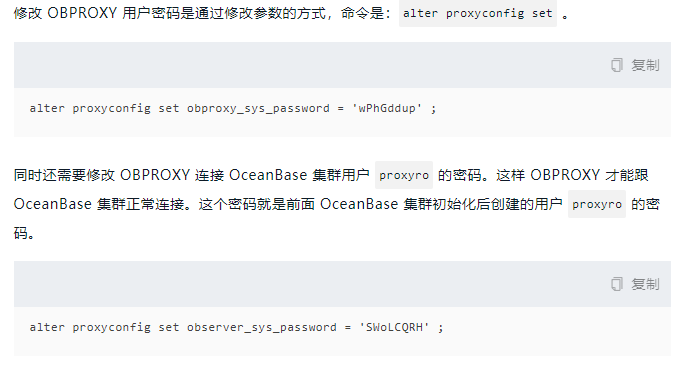
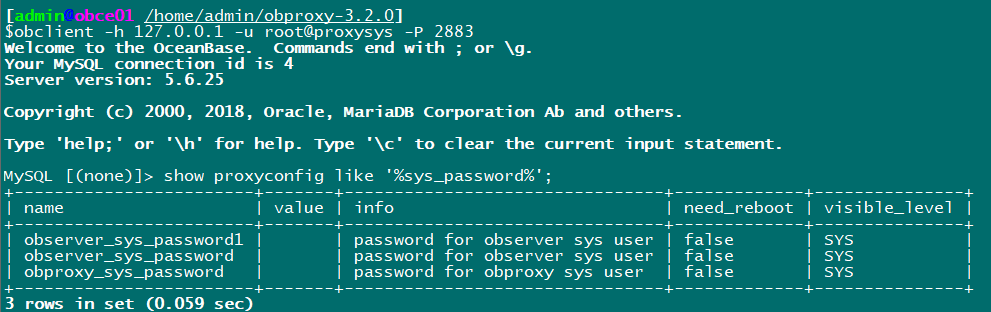
obclient -h 127.0.0.1 -u root@proxysys -P 2883
# Set root user password for admin obproxy
alter proxyconfig set obproxy_sys_password = 'root123' ;
# Set the password of the user connected to the observer
alter proxyconfig set observer_sys_password = 'root123' ;
After setting, you also need to change the password of the proxyro user in the observer.
Log in to the observer to view users
obclient -h 127.0.0.1 -u root@sys -P 2881 -c -A -proot123 -Doceanbase
select user_id,user_name from __all_user;
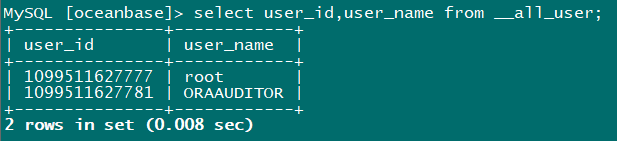
This user is not found and needs to be created and authorized (read-only user, select):
create user proxyro identified by 'root123';
grant select on *.* to proxyro;
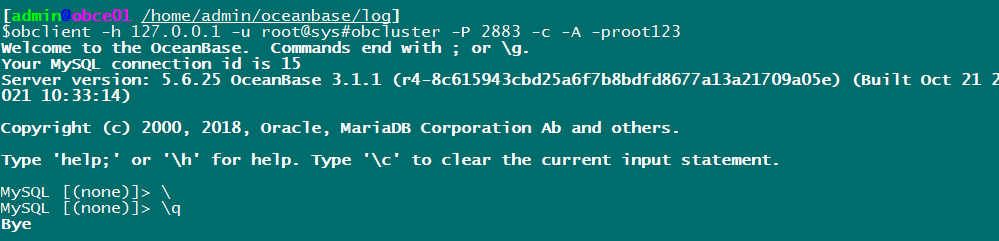
Test again and find that you can connect!
End of this article.
An expanded article is planned later.