In an article CentOS7 installation of MySQL (full version) , explain the process of offline installation of mysql database. This article will explain the master-slave configuration method of mysql database. After the master-slave configuration of mysql database, the backup of database and the separation of read and write can be realized, so as to improve the concurrency of applications.
1. Master-slave principle
There are three steps to explain the master-slave principle in high performance mysql:
- Data changes are recorded in the Binary Log on the master database. These records are called Binary Log events.
- The slave library copies the logs on the master library to its own Relay Log through the IO thread.
- Read the events in the relay log from the library through SQL thread and put them back on their own data.
The schematic diagram is:

2. Master slave configuration
The demonstration environment is as follows:
| name | IP |
|---|---|
| MSYQL master (master library) | 192.168.197.135 |
| MySQL slave (slave Library) | 192.168.197.136 |
First, install the mysql database on the two servers. Refer to the installation method CentOS7 installation of MySQL (full version)
(1) . configure main library
-
Modify my CNF file, add the following content in [mysqld]:
- vi /etc/my.cnf
-
# Unique number of the service
server-id = 1

# open mysql binlog function
log-bin = mysql-bin

# binlog The method of recording the content, recording each line operated
binlog_format = ROW

# Reduce the content of the log and record only the affected columns
binlog_row_image = minimal

# Specify the name of the database to be replicated jgyw
binlog-do-db = jgyw
-
Modify the configuration file and restart the mysql service
service mysqld restart
-
Create an account to synchronize data from the library
mysql> grant replication slave on *.* to 'jgyw'@'192.168.197.136' identified by 'jgyw@123';
mysql> flush privileges;
Note: the above two commands are executed on the mysql terminal.
-
To view the status of the main library:
Terminal execution of mysql:
mysql> show master status\G;The returned information is:
*************************** 1. row ***************************
             File: mysql-bin.000002
         Position: 2380
     Binlog_Do_DB: jgyw
 Binlog_Ignore_DB:
Executed_Gtid_Set:
1 row in set (0.00 sec)
(2) Configure slave Library
-
Modify my CNF file, add the following content in [mysqld]:
# Unique number of the service
server-id = 2

# open mysql binlog function
log-bin = mysql-bin

# binlog The method of recording the content, recording each line operated
binlog_format = ROW

# Reduce the content of the log and record only the affected columns
binlog_row_image = minimal

# Specify the name of the database to be replicated jgyw
replicate-do-db = jgyw
-
Modify the configuration file and restart the mysql service
service mysqld restart
-
Execute synchronization command
Terminal execution of mysql:
# Set the master server ip, synchronization account, password and synchronization location
mysql> change master to master_host='192.168.197.135',master_user='jgyw',master_password='jgyw@123',master_log_file='mysql-bin.000002',master_log_pos=2380;

# Turn on the synchronization function
mysql> start slave;
-
View the status of the slave library
Terminal execution of mysql:
mysql> show slave status\G;The returned information is:
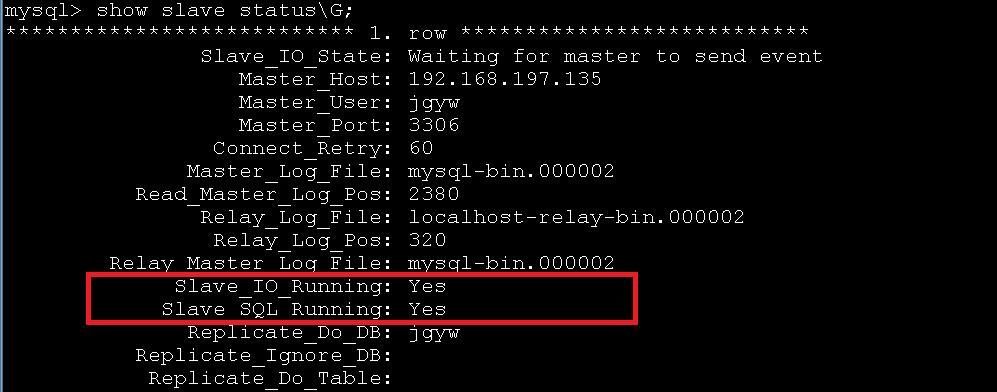
Note: Slave_IO_Running and slave_ SQL_ When the running status is Yes, the slave library configuration is successful.
3. Testing
(1) . create jgyw mode on the main library, i.e.:
mysql> create schema jgyw;
(2) . create the comm_config table in the jgyw mode on the main database, that is:
mysql> use jgyw;
mysql> CREATE TABLE comm_config (configId varchar(200) NOT NULL ,configValue varchar(1024) DEFAULT NULL ,description varchar(2000) DEFAULT NULL ,PRIMARY KEY (configId)) ENGINE=InnoDB DEFAULT CHARSET=utf8 ;
(3) . insert a record into the comm_config table on the main database, that is:
mysql> insert into comm_config(configId, configValue, description) values('name', 'Architecture and me', 'Test it');
(4) . view the mode from the library, i.e.:
mysql> show schemas;
The result is:
+--------------------+
| Database           |
+--------------------+
| information_schema |
| jgyw               |
| mysql              |
| performance_schema |
| sys                |
+--------------------+
5 rows in set (0.00 sec)
Description jgyw mode is synchronized to slave library
(5) . the tables and data in the view jgyw mode from the database, i.e.:
mysql> use jgyw;
mysql> show tables;
The result is:
+----------------+
| Tables_in_jgyw |
+----------------+
| comm_config    |
+----------------+
1 row in set (0.00 sec)
After the description table is synchronized, view the data, that is:
mysql> select * from comm_config;
The result is:
+----------+--------------+--------------+
| configId | configValue  | description  |
+----------+--------------+--------------+
| name     | Architecture and me     | Test it     |
+----------+--------------+--------------+
1 row in set (0.00 sec)
It means that the data has also been synchronized.
Reprinted from: https://www.cnblogs.com/atcloud/p/10773855.html