1. Master slave replication
1.1 INTRODUCTION
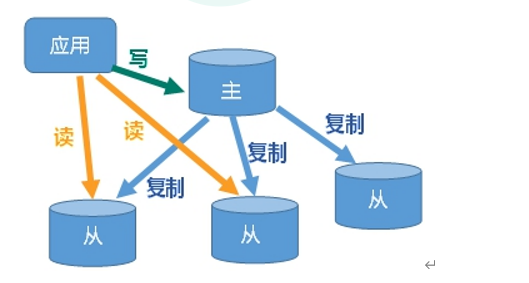
What is master-slave replication?
- After the host data is updated, it is automatically synchronized to the Master / Slave mechanism of the standby machine according to the configuration and policy. The Master is mainly write and the Slave is mainly read.
purpose
-
Read write separation, performance expansion
-
Disaster recovery and rapid recovery
1.2. Build one master and two slaves
-
Create / myredis folder
-
Copy redis Conf configuration file to folder
-
Configure one master and two slaves, and create three configuration files
- redis6379.conf
- redis6380.conf
- redis6381.conf
-
Write content in three configuration files
include /myredis/redis.conf
pidfile /var/run/redis6379.conf
port 6379
dbfilename dump6379.rdb
-
Start three redis services
-
View current host health
-
Host ip port number for slaveof on host
-
# 1. Create / myredis folder
 mkdir /myredis


# 2. Copy redis Conf configuration file to folder

 cp /etc/redis.conf /myredis/redis.conf


# 3. Configure one master and two slaves, and create three configuration files
# Configuration content
include /myredis/redis.conf
pidfile /var/run/redis6379.conf
port 6379
dbfilename dump6379.rdb


# 5. Start three redis services
redis-server /myredis/redis6379.conf
redis-server /myredis/redis6380.conf
redis-server /myredis/redis6381.conf


# View host operation
info replication


# Establish master-slave relationship
slaveof 127.0.0.1 6379
- The built one master and two slaves. If the host performs a write operation, the slave can read the corresponding content. However, the slave cannot write.
1.3. One master and two servants
Relevant characteristics
-
If the slave starts again after the slave goes down, the slave starts as the master. We need to manually restore the identity of the slave. After recovery, if the host changes the contents of the database during downtime, the opportunity to recover the data from scratch.
-
If the host goes down, the slave remains the slave. If the host restarts, it starts as the original host.
1.4 replication principle
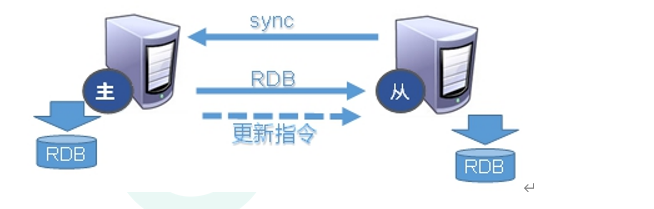
1. Actively initiate synchronization when the slave connects to the host
- After the slave connects to the master server, the slave server sends a data synchronization message to the master server.
- The master server connects to the synchronization message sent from the server, persists the master server data to the rdb file, sends the rdb file to the slave server, and gets the rdb file from the server for reading.
2. Host initiated synchronization
- Each time the master server performs a write operation, it synchronizes data with the slave server.
3. Related replication types
- Full copy: after receiving the database file data, the slave service saves it and loads it into memory.
- Incremental replication: the Master continues to transmit all new collected modification commands to the slave in turn to complete the synchronization
1.5 passing on from generation to generation
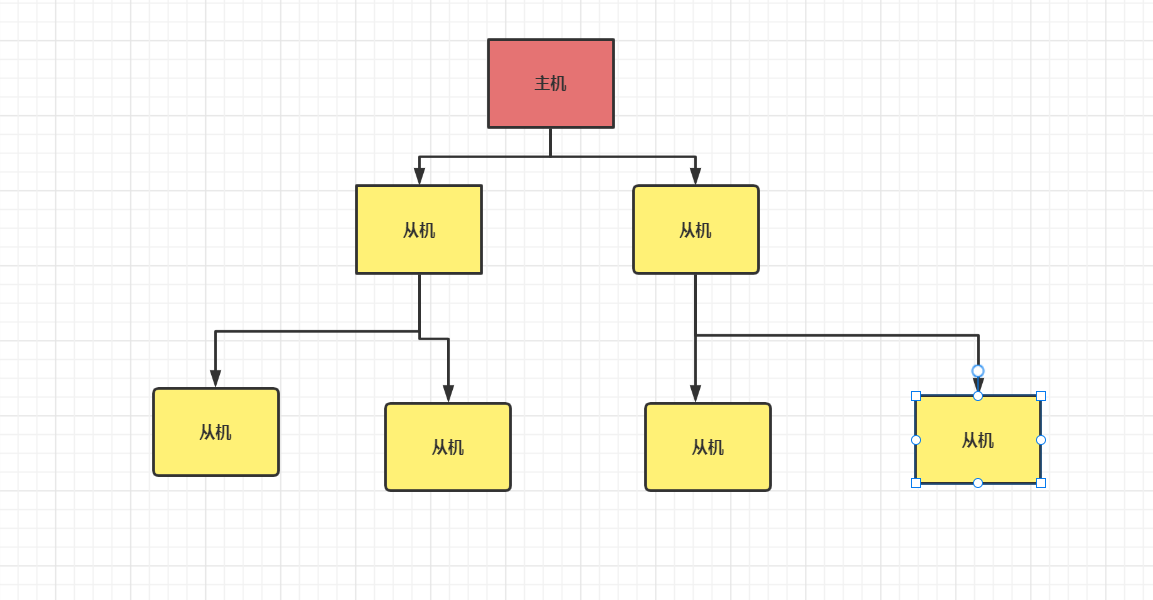
- If a host corresponds to multiple slaves, it will be very difficult for the host to manage. Then, one way is that the host manages one or two slaves, and then other slaves are managed as slaves of the two hosts. If the host changes the database content, its slave and the slave of the slave can read the corresponding data. Well, this is the tradition.
- If the host goes down, other slaves will still run as slaves. After the host is restarted, they will still run as hosts. Just can't write data.
- Change in the middle: the previous data will be cleared and the latest copy will be re established. The risk is that once a slave goes down, the subsequent slave cannot be backed up
1.6. Focus on anti guest
- If the host machine goes down, we can slaveof no one to make the slave machine reverse the guest, and the slave behind it should not be modified. But this must be done manually.
1.7 sentinel mode
1.7. 1. What is sentinel mode?
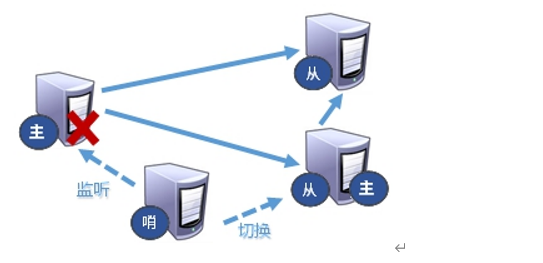
- The anti guest based automatic version can monitor whether the host fails in the background. If it fails, it will automatically convert from the library to the main library according to the number of votes
1.7. 2. Configure sentinel mode
- Adjust to one master and two servants mode
- Create a new sentinel in the customized / myredis directory Conf file, the name must not be wrong.
- Configure sentinels and fill in the contents
# Where mymaster is the server name of the monitoring object, and 1 is the number of sentinels when the migration occurs only when at least how many sentinels agree to the migration.
sentinel monitor mymaster 127.0.0.1 6379 1
- Start the sentry
# Start the sentry
redis-sentinel  /myredis/sentinel.conf

# The default boot port number is 26379
- When the host hangs up, a new host is generated from the slave election.
- Replication delay: since all write operations are performed on the Master first and then synchronously updated to the Slave, there is a certain delay in synchronizing from the Master to the Slave machine. When the system is very busy, the delay problem will become more serious, and the increase in the number of Slave machines will also make this problem more serious.
1.7. 3. Fault recovery
- When the host goes down, the selection criteria for a new host are
- Select the one with the highest priority. The priority is redis Conf defaults to replica priority 100. The smaller the value, the higher the priority.
- Select the with the largest offset. Offset refers to the most complete data obtained from the original host.
- Select the slave service with the smallest runid After each redis instance is started, a 40 bit runid will be randomly generated.
- When the new master server is selected, sentinel will send the slave service command of slave of the original master service to copy the new master.
- When the offline service goes online again, sentinel will send the slave command to it to become the slave of the new master.
1.8 master slave replication configuration in Java development
The main reason is that the configuration of the connection pool has changed
private static JedisSentinelPool jedisSentinelPool=null;

public static  Jedis getJedisFromSentinel(){
	if(jedisSentinelPool==null){
        Set<String> sentinelSet=new HashSet<>();
        sentinelSet.add("192.168.11.103:26379");

        JedisPoolConfig jedisPoolConfig =new JedisPoolConfig();
        jedisPoolConfig.setMaxTotal(10); //Maximum number of available connections
		jedisPoolConfig.setMaxIdle(5); //Maximum idle connections
		jedisPoolConfig.setMinIdle(5); //Minimum number of idle connections
		jedisPoolConfig.setBlockWhenExhausted(true); //Connection exhausted wait
		jedisPoolConfig.setMaxWaitMillis(2000); //waiting time
		jedisPoolConfig.setTestOnBorrow(true); //Test the connection ping pong

		jedisSentinelPool=new JedisSentinelPool("mymaster",sentinelSet,jedisPoolConfig);
		return jedisSentinelPool.getResource();
   }else{
		return jedisSentinelPool.getResource();
   }
}
2. Cluster
2.1 problems faced
-
How can redis expand if the capacity is insufficient?
-
How does redis allocate concurrent write operations?
-
Solution: no centralized cluster configuration.
2.2. What is a cluster?
-
The Redis cluster realizes the horizontal expansion of Redis, that is, start n Redis nodes, distribute and store the whole database in these n nodes, and each node stores 1/N of the total data.
-
Redis cluster provides a certain degree of availability through partition: even if some nodes in the cluster fail or cannot communicate, the cluster can continue to process command requests.
2.3 steps of cluster construction
1. redis6379.conf configuration information
include /home/bigdata/redis.conf
port 6379
pidfile "/var/run/redis_6379.pid"
dbfilename "dump6379.rdb"
cluster-enabled yes    #Open cluster mode
cluster-config-file nodes-6379.conf  #Set node profile name
cluster-node-timeout 15000   #Set the node loss time. After that time (MS), the cluster will automatically switch between master and slave.
2. Copy multiple copies of the above configuration files
- redis6380.conf
- redis6381.conf
- redis6389.conf
- redis6390.conf
- redis6391.conf
3. Use find replace to modify another 5 files
# for example
%s/6379/6380
4. Start six redis services respectively
5. Combine six nodes into a cluster
- Before combining, make sure that after all redis instances are started, nodes XXXX Conf files are generated normally.
- Before merging, you need to switch to / opt / redis-6.2 1 / SRC, and then execute the following command
redis-cli --cluster create --cluster-replicas 1 192.168.123.129:6379 192.168.123.129:6380 192.168.123.129:6381
192.168.123.129:6389 192.168.123.129:6390 192.168.123.129:6391
Special note
- Do not use 127.0 here 0.1, please use the real IP address
- --replicas 1 configures the cluster in the simplest way, one host and one slave, with exactly three groups.
6. Connection mode
- Common mode connection
redis-cli -p 6379
- -c connect with cluster policy, and the setting data will be automatically switched to the corresponding write host.
redis-cli -c -p 6379
7. View cluster information
View command
cluster nodes
View results
6019df2006afe1f05319c77560ff0c5da57003b4 192.168.123.129:6381@16381 master - 0 1639140826000 3 connected 10923-16383
185b8d4e5cffdda4589e53b4ef25cc6dabfd2eee 192.168.123.129:6389@16389 slave bf3d815ea4343d1edbe2531309e89ffb336aa4d3 0 1639140826372 1 connected
bf3d815ea4343d1edbe2531309e89ffb336aa4d3 192.168.123.129:6379@16379 myself,master - 0 1639140820000 1 connected 0-5460
3ac702d1d41273475444e83ab82cdbb3033cbd84 192.168.123.129:6391@16391 slave 6019df2006afe1f05319c77560ff0c5da57003b4 0 1639140825364 3 connected
819200fa1a92f6199fddca92c034bad1f4bc4be2 192.168.123.129:6390@16390 slave 2b68d1fec5abe9832c371dca7a16444f485ab4c9 0 1639140824357 2 connected
2b68d1fec5abe9832c371dca7a16444f485ab4c9 192.168.123.129:6380@16380 master - 0 1639140824000 2 connected 5461-10922
2.4 cluster operation
1. What are slots?
-
A Redis cluster contains 16384 hash slot s, and each key in the database belongs to one of these 16384 slots
-
The cluster uses the formula CRC16(key)% 16384 to calculate which slot the key belongs to. The CRC16(key) statement is used to calculate the CRC16 checksum of the key.
-
Each node in the cluster is responsible for processing a portion of the slots. For example, if a cluster can have a master node, where:
- Node A handles slots 0 through 5460.
- Node B handles slots 5461 to 10922.
- Node C handles slots 10923 to 16383.
2. Enter values in the cluster
# When adding a single value to it, it will calculate its slot value, and then switch to the corresponding server to add
127.0.0.1:6379> set k1 v1
-> Redirected to slot [12706] located at 192.168.123.129:6381
OK


# When adding multiple values to it, it will calculate its slot value according to its group name, and then switch to the corresponding server to add
192.168.123.129:6381> mset name{user} lucy age{user} 20
-> Redirected to slot [5474] located at 192.168.123.129:6380
OK
3. Query the values in the cluster
# Calculate the value corresponding to the slot corresponding to the key
192.168.123.129:6380> cluster keyslot cust
(integer) 4847


# Returns the number of keys in the corresponding slot
127.0.0.1:6379> cluster countkeysinslot 449
(integer) 1


# Returns the key in the count slot
cluster getkeysinslot <slot>  <count>
2.5 fault recovery
1. Only the host is down
- If the host goes down, the slave will relay up as the host; When the original master is started again, it will act as a slave of the master on the relay.
2. The master and slave are down together
- If the master and slave of a slot hang up and the cluster require full coverage is yes, then the whole cluster hangs up
- If the master and slave of a slot hang up and the cluster require full coverage is no, the data of the slot cannot be used or stored.
- redis. Parameter cluster require full coverage in conf
2.6. redis cluster development in java
- Even if the host is not connected, the cluster will automatically switch the host storage. Host write, slave read.
- No centralized master-slave cluster. Data written from any host can be read from other hosts.
public class JedisClusterTest {
  public static void main(String[] args) {
     HostAndPort hostAndPort =new HostAndPort("192.168.123.129",6379);
     JedisCluster jedisCluster=new JedisCluster(hostAndPort);
     jedisCluster.set("k1", "v1");
     System.out.println(jedisCluster.get("k1"));
  }
}
2.7 advantages
- Realize capacity expansion
- Sharing pressure
- The centerless configuration is relatively simple
2.8 disadvantages
- Multi key operations are not supported
- Multi key Redis transactions are not supported.
- lua script is not supported
- Due to the late emergence of the cluster scheme, many companies have adopted other cluster schemes, while the proxy or client fragmentation scheme needs overall migration rather than gradual transition to redis cluster, which is more complex.
3. Application problem solving
3.1 cache penetration
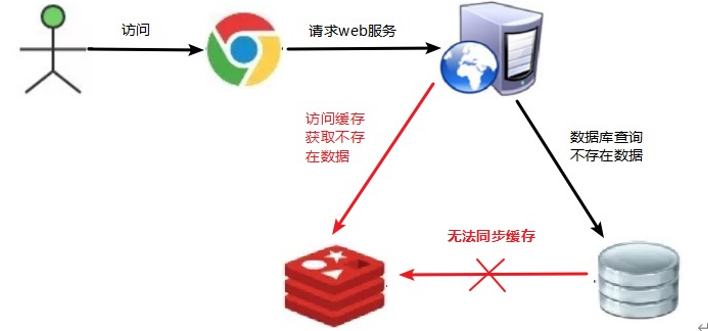
1. Introduction
- The data corresponding to the key does not exist in the data source. Every time a request for this key cannot be obtained from the cache, the request will be pressed to the data source, which may crush the data source.
- For example, a nonexistent user id is used to obtain user information, and neither the cache nor the database is available. If hackers exploit this vulnerability, they may crush the database
-
The pressure on the application server has increased.
-
redis hit rate decreases.
-
The database is always queried, and the data does not exist in the database. This results in cache penetration.
2. Solutions
- Cache null values: if the data returned by a query is null (whether the data does not exist or not), we still cache the null result. Set the expiration time of the null result to be very short, no more than five minutes
- Set the accessible list (white list): use the bitmaps type to define an accessible list. The list id is used as the offset of bitmaps. Each access is compared with the id in bitmaps. If the access id is not in bitmaps, it is intercepted and access is not allowed.
- Using Bloom Filter: (Bloom Filter was proposed by bloom in 1970. It is actually a long binary vector (bitmap) and a series of random mapping functions (hash function). Bloom Filter can be used to retrieve whether an element is in a collection. Its advantage is that its spatial efficiency and query time are far higher than those of general algorithms. Its disadvantage is that it has a certain false recognition rate and deletion difficulties. Hash all possible data into a large enough bitmap, and a data that must not exist will be intercepted by this bitmap So as to avoid the query pressure on the underlying storage system.
- Real time monitoring: when Redis's hit rate starts to decrease rapidly, it is necessary to check the access objects and data, and cooperate with the operation and maintenance personnel to set the blacklist restriction service
3.2 buffer breakdown
1. Introduction
- The data corresponding to a hot key exists, but it expires in redis. At this time, if a large number of concurrent requests come, if these requests find that the cache expires, they will generally load data from the back-end DB and set it back to the cache. At this time, large concurrent requests may instantly crush the back-end DB.
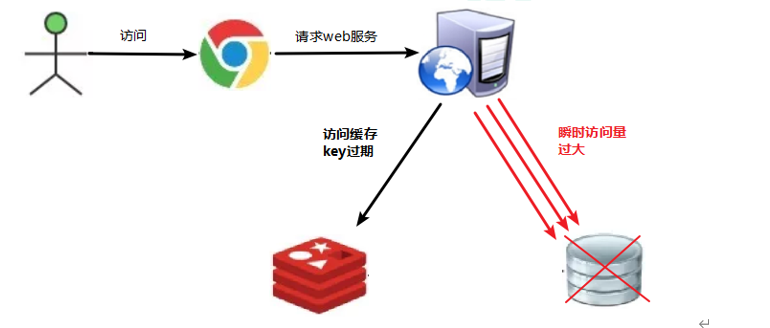
- A hotspot key in redis has expired, but the data corresponding to the hotspot key exists in the database. This key is used for a large number of accesses. This leads to an increase in database access.
2. Solutions
-
Preset popular data: store some popular data in redis in advance before the peak visit of redis, and increase the duration of these popular data key s.
-
Real time adjustment: monitor the popular data on site and adjust the expiration time of the key in real time
-
Using lock: low efficiency.
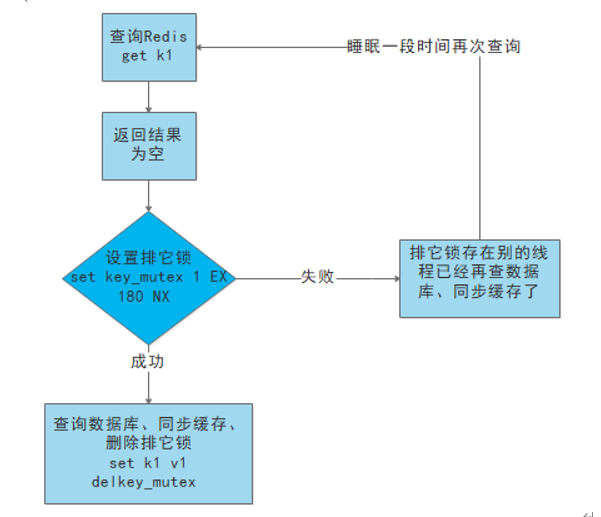
1. That is, when the cache fails (it is judged that the value is empty), it is not immediately load db.
2. First, use some operations of the caching tool with the return value of successful operations (such as Redis of SETNX)go set One mutex key.
3. When the operation returns success, proceed again load db And reset the cache,Last delete mutex key;
4. When the operation returns failure, it proves that a thread is running load db,The current thread sleeps for a period of time and then retries the whole process get Cache method.
3.3 cache avalanche
1. Introduction
- A large number of data corresponding to key s exist, but they expire centrally in redis. At this time, if a large number of concurrent requests come, if these requests find that the cache expires, they will generally load data from the back-end dB and set it back to the cache. At this time, large concurrent requests may crush the back-end DB instantly.
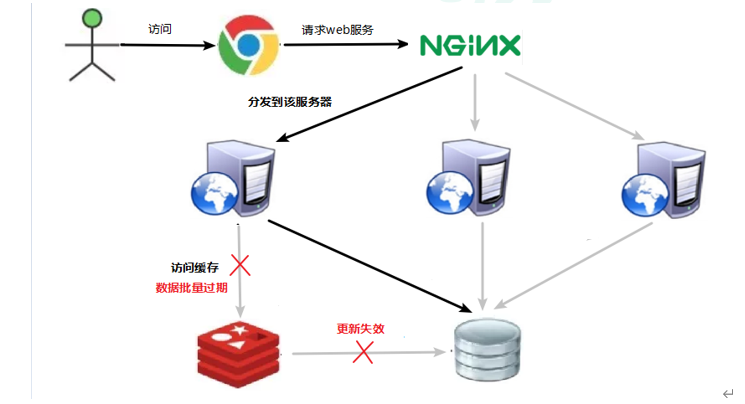
- Query the centralized expiration of a large number of key s in a very small period of time
2. Solutions
- Build a multi-level cache architecture: nginx cache + redis cache + other caches (ehcache, etc.)
- Use lock or queue: lock or queue is used to ensure that a large number of threads will not read and write to the database at one time, so as to avoid a large number of concurrent requests falling on the underlying storage system in case of failure. Not applicable to high concurrency
- Set the expiration flag to update the cache: record whether the cache data expires (set the advance amount). If it expires, it will trigger another thread to update the cache of the actual key in the background.
- Disperse the cache expiration time: for example, we can add a random value based on the original expiration time, such as 1-5 minutes random, so that the repetition rate of each cache expiration time will be reduced, and it is difficult to cause collective failure events.
3.4 distributed lock
1. What is a distributed lock?
- After the system deployed by the original single machine is evolved into a distributed cluster system, because the distributed system is multi-threaded, multi process and distributed on different machines, this will invalidate the concurrency control lock strategy under the original single machine deployment. The simple Java API can not provide the ability of distributed lock. Then distributed locks were born.
2. Implementation scheme of distributed lock
-
Implementation of distributed lock based on Database
-
Cache based (Redis, etc.)
-
Based on Zookeeper
Each distributed lock solution has its own advantages and disadvantages:
-
Performance: redis is the highest
-
Reliability: zookeeper highest
3. How does redis implement distributed locks?
- Use setnx to lock and del to release the lock.
setnx users 20

del users
- The lock has not been released. Set the key expiration time to release automatically.
setnx users 10 # Lock

expire users 10 # Set key expiration time to release automatically
- If an exception occurs suddenly after locking, the expiration time cannot be set. But because the process we set up above is not atomic.
# You can set the expiration time when locking

set users 10 nx ex 12