Because the erasure effect was needed in previous projects, I didn't know what technology to use at that time, so I cracked other people's games and found a library: Clipper. As a result, we really found the c# library written by the original author on github. The original author actually wrote an mfc exe running file, so we only need the original library file. As for how to run, the original mfc project is vs project. Here is the address of the original project: Clipper download | SourceForge.net
You can use vs to open the source project and run it. You can see how the code is implemented. Briefly talk about its principle. In terms of the principle of aggregation, you can find the difference set of two sets.
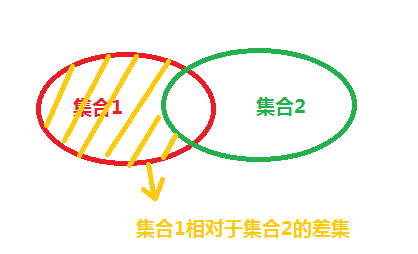
It is a set obtained from set 1-set 2. Therefore, we need to apply the set to the program, especially to the game. In unity, we know that a map may be irregular and the coordinates of the map are floating-point. The principle of this library is to enlarge all points on the map by 100 times, and then take all vertices as integers. In this way, the accuracy will not be greatly lost, and it is also more convenient to calculate. So when used in unity, we need to put every coordinate passed in N times, and then reduce the calculated result n times. Finally, the new map is rendered. Therefore, the library for effect erasure, the knowledge of mesh rendering used in rendering and the knowledge of mesh rendering have been mentioned in my previous blog. Let's look at the renderings first
This is the main effect. First, render the map during Awake. First define the size of the map as 10X10
Define four vertices: (0, -5 * Scale), (5 * Scale, -5 * Scale), (5 * Scale, 5 * Scale), (0, 5 * Scale). Here, the coordinates are multiplied by a coefficient, which will be divided by this coefficient at the end of the drawing.
private GameObject GeneratorBody(string bodyName,Polygon points)
{
        GameObject obj = new GameObject(bodyName);
        obj.transform.position = Vector3.zero;

        Mesh mesh = new Mesh();
        obj.AddComponent<MeshRenderer>();
        var mf = obj.AddComponent<MeshFilter>();

        List<Vector3> verticles = new List<Vector3>();
        List<Vector2> tempVerticles = new List<Vector2>();
        for (int i = 0; i < points.Count; i++)
        {
            tempVerticles.Add(new Vector2(points[i].X / FloatScale, points[i].Y / FloatScale));
            verticles.Add(new Vector3(points[i].X / FloatScale, points[i].Y / FloatScale, 0f));
        }

        var list = Triangulate.Points(verticles);

        mesh.vertices = verticles.ToArray();
        mesh.triangles = list;

        mf.mesh = mesh;
        obj.AddComponent<MeshCollider>().sharedMesh = mesh;

        return obj;
}
Triangulate.Points this method is to find the drawing information of all triangular surfaces. This static class is provided in my previous blog. After the initial mesh generation is completed, start to erase the core. First, put a collider under the mesh to record the position of the world coordinates pressed by the mouse.
private void Update()
{
        if (Input.GetMouseButton(0))
        {
            var p = Input.mousePosition;
            bool b = Physics.Raycast(Camera.main.ScreenPointToRay(p), out RaycastHit info, 1000f, 1 << LayerMask.NameToLayer("Ground"));
            if (b)
            {
                Vector3 t = info.point;

                ClipMap(t);
            }
        }
}
What ClipMap(t) passes in is a specific coordinate. Take this coordinate as the center and generate a polygon with a fixed radius. Convert this polygon into a set called a set, and the original mesh is a set called B set, so the final result is B-A set. First, calculate a set. The original model of a set is a polygon
Polygon clip = new Polygon();

float radius = 0.5f;
int c = 15;
float offset = Mathf.PI * 2 / c;
for (int i = 0; i < c; i++)
{
    var t1 = new IntPoint(centerPos.x * Scale, centerPos.y * Scale);
    var t2 = new IntPoint(Mathf.Cos(i * offset) * radius * Scale, Mathf.Sin(i * offset) * radius * Scale);
            clip.Add(t1 + t2);
}

_clips.Clear();
_clips.Add(clip);
The specific erasure method is as follows: first, add two sets to the calculated array, and then calculate their difference set. When adding, identify whether it is set A or set B, that is, it is A subtracted number and that is A subtracted number.
_clipper.Clear();
_clipper.AddPaths(_subjects, PolyType.ptSubject, true);
_clipper.AddPaths(_clips, PolyType.ptClip, true);

_solution.Clear();

_succeeded = _clipper.Execute(ClipType.ctDifference, _solution);
if (_succeeded)
{

   _solution2 = new Polygons(_solution);
   _subjects.Clear();
   int c1 = _objs.Count;
   for (int i = 0; i < c1; i++)
   {
       Destroy(_objs[0]);
       _objs.RemoveAt(0);
   }

   int count = _solution.Count;
   for (int i = 0; i < count; i++)
   {
       var s = _solution[i];
       var obj = GeneratorBody("Body" + i, s);
       _objs.Add(obj);

       _subjects.Add(s);
    }
 }
PolyType.ptSubject can be understood as set B, polytype Ptclip can be understood as set a_ clipper.Execute(ClipType.ctDifference, _solution); This method returns a bool value. If it is true, it indicates_ A valid value is found in the solution, otherwise it is an invalid value. ClipType. Ctdifference is to find the difference set of two sets. This enumeration has four states,

They are intersection set, union set, difference set and symmetric difference set. After calculating a set, when calculating the difference set of two sets, there may be multiple polygons in the set, so the meshes are generated respectively according to the number of polygons and updated at the same time_ For subjects data, we need to explain a pit here, because the drawing of polygon mesh with holes here cannot break through this temporarily, so I generally erase around the boundary rather than the center of the mesh. Of course, the center can also be erased here. Here is a clever scheme, which is to divide the whole large grid into several small grids, as long as the area of each small grid is smaller than the erased area.
Project source code: link: https://pan.baidu.com/s/1DokatKnPrrY_ATcqBwiqZg Extraction code: w6xq