introduction We want grid service discovery, routing, fuse degradation and load balancing. These traffic governance can only be implemented in the data plane envoy. Envoy also provides a Filter mechanism to perform these functions, usually in the following ways:
- Recompile Envoy through C + + code custom filter
- Extend filter with Lua script
- Extending Envoy with wasm
1, Working principle of wasm
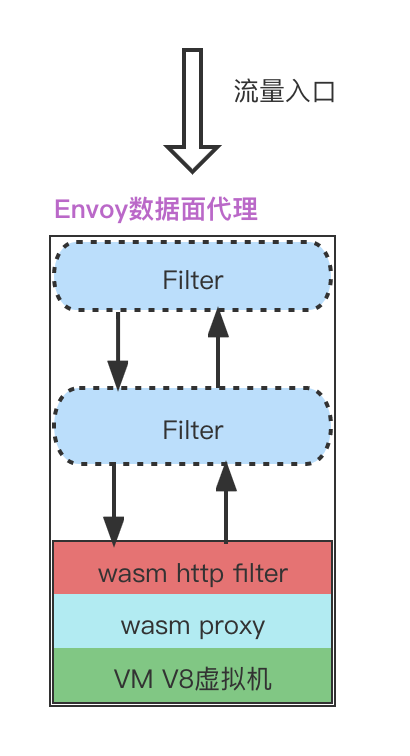
The first is C + + compilation, which costs too much to learn and is difficult to maintain. The second is suitable for realizing simple functions. The third is the key development direction. filter is written in other languages, embedded in Envoy through wasm compilation and operation, and realized through portable binary instructions. The following features:
- Dynamically loaded into Envoy for execution
- It is easy to maintain without modifying the Envoy code
- Support more development languages such as tinygo
- Process level isolation affects the Envoy process in the VM sandbox operation Department
Schematic diagram of flow into Envoy:
2, wasm installation process
Installation of Isito1.9.9
The latest version is v0.0.33, and the supported Istio is 1.9.X
https://github.com/solo-io/wasm/releases/
Uninstall the original istio version 1.10 and install 1.9.9
istioctl x uninstall --purge
Istio 1.9.9 installation path. See the previous article for the specific installation process
https://github.com/istio/istio/releases/download/1.9.9/istio-1.9.9-linux-amd64.tar.gz
Declarative mount wasme
There are detailed installation suggestions below. Declarative mounting is recommended for production environment:
https://docs.solo.io/web-assembly-hub/latest/tutorial_code/wasme_operator/
1. Install Wasme CRDs
kubectl apply -f https://github.com/solo-io/wasm/releases/latest/download/wasme.io_v1_crds.yaml

# kubectl apply -f wasme.io_v1_crds.yaml
customresourcedefinition.apiextensions.k8s.io/filterdeployments.wasme.io created
2. Install Operator components
kubectl apply -f https://github.com/solo-io/wasm/releases/latest/download/wasme-default.yaml

# kubectl apply -f wasme-default.yaml
namespace/wasme created
serviceaccount/wasme-operator created
serviceaccount/wasme-cache created
configmap/wasme-cache created
clusterrole.rbac.authorization.k8s.io/wasme-operator created
clusterrole.rbac.authorization.k8s.io/wasme-cache created
clusterrolebinding.rbac.authorization.k8s.io/wasme-operator created
clusterrolebinding.rbac.authorization.k8s.io/wasme-cache created
daemonset.apps/wasme-cache created
deployment.apps/wasme-operator created
3. Verify whether the installation is successful
# kubectl get pod -n wasme
NAME                              READY   STATUS    RESTARTS   AGE
wasme-cache-96mnm                 1/1     Running   0          23s
wasme-cache-ktnpb                 1/1     Running   0          23s
wasme-cache-w929m                 1/1     Running   0          23s
wasme-operator-75bbf94974-nb684   1/1     Running   0          23s
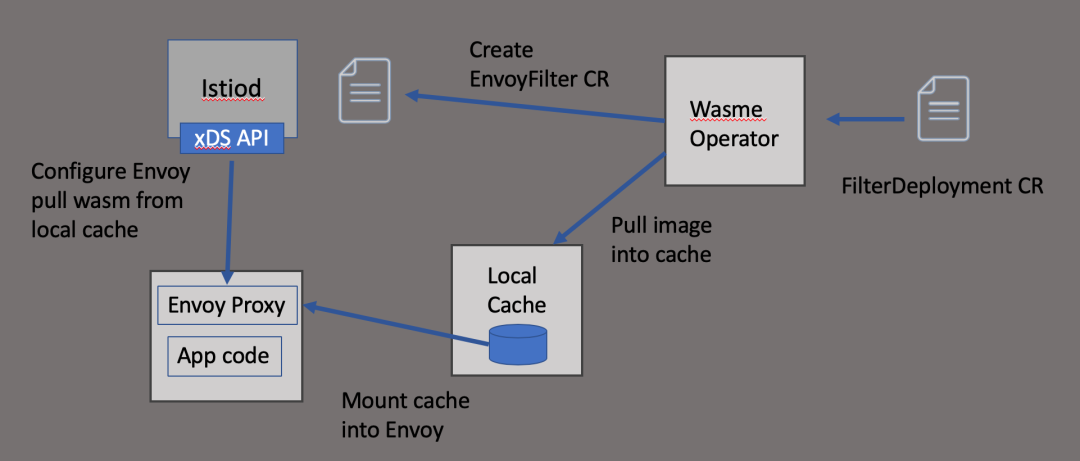
How mount works
Command line installation
Official installation documentation
https://docs.solo.io/web-assembly-hub/latest/tutorial_code/getting_started/
Good network, you can use the quick installation command
curl -sL https://run.solo.io/wasme/install | sh
From install_ What does the cli.sh installation script look like
if [ "$(uname -s)" = "Darwin" ]; then OS=darwin // Mac renames darwinelse OS = linuxfi / / and grants execution permission cd "$HOME"mkdir -p ".wasme/bin"mv "${tmp}/${filename}" ".wasme/bin/wasme"chmod +x ".wasme/bin/wasme" / / adds it to the environment variable export PATH=$HOME/.wasme/bin:$PATH“
The Mac can download wasme-darwin-amd64 and just install it.
https://github.com/solo-io/wasm/releases/download/v0.0.33/wasme-darwin-amd64
export PATH=$PATH:/Users/yongliang/work/software_install/wasme/binsource ~/.bash_profilechmod +x /Users/yongliang/work/software_install/wasme/bin/wasmewasme --versionwasme version 0.0.33
3, wasm generate Filter
For official use guidelines, see:
https://docs.solo.io/web-assembly-hub/latest/tutorial_code/build_tutorials/building_assemblyscript_filters/
Try tinygo as an example to see the effect
wasme init melon-filterUse the arrow keys to navigate: ↓ ↑ → ← ? What language do you wish to use for the filter: cpp rust assemblyscript ▸ tinygo
After execution:
wasme init melon-filter✔ tinygo✔ istio:1.7.x, gloo:1.6.x, istio:1.8.x, istio:1.9.x
directory structure
-rw-r--r-- 1 yongliang staff 83 11 15 19:26 go.mod-rw-r--r-- 1 yongliang staff 676 11 15 19:26 go.sum-rw-r--r-- 1 yongliang staff 1707 11 15 19:26 main.go-rw-r--r-- 1 yongliang staff 162 11 15 19:26 runtime-config.json
runtime-config.json is used by wamse to build the filter and must contain the rootIds field
{ "type": "envoy_proxy", "abiVersions": ["v0-4689a30309abf31aee9ae36e73d34b1bb182685f", "v0.2.1"], "config": { "rootIds": [ "root_id" ] }}
main.go is the generated sample code. It mainly adds information to the return response Header and modifies it to "hello" and "mean"
func (ctx *httpHeaders) OnHttpResponseHeaders(numHeaders int, endOfStream bool) types.Action { if err := proxywasm.SetHttpResponseHeader("hello", "melon"); err != nil { proxywasm.LogCriticalf("failed to set response header: %v", err) } return types.ActionContinue}
4, wasm build Filter
Filter build
The construction process takes a long time. Wait a little longer
wasme build tinygo /Users/yongliang/GoLandProjects/melon-filter -t xxx/base/melon-add-header:v0.1Unable to find image 'quay.io/solo-io/ee-builder:0.0.33' locally0.0.33: Pulling from solo-io/ee-builderdf27e1f7c31e: Pull complete 0a8813a60e2e: Pull complete 3c2cba919283: Pull complete 26f4837a47c0: Pull complete dd7b292cf068: Pull complete 4a4d78f042bc: Pull complete 9108a736d6a0: Pull complete 70ac09daaa76: Pull complete 809bdff17a4d: Pull complete 31fc029d676e: Pull complete 85533903f7c2: Pull complete f87e543b124a: Pull complete 93d78f561264: Pull complete 8ba3d0f61e41: Pull complete d511201136be: Pull complete Digest: sha256:94b6ce4624b0c4ed4cfa4f311c8af57083b538949b5c88ce62ef984f9b81ef66Status: Downloaded newer image for quay.io/solo-io/ee-builder:0.0.33Building with tinygo...go: downloading github.com/tetratelabs/proxy-wasm-go-sdk v0.1.1INFO[2146] adding image to cache... filter file=/tmp/wasme066130090/filter.wasm tag="xxx/base/melon-add-header:v0.1"INFO[2146] tagged image digest="sha256:750d63889653e7117fcbc0831f10f0e1d3f7ec0c82fe5787b71d08a783e3393f" image="xxx/base/melon-add-header:v0.1"
After the construction is completed, the image is generated
wasme listNAME TAG SIZE SHA UPDATEDxxxx/base/melon-add-header v0.1 247.6 kB 750d6388 15 Nov 21 20:23 CST
Note: for the official build tutorial, see
https://docs.solo.io/web-assembly-hub/latest/tutorial_code/build_tutorials/building_assemblyscript_filters/
Image push
The constructed image needs to be pushed to the remote warehouse
wasme push xxx/base/melon-add-header:v0.1INFO[0000] Pushing image xxxn/base/melon-add-header:v0.1 INFO[0004] Pushed xxx/base/melon-add-header:v0.1 INFO[0004] Digest: sha256:27aecb092318b2f922204ce722a34e5c2866baa168cf2f9f00c303b1982cfa9a
Note: for the official push tutorial, see
https://docs.solo.io/web-assembly-hub/latest/tutorial_code/push_tutorials/basic_push/
5, Filter effective deployment
Through the user-defined resources of Kubernetes and through FilterDeployment, the following is the content of melon-add-header.yaml
apiVersion: wasme.io/v1kind: FilterDeploymentmetadata: name: melon-add-header namespace: defaultspec: deployment: istio: kind: Deployment filter: image: xxx/base/melon-add-header:v0.1
Execute deployment command
kubectl apply -f melon-add-header.yamlfilterdeployment.wasme.io/melon-add-header created
Note: for the official tutorial, see
https://docs.solo.io/web-assembly-hub/latest/tutorial_code/wasme_operator/
6, Validation
1. Access grid Mesh service
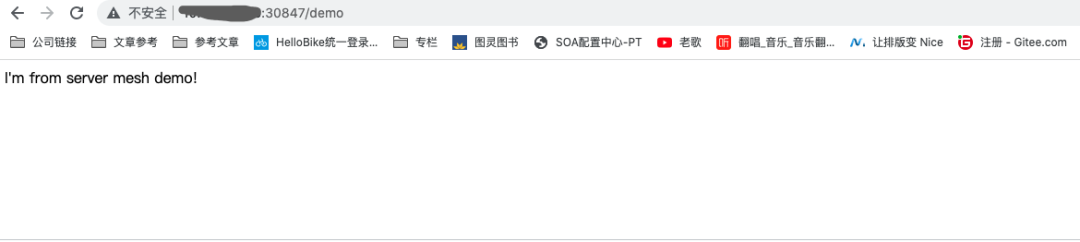
2. Verify that the Response Headers add "Hello: million"
