preface
The message push function can be said to be one of the indispensable functions of mobile APP. Generally, for simple push, we can use the SDK pushed by the third party, such as Aurora push and carrier pigeon push. However, if the timeliness of message chat is required or the three-party push does not meet the business requirements, we need to use WebSocket to realize the message push function.
Basic process
WebSocket is not introduced here. The open source framework we use here is https://github.com/TakahikoKawasaki/nv-websocket-client
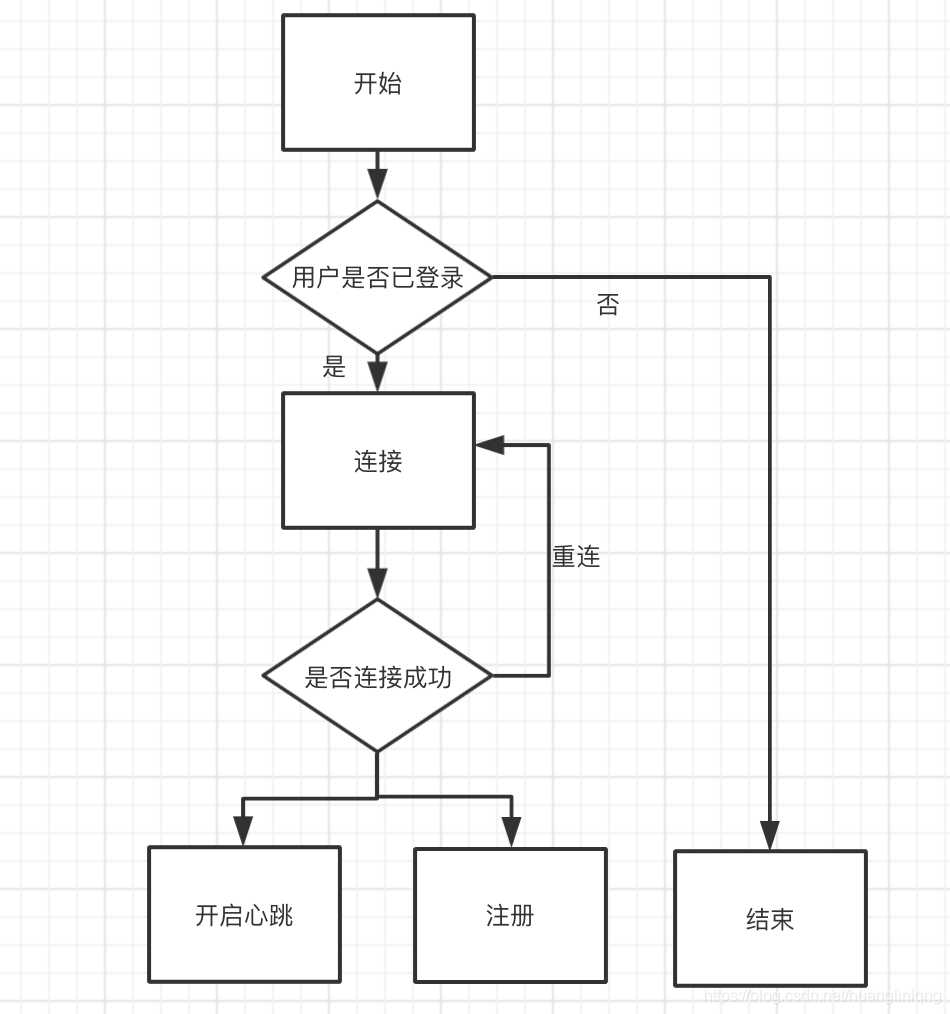
Based on the open source protocol, we encapsulate and implement WebSocket's functions of connection, registration, heartbeat, message distribution and timeout. The basic process is as follows:
Connection function
First, we create a new project in build Add configuration in grade
compile 'com.neovisionaries:nv-websocket-client:2.2'
Create a new websocket management class WsManger
public class WsManager {

    private volatile static WsManager wsManger;

    private WsManager() {
    }

    public static WsManager getWsManger() {
        if (wsManger == null) {
            synchronized (WsManager.class) {
                if (wsManger == null) {
                    wsManger = new WsManager();
                }
            }
        }
        return wsManger;
    }


}
Next, add the connection method. We will divide the status of webSocket into three types, and create a new wsstation enumeration class to correspond
public enum WsStatus {

    /**
     * Connection succeeded
     */
    CONNECT_SUCCESS,
    /**
     * connection failed
     */
    CONNECT_FAIL,
    /**
     * on connection
     */
    CONNECTING;
}
The connection method is as follows:
/**
 * The connection method here is to determine whether to log in and omit it here
 */
public void connect() {
    //WEB_SOCKET_API is the url address of the connection,
    // CONNECT_TIMEOUT is the timeout of the connection, here is 5 seconds
    try {
        ws = new WebSocketFactory().createSocket(WEB_SOCKET_API, CONNECT_TIMEOUT)
                //Set the maximum value of frame queue to 5
                .setFrameQueueSize(5)
                //Setting does not allow the server to close the connection without sending a close frame
                .setMissingCloseFrameAllowed(false)
                //Add callback listener
                .addListener(new WsListener())
                //Asynchronous connection
                .connectAsynchronously();
    } catch (IOException e) {
        e.printStackTrace();
    }
    setStatus(WsStatus.CONNECTING);
}
After calling the connection method, let's look at the callback of the connection, that is, WsListener
/**
 * websocket Callback Events
 */
private class WsListener extends WebSocketAdapter {


    @Override
    public void onConnected(WebSocket websocket, Map<String, List<String>> headers) throws Exception {
        Log.d(TAG, "onConnected: Connection succeeded");
    }

    @Override
    public void onConnectError(WebSocket websocket, WebSocketException exception) throws Exception {
        Log.d(TAG, "onConnectError: connection failed");
    }

    @Override
    public void onDisconnected(WebSocket websocket, WebSocketFrame serverCloseFrame,
                               WebSocketFrame clientCloseFrame,
                               boolean closedByServer) throws Exception {
        Log.d(TAG, "onDisconnected: Disconnect");

    }

    @Override
    public void onTextMessage(WebSocket websocket, String text) throws Exception {
        Log.d(TAG, "onTextMessage: Received message:" + text);
    }
}
Next, we call the connection method
WsManager.getWsManger().connect();
Running the project, we can see the following print:

What we need to do here is that if we need to reconnect after receiving the callback of connection failure or disconnection, we can call the connection method again. If more than three reconnections fail, we can call the interface to obtain data in the business to avoid data loss. Details are omitted here.
Protocol encapsulation
This agreement is as follows:
{
"action":"",
"requestChild":{
"clientType":"",
"id":""
}
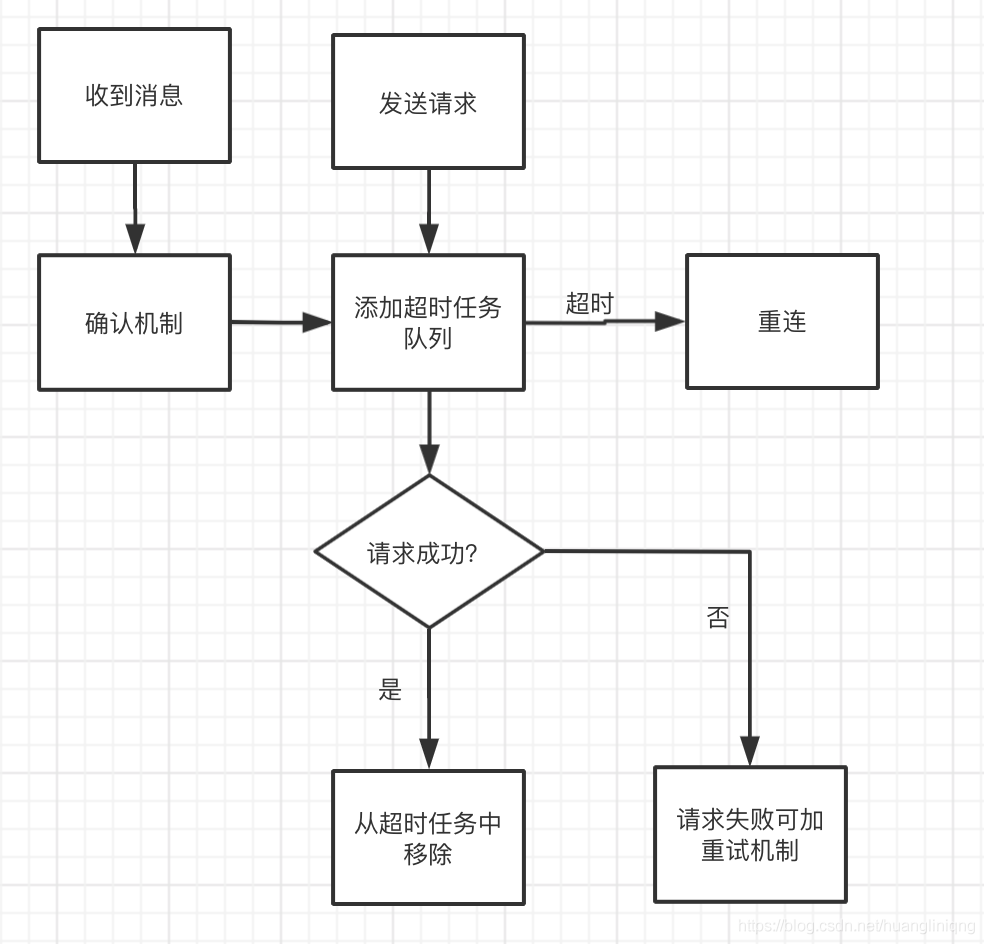
}Heartbeat and sending requests belong to the active sending requests by the client. The request results are divided into success, failure and timeout. When sending timeout, we can't receive any reply from the server, so we need to put the sending in the timeout task queue after sending. If the request is successful, remove the task from the timeout queue, Timeout get the task re request from the timeout queue.
The callback in the timeout task queue includes success, failure and timeout.
According to the above protocol, we add corresponding entity classes and adopt the Builder design pattern
public class Request {

    /**
     * behavior
     */
    private String action;

    /**
     * Request body
     */
    private RequestChild req;


    /**
     * Number of requests
     */
    private transient int reqCount;

    /**
     * Timeout time
     */
    private transient int timeOut;


    public Request() {
    }


    public Request(String action, int reqCount, int timeOut, RequestChild req) {
        this.action = action;
        this.req = req;
        this.reqCount = reqCount;
        this.timeOut = timeOut;
    }


    public static class Builder {
        //action request type
        private String action;
        //Sub class data is required to be divided according to specific business
        private RequestChild req;
        //Number of requests for retry
        private int reqCount;
        //Timeout
        private int timeOut;

        public Builder action(String action) {
            this.action = action;
            return this;
        }


        public Builder req(RequestChild req) {
            this.req = req;
            return this;
        }


        public Builder reqCount(int reqCount) {
            this.reqCount = reqCount;
            return this;
        }

        public Builder timeOut(int timeOut) {
            this.timeOut = timeOut;
            return this;
        }

        public Request build() {
            return new Request(action, reqCount, timeOut, req);
        }

    }
}
public class RequestChild {
/**
* Equipment type
*/
private String clientType;
/**
* id for user registration
*/
private String id;
public RequestChild(String clientType, String id) {
this.clientType = clientType;
this.id = id;
}
public RequestChild() {
}
public static class Builder {
private String clientType;
private String id;
public RequestChild.Builder setClientType(String clientType) {
this.clientType = clientType;
return this;
}
public RequestChild.Builder setId(String id) {
this.id = id;
return this;
}
public RequestChild build() {
return new RequestChild(clientType, id);
}
}
}We add a method to send a request as follows:
/**
 * Send request
 *
 * @param request        Request body
 * @param reqCount       Number of requests
 * @param requestListern Request callback
 */
private void senRequest(Request request, final int reqCount, final RequestListern requestListern) {
    if (!isNetConnect()) {
        requestListern.requestFailed("The network is not connected");
        return;
    }

}
The request callback is shown below
public interface RequestListern {

    /**
     * Request succeeded
     */
    void requestSuccess();

    /**
     * request was aborted
     *
     * @param message Request failure message prompt
     */
    void requestFailed(String message);
}
Next, we will put the request in the timeout queue and create a new timeout task class, corresponding to request parameters, request callback and task scheduling
public class TimeOutTask {


    /**
     *  Request subject
     */
    private Request request;

    /**
     * General return
     */
    private RequestCallBack requestCallBack;

    /**
     * r task
     */
    private ScheduledFuture scheduledFuture;


    public TimeOutTask(Request request,
                           RequestCallBack requestCallBack,
                           ScheduledFuture scheduledFuture) {
        this.request = request;
        this.requestCallBack = requestCallBack;
        this.scheduledFuture = scheduledFuture;
    }

    public ScheduledFuture getScheduledFuture() {
        return scheduledFuture;
    }

    public void setScheduledFuture(ScheduledFuture scheduledFuture) {
        this.scheduledFuture = scheduledFuture;
    }

    public Request getRequest() {
        return request;
    }

    public void setRequest(Request request) {
        this.request = request;
    }

    public RequestCallBack getRequestCallBack() {
        return requestCallBack;
    }

    public void setRequestCallBack(RequestCallBack requestCallBack) {
        this.requestCallBack = requestCallBack;
    }

}
RequestCallBack is the callback of the timeout task, but there are more timeouts than the request callback. Because the timeout processing mechanism is the same, we don't need to callback the timeout into the request here
public interface RequestCallBack {

    /**
     * Request succeeded
     */
    void requestSuccess();

    /**
     * request was aborted
     *
     * @param request  Request body
     * @param message  Message of request failure
     */
    void requestFailed(String message, Request request);

    /**
     * request timeout
     *
     * @param request  Request body
     */
    void timeOut(Request request);
}
/**
* Add timeout task
*/
private ScheduledFuture enqueueTimeout(final Request request, final long timeout) {
Log.d(TAG, " " + "enqueueTimeout: Add timeout task type:" + request.getAction());
return executor.schedule(new Runnable() {
@Override
public void run() {
TimeOutTask timeoutTask = callbacks.remove(request.getAction());
if (timeoutTask != null) {
timeoutTask.getRequestCallBack().timeOut(timeoutTask.getRequest());
}
}
}, timeout, TimeUnit.MILLISECONDS);
}The method of timeout task is to call it regularly through task scheduling. After the request is successful, we will remove the timeout task. When the timeout time is reached, the task still exists, indicating that the task has timed out.
For each task, we take action as the key value and store it in the hashMap
private Map<String, CallbackWrapper> callbacks = new HashMap<>();
Put the task into the timeout task code as follows:
final ScheduledFuture timeoutTask = enqueueTimeout(request, request.getTimeOut());

final RequestCallBack requestCallBack = new RequestCallBack() {
    @Override
    public void requestSuccess() {
        requestListern.requestSuccess();
    }

    @Override
    public void requestFailed(String message, Request request) {
        requestListern.requestFailed(message);
    }

    @Override
    public void timeOut(Request request) {
        timeOutHanlder(request);
    }
};
callbacks.put(request.getAction(),
        new CallbackWrapper(request, requestCallBack, timeoutTask));
Generally speaking, the task timeout is caused by connection, so we can try to retry here. If it still times out, use timeOutHanlder(request); Method for reconnection. The reconnection code is the same as the connection code, which is omitted here. Do this step well, and we can send messages.
/**
 * Timeout task
 */
private void timeOutHanlder(Request requset) {
    setStatus(WsStatus.CONNECT_FAIL);
    //Pretend to have reconnection here
    Log.d(TAG, "timeOutHanlder: Request timed out for reconnection");
}
Here, our process can basically go through.
heartbeat
First of all, we need to know what the function of heartbeat is. After the connection is successful, heartbeat sends a query to the server at a fixed interval to ask whether it is still online. Many people say that if the heartbeat fails, we will reconnect and continue to heartbeat if it succeeds. However, it should be noted here that we generally cannot receive the callback of heartbeat failure, and heartbeat also sends data to the server, So we need to put all active requests in the timeout task queue,
Therefore, for websocket, there are three kinds of request results: success, failure and timeout. For users, only success and failure are required.
As for the data sent by heartbeat, registration and other requests, it depends on the protocol we have set with the server. Generally speaking, it is divided into action and requestBody. The protocol format has been encapsulated in the second step. Here, we take heartbeat task as an example to verify the above encapsulation.
/**
 * heartbeat
 */
void keepAlive() {

    Request request = new Request.Builder()
            .reqCount(0)
            .timeOut(REQUEST_TIMEOUT)
            .action(ACTION_KEEPALIVE).build();

    WsManager.getWsManger().senRequest(request, request.getReqCount() + 1, new RequestListern() {
        @Override
        public void requestSuccess() {
            Log.d(TAG, "requestSuccess: Heartbeat sent successfully");
        }

        @Override
        public void requestFailed(String message) {
        }
    });
}
We start the heartbeat task every 10s
/**
 * Start heartbeat
 */
public void startKeepAlive() {
    mHandler.postDelayed(mKeepAliveTask, HEART_BEAT_RATE);
}
/**
* Heartbeat task
*/
private Runnable mKeepAliveTask = new Runnable() {
@Override
public void run() {
keepAlive();
mHandler.removeCallbacks(mKeepAliveTask);
mHandler.postDelayed(mKeepAliveTask, HEART_BEAT_RATE);
}
};To facilitate the operation demonstration, add a button on the main page, click the button to call the startKeepAlive method, and run as follows:

We can see that the status returned by the heartbeat is 300, which is unsuccessful. After 5 seconds, we go to the request timeout method. Therefore, if the status is returned successfully, we need to call back to the caller
/**
 * Processing task callback
 *
 * @param action Request type
 */
void disPatchCallbackWarp(String action, boolean isSuccess) {
    CallbackWrapper callBackWarp = callbacks.remove(action);
    if (callBackWarp == null) {
        Logger.d(TAG+"  "+ "disPatchCallbackWarp: Task queue is empty");
    } else {
        callBackWarp.getScheduledFuture().cancel(true);
        if (isSuccess) {
            callBackWarp.getRequestCallBack().requestSuccess();
        } else {
            callBackWarp.getRequestCallBack().requestFailed("", new Request());
        }

    }
}
Only in this way can the caller know success or failure.
Sending other messages is the same as heartbeat, but the Request parameters are different. You can modify the Request parameters. In this way, we can implement a relatively standardized webSocket message push process according to the protocol and business.