Working principle of rabbitmq

Explanation:
- Producer: publishes messages to the switch (Exchange) in RabbitMQ
- Exchange: establishes a connection with the producer and receives messages from the producer. On the one hand, it receives messages from the producer, on the other hand, it pushes messages to the queue. The switch must know exactly how to handle the messages it receives, whether to push these messages to a specific queue or multiple queues, or discard the messages, which depends on the switch type
- Queue: Exchange distributes messages to the specified queue, which interacts with consumers. The queue is only constrained by the memory and disk limitations of the host. It is essentially a large message buffer. Many producers can send messages to a queue, and many consumers can try to receive data from a queue
- Routes: Rules for the switch to forward messages to the queue
- Consumer: listen for messages in the Queue in RabbitMQ
Note: producers, consumers and message middleware are often not on the same machine; The same application can be both a producer and a consumer.
2. RabbitMQ has seven messaging methods
RabbitMQ official website introduces the following seven forms of message distribution, which are implemented in code one by one. The code can be viewed at the end of the article.
2.1 code environment
SpringBoot : 2.5.7,RabbitMQ: 3.9.13
application. Configure the basic connection information of RabbitMQ in properties, as follows:
server.port=8888
spring.rabbitmq.host=192.168.3.157
spring.rabbitmq.username=guest
spring.rabbitmq.password=guest
spring.rabbitmq.port=5672
spring.rabbitmq.virtual-host=/
In RabbitMQ, all messages submitted by message producers will be handed over to exchange for redistribution. Exchange will distribute messages to different queues according to different policies.
All the following producers and consumers are in the same project, which is convenient for testing
2.2 messaging
2.2.1 Hello World
The message propagation diagram is as follows:

This message distribution adopts the default Exchange. In the Web client of RabbitMQ, you can see the switch provided by RabbitMQ

Define queue:
@Configuration
public class RabbitMQConfig {

    // The name of the queue
    public static final String SCORPIOS_QUEUE_NAME = "scorpios_queue_name";

    /**
     * The first parameter is the message queue name
     * The second parameter indicates whether the message is persistent
     * The third parameter indicates whether the message queue is exclusive. Generally, it is set to false, that is, it is not exclusive
     * The fourth parameter indicates that if the queue does not have any subscribed consumers, the queue will be automatically deleted, which is generally applicable to temporary queues
     * @return
     */
    @Bean
    Queue queue() {
        return new Queue(RabbitMQConfig.SCORPIOS_QUEUE_NAME,true,false,false);
    }

}
Consumer definition:
@Slf4j
@Component
public class ScorpiosConsumer {

    @RabbitListener(queues = RabbitMQConfig.SCORPIOS_QUEUE_NAME)
    public void consume(String msg) {
        log.info("The message received by the consumer is:{}",msg);
    }
}
Message sending: simulate sending request to send message to RabbiMQ
@RestController
public class RabbitMQController {

    @Autowired
    RabbitTemplate rabbitTemplate;

    @GetMapping("/send/message")
    public String test(){
        log.info("After receiving the client message, send it to RabbitMQ send message...");
        rabbitTemplate.convertAndSend(RabbitMQConfig.SCORPIOS_QUEUE_NAME, "hello scorpios....");
        log.info("-----------------------------------");
        return "success";
    }

}
Test results: Browser input: http://localhost:8888/send/message , see the console log input

In the above code, Exchange is not created, but the default direct Exchange is used. The routing policy of direct Exchange is to bind the message Queue to a direct Exchange. When a message arrives at direct Exchange, it will be forwarded to the Queue with the same routing key as the message. For example, the message Queue name is scorpios_queue_name, then routingkey is Scorpios_ Queue_ The message of "name" will be received by the message Queue.
As the official website introduces this method: The simplest thing that does something, this method is the simplest
Note: if the producer here is in another project, just copy the Controller and RabbitMQConfig.
2.2.2 Work queues
The main consideration of this method is how the messages of the message queue are consumed by consumers
One producer, one default switch (DirectExchange), one queue and two consumers, as shown in the following figure:

A queue corresponds to multiple consumers. By default, the queue distributes messages evenly, and messages will be distributed to different consumers.
Consumers can also configure their own concurrency capabilities to improve message consumption. Consumers can also configure manual ack to decide whether to consume a message
Let's first look at the configuration of concurrency capability, as follows:
@Slf4j
@Component
public class ScorpiosConsumer {

    @RabbitListener(queues = RabbitMQConfig.SCORPIOS_QUEUE_NAME)
    public void consumeOne(String msg) {
        log.info("consumeOne The message received by the consumer is:{}",msg);
    }

    // Indicates that this consumer will create 5 threads to execute
    @RabbitListener(queues = RabbitMQConfig.SCORPIOS_QUEUE_NAME,concurrency = "5")
    public void consumeTwo(String msg) {
        log.info("consumeTwo The message received by the consumer is:{}",msg);
    }
}
For the second consumer, I have configured concurrency to be 5. At this time, for the second consumer, there will be five sub threads to consume messages at the same time
Start the project, and you can also see a total of 6 consumers in the background of RabbitMQ. One connection with 6 channels
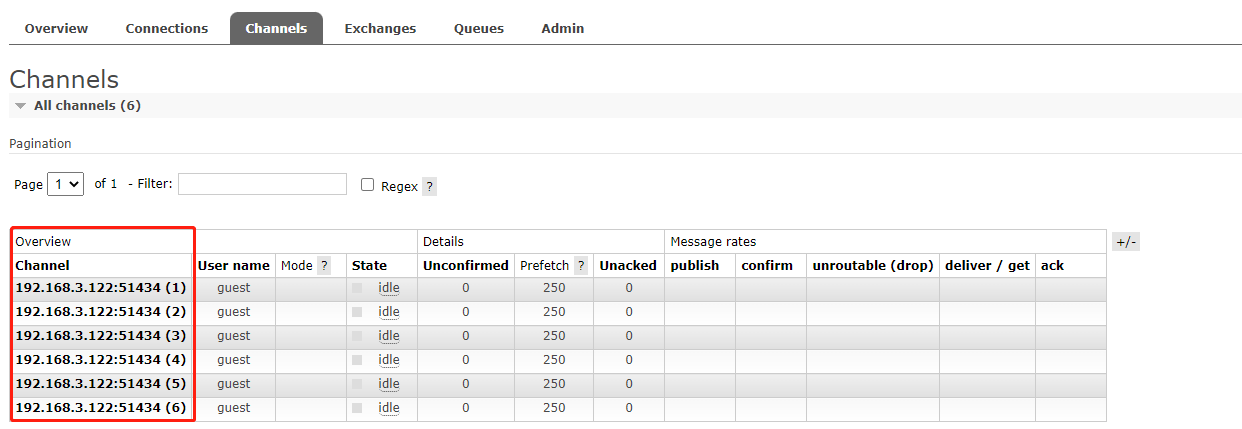
At this point, if the producer sends five messages, they will be consumed all at once
The message sending method is as follows:
@Slf4j
@RestController
public class RabbitMQController {

    @Autowired
    RabbitTemplate rabbitTemplate;

    @GetMapping("/send/message")
    public String test(){
        log.info("After receiving the client message, send it to RabbitMQ send message...");
        for (int i = 0; i < 5; i++) {
            rabbitTemplate.convertAndSend(RabbitMQConfig.SCORPIOS_QUEUE_NAME, "hello scorpios...." + i);
        }
        log.info("-----------------------------------");
        return "success";
    }
}
Test results: Browser input: http://localhost:8889/send/message , see the console log input

It can be seen that the news has been consumed by the second consumer. However, it should be noted that if you try several times, you can see that the news may also be consumed by the first consumer
Let's take a look at the following. Consumers can decide whether to consume messages sent by RabbitMQ by themselves when they enable manual ack. To configure manual ACK, the following configuration needs to be added to the configuration file:
spring.rabbitmq.listener.simple.acknowledge-mode=manual
The consumption code is as follows:
@Slf4j
@Component
public class ScorpiosConsumer {

    @RabbitListener(queues = RabbitMQConfig.SCORPIOS_QUEUE_NAME)
    public void consumeOne(Message message, Channel channel) throws IOException {
        log.info("consumeOne The message received by the consumer is:{}",message.getPayload());
        // Confirm consumption message
        channel.basicAck(((Long) message.getHeaders().get(AmqpHeaders.DELIVERY_TAG)),true);
    }

    @RabbitListener(queues = RabbitMQConfig.SCORPIOS_QUEUE_NAME,concurrency = "5")
    public void consumeTwo(Message message, Channel channel) throws IOException {
        log.info("consumeTwo The message received by the consumer is:{},Consumption thread is:{}", message.getPayload(), Thread.currentThread().getName());
        // Reject consumption message
        channel.basicReject(((Long) message.getHeaders().get(AmqpHeaders.DELIVERY_TAG)), true);
    }
}
Test results: Browser input: http://localhost:8889/send/message , see the console log input

At this time, the second consumer rejects all messages, and the first consumer consumes all messages
2.2.3 Publish/Subscribe
This method mainly considers how to transfer the message to the message queue after it reaches the switch
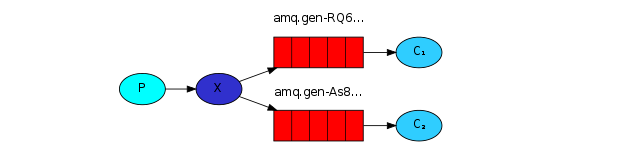
A Producer, an Exchange, and multiple consumers each have their own Queue
The producer does not send the message directly to the queue, but to the switch. Each queue is bound to the switch. The message sent by the producer passes through the switch and reaches the queue to achieve the purpose that a message is obtained by multiple consumers
It should be noted that if a message is sent to an Exchange without queue binding, the message will be lost. This is because Exchange does not have the ability to store messages in RabbitMQ, and only the queue has the ability to store messages, as shown in the following figure:
There are four options for switches:
- Direct
- Fanout
- Topic
- Header (header)
2.2.3.1 Direct
The routing strategy of DirectExchange is to bind the message Queue to a DirectExchange. When a message arrives at DirectExchange, it will be forwarded to the Queue with the same routing key as the message.
Configuration class:
@Configuration
public class RabbitMQConfig {

    // Name of the switch
    public static final String SCORPIOS_EXCHANGE_NAME = "scorpios_exchange_name";

    // The name of the queue
    public static final String SCORPIOS_QUEUE_NAME = "scorpios_queue_name";

    /**
     * Create a DirectExchange switch
     * First parameter: switch name
     * Second parameter: is it still valid after restart
     * The third parameter: delete when not used for a long time
     * @return
     */
    @Bean
    DirectExchange directExchange(){
        return new DirectExchange(RabbitMQConfig.SCORPIOS_EXCHANGE_NAME,true,false);
    }

    @Bean
    Queue queue() {
        return new Queue(RabbitMQConfig.SCORPIOS_QUEUE_NAME,true,false,false);
    }

    // To bind the queue to DirectExchange, specify routingkey
    @Bean
    Binding binding() {
        return BindingBuilder.bind(queue()).to(directExchange()).with("direct");
    }

}
Binding is actually a bridge between Exchange and Queue. It tells us which Queue Exchange has a binding relationship with
consumer:
@Slf4j
@Component
public class DirectConsumer {

    @RabbitListener(queues = RabbitMQConfig.SCORPIOS_QUEUE_NAME)
    public void consume(String msg) {
        log.info("consume The message received by the consumer is:{}",msg);
    }
}
Sender:
@Slf4j
@RestController
public class RabbitMQController {

    @Autowired
    RabbitTemplate rabbitTemplate;

    @GetMapping("/send/message")
    public String test(){
        log.info("Client message received");
        // To add the routingkey parameter
        rabbitTemplate.convertAndSend(RabbitMQConfig.SCORPIOS_EXCHANGE_NAME,"direct","hello scorpios...");
        return "success";
    }

}
Test results: Browser input: http://localhost:8889/send/message , see the console log input

In the configuration class, bind DirectExchange and Queue, and specify routingkey
At the same time, the name of the switch and the routingkey should be specified in the sender's code
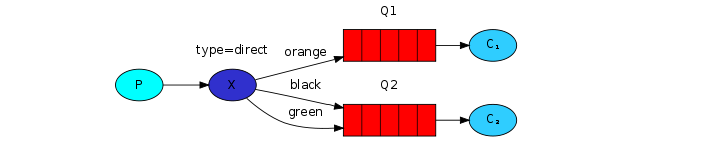
In combination with the following figure, the type of switch is DirectExchange:
- Only when routingkey is orange, the message will be transferred to Q1 queue
- When the routingkey is black and green, the message will be transferred to the Q2 queue
2.2.3.2 Fanout
The data exchange policy of FanoutExchange is to forward all messages arriving at FanoutExchange to all queues bound to it. In this policy, routingkey will not play any role. The configuration of FanoutExchange is as follows:
@Configuration
public class FanoutRabbitMQConfig {

    // Name of the switch
    public static final String SCORPIOS_EXCHANGE_NAME = "scorpios_exchange_name";

    // The name of the queue
    public static final String SCORPIOS_QUEUE_NAME_ONE = "scorpios_queue_name_one";
    public static final String SCORPIOS_QUEUE_NAME_TWO = "scorpios_queue_name_two";

    /**
     * Create a FanoutExchange switch
     * First parameter: switch name
     * Second parameter: is it still valid after restart
     * The third parameter: delete when not used for a long time
     * @return
     */
    @Bean
    FanoutExchange fanoutExchange(){
        return new FanoutExchange(FanoutRabbitMQConfig.SCORPIOS_EXCHANGE_NAME,true,false);
    }

    @Bean
    Queue queueOne() {
        return new Queue(FanoutRabbitMQConfig.SCORPIOS_QUEUE_NAME_ONE,true,false,false);
    }

    @Bean
    Queue queueTwo() {
        return new Queue(FanoutRabbitMQConfig.SCORPIOS_QUEUE_NAME_TWO,true,false,false);
    }

    // Bind queue to FanoutExchange
    @Bean
    Binding bindingOne() {
        return BindingBuilder.bind(queueOne()).to(fanoutExchange());
    }

    @Bean
    Binding bindingTwo() {
        return BindingBuilder.bind(queueTwo()).to(fanoutExchange());
    }

}
Create FanoutExchange above, and the meaning of the parameter is consistent with that of the DirectExchange parameter. Then create two queues, and then bind both queues to FanoutExchange. Next, create two consumers, as follows:
@Slf4j
@Component
public class FanoutConsumer {

    @RabbitListener(queues = FanoutRabbitMQConfig.SCORPIOS_QUEUE_NAME_ONE)
    public void consumeOne(String msg) {
        log.info("consumeOne The message received by the consumer is:{}",msg);
    }

    @RabbitListener(queues = FanoutRabbitMQConfig.SCORPIOS_QUEUE_NAME_TWO)
    public void consumeTwo(String msg) {
        log.info("consumeTwo The message received by the consumer is:{}",msg);
    }

}
Sender:
@Slf4j
@RestController
public class RabbitMQController {

    @Autowired
    RabbitTemplate rabbitTemplate;

    @GetMapping("/send/message")
    public String test(){
        log.info("Client message received");
        // The routingkey parameter is null
        rabbitTemplate.convertAndSend(FanoutRabbitMQConfig.SCORPIOS_EXCHANGE_NAME,null,"hello scorpios... FanoutExchange");
        return "success";
    }}

}
Note that there is no need for a routingkey when sending messages here. You can specify exchange, and the routingkey can directly pass a null.
Test results: Browser input: http://localhost:8889/send/message , see the console log input

FanoutExchange switch broadcasts all received messages to all queues it knows
Look at the following picture:

If the binding type of Exchange is Direct, but the key s of multiple queues it binds are the same, in this case, although the binding type is Direct, its performance is somewhat similar to that of Fanout, just like broadcasting, as shown in the above figure.
2.2.3.3 Topic
TopicExchange is a complex but flexible routing strategy. In TopicExchange, the Queue is bound to TopicExchange through the routingkey. When the message arrives at TopicExchange, TopicExchange routes the message to one or more queues according to the routingkey of the message.
TopicExchange is configured as follows:
@Configuration
public class TopicsRabbitMQConfig {

    // Name of the switch
    public static final String SCORPIOS_EXCHANGE_NAME = "scorpios_exchange_name";

    // The name of the queue
    public static final String SCORPIOS_QUEUE_NAME_ONE = "scorpios_queue_name_xiaomi";
    public static final String SCORPIOS_QUEUE_NAME_TWO = "scorpios_queue_name_huawei";
    public static final String SCORPIOS_QUEUE_NAME_THREE = "scorpios_queue_name_phone";

    /**
     * Create a TopicExchange switch
     * First parameter: switch name
     * Second parameter: is it still valid after restart
     * The third parameter: delete when not used for a long time
     * @return
     */
    @Bean
    TopicExchange topicExchange(){
        return new TopicExchange(TopicsRabbitMQConfig.SCORPIOS_EXCHANGE_NAME,true,false);
    }

    @Bean
    Queue xiaomi() {
        return new Queue(TopicsRabbitMQConfig.SCORPIOS_QUEUE_NAME_ONE,true,false,false);
    }

    @Bean
    Queue huawei() {
        return new Queue(TopicsRabbitMQConfig.SCORPIOS_QUEUE_NAME_TWO,true,false,false);
    }

    @Bean
    Queue phone() {
        return new Queue(TopicsRabbitMQConfig.SCORPIOS_QUEUE_NAME_THREE,true,false,false);
    }

    // Bind queue to TopicExchange
    @Bean
    Binding bindingXiaomi() {
        return BindingBuilder.bind(xiaomi()).to(topicExchange()).with("xiaomi.#");
    }

    @Bean
    Binding bindingHuawei() {
        return BindingBuilder.bind(huawei()).to(topicExchange()).with("huawei.#");
    }

    @Bean
    Binding bindingPhone() {
        return BindingBuilder.bind(phone()).to(topicExchange()).with("#.phone.#");
    }

}
- Create a TopicExchange with three queues. The first Queue is used to store messages related to xiaomi, the second Queue is used to store messages related to huawei, and the third Queue is used to store messages related to phone
- Bind the three queues to TopicExchange respectively,
- xiaomi in the first Binding# The routingkey indicating the message, which starts with xiaomi, will be routed to the Queue named xiaomi
- huawei. In the second Binding# The routingkey indicating the message, which starts with huawei, will be routed to the Queue named huawei
- In the third Binding # phone.# It means that any message containing phone in the routing key of the message will be routed to the Queue named phone
Next, create three consumers for three queues, as follows:
@Slf4j
@Component
public class TopicsConsumer {

    @RabbitListener(queues = TopicsRabbitMQConfig.SCORPIOS_QUEUE_NAME_ONE)
    public void consumeXiaomi(String msg) {
        log.info("consumeXiaomi The message received by the consumer is:{},matching routingkey:xiaomi.#",msg);
    }

    @RabbitListener(queues = TopicsRabbitMQConfig.SCORPIOS_QUEUE_NAME_TWO)
    public void consumeHuawei(String msg) {
        log.info("consumeHuawei The message received by the consumer is:{},matching routingkey:huawei.#",msg);
    }

    @RabbitListener(queues = TopicsRabbitMQConfig.SCORPIOS_QUEUE_NAME_THREE)
    public void consumePhone(String msg) {
        log.info("consumePhone The message received by the consumer is:{},matching routingkey:#.phone.#",msg);
    }

}
Sender:
@Slf4j
@RestController
public class RabbitMQController {

    @Autowired
    RabbitTemplate rabbitTemplate;

     @GetMapping("/send/message")
    public String test(){
        log.info("Client message received");
        rabbitTemplate.convertAndSend(TopicsRabbitMQConfig.SCORPIOS_EXCHANGE_NAME,"xiaomi.news","Xiaomi news,xiao.news");
        rabbitTemplate.convertAndSend(TopicsRabbitMQConfig.SCORPIOS_EXCHANGE_NAME,"huawei.news","Huawei news,huawei.news");
        rabbitTemplate.convertAndSend(TopicsRabbitMQConfig.SCORPIOS_EXCHANGE_NAME,"xiaomi.phone","Mi phones,xiaomi.phone");
        rabbitTemplate.convertAndSend(TopicsRabbitMQConfig.SCORPIOS_EXCHANGE_NAME,"huawei.phone","Huawei Mobile,huawei.phone");
        rabbitTemplate.convertAndSend(TopicsRabbitMQConfig.SCORPIOS_EXCHANGE_NAME,"phone.news","Mobile News,phone.news");
        return "success";
    }

}
According to the configuration in topicsrabbit mqconfig, the test results should be as follows:
- The first message will be routed to a Queue named xiaomi
- The second message will be routed to a Queue named huawei
- The third message will be routed to the Queue named xiaomi and phone
- The fourth message will be routed to the Queue named huawei and phone
- The fifth message will be routed to a Queue named phone
Test results: Browser input: http://localhost:8889/send/message , see the console log input

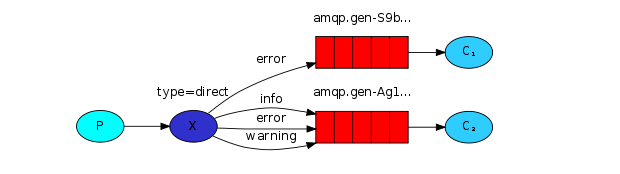
2.2.3.4 Header
HeadersExchange is a less used routing strategy. HeadersExchange routes messages to different queues according to the Header of the message. This strategy is also independent of routingkey. HeadersExchange is configured as follows:
@Configuration
public class HeaderRabbitMQConfig {

    // Name of the switch
    public static final String SCORPIOS_EXCHANGE_NAME = "scorpios_exchange_name";

    // The name of the queue
    public static final String SCORPIOS_QUEUE_NAME_ONE = "scorpios_queue_name_name";
    public static final String SCORPIOS_QUEUE_NAME_TWO = "scorpios_queue_name_age";

    /**
     * Create a HeadersExchange switch
     * First parameter: switch name
     * Second parameter: is it still valid after restart
     * Delete the third parameter when it is not used for a long time
     * @return
     */
    @Bean
    HeadersExchange headersExchange(){
        return new HeadersExchange(HeaderRabbitMQConfig.SCORPIOS_EXCHANGE_NAME,true,false);
    }

    @Bean
    Queue queueName() {
        return new Queue(HeaderRabbitMQConfig.SCORPIOS_QUEUE_NAME_ONE,true,false,false);
    }

    @Bean
    Queue queueAge() {
        return new Queue(HeaderRabbitMQConfig.SCORPIOS_QUEUE_NAME_TWO,true,false,false);
    }

    // Bind queue to HeadersExchange
    @Bean
    Binding bindingName() {
        Map<String, Object> map = new HashMap<>();
        map.put("name", "scorpios");
        return BindingBuilder.bind(queueName()).to(headersExchange()).whereAny(map).match();
    }

    @Bean
    Binding bindingAge() {
        return BindingBuilder.bind(queueAge()).to(headersExchange()).whereAny("age").exist();
    }

}
The main focus here is on the configuration of Binding. In the first bindingName method, where any means that as long as there is a Header in the Header of the message that matches the key/value in the map, the message will be routed to the name Scorpios_ Queue_ name_ On the Queue of name, the whereAll method can also be used here to indicate that all headers of the message should match. whereAny and whereAll actually correspond to an attribute called x-match. The configuration in bindingAge means that as long as the Header of the message contains age, regardless of the value of age, the message will be routed to the message named Scorpios_ Queue_ name_ On the Queue of page
consumer:
@Slf4j
@Component
public class HeaderConsumer {

    @RabbitListener(queues = HeaderRabbitMQConfig.SCORPIOS_QUEUE_NAME_ONE)
    public void consumeName(String msg) {
        log.info("consumeName The message received by the consumer is:{}",msg);
    }

    @RabbitListener(queues = HeaderRabbitMQConfig.SCORPIOS_QUEUE_NAME_TWO)
    public void consumeAge(String msg) {
        log.info("consumeAge The message received by the consumer is:{}",msg);
    }

}
Sender:
@Slf4j
@RestController
public class RabbitMQController {

    @Autowired
    RabbitTemplate rabbitTemplate;

    @GetMapping("/send/message")
    public String test(){
        log.info("Client message received");
        Message name = MessageBuilder.withBody("header exchange, scorpios_queue_name_name".getBytes())
                                        .setHeader("name", "scorpios").build();
        Message age = MessageBuilder.withBody("header exchange, scorpios_queue_name_age".getBytes())
                                        .setHeader("age", "20").build();
        rabbitTemplate.convertAndSend(HeaderRabbitMQConfig.SCORPIOS_EXCHANGE_NAME,null,name);
        rabbitTemplate.convertAndSend(HeaderRabbitMQConfig.SCORPIOS_EXCHANGE_NAME,null,age);
        return "success";
    }

}
Create and send two messages with different headers. Messages with different headers will be sent to different queues
Test results: Browser input: http://localhost:8889/send/message , see the console log input

2.2.3.5 summary
- routingkey is required for DirectExchange and TopicExchange
- FanoutExchange and HeadersExchange do not need routingkey
- If the key s of multiple queues bound to a DirectExchange switch are the same, although the binding type is Direct, its performance is a little similar to that of FanoutExchange and similar to that of broadcast
2.2.4 Routing
One producer, one switch, two queues and two consumers. After creating the Exchange, the producer binds the corresponding queue according to the RoutingKey, and when sending the message, specify the specific RoutingKey of the message. See the following figure for understanding:
This method is to route messages according to the routing key. You can refer to DirectExchange and TopicExchange above
2.2.5 Topics
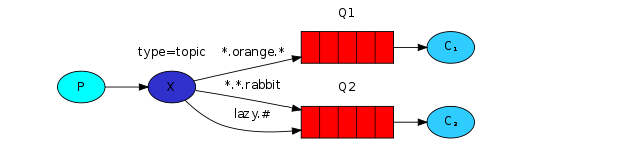
One producer, one switch, two queues and two consumers create TopicExchange and bind it to the queue. For this binding, you can write and use wildcards for the specified RoutingKey content through * and # keywords. See the following figure for understanding:

This method is to route messages according to the routing key. You can refer to TopicExchange above
2.2.6 RPC
RabbitMQ provides RPC function. The schematic diagram is as follows:
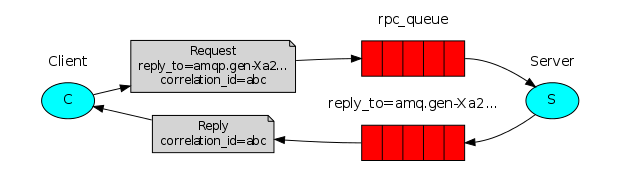
Principle explanation:
- The Client sends a message. Compared with ordinary messages, this message has two more key contents: one is correlation_id, which represents the unique id of the message. Another content is reply_to, which indicates the name of the message reply queue
- The Server obtains the message from the message sending queue and processes the corresponding business logic. After processing, the Server sends the processing result to reply_to the specified callback queue
- When the Client reads the message from the callback queue, it can know the execution result of the message
Specific examples, the next implementation~
2.2.7 Publisher Confirms
There are two ways to solve the problem of message reliability: transaction and message confirmation.
For whether the message is successfully consumed, you can use this method - message confirmation mechanism. Message confirmation is divided into automatic confirmation and manual confirmation.
In the above code, most of them use automatic confirmation. In addition to introducing the Work Queues method, the consumer started the manual ack
This method is very important. Follow up research alone~~