Introduction to docker image
docker images are layered, with underlying online overlay downloads.

dockerfille generates images in the form of text. Its advantage is that you can view the generation process after generating images. Compared with docker commit, it is more secure and reliable.
When using dockerfile, you must write a file with the name of dockerfile.
Workflow of dockerfile
- docker runs a container FROM the image specified in the FROM header of the dockerfile file
- Then make an instruction to modify the container
- Then perform an operation similar to docker commit to create a new image layer
- Then create a new container based on this image
- In this image, execute the instructions in the dockerfile successively until the instruction ends
Features: Dockerfile has the advantage of caching. As long as the image layer is not changed, it generates an image at the second level.

dockerfile file writing format
- *FROM: which image is used to build the image
For example: FROM centos:7 - MAINTAINER: name or email address of image MAINTAINER
For example: MAINTAINER adam - *RUN: the shell command that runs when the image is built
For example:
RUN ["yum","install","httpd"] RUN yum -y install httpd - *CMD: shell command executed when the container is run
For example: CMD ["/bin/bash"] - *Export: declares the service port of the container
For example: export 80 443 - *ENV: setting container environment variables
For example: ENV MYSQL_ROOT_PASSWORD 123.com - *ADD: copy the file or directory to the image. If it is a URL or compressed package, it will be automatically downloaded or decompressed
Add < source file >... < destination directory > add ["source file"... "Destination directory"] - *COPY: COPY files or directories into the image container, similar to ADD, but without automatic download or decompression function
- ENTRYPOINT: shell command executed when the container is run
For example: ENTRYPOINT ["/bin/bash","-c", "command"] ENTRYPOINT /bin/bash -c 'command' - *VOLUME: Specifies the container mount point to a directory or other container automatically generated by the host
For example: VOLUME ["/var/lib/mysql"] - USER: Specifies the running USER for the RUN, CMD, and ENTRYPOINT execution commands
- *WORKDIR: set the working directory for RUN, CMD, ENTRYPOINT, COPY and ADD, which means to switch directories
For example:
WORKDIR: /var/lib/mysql = cd /var/lib/mysql - HEALTHCHECK: health check
- ARG: some parameters specified during construction
For example: FROM centos:7 ARG user USER $user
be careful:
- RUN runs during building and can write multiple. In fact, RUN is conditional (like 200).
- CMD and ENTRYPOINT can only write one entry when running container. If multiple entries are written, the last entry will take effect
- CMD can be overwritten by COMMAND when run ning, and entrypoint will not be overwritten by COMMAND, but – entrypoint can be specified.
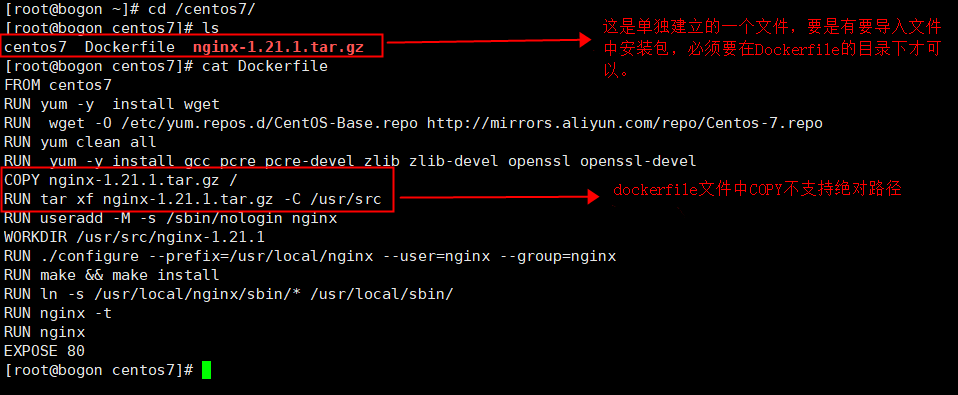
- If you need to import a file into the image in Dockerfile, the file or directory must be in the directory or subdirectory where Dockerfile is located.
- There can only be one Dockerfile in a directory, and the case of the name is strictly in accordance with the requirements: Dockerfile
experiment
Make an image using dockerfile.
The first step; Create a dedicated file plus, I like to create it under the root, which should be easy to find.
Step 2: create a Dockerfile file. Note that the beginning must be capitalized.
Step 3: write the content to be executed, which is run in the docker container.
Step 4: run the command
Command formats: commands - parameter - option - Mirror new name - current directory
 Step 1:
[root@bogon centos7]# mkdir /centos7
 Step 2:
[root@bogon centos7]# vim Dockerfile
 Step 3:
FROM centos7
RUN yum -y  install wget
RUN  wget -O /etc/yum.repos.d/CentOS-Base.repo http://mirrors.aliyun.com/repo/Centos-7.repo
RUN yum clean all
RUN  yum -y install gcc pcre pcre-devel zlib zlib-devel openssl openssl-devel
COPY nginx-1.21.1.tar.gz /
RUN tar xf nginx-1.21.1.tar.gz -C /usr/src
RUN useradd -M -s /sbin/nologin nginx
WORKDIR /usr/src/nginx-1.21.1
RUN ./configure --prefix=/usr/local/nginx --user=nginx --group=nginx
RUN make && make install
RUN ln -s /usr/local/nginx/sbin/* /usr/local/sbin/
RUN nginx -t
RUN nginx
EXPOSE 80
 Step 4:
[root@bogon centos7]# docker build -t centos7.23 .
Sending build context to Docker daemon  612.7MB
Step 1/15 : FROM centos7
 ---> 7e6257c9f8d8
Step 2/15 : RUN yum -y  install wget
 ---> Using cache
 ---> 1a2feeacb848
Step 3/15 : RUN  wget -O /etc/yum.repos.d/CentOS-Base.repo http://mirrors.aliyun.com/repo/Centos-7.repo
 ---> Using cache
 ---> 60c79176858e
 Wait quietly for the container to be made. After making, the image is saved in docker In.
docker commit production
The image produced by this method is more simple. One command can be run directly. The disadvantage is that the production steps cannot be viewed.
Command formats: commands - parameter - Container already exists - New mirror name
[root@bogon centos7]# docker commit test1 testss
sha256:1d4227113442d943a17e20404028e66061775eb1141a326c4c5b25859a999394
[root@bogon centos7]# docker images
REPOSITORY          TAG                 IMAGE ID            CREATED             SIZE
testss              latest              1d4227113442        12 seconds ago      462MB
test1_test          latest              968dc0f28dd1        11 hours ago        462MB
centos7.1           latest              ec601049a17a        17 hours ago        601MB