Learning objectives
- Learn microservice architecture
- Corresponding project Hotel demo
Study notes
1. Get to know elasticsearch
1.1. Understanding ES
1.1. 1. Function of elasticsearch
Elastic search is a very powerful open source search engine with many powerful functions, which can help us quickly find the content we need from massive data
1.1.2.ELK technology stack
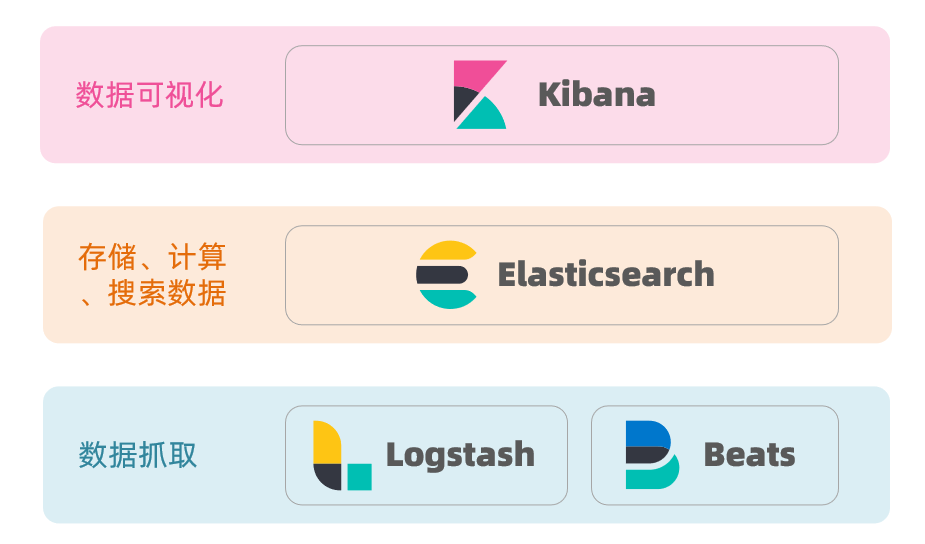
Elastic search combines kibana, Logstash and Beats, that is, elastic stack (ELK). It is widely used in log data analysis, real-time monitoring and other fields
Elastic search is the core of elastic stack, which is responsible for storing, searching and analyzing data.
1.1.3.elasticsearch and lucene
The bottom layer of elastic search is implemented based on lucene.
Lucene is a search engine class library of Java language. It is a top-level project of Apache Company. It was developed by DougCutting in 1999. Official website address: https://lucene.apache.org/ .
Development history of elasticsearch:
- In 2004, Shay Banon developed Compass based on Lucene
- In 2010, Shay Banon rewritten Compass and named it Elasticsearch.
1.1. 4. Summary
What is elastic search?
- An open source distributed search engine can be used to realize the functions of search, log statistics, analysis, system monitoring and so on
What is elastic stack (ELK)?
- It is a technology stack with elasticsearch as the core, including beats, Logstash, kibana and elasticsearch
What is Lucene?
- It is the open source search engine class library of Apache and provides the core API of search engine
1.2. Inverted index
The concept of inverted index is based on forward indexes such as MySQL.
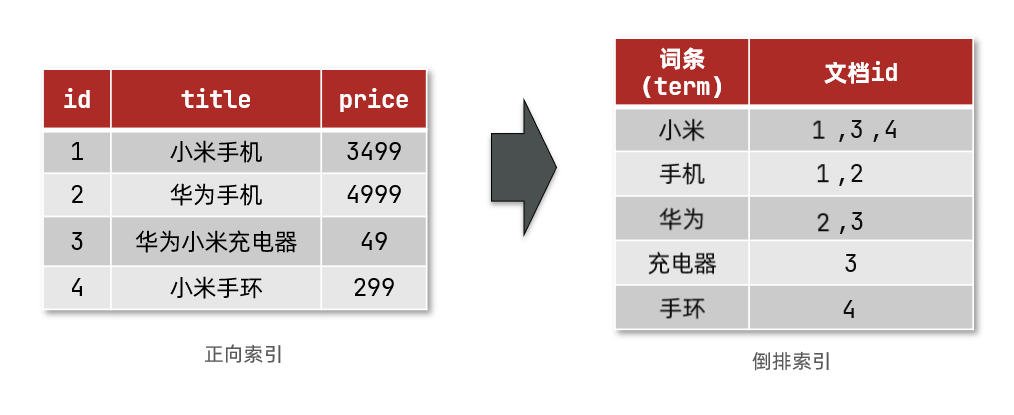
1.2. 1. Forward index
Scan row by row according to the primary key, that is, scan the whole table. As the amount of data increases, the query efficiency will become lower and lower. When the amount of data reaches millions, it is a disaster.
1.2. 2. Inverted index
There are two very important concepts in inverted index:
- Document: data used to search. Each piece of data is a document, such as a web page and a commodity information
- Term: for document data or user search data, use some algorithm to segment words, and the words with meaning are terms. For example, if I am Chinese, I can be divided into several terms: I, yes, Chinese, Chinese and Chinese
Creating inverted index is a special process for forward index. The process is as follows:
- The data of each document is segmented by the algorithm to get each entry
- Create a table. Each row of data includes the entry, the document id where the entry is located, the location and other information
- Because entries are unique, you can create indexes for entries, such as hash table structure index
As shown in the figure:
The search process of inverted index is as follows (take the search of "Huawei mobile phone" as an example):
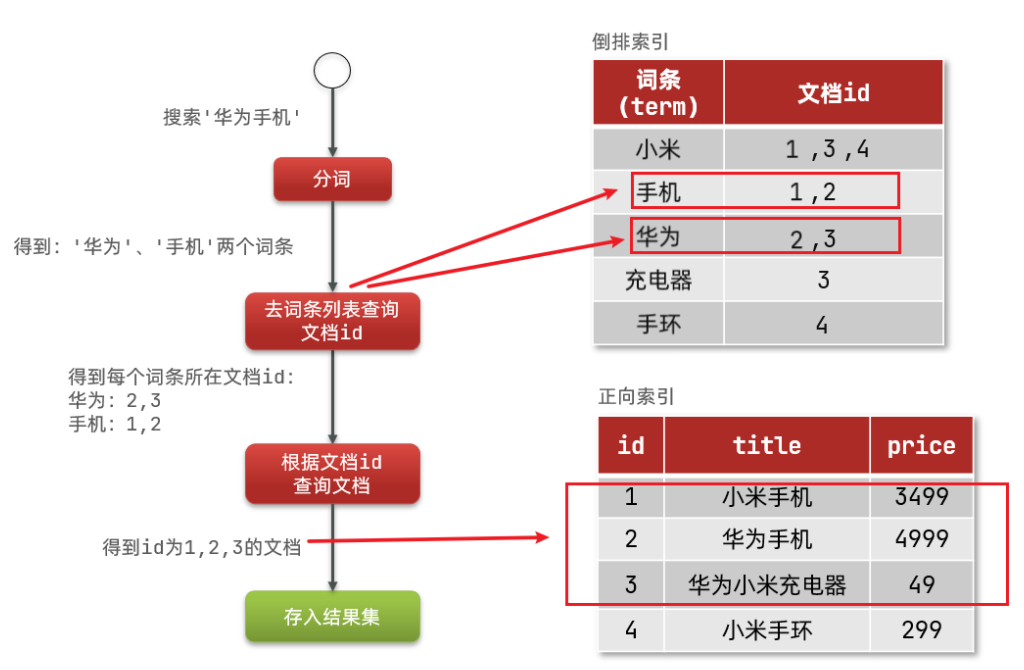
Although it is necessary to query the inverted index first and then the inverted index, the index is established for both terms and document id, and the query speed is very fast! Full table scanning is not required.
1.2. 3. Forward and reverse
So why is one called forward index and the other called inverted index?
-
Forward indexing is the most traditional way of indexing according to id. However, when querying according to terms, you must first obtain each document one by one, and then judge whether the document contains the required terms. It is the process of finding terms according to the document.
-
On the contrary, the inverted index first finds the term that the user wants to search, obtains the id of the document protecting the term according to the term, and then obtains the document according to the id. It is the process of finding documents according to entries.
Is it just the opposite?
So what are the advantages and disadvantages of the two methods?
Forward index:
- advantage:
- Multiple fields can be indexed
- Searching and sorting according to index fields is very fast
- Disadvantages:
- When searching according to non index fields or some entries in index fields, you can only scan the whole table.
Inverted index:
- advantage:
- According to the entry search, fuzzy search, the speed is very fast
- Disadvantages:
- Only entries can be indexed, not fields
- Cannot sort by field
1.3. Some concepts of ES
There are many unique concepts in elastic search, which are slightly different from those in mysql, but also have similarities.
1.3. 1. Documents and fields
Elasticsearch is stored for * * Document * *. It can be a piece of product data and an order information in the database. The Document data will be serialized into json format and stored in elasticsearch
Json documents often contain many fields, similar to columns in the database.
1.3. 2. Indexing and mapping
An Index is a collection of documents of the same type.
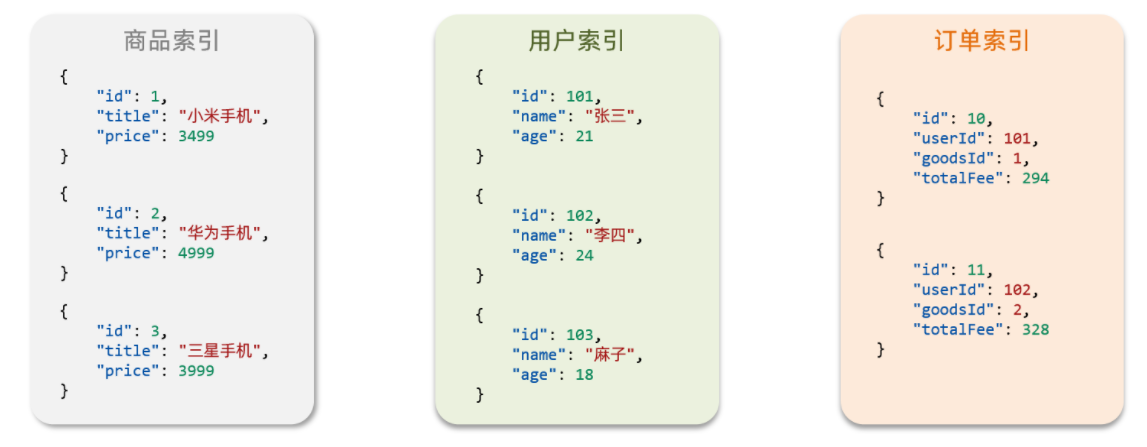
You can think of an index as a table in a database.
The database table will have constraint information, which is used to define the table structure, field name, type and other information. Therefore, there is mapping in the index library, which is the field constraint information of the document in the index, similar to the structure constraint of the table.
1.3.3.mysql and elasticsearch
| MySQL | Elasticsearch | explain |
|---|---|---|
| Table | Index | An index is a collection of documents, similar to a database table |
| Row | Document | Documents are pieces of data, similar to rows in a database. Documents are in JSON format |
| Column | Field | A Field is a Field in a JSON document, similar to a Column in a database |
| Schema | Mapping | Mapping is a constraint on documents in an index, such as field type constraints. It is similar to the table structure (Schema) of a database |
| SQL | DSL | DSL is a JSON style request statement provided by elasticsearch. It is used to operate elasticsearch and implement CRUD |
-
Mysql: good at transaction type operation, which can ensure data security and consistency
-
Elastic search: good at searching, analyzing and calculating massive data
In enterprises, the two are often used in combination:
- Write operations requiring high security are implemented using mysql
- For the search requirements with high query performance, elastic search is used
- Based on some way, the two can realize data synchronization and ensure consistency
1.4. Install es, kibana, word splitter
1.4. 1. Deploy single point es
Run the docker command to deploy a single point es:
docker run -d \
	--name es \
    -e "ES_JAVA_OPTS=-Xms512m -Xmx512m" \
    -e "discovery.type=single-node" \
    -v es-data:/usr/share/elasticsearch/data \
    -v es-plugins:/usr/share/elasticsearch/plugins \
    --privileged \
    --network es-net \
    -p 9200:9200 \
    -p 9300:9300 \
elasticsearch:7.12.1
Command interpretation:
- -E "cluster. Name = es docker cluster": set the cluster name
- -e "http.host=0.0.0.0": the monitored address can be accessed from the Internet
- -e "ES_JAVA_OPTS=-Xms512m -Xmx512m": memory size
- -E "discovery. Type = single node": non cluster mode
- -V es data: / usr / share / elasticsearch / data: mount the logical volume and bind the data directory of ES
- -V es logs: / usr / share / elasticsearch / logs: mount the logical volume and bind the log directory of ES
- -V es plugins: / usr / share / elasticsearch / plugins: mount the logical volume and bind the plug-in directory of ES
- --privileged: granted access to the logical volume
- --Network es net: join a network called es net
- -p 9200:9200: port mapping configuration
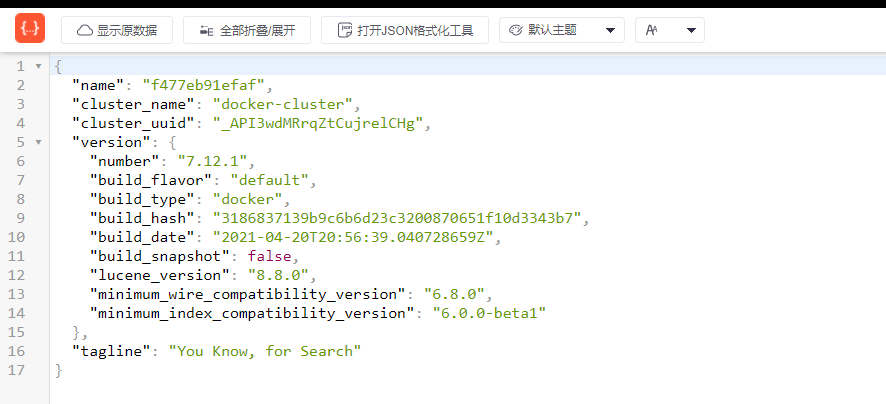
Enter in the browser: http://192.168.150.101:9200 You can see the response result of elasticsearch:
1.4. 2. Deploy kibana
kibana can provide us with a visual interface of elastic search, which is convenient for us to learn.
Run the docker command to deploy kibana. Kibana must be the same version as elasticsearch
docker run -d \
--name kibana \
-e ELASTICSEARCH_HOSTS=http://es:9200 \
--network=es-net \
-p 5601:5601  \
kibana:7.12.1
- --Network es net: join a network called es net, which is in the same network as elastic search
- -e ELASTICSEARCH_HOSTS=http://es:9200 ": set the address of elasticsearch. Because kibana is already on the same network as elasticsearch, you can directly access elasticsearch with the container name
- -p 5601:5601: port mapping configuration
kibana generally starts slowly and needs to wait a little longer. You can use the command:
docker logs -f kibana
View the operation log. When you view the following log, it indicates success:
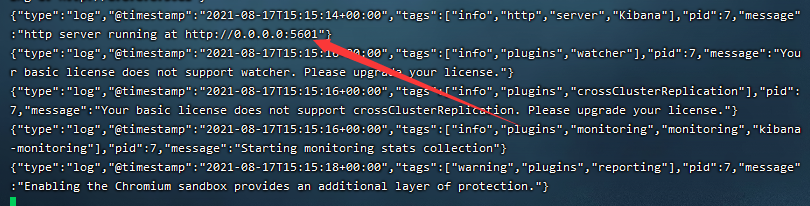
At this point, enter the address in the browser to access: http://192.168.150.101:5601 , you can see the results
1.4. 3. Install word splitter
To install the plug-in, you need to know the location of the plugins directory of elasticsearch, and we use the data volume mount. Therefore, you need to view the data volume directory of elasticsearch through the following command:
docker volume inspect es-plugins
Display results:
[
    {
        "CreatedAt": "2022-05-06T10:06:34+08:00",
        "Driver": "local",
        "Labels": null,
        "Mountpoint": "/var/lib/docker/volumes/es-plugins/_data",
        "Name": "es-plugins",
        "Options": null,
        "Scope": "local"
    }
]
Description the plugins directory is mounted to: / var / lib / docker / volumes / es plugins/_ Data in this directory. Unzip the plug-in and upload it to the directory
The IK word breaker contains two modes:
-
ik_smart: minimum segmentation
-
ik_max_word: thinnest segmentation
1.4. 4. Extended word dictionary
With the development of the Internet, "word making movement" is becoming more and more frequent. There are many new words that do not exist in the original vocabulary list. For example: "Aoli to", "wisdom podcast", etc.
Therefore, our vocabulary also needs to be constantly updated. IK word splitter provides the function of expanding vocabulary.
1) Open the IK word splitter config Directory:
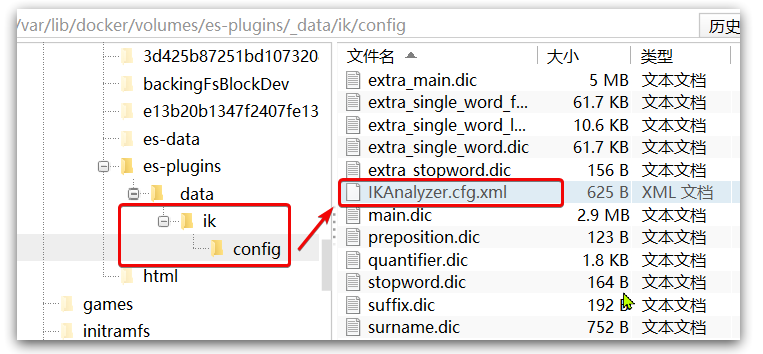
2) At ikanalyzer cfg. XML configuration file content addition:
<?xml version="1.0" encoding="UTF-8"?>
<!DOCTYPE properties SYSTEM "http://java.sun.com/dtd/properties.dtd">
<properties>
        <comment>IK Analyzer Extended configuration</comment>
        <!--Users can configure their own extended dictionary here *** Add extended dictionary-->
        <entry key="ext_dict">ext.dic</entry>
</properties>
3) Create a new ext.dic. You can copy a configuration file under the config directory for modification
Intelligence Podcast
 awesome
4) Restart elasticsearch
docker restart es

# View log
docker logs -f elasticsearch
The ext.dic configuration file was successfully loaded in the log
Note that the encoding of the current file must be in UTF-8 format. It is strictly prohibited to edit it with Windows Notepad
1.4. 5. Stop word dictionary
In Internet projects, the transmission speed between networks is very fast, so many languages are not allowed to be transmitted on the network, such as sensitive words such as religion and politics, so we should also ignore the current words when searching.
The IK word splitter also provides a powerful stop word function, allowing us to directly ignore the contents of the current stop vocabulary when indexing.
1)IKAnalyzer.cfg.xml configuration file content addition:
<?xml version="1.0" encoding="UTF-8"?>
<!DOCTYPE properties SYSTEM "http://java.sun.com/dtd/properties.dtd">
<properties>
        <comment>IK Analyzer Extended configuration</comment>
        <!--Users can configure their own extended dictionary here-->
        <entry key="ext_dict">ext.dic</entry>
         <!--Users can configure their own extended stop word dictionary here  *** Add stop word dictionary-->
        <entry key="ext_stopwords">stopwords.dic</entry>
</properties>
3) At stopwords DIC add stop word
4) Restart elasticsearch
# Restart service
docker restart elasticsearch
docker restart kibana

# View log
docker logs -f elasticsearch
Stopword.com has been successfully loaded in the log DIC profile
Note that the encoding of the current file must be in UTF-8 format. It is strictly prohibited to edit it with Windows Notepad
1.4. 6. Summary
What is the function of the word splitter?
- Word segmentation of documents when creating inverted indexes
- When the user searches, word segmentation is performed on the input content
How many modes does the IK word breaker have?
- ik_smart: intelligent segmentation, coarse granularity
- ik_max_word: finest segmentation, fine granularity
How does IK participle expand entries? How to deactivate an entry?
- Use the ikanalyzer. config directory cfg. Add extended dictionary and deactivated dictionary to XML file
- Add extended or disabled entries to the dictionary
2. Index library operation
The index library is similar to the database table, and the mapping mapping is similar to the structure of the table.
To store data in es, we must first create "library" and "table".
2.1.mapping mapping properties
Mapping is a constraint on documents in the index library. Common mapping attributes include:
- Type: field data type. Common simple types are:
- String: text (separable text), keyword (exact value, such as brand, country, ip address)
- Values: long, integer, short, byte, double, float
- boolean: boolean
- date: date
- Objects: object
- Index: whether to create an index. The default value is true
- analyzer: what kind of participle do you use
- properties: subfield of this field
2.2. CRUD of index library
Here, we uniformly use Kibana to write DSL for demonstration.
2.2. 1. Create index library and mapping
Basic syntax:
- Request method: PUT
- Request path: / index library name, which can be customized
- Request parameters: mapping
Format:
PUT /Index library name
{
  "mappings": {
    "properties": {
      "Field name":{
        "type": "text",
        "analyzer": "ik_smart"
      },
      "Field name 2":{
        "type": "keyword",
        "index": "false"
      },
      "Field name 3":{
        "properties": {
          "Subfield": {
            "type": "keyword"
          }
        }
      },
      // ... slightly
    }
  }
}
2.2. 2. Query index library
Basic syntax:
-
Request method: GET
-
Request path: / index library name
-
Request parameters: None
Format:
GET /Index library name
2.2. 3. Modify index library
Although the inverted index structure is not complex, once the data structure changes (such as changing the word splitter), the inverted index needs to be re created, which is a disaster. Therefore, once the index library is created, mapping cannot be modified.
Although the existing fields in mapping cannot be modified, it is allowed to add new fields to mapping because it will not affect the inverted index.
Syntax description:
PUT /Index library name/_mapping
{
  "properties": {
    "new field name":{
      "type": "integer"
    }
  }
}
2.2. 4. Delete index library
Syntax:
-
Request method: DELETE
-
Request path: / index library name
-
Request parameters: None
Format:
DELETE /Index library name
2.2. 5. Summary
What are the operations of the index library?
- Create index library: PUT / index library name
- Query index library: GET / index library name
- DELETE index library: DELETE / index library name
- Add field: PUT / index library name/_ mapping
3. Document operation
3.1. New document
Syntax:
POST /Index library name/_doc/file id
{
    "Field 1": "Value 1",
    "Field 2": "Value 2",
    "Field 3": {
        "Sub attribute 1": "Value 3",
        "Sub attribute 2": "Value 4"
    },
    // ...
}
3.2. consult your documentation
According to the rest style, the new is post, and the query should be get. However, the query generally requires conditions. Here we bring the document id.
Syntax:
GET /{Index library name}/_doc/{id}
View data through kibana:
GET /heima/_doc/1
3.3. remove document
To DELETE a DELETE request, you need to DELETE it according to the id:
Syntax:
DELETE /{Index library name}/_doc/id value
Example:
# Delete data by id
DELETE /heima/_doc/1
3.4. Modify document
There are two ways to modify:
- Full modification: directly overwrite the original document
- Incremental modification: modify some fields in the document
3.4. 1. Full volume modification
Full modification is to overwrite the original document. Its essence is:
- Deletes the document according to the specified id
- Add a document with the same id
Note: if the id does not exist when it is deleted according to the id, the addition in the second step will also be executed, which will change from modification to addition.
Syntax:
PUT /{Index library name}/_doc/file id
{
    "Field 1": "Value 1",
    "Field 2": "Value 2",
    // ...  slightly
}
3.4. 2. Incremental modification
Incremental modification is to modify only some fields in the document with the specified id matching.
Syntax:
POST /{Index library name}/_update/file id
{
    "doc": {
         "Field name": "New value",
    }
}
3.5. summary
What are the document operations?
- Create document: POST / {index library name}/_ doc / document ID {JSON document}
- Query document: GET / {index library name}/_ doc / document id
- DELETE document: DELETE / {index library name}/_ doc / document id
- Modify document:
- Full modification: PUT / {index library name}/_ doc / document ID {JSON document}
- Incremental modification: POST / {index library name}/_ update / document id {"doc": {field}}
4.RestAPI
ES officially provides clients in different languages to operate ES. The essence of these clients is to assemble DSL statements and send them to ES through http requests. Official document address: https://www.elastic.co/guide/en/elasticsearch/client/index.html
The Java Rest Client includes two types:
- Java Low Level Rest Client
- Java High Level Rest Client
4.0. Initialize RestClient
In the API provided by elasticsearch, all interactions with elasticsearch are encapsulated in a class named RestHighLevelClient. You must initialize this object and establish a connection with elasticsearch.
There are three steps:
1) RestHighLevelClient dependency introduced es:
<dependency>
    <groupId>org.elasticsearch.client</groupId>
    <artifactId>elasticsearch-rest-high-level-client</artifactId>
</dependency>
2) Because the default ES version of SpringBoot is 7.6 2. Therefore, we need to overwrite the default ES version:
<properties>
    <java.version>1.8</java.version>
    <elasticsearch.version>7.12.1</elasticsearch.version>
</properties>
3) Initialize RestHighLevelClient:
The initialization code is as follows:
RestHighLevelClient client = new RestHighLevelClient(RestClient.builder(
        HttpHost.create("http://192.168.150.101:9200")
));
For the convenience of unit testing, we create a test class HotelIndexTest, and then write the initialization code in the @ BeforeEach method:
package cn.itcast.hotel;

import org.apache.http.HttpHost;
import org.elasticsearch.client.RestHighLevelClient;
import org.junit.jupiter.api.AfterEach;
import org.junit.jupiter.api.BeforeEach;
import org.junit.jupiter.api.Test;

import java.io.IOException;

public class HotelIndexTest {
    private RestHighLevelClient client;

    @BeforeEach
    void setUp() {
        this.client = new RestHighLevelClient(RestClient.builder(
                HttpHost.create("http://192.168.150.101:9200")
        ));
    }

    @AfterEach
    void tearDown() throws IOException {
        this.client.close();
    }
}
4.1. Create index library
4.1. 1. Code interpretation
The API for creating the index library is as follows:
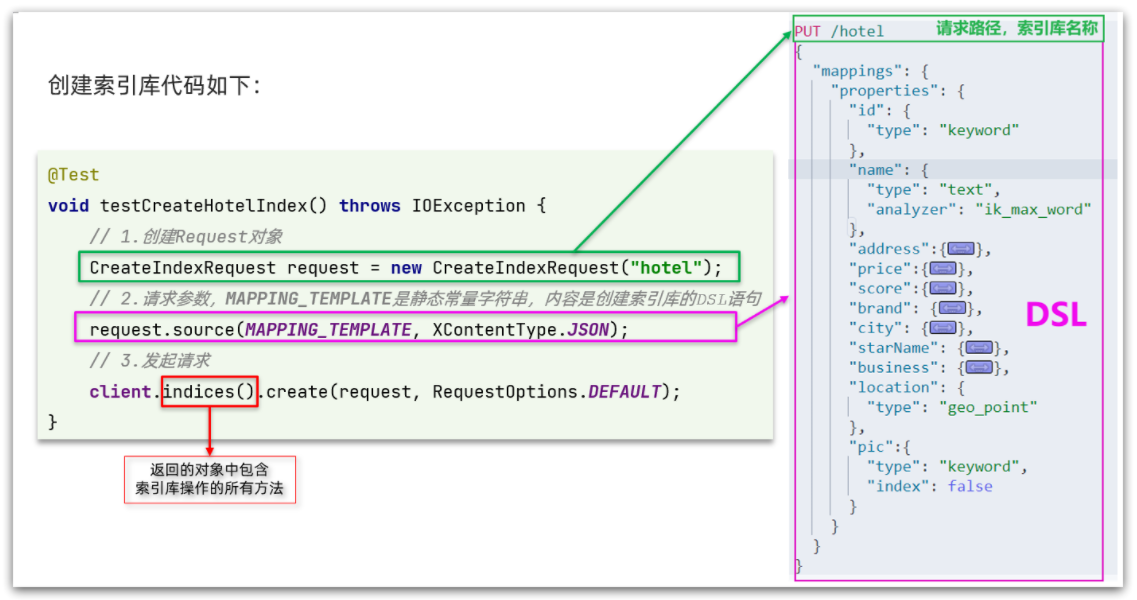
The code is divided into three steps:
- 1) Create a Request object. Because it is an operation to create an index library, Request is CreateIndexRequest.
- 2) Adding request parameters is actually the JSON parameter part of DSL. Because the JSON string is very long, the static string constant mapping is defined here_ Template to make the code look more elegant.
- 3) Send request, client The return value of the indices () method is the IndicesClient type, which encapsulates all methods related to the index library operation.
4.2. Delete index library
The DSL statement to delete the index library is very simple:
DELETE /hotel
Compared to creating an index library:
- Request mode changed from PUT to DELTE
- Request path unchanged
- No request parameters
Therefore, the code difference should be reflected in the Request object. There are still three steps:
- 1) Create a Request object. This is the DeleteIndexRequest object
- 2) Prepare parameters. Here is no reference
- 3) Send request. Use the delete method instead
In the HotelIndexTest test test class in the hotel demo, write a unit test to delete the index:
@Test
void testDeleteHotelIndex() throws IOException {
    // 1. Create Request object
    DeleteIndexRequest request = new DeleteIndexRequest("hotel");
    // 2. Send request
    client.indices().delete(request, RequestOptions.DEFAULT);
}
4.3. Determine whether the index library exists
Judging whether an index library exists is essentially a query. The corresponding DSL is:
GET /hotel
Therefore, it is similar to the deleted Java code flow. There are still three steps:
- 1) Create a Request object. This is the GetIndexRequest object
- 2) Prepare parameters. Here is no reference
- 3) Send request. Use the exists method instead
@Test
void testExistsHotelIndex() throws IOException {
    // 1. Create Request object
    GetIndexRequest request = new GetIndexRequest("hotel");
    // 2. Send request
    boolean exists = client.indices().exists(request, RequestOptions.DEFAULT);
    // 3. Output
    System.err.println(exists ? "Index library already exists!" : "Index library does not exist!");
}
4.4. summary
The process of JavaRestClient operating elasticsearch is basically similar. The core is client The indexes () method to get the operation object of the index library.
Basic steps of index library operation:
- Initialize RestHighLevelClient
- Create an XxxIndexRequest. XXX is create, Get and Delete
- Prepare DSL (required when creating, others are parameterless)
- Send request. Call resthighlevelclient #indices() xxx () method, xxx is create, exists, delete
5.RestClient operation document
In order to separate from the index library operation, we participate in a test class again and do two things:
- Initialize RestHighLevelClient
- Our hotel data is in the database and needs to be queried by IHotelService, so we inject this interface
@SpringBootTest
public class HotelDocumentTest {
    @Autowired
    private IHotelService hotelService;

    private RestHighLevelClient client;

    @BeforeEach
    void setUp() {
        this.client = new RestHighLevelClient(RestClient.builder(
                HttpHost.create("http://192.168.150.101:9200")
        ));
    }

    @AfterEach
    void tearDown() throws IOException {
        this.client.close();
    }
}
5.1. New document
We need to query the hotel data in the database and write it into elasticsearch.
5.1. 1. Index library entity class
The result of the database query is an object of type Hotel. The structure is as follows:
@Data
@TableName("tb_hotel")
public class Hotel {
    @TableId(type = IdType.INPUT)
    private Long id;
    private String name;
    private String address;
    private Integer price;
    private Integer score;
    private String brand;
    private String city;
    private String starName;
    private String business;
    private String longitude;
    private String latitude;
    private String pic;
}
There are differences with our index library structure:
- longitude and latitude need to be merged into location
Therefore, we need to define a new type, which is consistent with the index library structure:
package cn.itcast.hotel.pojo;

import lombok.Data;
import lombok.NoArgsConstructor;

@Data
@NoArgsConstructor
public class HotelDoc {
    private Long id;
    private String name;
    private String address;
    private Integer price;
    private Integer score;
    private String brand;
    private String city;
    private String starName;
    private String business;
    private String location;
    private String pic;

    public HotelDoc(Hotel hotel) {
        this.id = hotel.getId();
        this.name = hotel.getName();
        this.address = hotel.getAddress();
        this.price = hotel.getPrice();
        this.score = hotel.getScore();
        this.brand = hotel.getBrand();
        this.city = hotel.getCity();
        this.starName = hotel.getStarName();
        this.business = hotel.getBusiness();
        this.location = hotel.getLatitude() + ", " + hotel.getLongitude();
        this.pic = hotel.getPic();
    }
}
5.1. 2. Syntax description
The DSL statement of the new document is as follows:
POST /{Index library name}/_doc/1
{
    "name": "Jack",
    "age": 21
}
The corresponding java code is shown in the figure below:
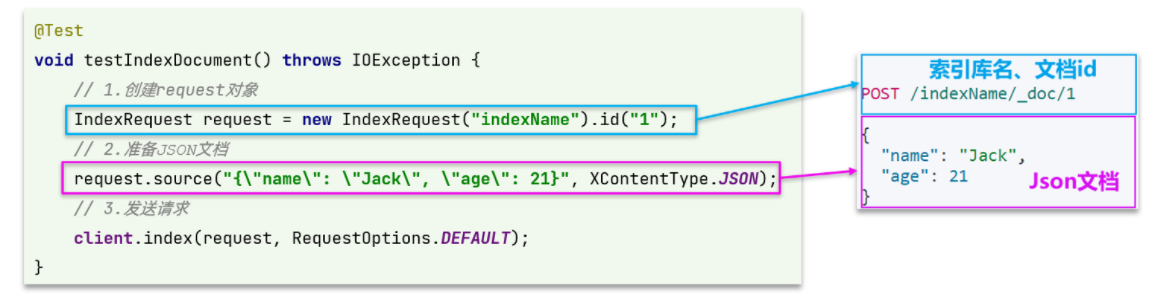
You can see that, similar to creating an index library, there are three steps:
- 1) Create Request object
- 2) Prepare the request parameters, that is, the JSON document in the DSL
- 3) Send request
The change is that the client. XML is used directly here The API of XXX () no longer requires client Indices().
5.1. 3. Complete code
We import hotel data with the same basic process, but we need to consider several changes:
- The hotel data comes from the database. We need to query it first to get the hotel object
- The hotel object needs to be converted to a HotelDoc object
- HotelDoc needs to be serialized into json format
Therefore, the overall steps of the code are as follows:
- 1) Query Hotel data according to id
- 2) Encapsulate Hotel as HotelDoc
- 3) Serialize HotelDoc to JSON
- 4) Create an IndexRequest and specify the name and id of the index library
- 5) Prepare request parameters, that is, JSON documents
- 6) Send request
In the HotelDocumentTest test test class of the hotel demo, write a unit test:
@Test
void testAddDocument() throws IOException {
    // 1. Query hotel data according to id
    Hotel hotel = hotelService.getById(61083L);
    // 2. Convert to document type
    HotelDoc hotelDoc = new HotelDoc(hotel);
    // 3. Transfer HotelDoc to json
    String json = JSON.toJSONString(hotelDoc);

    // 1. Prepare the Request object
    IndexRequest request = new IndexRequest("hotel").id(hotelDoc.getId().toString());
    // 2. Prepare Json documents
    request.source(json, XContentType.JSON);
    // 3. Send request
    client.index(request, RequestOptions.DEFAULT);
}
5.2. consult your documentation
5.2. 1. Syntax description
The DSL statement of query is as follows:
GET /hotel/_doc/{id}
Very simple, so the code is roughly divided into two steps:
- Prepare Request object
- Send request
However, the purpose of query is to get the result and parse it into HotelDoc, so the difficulty is the result parsing. The complete code is as follows:
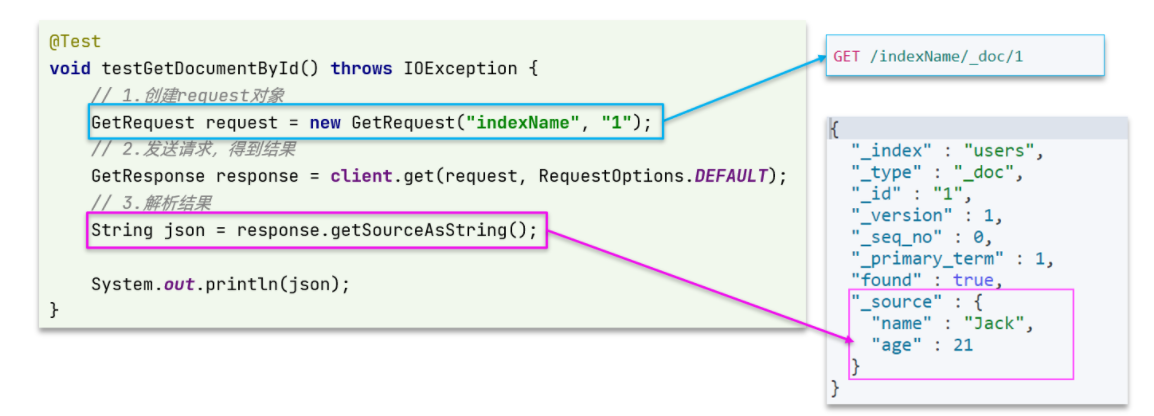
As you can see, the result is a JSON in which the document is placed in a_ source attribute, so parsing is to get_ source, which can be deserialized as a Java object.
Similar to before, there are three steps:
- 1) Prepare the Request object. This is a query, so it's GetRequest
- 2) Send the request and get the result. Because it is a query, call client Get() method
- 3) The result of parsing is to deserialize JSON
5.2. 2. Complete code
In the HotelDocumentTest test test class of the hotel demo, write a unit test:
@Test
void testGetDocumentById() throws IOException {
    // 1. Prepare Request
    GetRequest request = new GetRequest("hotel", "61082");
    // 2. Send a request and get a response
    GetResponse response = client.get(request, RequestOptions.DEFAULT);
    // 3. Analyze the response results
    String json = response.getSourceAsString();

    HotelDoc hotelDoc = JSON.parseObject(json, HotelDoc.class);
    System.out.println(hotelDoc);
}
5.3. remove document
The deleted DSL is as follows:
DELETE /hotel/_doc/{id}
Compared with query, only the request mode changes from DELETE to GET. It is conceivable that the Java code should still follow three steps:
- 1) Prepare the Request object because it is deleted. This time, it is the DeleteRequest object. To specify the index library name and id
- 2) Prepare parameters, no parameters
- 3) Send request. Because it is deleted, it is a client Delete() method
In the HotelDocumentTest test test class of the hotel demo, write a unit test:
@Test
void testDeleteDocument() throws IOException {
    // 1. Prepare Request
    DeleteRequest request = new DeleteRequest("hotel", "61083");
    // 2. Send request
    client.delete(request, RequestOptions.DEFAULT);
}
5.4. Modify document
5.4. 1. Syntax description
There are two ways to modify:
- Full quantity modification: in essence, it is deleted according to the id and then added
- Incremental modification: modifies the specified field value in the document
In the RestClient API, the total modification is completely consistent with the newly added API. The judgment basis is ID:
- If the ID already exists when adding, it can be modified
- If the ID does not exist when adding, add
We will not repeat it here. We mainly focus on incremental modification.
The code example is shown in the figure below:
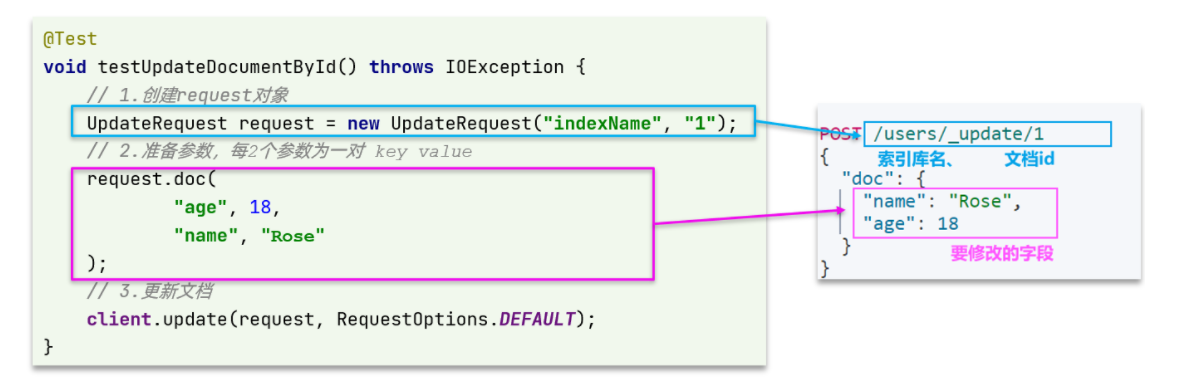
Similar to before, there are three steps:
- 1) Prepare the Request object. This is a modification, so it is an UpdateRequest
- 2) Prepare parameters. That is, the JSON document, which contains the fields to be modified
- 3) Update the document. Here, call client Update() method
5.4. 2. Complete code
In the HotelDocumentTest test test class of the hotel demo, write a unit test:
@Test
void testUpdateDocument() throws IOException {
    // 1. Prepare Request
    UpdateRequest request = new UpdateRequest("hotel", "61083");
    // 2. Prepare request parameters
    request.doc(
        "price", "952",
        "starName", "Four drill"
    );
    // 3. Send request
    client.update(request, RequestOptions.DEFAULT);
}
5.5. Batch import documents
Case requirements: use BulkRequest to import database data into the index library in batches.
The steps are as follows:
-
Query hotel data with mybatis plus
-
Convert the queried Hotel data (Hotel) to document type data (HotelDoc)
-
The BulkRequest batch processing in JavaRestClient is used to realize batch addition of documents
5.5. 1. Syntax description
The essence of bulk request processing is to send multiple ordinary CRUD requests together.
An add method is provided to add other requests
Therefore, adding multiple indexrequests to Bulk is a new function in batch. Example:
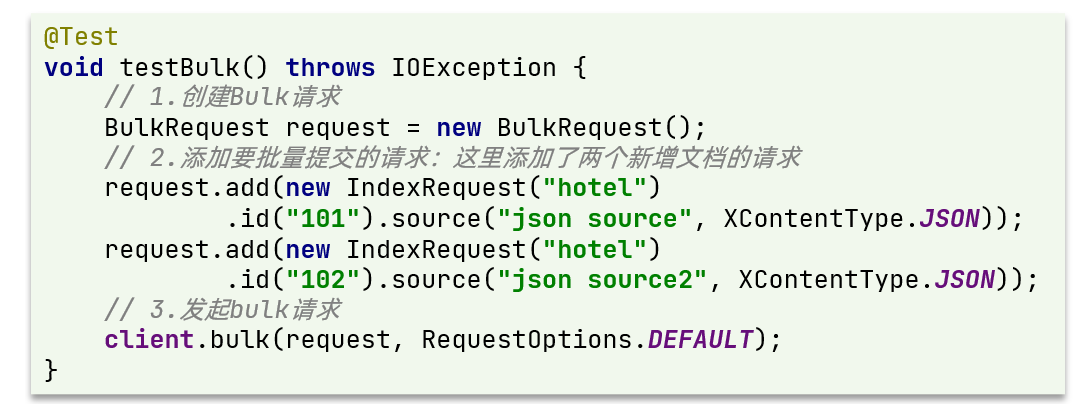
In fact, there are still three steps:
- 1) Create a Request object. This is BulkRequest
- 2) Prepare parameters. Batch processing parameters are other Request objects. Here are multiple indexrequests
- 3) Initiate a request. This is batch processing, and the called method is client Bulk() method
When importing hotel data, we can transform the above code into a for loop.
5.5. 2. Complete code
In the HotelDocumentTest test test class of the hotel demo, write a unit test:
@Test
void testBulkRequest() throws IOException {
    // Batch query of hotel data
    List<Hotel> hotels = hotelService.list();

    // 1. Create a Request
    BulkRequest request = new BulkRequest();
    // 2. Prepare parameters and add multiple new requests
    for (Hotel hotel : hotels) {
        // 2.1. Convert to document type HotelDoc
        HotelDoc hotelDoc = new HotelDoc(hotel);
        // 2.2. Create a Request object for a new document
        request.add(new IndexRequest("hotel")
                    .id(hotelDoc.getId().toString())
                    .source(JSON.toJSONString(hotelDoc), XContentType.JSON));
    }
    // 3. Send request
    client.bulk(request, RequestOptions.DEFAULT);
}
5.6. Summary
Basic steps of document operation:
- Initialize RestHighLevelClient
- Create an XxxRequest. XXX is Index, Get, Update, Delete, Bulk
- Prepare parameters (required for Index, Update and Bulk)
- Send request. Call resthighlevelclient # xxx () method, xxx is index, get, update, delete, bulk
- Parsing results (required for Get)