Micro services involved
demo involving three microservices:
- Service registration and discovery: Eureka server
- Management service: admin service
- User service: User Service
The management service and User service will register with eureka. When accessing the add user api of the Admin service, the Admin service will call the add user api of the User service and write it to the mysql database.
Generate docker image
Build maven project through dockerfile. After the introduction of Docker 17.05 multi-stage build, we only need to maintain a dockerfile. The specific contents of the file are as follows.
Create Dockerfile file:
User-service/Dockerfile:
# Phase I build environment
FROM maven:3.5.0-jdk-8-alpine AS builder
# Add POM XML and source code
ADD ./pom.xml pom.xml
ADD ./src src/
# Skip test
RUN mvn package -Dmaven.test.skip=true

# In the second stage, the basic image is openjdk
FROM openjdk:8u232-jre-stretch
# jar and copy in the first stage
COPY --from=builder ./target/user-service.jar /app/user-service.jar
ADD runboot.sh /app/
WORKDIR /app
RUN chmod a+x runboot.sh
# run jar
CMD /app/runboot.sh
Eureka-server/Dockerfile:
FROM maven:3.5.0-jdk-8-alpine AS builder
ADD ./pom.xml pom.xml
ADD ./src src/
RUN mvn package -Dmaven.test.skip=true

FROM openjdk:8u232-jre-stretch
COPY --from=builder ./target/eureka-server.jar /app/eureka-server.jar
ADD runboot.sh /app/
WORKDIR /app
RUN chmod a+x runboot.sh
CMD /app/runboot.sh
admin-server/Dockerfile:
FROM maven:3.5.0-jdk-8-alpine AS builder
ADD ./pom.xml pom.xml
ADD ./src src/
RUN mvn package -Dmaven.test.skip=true

FROM openjdk:8u232-jre-stretch
COPY --from=builder ./target/admin-service.jar /app/admin-service.jar
ADD runboot.sh /app/
WORKDIR /app
RUN chmod a+x runboot.sh
CMD /app/runboot.sh
This completes three dockerfiles.
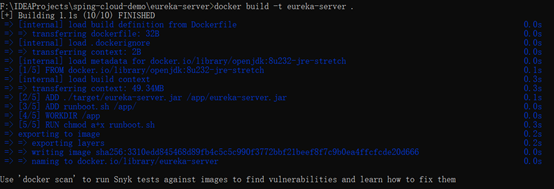
Next, build a docker image. Take Eureka server / dockerfile as an example. First enter the file directory and execute
docker build -t eureka-server .
Start building the docker image:
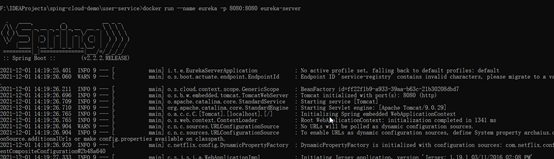
Start container:
# docker run --name [container name] - p [virtual machine port: exposed port] [image name]
docker run --name eureka -p 8080:8080 eureka-server
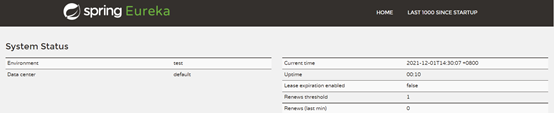
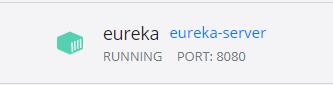
Enter in the browser http://localhost:8080/ , you can see the eureka console:
Run admin service with the same steps. Admin service needs to provide an operation parameter EURKA_URL
# --env [variable = xx]
docker run --name admin --env EUREKA_URL=http://host.docker.internal:8080/eureka -p 18000:18000 admin-service
The user service needs to configure the database. The database information is in application Properties is obtained by running parameters:
docker run --name user --env DB_HOST=host.docker.internal --env EUREKA_URL=http://host.docker.internal:8080/eureka -p 9090:9090 user-service
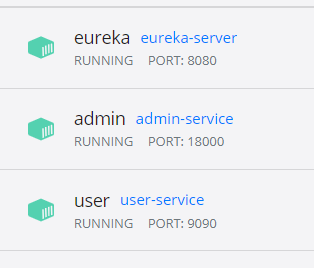
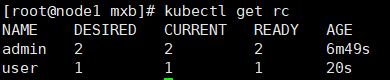
Finally, the services of admin and user are discovered and registered:

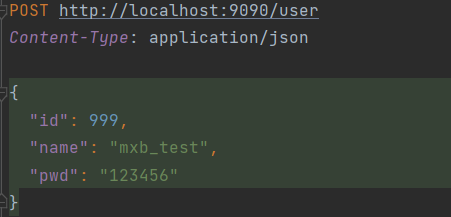
Here is a simple test:
Send a POST request in the following format:
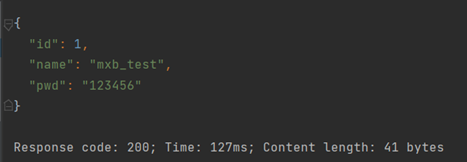
Operation results:
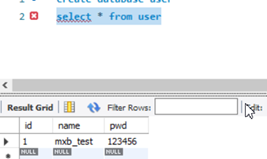
In the database:
k8s environment construction
Environmental preparation
Three virtual machines are opened locally to deploy k8s services. The operating system is CentOS7
192.168.80.10 node1 2-core 3GB memory
192.168.80.11 node2 1-core 2GB memory
192.168.80.12 node3 1-core 2GB memory
Physical machine 172.19 one hundred and ninety-one point one three five
k8s service installation
Synchronous clock
# Set the time zone on the three platforms
timedatectl set-timezone Asia/Shanghai
Turn off firewall
systemctl disable firewalld
systemctl stop firewalld
Configure warehouse and install docker
# Configure the stable version warehouse of Docker
yum-config-manager --add-repo https://download.docker.com/linux/centos/docker-ce.repo
 install Docker CE
yum -y install docker-ce-18.06.1.ce-3.el7
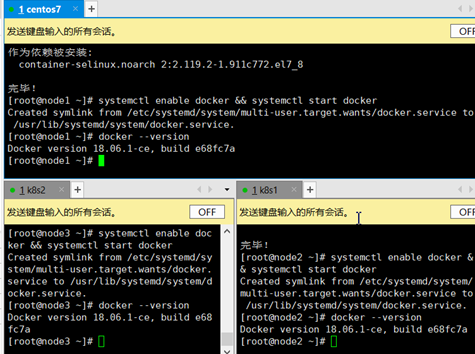
Start docker
# Start docker
systemctl enable docker && systemctl start docker
The docker version is as follows
Configure the docker image source and change the docker driver to systemtd:
Vim /etc/docker/daemon.json
{
     "registry-mirrors": [
	"http://f1361db2.m.daocloud.io",
	"https://registry.docker-cn.com",
    "https://zeco842d.mirror.aliyuncs.com"
  ],
    "exec-opts": ["native.cgroupdriver=systemd"]
}
Install k8s three major components, version 1.14 (not the latest).
yum install -y kubelet-1.14.3 kubeadm-1.14.3 kubectl-1.14.3
configure network
/etc/sysctl.d/k8s.conf
net.bridge.bridge-nf-call-ip6tables = 1
net.bridge.bridge-nf-call-iptables = 1

sysctl –system
Deploy master node (stand-alone version)
192.168 80.10 (node1) as the master.
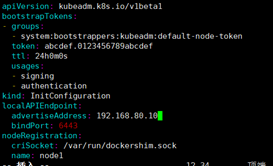
Generate kubedm default initialization template:
kubeadm config print init-defaults > kubeadm-config.yaml
Modify kubedm config advertiseAddress in yaml is the ip address of the current node:
Modify Ali source

Pull source:
kubeadm config images pull --config kubeadm-config.yaml
If the master CPU is not dual core or above, an error [error numcpu] will be reported here: the number of available CPUs 1 is less than the required 2.
The stand-alone version is running:
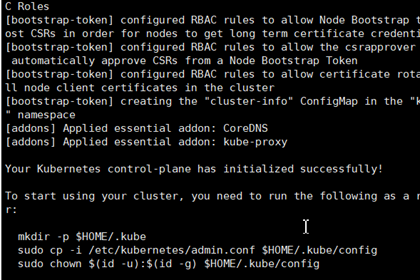
Output here is a series of commands, which can be executed on other node s to join k8s clusters:
To start using your cluster, you need to run the follr:

  mkdir -p $HOME/.kube
  sudo cp -i /etc/kubernetes/admin.conf $HOME/.kube/c
  sudo chown $(id -u):$(id -g) $HOME/.kube/config

You should now deploy a pod network to the cluster.
Run "kubectl apply -f [podnetwork].yaml" with one of
  https://kubernetes.io/docs/concepts/cluster-adminis

Then you can join any number of worker nodes by runnich as root:

kubeadm join 192.168.80.10:6443 --token abcdef.0123456789abcdef \
    --discovery-token-ca-cert-hash sha256:9584a0d8bcac4a4e3a14782b6bf751f31bf4e3621c65ec41d7295f979acd3ea7
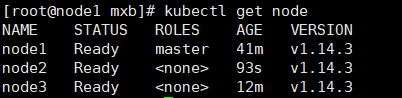
View current node information
kubectl get node
You can see that the status is NotReady. Wait a while before you can be Ready.

Cluster configuration
Follow the output prompts.
On the master:
# Execute on master
mkdir -p $HOME/.kube
sudo cp -i /etc/kubernetes/admin.conf $HOME/.kube/config
sudo chown $(id -u):$(id -g) $HOME/.kube/config
master deployment communication component calico
# Execute on master
kubectl apply -f https://docs.projectcalico.org/v3.0/getting-started/kubernetes/installation/hosted/kubeadm/1.7/calico.yaml
Next, let other nodes join and execute on other nodes
# node2,3 execution
kubeadm join 192.168.80.10:6443 --token abcdef.0123456789abcdef \
--discovery-token-ca-cert-hash sha256:9584a0d8bcac4a4e3a14782b6bf751f31bf4e3621c65ec41d7295f979acd3ea7
In this way, node2 and 3 also join the k8s cluster:
Microservice deployment
Deployment requirements
Three micro services: Admin Service, User Service and Eruka Service
When accessing the add user api of the Admin service, the Admin service will call the add user api of the User service and write it to the mysql database
The Admin Service has two copies, one svc address
User Service a copy
You can access the Admin Service with ingress
You can use nodeport to access the User Service
Orchestration and deployment
Start the eruka service and mysql on the docker of the physical machine.
mysql on port 3306
Write yaml file
springboot-user.yaml:
apiVersion: v1
kind: ReplicationController
metadata:
  name: user-service
spec:
  replicas: 1
  selector:
    app: user-service
  template:
    metadata:
      labels:
        app: user-service
        creater: mxb
    spec:
      containers:
      - name: user-service
        image: user-service
        imagePullPolicy: IfNotPresent
        env:
          - name: EUREKA_URL
            value: http://172.19.191.135:8080/eureka
          - name: DB_HOST
            value: 172.19.191.135
        ports:
        - containerPort: 9090
function:
kubectl create -f springboot-user.yaml
You can view the pod status through kubectl describe pod xx
View logs via kubectl logs xxx

You can see the microservice information on the eureka console:

In this way, the user service is pulled up. Next, configure the service
springboot-user-svc.yaml:
apiVersion: v1
kind: Service #Object type, here is service
metadata:
  name: user-service #name
  labels:
    name: user #tagging
spec:
  type: NodePort
  ports:
  - port: 9090
    targetPort: 9090
    nodePort: 32001
  selector:
    app: user-service
Pull it up
kubectl create -f springboot-user-svc.yaml
Similarly, deploy admin:
apiVersion: v1
kind: ReplicationController #Object type, here is rc (full name: ReplicationController)
metadata:
  name: admin
spec:
  replicas: 2
  selector:
    app: admin
  template:
    metadata:
      labels:
        app: admin
        creater: mxb
    spec:
      containers:
      - name: admin
        image: admin-service
        imagePullPolicy: IfNotPresent
        env:
          - name: EUREKA_URL
            value: http://192.168.0.104:8080/eureka
        ports:
        - containerPort: 18000

For the service deployment of admin, write admin SVC yaml:
apiVersion: v1
kind: Service #Object type, here is service
metadata:
  name: admin-svc
  labels:
    name: admin
spec:
  type: NodePort
  ports:
  - port: 18000
    targetPort: 18000
  selector:
    app: admin
function:
kubectl create -f admin-svc.yaml
Because of the need for ingress access, write admin - ingress yaml:
apiVersion: extensions/v1beta1
kind: Ingress
metadata:
  name: admin-http
spec:
  rules:
  - host: test.mxb.com
    http:
      paths:
      - backend:
          serviceName: admin-svc
          servicePort: 18000
function:
kubectl create -f admin-ingress.yaml

Next, let's verify:
The first is to verify that the User Service is accessed with nodeport.
First, take a look at the node on which the User Service is deployed:
kubectl describe pods user-wgk5s

You can see that it is deployed in node3 / 192.168 80.12 upper
Send a POST request and return:
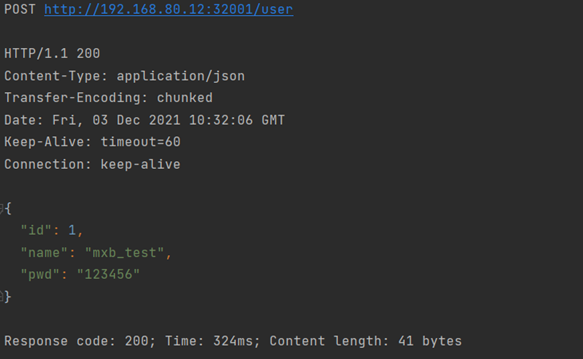
Normal access through nodeport.
You need to access the Admin Service through ingress:
Configure hosts for the physical machine, and then POST http://test.mxb.com:32054/user Call service:
20211207: I haven't run out yet. The ip address on eureka is wrong and can't be accessed by 500.