nacos preparation
1. Configure java environment variables

2. Download and install nacos
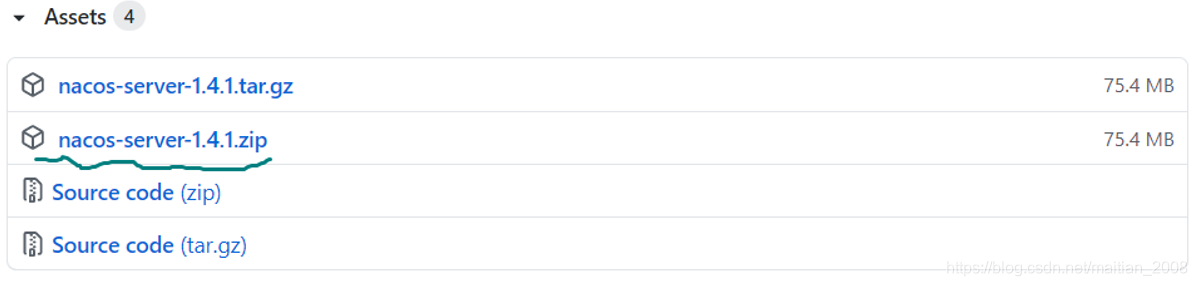
- Download URL
https://github.com/alibaba/nacos/releases
- Select the corresponding version
3. Decompress nacos
be careful:
- The path should not have Chinese and spaces
- Make sure your MySQL version is above 5.7 (MariaDB above 10.5)
4. Add the following content to the sql script
DROP DATABASE IF EXISTS `nacos_config`;
CREATE DATABASE `nacos_config` DEFAULT character set utf8mb4;
SET names utf8mb4;
SET FOREIGN_KEY_CHECKS = 0;
USE `nacos_config`;
be careful:
- Add the above at the top
- If you don't want to add the above content, you can create a database first and import the sql script into the database
5. Initialize configuration
- Log in to mysql and execute the sql script sent by the teacher to the students. For example, we can use the built-in client of mysql. First log in to mysql on the command line, and then execute the following instructions:

After successful execution, a nacos_config database will be created - Open the default configuration in / conf/application.properties, configure the database to be connected based on your current environment, and the user name and password to be used when connecting to the database (if there is "#" in front, remove it):
### If use MySQL as datasource:
spring.datasource.platform=mysql

### Count of DB:
db.num=1

### Connect URL of DB:
db.url.0=jdbc:mysql://127.0.0.1:3306/nacos_config?characterEncoding=utf8&connectTimeout=1000&socketTimeout=3000&autoReconnect=true&useUnicode=true&useSSL=false&serverTimezone=UTC
db.user.0=root
db.password.0=root
6. Start nacos
Linux/Unix/Mac startup command (standalone stands for stand-alone mode, non cluster mode):
./startup.sh -m standalone
Windows startup command (standalone stands for stand-alone mode, non cluster mode):
startup.cmd -m standalone
be careful:
1) When executing the startup command, either configure the environment variable or execute it directly in the nacos/bin directory
2) When Nacos starts, java_home (corresponding to the installation directory of jdk) needs to be configured in the local environment variable,
3) Make sure that the database you connect to (nacos_config) exists
4) If all configurations are correct and can not be connected, check how many databases you have (mysql,...)
7. Accessing nacos services
Enter the following URL
http://localhost:8848/nacos
**Tip: * * default account and password: nacos
1, Registration service
1. Add dependency
- Add service registration and discovery dependencies
 <dependency>
            <groupId>com.alibaba.cloud</groupId>
            <artifactId>spring-cloud-starter-alibaba-nacos-discovery</artifactId>
        </dependency>
- Add springboot web dependency
 <dependency>
            <groupId>org.springframework.boot</groupId>
            <artifactId>spring-boot-starter-web</artifactId>
        </dependency>
2. Start the nacos service
startup.cmd -m standalone
3. Edit profile
- Create and modify the configuration file application.yml (or application.properties) to implement service registration
server:
   port: 8081
spring:
  application:
    name: sca-provider #Service name must be configured for service registration
  cloud:
    nacos:
      discovery:
        server-addr: localhost:8848 # If nacos is local, it can be omitted here
- Start the provider to register successfully
2, Implement inter service call
1. Create a provider project class
1. Create a service provider object in the SCA provider project and provide external services based on this object
    package com.jt.provider.controller;
    /**Define the Controller object (this object is defined as handler in spring mvc),
     * Process client requests based on this object*/
    @RestController
    public class ProviderController{
        //@Value reads the content configured in the project configuration file by default
        //8080 is the default value given when the value of server.port is not read
        @Value("${server.port:8080}")
        private String server;
        //http://localhost:8081/provider/echo/tedu
        @GetMapping("/provider/echo/{msg}")
        public String doRestEcho1(@PathVariable String msg){
            return server+" say hello "+msg;
        }
    }
2. Create a consumer project class
- Edit pom file
<?xml version="1.0" encoding="UTF-8"?>
<project xmlns="http://maven.apache.org/POM/4.0.0"
         xmlns:xsi="http://www.w3.org/2001/XMLSchema-instance"
         xsi:schemaLocation="http://maven.apache.org/POM/4.0.0 http://maven.apache.org/xsd/maven-4.0.0.xsd">
    <parent>
        <artifactId>01-sca</artifactId>
        <groupId>com.jt</groupId>
        <version>1.0-SNAPSHOT</version>
    </parent>
    <modelVersion>4.0.0</modelVersion>
    <artifactId>sca-consumer</artifactId>

   <dependencies>
    <!--Web service-->
    <dependency>
        <groupId>org.springframework.boot</groupId>
        <artifactId>spring-boot-starter-web</artifactId>
    </dependency>
    <!--Registration and discovery of services(We're going to talk about service registration nacos)-->
    <dependency>
        <groupId>com.alibaba.cloud</groupId>
        <artifactId>spring-cloud-starter-alibaba-nacos-discovery</artifactId>
    </dependency>
    </dependencies>
</project>
- Modify profile
server:
  port: 8090
spring:
  application:
    name: sca-consumer #The service name is provided here. For service registration, it is the service name in the nacos service list
  cloud:
    nacos:
      discovery:
        server-addr: localhost:8848
# In the actual registration, you need to write the specific ip address and port number of nacos. 8848 is the default port number of the machine.
feign:
  hystrix:
    enabled: true
- Create startup class
- Add a method in the startup class to create a RestTemplate object to realize the binding between services
@Bean
    //@Bean("rt")
    //@Scope("singleton")
    //@Conditionalonmissingbean / / the spring container takes effect only when it does not have this bean
    public RestTemplate restTemplate(){
        return new RestTemplate();
    }
- Define the service consumer Controller
package com.jt.consumer.controller;

import org.springframework.beans.factory.annotation.Autowired;
import org.springframework.stereotype.Component;
import org.springframework.web.bind.annotation.GetMapping;
import org.springframework.web.bind.annotation.RestController;
import org.springframework.web.client.RestTemplate;
/**
 * Define the service consumer Controller in this Controller object
 * Implement the call to the remote service SCA provider
 */
@RestController
public class ConsumerController {
    /**
     * Get a RestTemplate object from the spring container,
     * Implement remote service invocation based on this object
     */
    @Autowired
    private RestTemplate restTemplate;
    /**
     * In this method, the service in the remote SCA provider is called through a RestTemplate object
     * @return
     * URL to access this method: http://localhost:8090/consumer/doRestEcho1
     */
    @GetMapping("/consumer/doRestEcho1")
    public String doRestEcho01(){
        //1. Define the url of the remote service to be called
        String url="http://localhost:8081/provider/echo/8090";
        //2. Call the service based on the relevant methods in the restTemplate object
        return restTemplate.getForObject(url, String.class);
    }
}
- visit http://localhost:8090/consumer/doRestEcho1 , the test is successful
Load balancing mode call
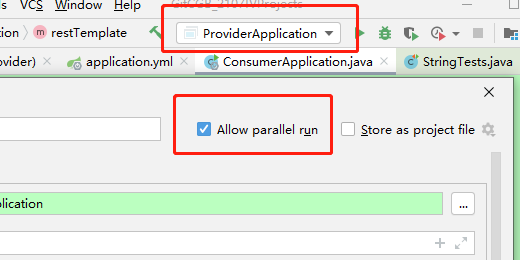
1. Set IDEA multi startup
Multiple ports can be started by modifying the profile port
It can start multiple tomcat servers
2. Modify consumer service
- Modify the ConsumerController class, inject the LoadBalancerClient object, add the doRestEcho2 method, and then access the service
  @Autowired
  private LoadBalancerClient loadBalancerClient;

  @GetMapping("/consumer/doRestEcho02")
 public String doRestEcho02(){
     ServiceInstance serviceInstance = loadBalancerClient.choose("sca-provider");
     String url = String.format("http://%s:%s/provider/echo/%s",serviceInstance.getHost(),serviceInstance.getPort(),appName);
     System.out.println("request url:"+url);
     return restTemplate.getForObject(url, String.class);
     }
 }
**Tip: * * the bottom layer implements load balancing algorithm based on Ribbon
2. Start two provider services and one consumer service
3. Access the consumer service, and different port numbers can appear
http://localhost:8090/consumer/doRestEcho02
3. Optimize code structure: feign
- Add Feign dependency
<dependency>
    <groupId>org.springframework.cloud</groupId>
    <artifactId>spring-cloud-starter-openfeign</artifactId>
</dependency>
- Add annotation on startup class
@EnableFeignClients
@SpringBootApplication
public class ConsumerApplication {...}
- Define Http request API. Based on this API, access remote services with OpenFeign. The code is as follows:
package com.jt.consumer.service;
@FeignClient(name="sca-provider")//SCA provider is the name of the service provider
public interface RemoteProviderService{
    @GetMapping("/provider/echo/{string}")//The premise is that the remote end needs this service
    public String echoMessage(@PathVariable("string") String string);
}
- Create feign consumercontroller and add feign access as follows:
package com.jt.consumer.controller;
@RestController
@RequestMapping("/consumer/ ")
public class FeignConsumerController {
    @Autowired
    private RemoteProviderService remoteProviderService;
    /**Service invocation based on feign mode*/
    @GetMapping("/echo/{msg}")
    public String doFeignEcho(@PathVariable  String msg){
        //Remote service invocation based on feign method (provided that the service must exist)
        return remoteProviderService.echoMessage(msg);
    }
}
- Start the consumer service and access it directly through the feign client in the browser, as shown in the figure (repeatedly refresh and detect its response results)
http://localhost:8090/consumer/echo/8090
