summary Recently, I learned from my friends that Huawei's in-depth learning framework mindspire has been updated to version 1.0.0, which is much more efficient than before. I went to the mindspire official website to have a look. The visual tutorial Notepad document on the official website aroused my interest. Therefore, I intend to learn how to record the data of the training process based on this Notepad document. process The first is to download the dataset Attach Code: import os, shutil
import urllib.request
from urllib.parse import urlparse
def callbackfunc(blocknum, blocksize, totalsize):
percent = 100.0 * blocknum * blocksize / totalsize
if percent > 100:
percent = 100
print("downloaded {:.1f}".format(percent), end="\r")
def _download_dataset():
ds_url = "https://www.cs.toronto.edu/~kriz/cifar-10-binary.tar.gz"
file_base_name = urlparse(ds_url).path.split("/")[-1]
file_name = os.path.join("./datasets", file_base_name)
if not os.path.exists(file_name):
urllib.request.urlretrieve(ds_url, file_name, callbackfunc)
print("{:*^40}".format("DataSets Downloaded"))
shutil.unpack_archive(file_name, extract_dir="./datasets/cifar-10-binary")
def _copy_dataset(ds_part, dest_path):
data_source_path = "./datasets/cifar-10-binary/cifar-10-batches-bin"
ds_part_source_path = os.path.join(data_source_path, ds_part)
if not os.path.exists(ds_part_source_path):
_download_dataset()
shutil.copy(ds_part_source_path, dest_path)
def download_cifar10_dataset():
ds_base_path = "./datasets/cifar-10-batches-bin"
train_path = os.path.join(ds_base_path, "train")
test_path = os.path.join(ds_base_path, "test")
print("{:*^40}".format("Checking DataSets Path."))
if not os.path.exists(train_path) and not os.path.exists(train_path):
os.makedirs(train_path)
os.makedirs(test_path)
print("{:*^40}".format("Downloading CIFAR-10 DataSets."))
for i in range(1, 6):
train_part = "data_batch_{}.bin".format(i)
if not os.path.exists(os.path.join(train_path, train_part)):
_copy_dataset(train_part, train_path)
pops = train_part + " is ok"
print("{:*^40}".format(pops))
test_part = "test_batch.bin"
if not os.path.exists(os.path.join(test_path, test_part)):
_copy_dataset(test_part, test_path)
print("{:*^40}".format(test_part+" is ok"))
print("{:*^40}".format("Downloaded CIFAR-10 DataSets Already."))
download_cifar10_dataset()
It turns out that the urllib module is used to download the cifar10 dataset to the local directory Processing data sets After downloading the data set, it can not be directly used for training. Some preprocessing operations need to be carried out. After research, the following processing methods are mainly used: import mindspore.dataset.transforms.c_transforms as C
import mindspore.dataset.vision.c_transforms as CV
resize_op = CV.Resize(size=(227, 227))
rescale_op = CV.Rescale(rescale, shift)
channel_swap_op = CV.HWC2CHW()
typecast_op = C.TypeCast(mstype.int32)
cifar_ds = cifar_ds.map(operations=resize_op, input_columns="image")
cifar_ds = cifar_ds.map(operations=rescale_op, input_columns="image")
cifar_ds = cifar_ds.map(operations=normalize_op, input_columns="image")
cifar_ds = cifar_ds.map(operations=channel_swap_op, input_columns="image")
Use pyplot to view the preprocessed data image: from matplotlib import pyplot as plt
import numpy as np
label_list = ["airplane", "automobile", "bird", "cat", "deer", "dog", "rog", "horse", "ship", "truck"]
print("The 32 images with label of the first batch in ds_train are showed below:")
ds_iterator = ds_train.create_dict_iterator()
ds_iterator.get_next()
batch_1 = ds_iterator.get_next()
batch_image = batch_1["image"].asnumpy()
batch_label = batch_1["label"].asnumpy()
%matplotlib inline
plt.figure(dpi=144)
for i,image in enumerate(batch_image):
plt.subplot(4, 8, i+1)
plt.subplots_adjust(wspace=0.2, hspace=0.2)
image = image/np.amax(image)
image = np.clip(image, 0, 1)
image = np.transpose(image,(1,2,0))
plt.imshow(image)
num = batch_label<i>
plt.title(f"image {i+1}\n{label_list[num]}", y=-0.65, fontdict={"fontsize":8})
plt.axis('off')
plt.show()
So excited, I printed out the image information of the first batch: 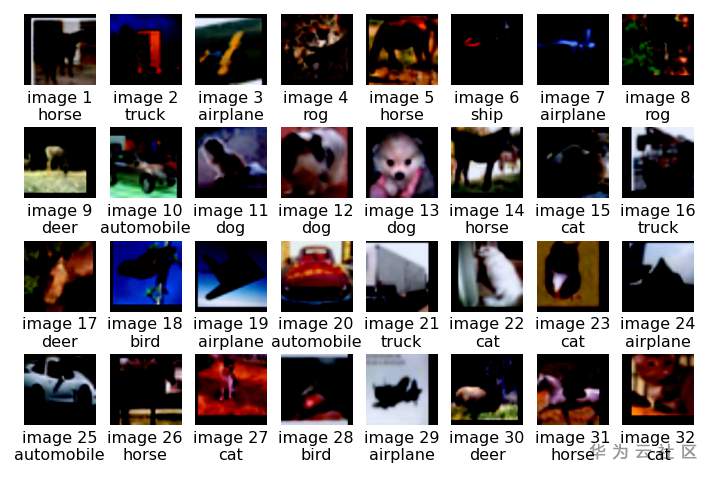
Define network Now it's finally time to define the network, or use the ultimate trick: Ctrl + C/Ctrl + V, one step in place: import mindspore.nn as nn
from mindspore.common.initializer import TruncatedNormal
from mindspore.ops import operations as P
def conv(in_channels, out_channels, kernel_size, stride=1, padding=0, pad_mode="valid"):
weight = weight_variable()
return nn.Conv2d(in_channels, out_channels,
kernel_size=kernel_size, stride=stride, padding=padding,
weight_init=weight, has_bias=False, pad_mode=pad_mode)
def fc_with_initialize(input_channels, out_channels):
weight = weight_variable()
bias = weight_variable()
return nn.Dense(input_channels, out_channels, weight, bias)
def weight_variable():
return TruncatedNormal(0.02)
class AlexNet(nn.Cell):
"""
Alexnet
"""
def __init__(self, num_classes=10, channel=3):
super(AlexNet, self).__init__()
self.conv1 = conv(channel, 96, 11, stride=4)
self.conv2 = conv(96, 256, 5, pad_mode="same")
self.conv3 = conv(256, 384, 3, pad_mode="same")
self.conv4 = conv(384, 384, 3, pad_mode="same")
self.conv5 = conv(384, 256, 3, pad_mode="same")
self.relu = nn.ReLU()
self.max_pool2d = P.MaxPool(ksize=3, strides=2)
self.flatten = nn.Flatten()
self.fc1 = fc_with_initialize(6*6*256, 4096)
self.fc2 = fc_with_initialize(4096, 4096)
self.fc3 = fc_with_initialize(4096, num_classes)
# Init TensorSummary
self.tensor_summary = P.TensorSummary()
# Init ImageSummary
self.image_summary = P.ImageSummary()
def construct(self, x):
# Record image by Summary operator
self.image_summary("Image", x)
x = self.conv1(x)
# Record tensor by Summary operator
self.tensor_summary("Tensor", x)
x = self.relu(x)
x = self.max_pool2d(x)
x = self.conv2(x)
x = self.relu(x)
x = self.max_pool2d(x)
x = self.conv3(x)
x = self.relu(x)
x = self.conv4(x)
x = self.relu(x)
x = self.conv5(x)
x = self.relu(x)
x = self.max_pool2d(x)
x = self.flatten(x)
x = self.fc1(x)
x = self.relu(x)
x = self.fc2(x)
x = self.relu(x)
x = self.fc3(x)
return x
It is generally understood that the defined AlexNet network is divided into many layers (in the construct method), and then TensorSummary is used to record tensor data and ImageSummary is used to record image data.
But how are other parameter data recorded? Continue to learn. Start training Do not understand is Ctrl+C network = AlexNet(num_classes=10)
net_loss = nn.SoftmaxCrossEntropyWithLogits(sparse=True, reduction="mean")
lr = Tensor(get_lr(0, 0.002, 10, ds_train.get_dataset_size()))
net_opt = nn.Momentum(network.trainable_params(), learning_rate=lr, momentum=0.9)
time_cb = TimeMonitor(data_size=ds_train.get_dataset_size())
config_ck = CheckpointConfig(save_checkpoint_steps=1562, keep_checkpoint_max=10)
ckpoint_cb = ModelCheckpoint(prefix="checkpoint_alexnet", config=config_ck)
model = Model(network, net_loss, net_opt, metrics={"Accuracy": Accuracy()})
summary_base_dir = "./summary_dir"
os.system(f"mindinsight start --summary-base-dir {summary_base_dir} --port=8080")
# Init a SummaryCollector callback instance, and use it in model.train or model.eval
specified = {"collect_metric": True, "histogram_regular": "^conv1.*|^conv2.*", "collect_graph": True, "collect_dataset_graph": True}
summary_collector = SummaryCollector(summary_dir="./summary_dir/summary_01", collect_specified_data=specified, collect_freq=1, keep_default_action=False, collect_tensor_freq=200)
print("============== Starting Training ==============")
model.train(epoch=10, train_dataset=ds_train, callbacks=[time_cb, ckpoint_cb, LossMonitor(), summary_collector], dataset_sink_mode=True)
print("============== Starting Testing ==============")
param_dict = load_checkpoint("checkpoint_alexnet-10_1562.ckpt")
load_param_into_net(network, param_dict)
acc = model.eval(ds_eval, callbacks=summary_collector, dataset_sink_mode=True)
print("============== {} ==============".format(acc))
After looking at the code carefully, it turns out that the SummaryCollector operator is used to record scalar data and parameter distribution map. The usage of SummaryCollector is well explained in the original text, and my training results are attached: epoch: 10 step: 1562, loss is 0.40318152
Epoch time: 116258.987, per step time: 74.430
============== Starting Testing ==============
============== {'Accuracy': 0.8340344551282052} ==============
A total of 10 iterations have been trained, with an accuracy of 0.83. The results are good, and the time under GPU acceleration is also very fast. View results According to the method in the document, open 127.0.0.1:8080 in the local browser, and finally view the recorded results: 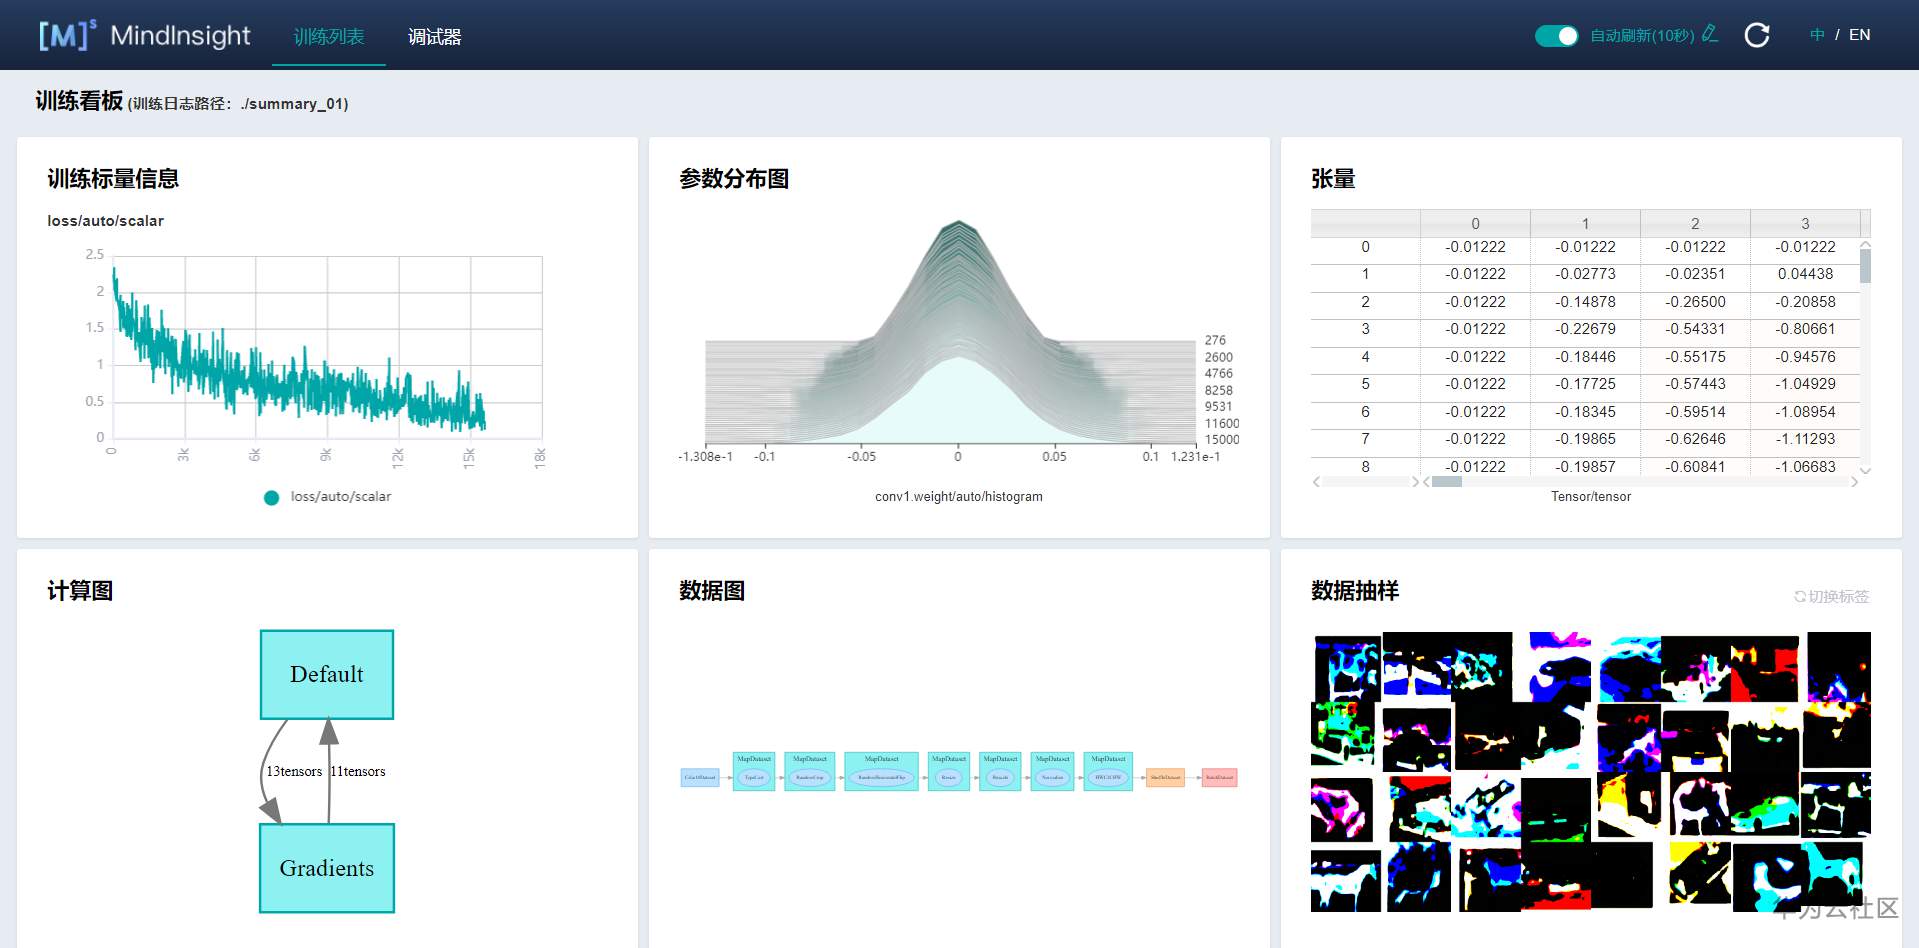
After a long time, I finally got the harvest. Mindspire is really convenient to use, and learning and using it by referring to the official tutorial documents speeds up the process of learning and experience. Deeply call for domestic AI framework! Contact email: 602642050@qq.com |