🧧 Write in front
- 📝 Personal homepage: Zeshi's blog_ CSDN blog
- 🆔 This article was originally written by Zeshi and launched by CSDN. If you need to reprint it, please inform us ⚠
- 🏆 Weekly list of new star creators and authors in embedded field: 34, total ranking: 3692 👑
- 🎉 Like & Comment & collect = = form a habit 😜
- 📣 Series column: [51 single chip microcomputer] series_ Desu CSDN blog
- 💬 Conclusion: after reading it, I hope it can help you. Please correct the deficiencies! Joint learning and exchange 🖊
- ✉️ We are not on the stage of our choice, and the performance is not the script of our choice ♐
- 💨 Previous series [51 single chip microcomputer] my roommate learned to use nixie tube in a king's time
- 📖 This series: Bili Bili River science and Technology University 51 MCU video based!
catalogue
🌌 Modular programming block diagram
🌍 Modular programming considerations
🌍 Precompiled translation of C language
🚀 Schematic diagram of LCD1602
🚀 Modular programming
Modular programming:
Put the codes of each module in different places c file, in h file is also called header file, which provides the declaration of external callable functions, others When you want to use the code in the c file, you only need to #include the "XXX. h" file. The use of modular programming can greatly improve the readability, maintainability and portability of the code. So why? We used to put Delay and Nixie functions in main In c, if we want to write another program, we need to open the main c's files are being copied. However, there may be other code copying, which will be relatively troublesome. If the person copying the code has a disordered program idea, his own program idea will be disrupted. So we can create one in c file to define the function, add a h file to declare this function, and then proceed directly in main c main function to declare a header file, so we only need to copy the function of that function c file is OK!
Like the Delay function and nixie tube display function we have written, this can be regarded as a module. When we write it, we don't need to modify the code in it at all. This is called driver code.
Traditional programming:
All functions are placed in main In C, if more modules are used, there will be a lot of code in a file, which is not conducive to the organization and management of the code, but also affects the thinking of programmers.
🚀 LCD1602 debugging tool
The LCD1602 LCD screen is used as the debugging window to provide functions similar to the {printf} function, which can observe the transformation of the internal data of the single chip microcomputer in real time, which is convenient for debugging and demonstration.
The LCD1602 code provided in this video belongs to modular code. Users only need to know the function and use method of the provided function to easily use LCD1602.
Although this operation is troublesome, it is a very simple thing after our modular programming 😉, Note: after power on, the LCD should be initialized, otherwise the functions inside cannot be used!
| function | effect |
| LCD_Init(); | initialization |
| LCD_ShowChar(1,1,'A'); | Display one character |
| LCD_ShowNum(1,9,123,3); | Display decimal digits |
| LCD_ShowSignedNum(1,13,-66,2); | Show signed decimal digits |
| LCD_ShowHexNum(2,1,0xA8,2); | Display hexadecimal digits |
| LCD_ShowBinNum(2,4,0xAA,8); | Display binary digits |
🌌 Modular programming block diagram
Examples are as follows:

🌍 Modular programming considerations
. c file: definition of functions and variables
. h file: Declaration of functions and variables that can be called externally
Any custom variable or function must be defined or declared before calling (the same. c)
The of the custom function used c files must be added to the project to participate in compilation
Used h files must be placed where the compiler can find them (root directory of project folder, installation directory, customization)
It is recommended that you put the modular programming in the project directory file (main.c)
🌍 Precompiled translation of C language
| precompile | significance |
| #include <REGX52.H> | Put regx52 The contents of the H document are moved here |
| #define PI 3.14 | Define PI and replace PI with 3.14 |
| #define ABC | Define ABC |
| #ifndef __XX_H__ | If not defined__ XX_H__ |
| #endif | Match with #ifndef and #if to form "brackets" |
The pre compilation of C language starts with # and is used to process the code before the real compilation (pre compilation)
In addition, #ifdef, #if, #else, #elif, #undef, etc
🌌 Modular instance
main.c. the document code is as follows:
#include <REGX52.H>
#include "Delay.h" 	// Contains the delay header file
#include "Nixie.h" 	// Contains nixie tube header files

void main()
{
	while(1)
	{
		Nixie(1,1);	//Display 1 at the first position of nixie tube
		Nixie(2,2);	//Display 2 at the second position of nixie tube
		Nixie(3,3);	//Display 3 at the third position of nixie tube
		Nixie(4,4);	//Display 4 at the 4th position of nixie tube
		Nixie(5,5);	//Display 5 at the 5th position of nixie tube
		Nixie(6,6);	//Display 6 at the 6th position of nixie tube
		Nixie(7,7); //Display 7 at the 7th position of nixie tube
		Nixie(8,8); //Display 8 at the 8th position of nixie tube
	}
}
Delay.h and delay C. the document code is as follows:
#ifndef __DELAY_H__
#define __DELAY_H__

void Delay(unsigned int xms);

#endif
//Delay subfunction
void Delay(unsigned int xms)
{
	unsigned char i, j;
	while(xms--)
	{
		i = 2;
		j = 239;
		do
		{
			while (--j);
		} while (--i);
	}
}
Nixie.c and nixie H. the document code is as follows:
#ifndef __NIXIE_H__
#define __NIXIE_H__

void Nixie(unsigned char Location,Number);

#endif
#include <REGX52.H>
#include "Delay.h" 	// Contains the delay header file

//Digital tube segment code table
unsigned char NixieTable[]={0x3F,0x06,0x5B,0x4F,0x66,0x6D,0x7D,0x07,0x7F,0x6F};

//Nixie tube display sub function
void Nixie(unsigned char Location,Number)
{
	switch(Location)		//Bit code output
	{
		case 1:P2_4=1;P2_3=1;P2_2=1;break;
		case 2:P2_4=1;P2_3=1;P2_2=0;break;
		case 3:P2_4=1;P2_3=0;P2_2=1;break;
		case 4:P2_4=1;P2_3=0;P2_2=0;break;
		case 5:P2_4=0;P2_3=1;P2_2=1;break;
		case 6:P2_4=0;P2_3=1;P2_2=0;break;
		case 7:P2_4=0;P2_3=0;P2_2=1;break;
		case 8:P2_4=0;P2_3=0;P2_2=0;break;
	}
	P0=NixieTable[Number];	//Segment code output
	Delay(1);				//Display for a period of time
	P0=0x00;				//Segment code clearing 0, shadow elimination
}
🚀 Schematic diagram of LCD1602
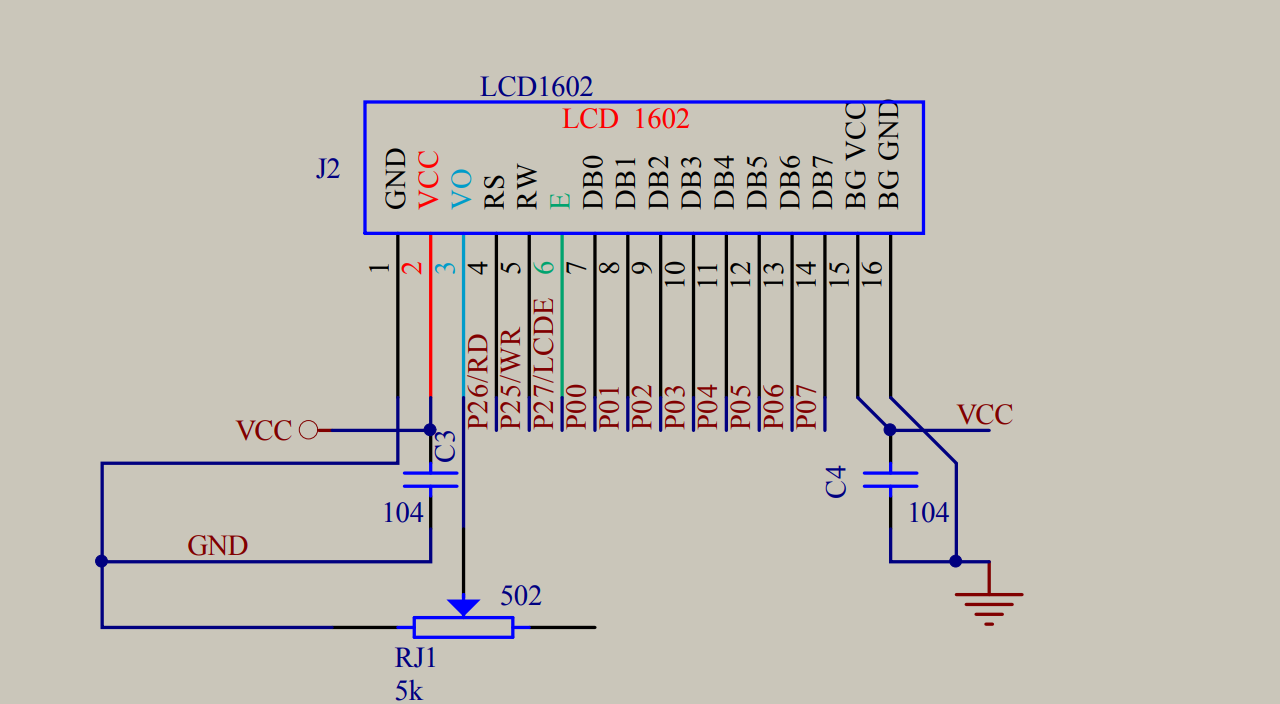
The port connected to LCD1602 is P0 port, which also occupies some other ports, and these P0 ports are actually these ports of nixie tube, and P2 port is still three LED pins, which will lead to pin conflict.
Therefore, after we use LCD1602 LCD screen, the three LED s can not be used, and the nixie tube can not be used, because it is occupied by LCD screen! But others will not conflict.
🚀 LCD1602 code display

LCD1602 shows the function of these functions! You only need to use LCD1602 custom function here!
The code example is as follows: some power failure may be due to the different pins of the development board, which can be modified according to the schematic diagram bought by the development board.
🌍 LCD1602 driver function
#include <REGX52.H>

//Pin configuration:
sbit LCD_RS=P2^6;
sbit LCD_RW=P2^5;
sbit LCD_EN=P2^7;
#define LCD_DataPort P0

//Function definition:
/**
  * @brief  LCD1602 Delay function, 12MHz call, 1ms delay
  * @param  nothing
  * @retval nothing
  */
void LCD_Delay()
{
	unsigned char i, j;

	i = 2;
	j = 239;
	do
	{
		while (--j);
	} while (--i);
}

/**
  * @brief  LCD1602 Write command
  * @param  Command Command to write
  * @retval nothing
  */
void LCD_WriteCommand(unsigned char Command)
{
	LCD_RS=0;
	LCD_RW=0;
	LCD_DataPort=Command;
	LCD_EN=1;
	LCD_Delay();
	LCD_EN=0;
	LCD_Delay();
}

/**
  * @brief  LCD1602 Write data
  * @param  Data Data to write
  * @retval nothing
  */
void LCD_WriteData(unsigned char Data)
{
	LCD_RS=1;
	LCD_RW=0;
	LCD_DataPort=Data;
	LCD_EN=1;
	LCD_Delay();
	LCD_EN=0;
	LCD_Delay();
}

/**
  * @brief  LCD1602 Set cursor position
  * @param  Line Row position, range: 1 ~ 2
  * @param  Column Column position, range: 1 ~ 16
  * @retval nothing
  */
void LCD_SetCursor(unsigned char Line,unsigned char Column)
{
	if(Line==1)
	{
		LCD_WriteCommand(0x80|(Column-1));
	}
	else if(Line==2)
	{
		LCD_WriteCommand(0x80|(Column-1+0x40));
	}
}

/**
  * @brief  LCD1602 Initialization function
  * @param  nothing
  * @retval nothing
  */
void LCD_Init()
{
	LCD_WriteCommand(0x38);//Eight bit data interface, two line display, 5 * 7 dot matrix
	LCD_WriteCommand(0x0c);//Display on, cursor off, flashing off
	LCD_WriteCommand(0x06);//After the data reading and writing operation, the cursor will automatically add one and the screen will not move
	LCD_WriteCommand(0x01);//Cursor reset, screen clearing
}

/**
  * @brief  Displays a character at the position specified by LCD1602
  * @param  Line Row position, range: 1 ~ 2
  * @param  Column Column position, range: 1 ~ 16
  * @param  Char Character to display + ''
  * @retval nothing
  */
void LCD_ShowChar(unsigned char Line,unsigned char Column,char Char)
{
	LCD_SetCursor(Line,Column);
	LCD_WriteData(Char);
}

/**
  * @brief  Start displaying the given string at the position specified by LCD1602
  * @param  Line Starting line position, range: 1 ~ 2
  * @param  Column Starting column position, range: 1 ~ 16
  * @param  String String to display + ""
  * @retval nothing
  */
void LCD_ShowString(unsigned char Line,unsigned char Column,char *String)
{
	unsigned char i;
	LCD_SetCursor(Line,Column);
	for(i=0;String[i]!='\0';i++)
	{
		LCD_WriteData(String[i]);
	}
}

/**
  * @brief  Return value = Y power of X
  */
int LCD_Pow(int X,int Y)
{
	unsigned char i;
	int Result=1;
	for(i=0;i<Y;i++)
	{
		Result*=X;
	}
	return Result;
}

/**
  * @brief  Start to display the given number at the specified position of LCD1602
  * @param  Line Starting line position, range: 1 ~ 2
  * @param  Column Starting column position, range: 1 ~ 16
  * @param  Number Number to display, range: 0 ~ 65535
  * @param  Length To display the length of the number, range: 1 ~ 5
  * @retval nothing
  */
void LCD_ShowNum(unsigned char Line,unsigned char Column,unsigned int Number,unsigned char Length)
{
	unsigned char i;
	LCD_SetCursor(Line,Column);
	for(i=Length;i>0;i--)
	{
		LCD_WriteData(Number/LCD_Pow(10,i-1)%10+'0');
	}
}

/**
  * @brief  Start at the specified position of LCD1602 and display the given number in signed decimal system
  * @param  Line Starting line position, range: 1 ~ 2
  * @param  Column Starting column position, range: 1 ~ 16
  * @param  Number Number to display, range: - 32768 ~ 32767
  * @param  Length To display the length of the number, range: 1 ~ 5
  * @retval nothing
  */
void LCD_ShowSignedNum(unsigned char Line,unsigned char Column,int Number,unsigned char Length)
{
	unsigned char i;
	unsigned int Number1;
	LCD_SetCursor(Line,Column);
	if(Number>=0)
	{
		LCD_WriteData('+');
		Number1=Number;
	}
	else
	{
		LCD_WriteData('-');
		Number1=-Number;
	}
	for(i=Length;i>0;i--)
	{
		LCD_WriteData(Number1/LCD_Pow(10,i-1)%10+'0');
	}
}

/**
  * @brief  Display the given number in hexadecimal from the specified position of LCD1602
  * @param  Line Starting line position, range: 1 ~ 2
  * @param  Column Starting column position, range: 1 ~ 16
  * @param  Number Number to display, range: 0~0xFFFF
  * @param  Length To display the length of the number, range: 1 ~ 4
  * @retval nothing
  */
void LCD_ShowHexNum(unsigned char Line,unsigned char Column,unsigned int Number,unsigned char Length)
{
	unsigned char i,SingleNumber;
	LCD_SetCursor(Line,Column);
	for(i=Length;i>0;i--)
	{
		SingleNumber=Number/LCD_Pow(16,i-1)%16;
		if(SingleNumber<10)
		{
			LCD_WriteData(SingleNumber+'0');
		}
		else
		{
			LCD_WriteData(SingleNumber-10+'A');
		}
	}
}

/**
  * @brief  Start to display the given number in binary at the specified position of LCD1602
  * @param  Line Starting line position, range: 1 ~ 2
  * @param  Column Starting column position, range: 1 ~ 16
  * @param  Number Number to display, range: 0 ~ 1111 1111 1111 1111
  * @param  Length To display the length of the number, range: 1 ~ 16
  * @retval nothing
  */
void LCD_ShowBinNum(unsigned char Line,unsigned char Column,unsigned int Number,unsigned char Length)
{
	unsigned char i;
	LCD_SetCursor(Line,Column);
	for(i=Length;i>0;i--)
	{
		LCD_WriteData(Number/LCD_Pow(2,i-1)%2+'0');
	}
}
🌍 Implementation program
#include <REGX52.H>
#include <LCD1602.H>
int main(void)
{
	unsigned int Number = 51;
	signed int negative = -1;
	LCD_Init();
	while(1)
	{
		LCD_ShowChar(1,1,'W');
		LCD_ShowString(1,2,"XH");
		LCD_ShowNum(1,4,Number,2);
		LCD_ShowSignedNum(1,7,negative,1);
		LCD_ShowHexNum(2,1,0xFF,2);
		LCD_ShowBinNum(2,4,0x00,8);
	}
}