"Why use C language to realize object-oriented development?"
"Wouldn't it be better to use C + + directly?"
Presumably, many people can't help asking similar questions when facing OOPC (Object-Oriented-Programming-with-ANSI-C) for the first time. In fact, any discussion on the above issues is controversial in itself - in other words, no matter what answer I give, I can't satisfy everyone - that's why this article has no intention to go into this muddy water.
The purpose of this article is to introduce a method for those who have been engaged in C language development in MDK environment for a long time: to help you easily and quickly use C language to "handle" object-oriented development when you occasionally need to use the concept of "Object-Oriented".
Before starting the follow-up, we need to agree and emphasize some basic principles:
- "Zero consumption" principle: that is, all object-oriented features we want to implement should be "zero resource consumption" or at least "minimal resource consumption". The principle here is: things that can be done at compile time must not be dragged to Runtime.
- Pragmatic principle: that is, we do not pursue formally similar to C + + unless its cost is zero or very small.
- The principle of "on-demand implementation": that is, for the implementation of any class, we do not pursue to implement all OO features - it is completely unnecessary - we only implement the minimum and necessary object-oriented technology according to the requirements of practical applications.
- "Fool" principle: that is, the establishment and use of classes must be fool enough. Best what you see is what you get.
Under the above premise, let's quickly enter today's content.
[only one preparation stage]
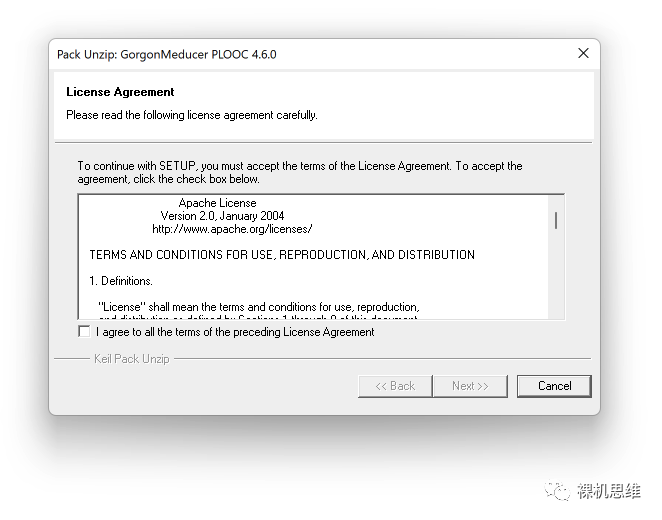
First, we want to download the CMSIS pack of PLOOC. The specific links are as follows:
https://raw.githubusercontent.com/GorgonMeducer/PLOOC/master/cmsis-pack/GorgonMeducer.PLOOC.4.6.0.pack
Of course, if you can't access Github for some reason, you can also send the keyword "PLOOC" to get SkyDrive links after paying attention to the official account of the naked machine.
After the download is successful, double-click the installation package directly.
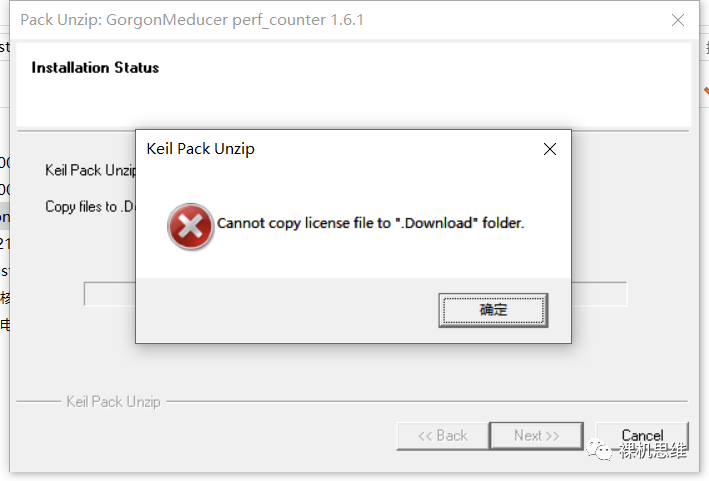
The MDK version you are using is probably too low - it's time to update the MDK
PLOOC is the abbreviation of Protected-Low-overhead-Object-Oriented-programming-with-ansi-C. as the name suggests, PLOOC is an object-oriented template that emphasizes resource consumption and provides protection for private class members.
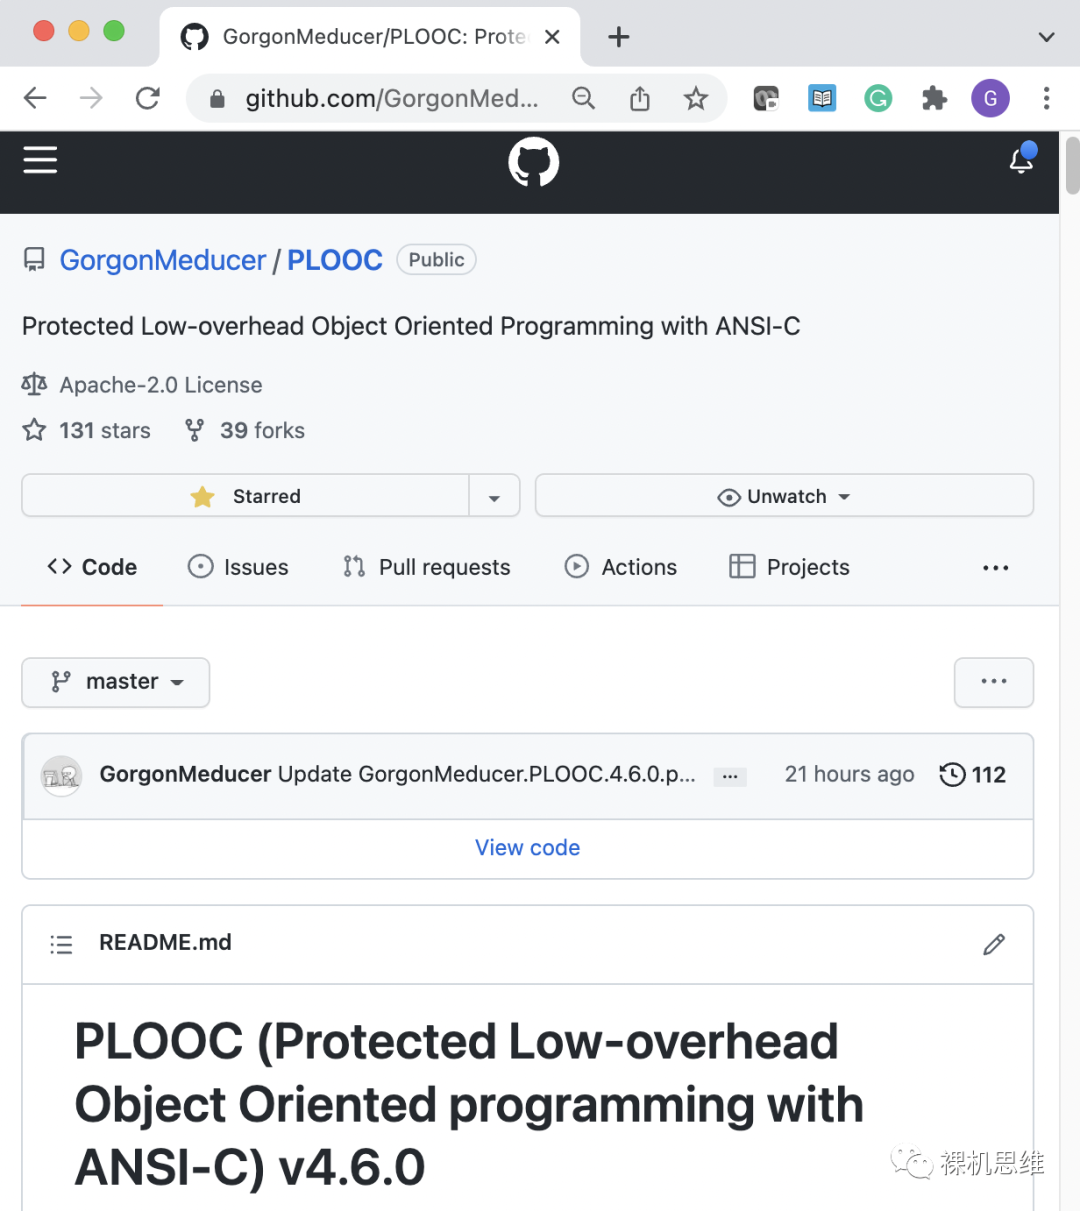
It is an open source project. If you like it, please Star more!
https://github.com/GorgonMeducer/PLOOC
[how to taste fresh food quickly]
In order to simplify the user's learning cost of OOC, PLOOC provides an example project that can be directly simulated without any hardware. Taking the queue class as an example, the example project shows:
- How classes are defined
- How to implement class methods
- How to define an Interface for a class
- How to define derived classes
- How to reload interfaces
- How to access protected members of a base class in a derived class
- ......
Many times a thousand words can't beat a few lines of code - learning OOC is true.
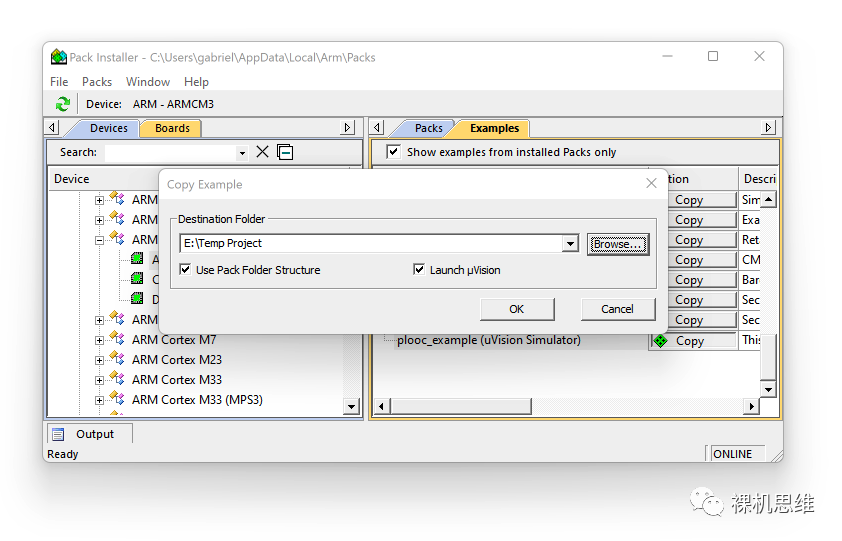
The acquisition of the example project is very simple. First, open the pack installer, find Arm in the Device list, and select any Cortex-M kernel (such as Arm Cortex-M3). Select ARMCMx in the list (such as ARMCM3 in the following figure).
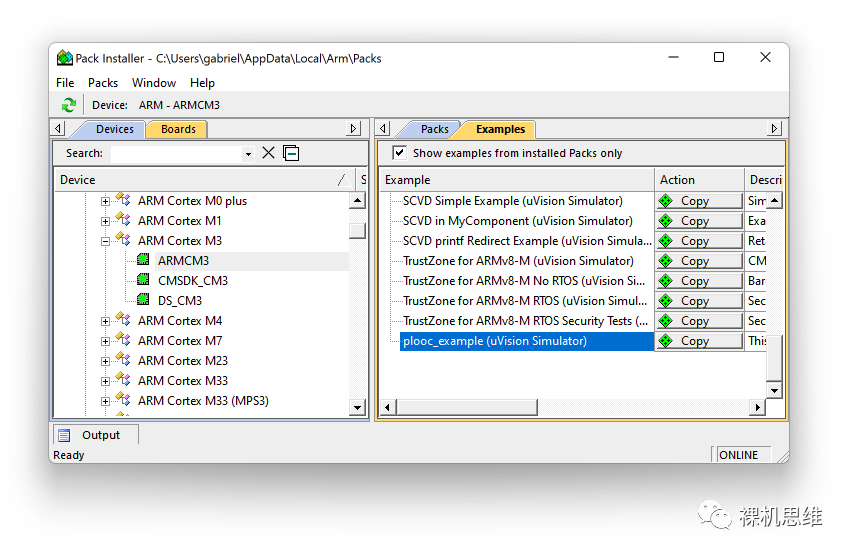
At this point, in the example tab on the right, you can see that a file named plooc appears at the bottom_ Example (uVision simulator). Click Copy and select a directory location in the pop-up window to save the project:
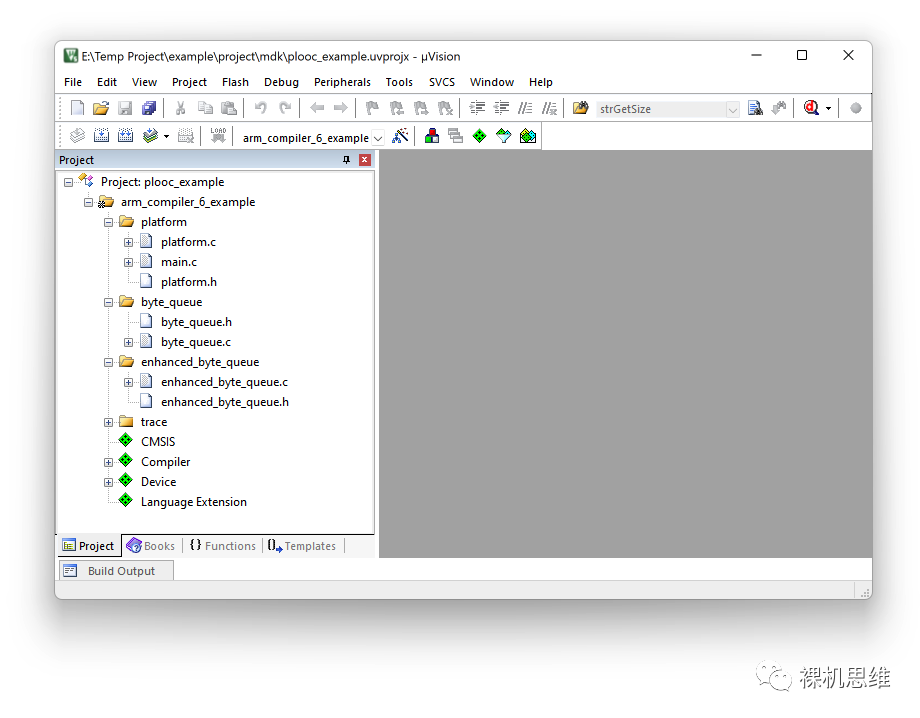
Click OK to automatically open the MDK interface as shown below:
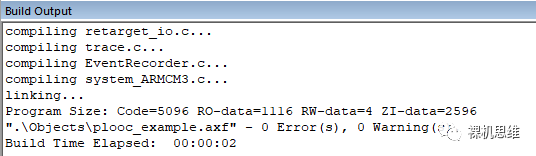
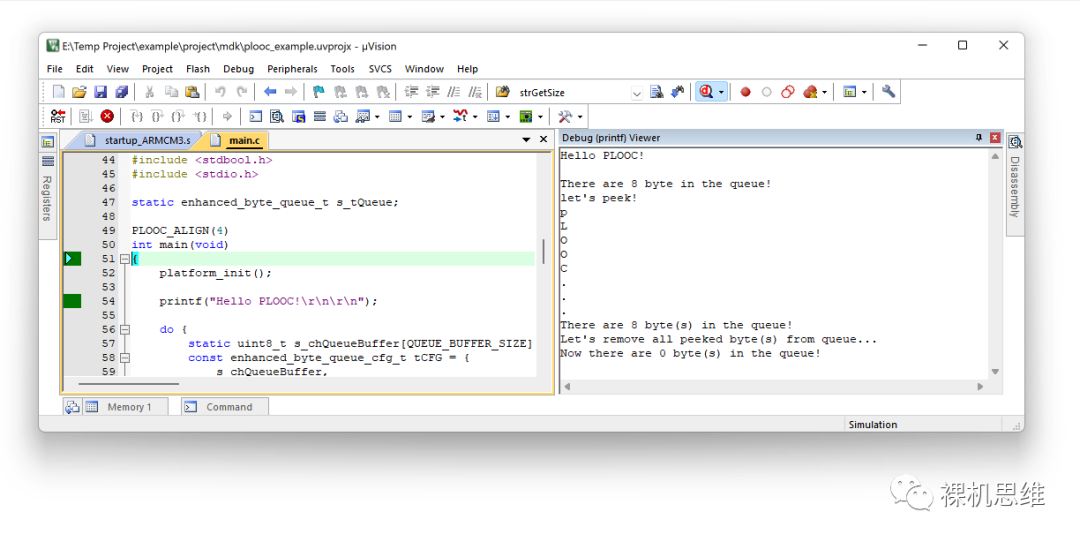
Click compile directly. If everything goes well, there should be no compilation errors:
At this point, we can directly enter the debugging mode:
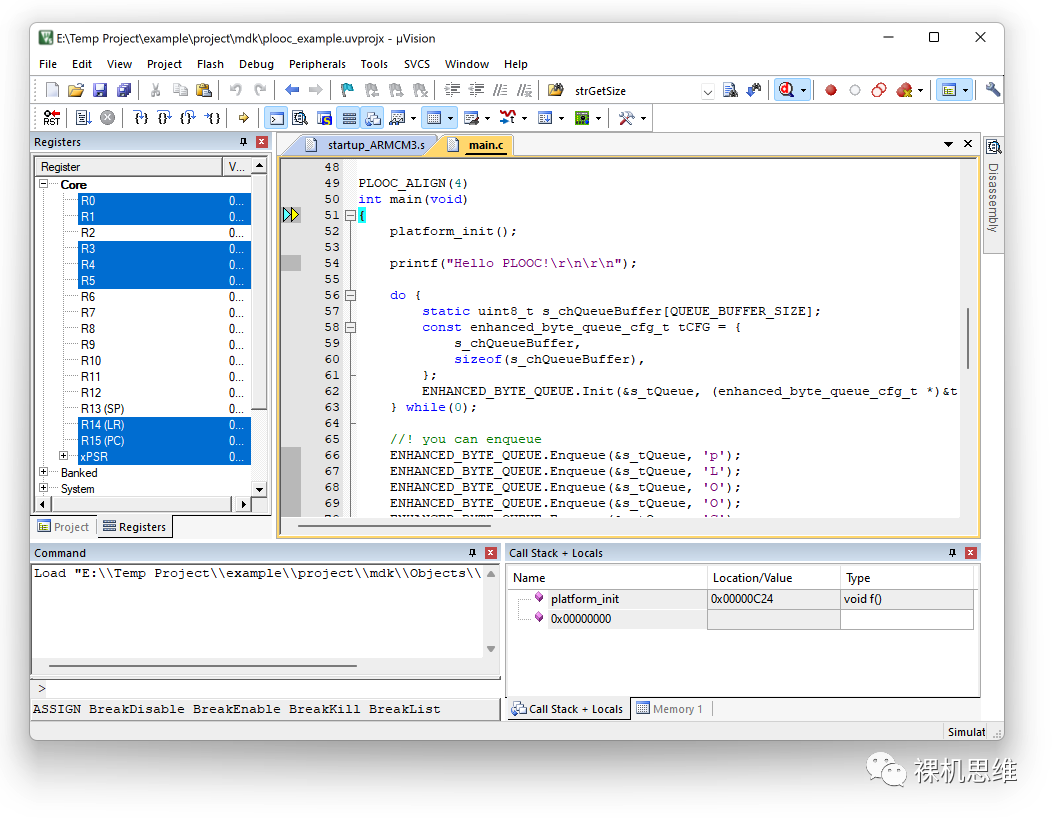
As you can see, the debug pointer stops at the start of the main() function. Let's start running at full speed. Open the Debug (printf) Viewer window from the menu:
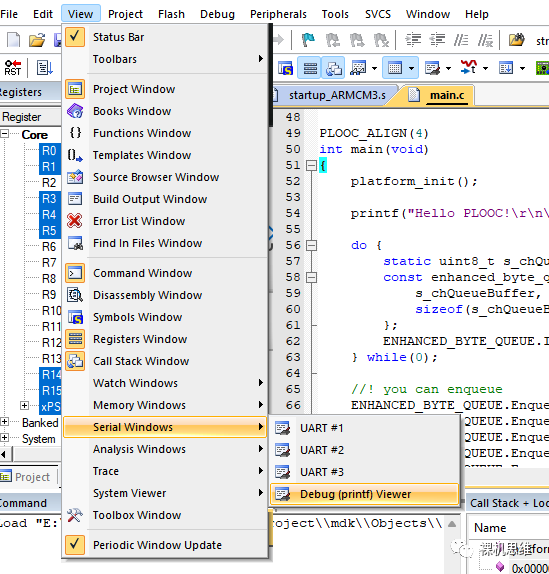
At first, the window will appear in the form at the bottom of the screen. By dragging, we can move it to an eye-catching position. At this time, the effect of the example project can be seen by running at full speed:
This example only shows the effect of the queue class (enhanced_byte_queue_t) built using PLOOC in C99 mode:
static enhanced_byte_queue_t s_tQueue;

    printf("Hello PLOOC!\r\n\r\n");

    do {
        static uint8_t s_chQueueBuffer[QUEUE_BUFFER_SIZE];
        const enhanced_byte_queue_cfg_t tCFG = {
            s_chQueueBuffer,
            sizeof(s_chQueueBuffer),
        };
        ENHANCED_BYTE_QUEUE.Init(&s_tQueue, (enhanced_byte_queue_cfg_t *)&tCFG);
    } while(0);

    //! you can enqueue
    ENHANCED_BYTE_QUEUE.Enqueue(&s_tQueue, 'p');
    ENHANCED_BYTE_QUEUE.Enqueue(&s_tQueue, 'L');
    ENHANCED_BYTE_QUEUE.Enqueue(&s_tQueue, 'O');
    ENHANCED_BYTE_QUEUE.Enqueue(&s_tQueue, 'O');
    ENHANCED_BYTE_QUEUE.Enqueue(&s_tQueue, 'C');

    ENHANCED_BYTE_QUEUE.use_as__i_byte_queue_t.Enqueue(&s_tQueue.use_as__byte_queue_t, '.');
    ENHANCED_BYTE_QUEUE.use_as__i_byte_queue_t.Enqueue(&s_tQueue.use_as__byte_queue_t, '.');
    ENHANCED_BYTE_QUEUE.use_as__i_byte_queue_t.Enqueue(&s_tQueue.use_as__byte_queue_t, '.');

    //! you can dequeue
    do {
        uint_fast16_t n = ENHANCED_BYTE_QUEUE.Count(&s_tQueue);
        uint8_t chByte;
        printf("There are %d byte in the queue!\r\n", n);
        printf("let's peek!\r\n");

        while(ENHANCED_BYTE_QUEUE.Peek.PeekByte(&s_tQueue, &chByte)) {
            printf("%c\r\n", chByte);
        }
        printf("There are %d byte(s) in the queue!\r\n",
                ENHANCED_BYTE_QUEUE.Count(&s_tQueue));
        printf("Let's remove all peeked byte(s) from queue... \r\n");
        ENHANCED_BYTE_QUEUE.Peek.GetAllPeeked(&s_tQueue);
        printf("Now there are %d byte(s) in the queue!\r\n",
                ENHANCED_BYTE_QUEUE.Count(&s_tQueue));
    } while(0);
Its output is:
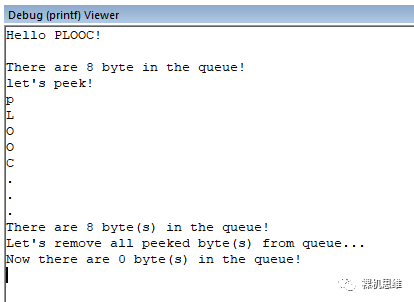
Class enhanced_byte_queue_t is actually from the base class byte_queue_t, and a very useful function is added: you can continuously Peek at the contents of the queue, and you can either 1) actually take out the peeked contents when needed; Or 2) Peek from the beginning - the code above shows this function.
Compared with ordinary OOC templates, PLOOC can not only hide the private member s of classes, but also realize polypeptide at zero runtime cost -- in common words, PLOOC allows multiple functions with different parameter numbers and different parameter types to have the same name.
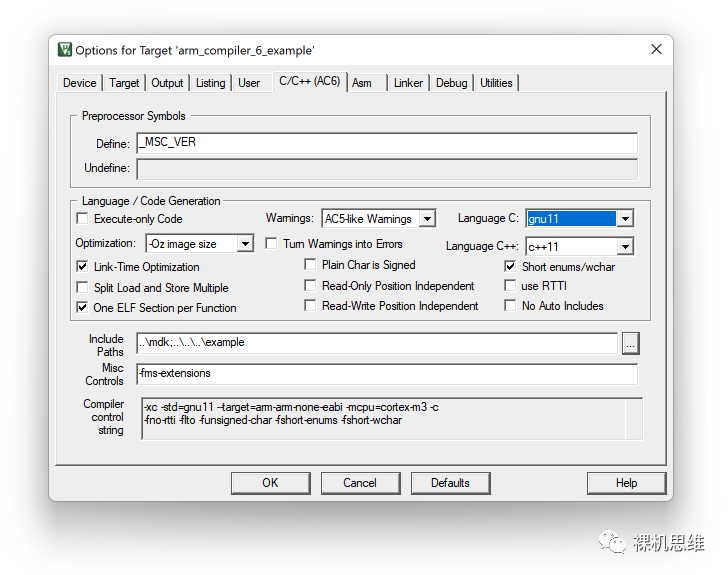
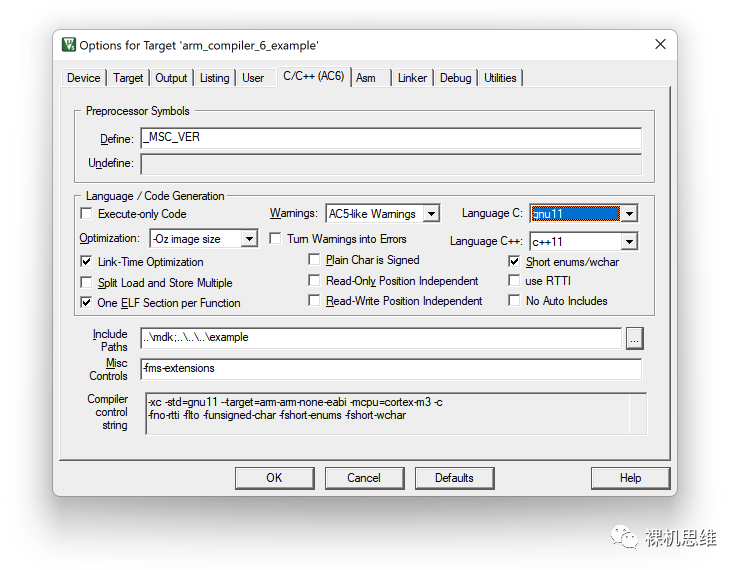
To get such a function, you need to turn on the support of C11 (preferably gnu11). When we open the project configuration, set Language C to C11 (preferably gnu11) in the "C/C + +" tab:
After recompiling, enter the debugging mode, and you will see additional information in the output window:
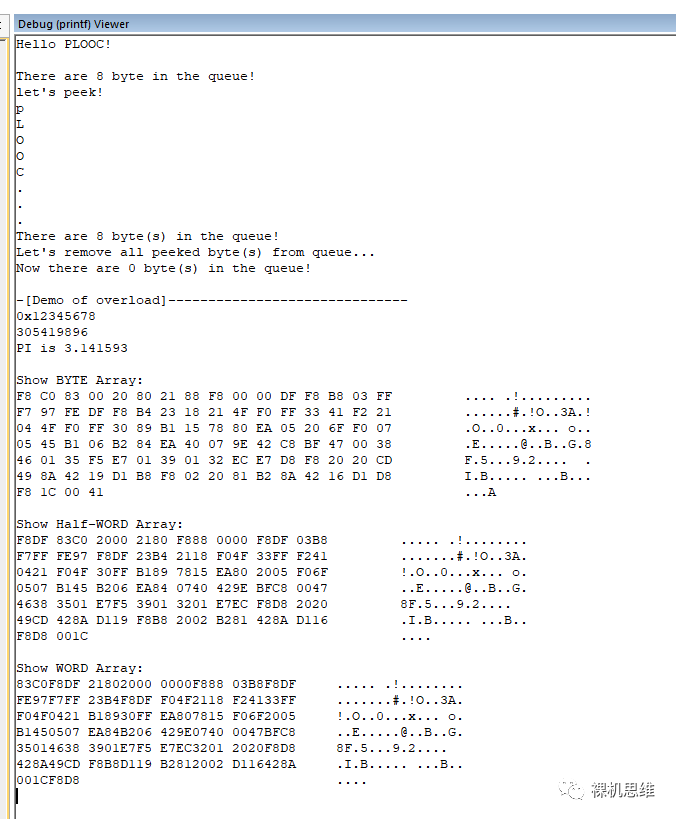
These information actually correspond to the following codes:
#if defined(__STDC_VERSION__) && __STDC_VERSION__ > 199901L
    LOG_OUT("\r\n-[Demo of overload]------------------------------\r\n");
    LOG_OUT((uint32_t) 0x12345678);
    LOG_OUT("\r\n");
    LOG_OUT(0x12345678);
    LOG_OUT("\r\n");
    LOG_OUT("PI is ");
    LOG_OUT(3.1415926f);
    LOG_OUT("\r\n");

    LOG_OUT("\r\nShow BYTE Array:\r\n");
    LOG_OUT((uint8_t *)main, 100);

    LOG_OUT("\r\nShow Half-WORD Array:\r\n");
    LOG_OUT((uint16_t *)(((intptr_t)&main) & ~0x1), 100/sizeof(uint16_t));

    LOG_OUT("\r\nShow WORD Array:\r\n");
    LOG_OUT((uint32_t *)(((intptr_t)&main) & ~0x3), 100/sizeof(uint32_t));
#endif
You see, the same function log_ Is it amazing that out () can achieve different output effects when we give it different numbers and types of parameters -- this is the charm of polymorphism in object-oriented development. Remember:
- At this time, we still use C language, not c + +;
- Under C99, we can share the same name for functions with different parameter numbers;
- Under C11, we can implement functions with the same number of parameters but different types to share the same name;
- Our overhead at runtime is 0, and everything is settled at compile time. We didn't sacrifice any code space for this feature.
The example project can help us quickly get familiar with the development mode of OOC. How can we use PLOOC template in any ordinary project?
[PLOOC deployment in any common project]
PLOOC template is actually a set of header files. There is neither Library (lib) nor C language source code, let alone assembly.
In any MDK project, as long as you have installed the CMSIS pack mentioned earlier, you can open the RTE configuration interface through the buttons marked in the following toolbar:

Find the Language Extension option, expand it, check PLOOC, and click OK to close the window.
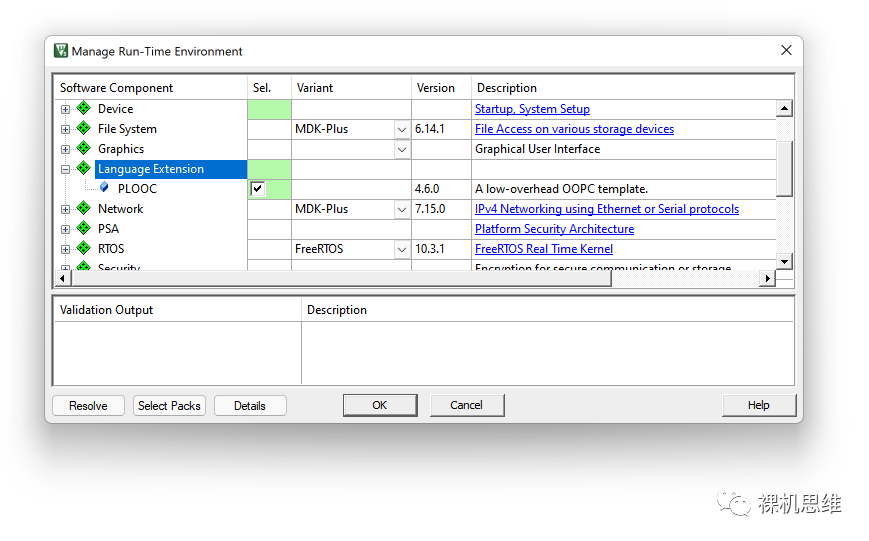
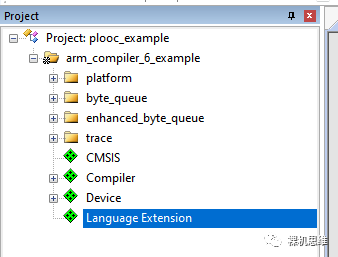
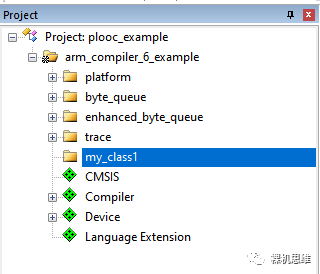
At this point, we can see a new list item "Language Extension" in the project manager:
It's not expandable. Don't worry, that's enough. Open the project configuration. If you are using Arm Compiler 6 (armclang):
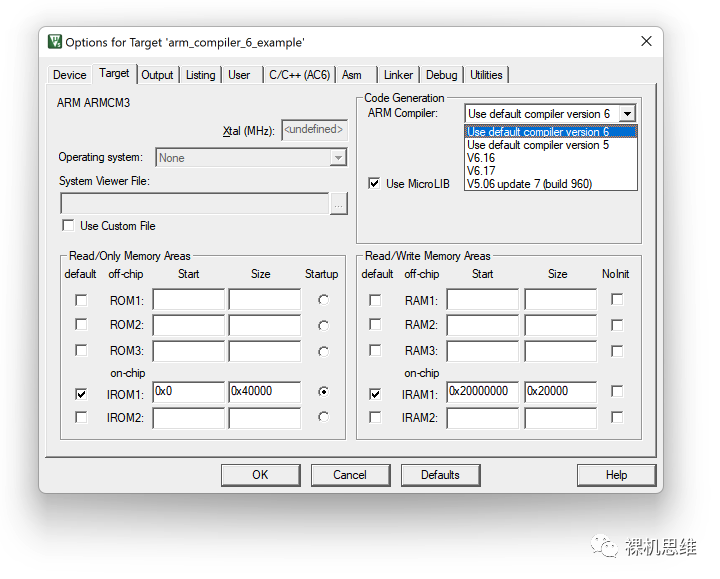
In the C/C + + option:
- Set Language C to gnu11 (or minimum c99):
- (recommended, not required) add support for Microsoft extensions in Misc Controls, and add a macro definition in Define_ MSC_VER.
-fms-extensions
If you are using Arm Compiler 5 (armcc):
You need to enable support for GNU Extension and C99 in the C/C + + Tab:
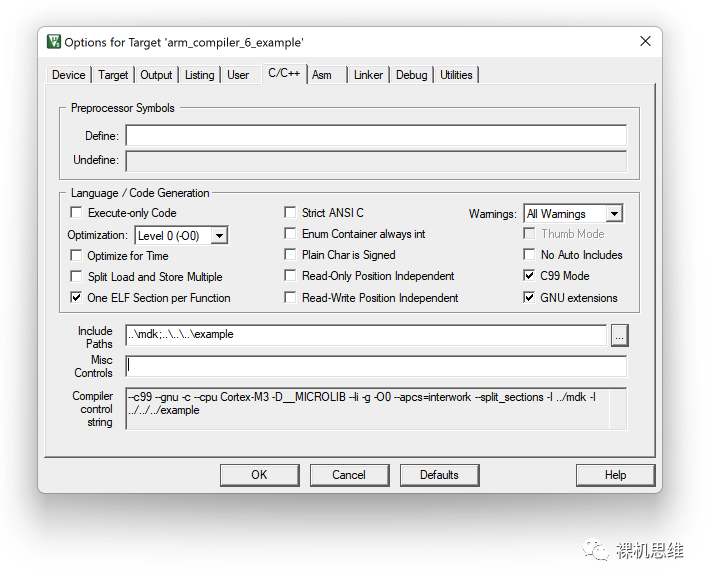
Unfortunately, as a compiler that has stopped updating, Arm Compiler 5 does not support C11 or Microsoft extensions (- FMS extensions), which means that the polymorphic feature in PLOOC cannot give full play to its potential. It is a bit regrettable (but functions with different parameter numbers are still allowed to share the same name).
So far, we have completed the deployment of PLOOC in a project. Is it particularly simple?
Maybe I didn't ask until halfway through the article. It's a little late - are you familiar with the basic object-oriented concepts? For example:
- class
- private member
- public member
- protected member
- constructor
- destructor
- method of class
- ......
If you are not familiar with it, please find a c# or C + + book to learn it a little. Later, I will assume that you are familiar with the basic elements of object-oriented development.
So, how can we quickly build a class in C language engineering?
[creating a new class has never been so simple]
Suppose we want to create a new class called my_class1
Step 1: import template
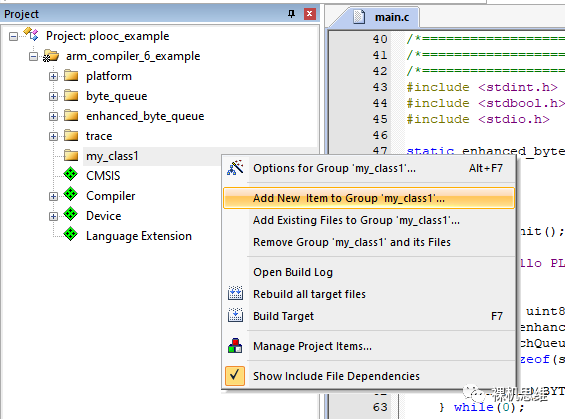
In the project manager, add a new group named my_class1:
Right click my_ Class1, and select "Add New Item to Group my_class1" in the pop-up menu:
In the pop-up dialog box, select User Code Template:
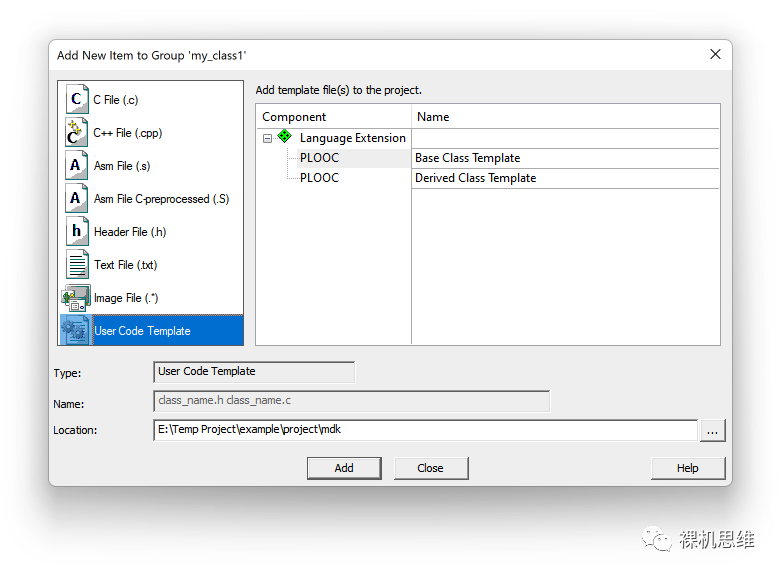
Expand the Language Extension to see two PLOOC templates, corresponding to:
- Base class and common class (Base Class Template)
- Derived Class Template
Since we want to create a common class (which can also be used as a base class in the future), select "Base Class Template". Click "..." to the right of Location Button, select a path to save the code file, and click Add.
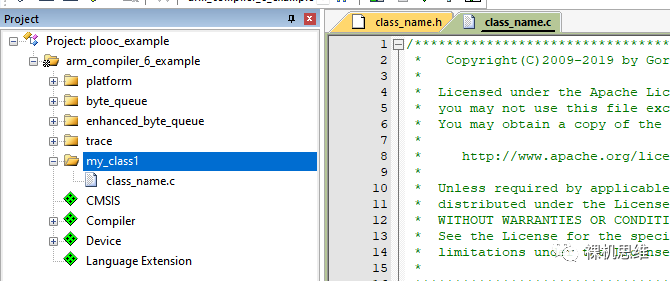
At this point, we can see that class_name.c was added to my_ Class 1, and MDK automatically opens two template files for us in the editor: class_name.h and class_name.c.
Step 2: format
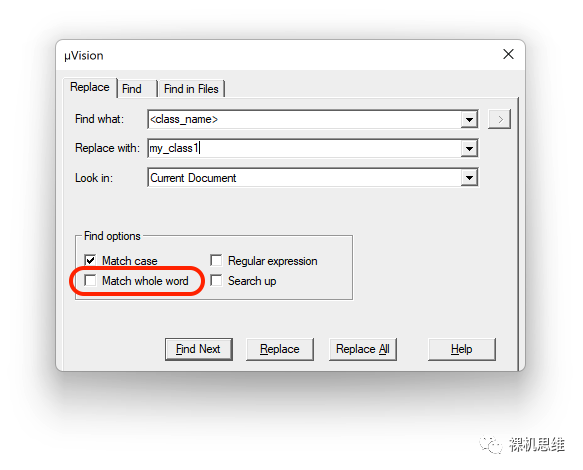
Open or select class in the editor_ name. c. Open the replacement window with the shortcut CTRL+H:
- Select Current Document in Look in
- Remove the tick in front of match while word in the find options attribute box (this step is very important)
Next, in turn:
- Lower case < class_ Replace name > with my_class1
- Capitalize < class_ Name > replace with MY_CLASS1
After completing the above steps, save the class_name.c.
Open class_name.h. Repeat the above process, i.e.:
- Lower case < class_ Replace name > with my_class1
- Capitalize < class_ Name > replace with MY_CLASS1
Save class when finished_ name. h.
Step 3: add project compilation
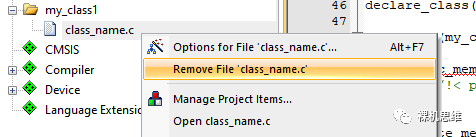
Expand my in the project manager_ Class1, and put the class in it_ name. C delete:
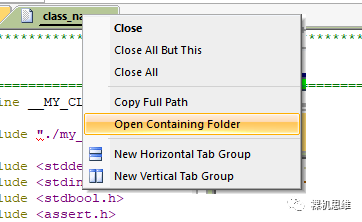
Open class_name.c) file directory:
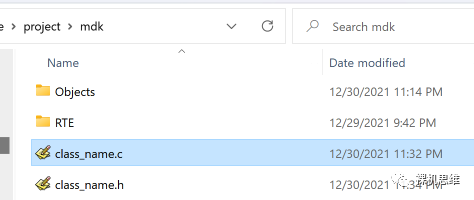
Find the two files we just edited_ name. C and class_name.h:
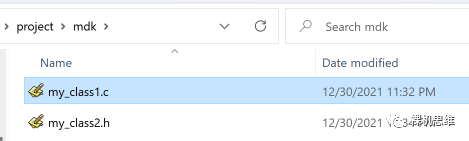
Name these two files with our class: my_class1.c and my_class1.h
In the MDK project manager, add these two files to my_class1:

If your project can be compiled normally before, it should still be compiled normally after adding the above files:

Step 4: how to design your class member variables
Open my_class1.h. Find def_ Code snippet of class:
//! \name class my_class1_t
//! @{
declare_class(my_class1_t)

def_class(my_class1_t,

    public_member(
        //!< place your public members here
    )

    private_member(
        //!< place your private members here
    )

    protected_member(
        //!< place your private members here
    )
)

end_def_class(my_class1_t) /* do not remove this for forward compatibility  */
//! @}
It is easy to note that:
- The type corresponding to the class will automatically add "_t" at the end to indicate that it is a user-defined type. Of course, this is not mandatory. After you are familiar with the template, if you really don't like it, you can change it to any type name you like. Here, because our class is called my_class1, so the corresponding type is my_class1_t.
- declare_class (or can be written as dcl_class) is used for the "pre declaration" of a type. Its essence is
typedef struct my_class1_t my_class1_t;
So there is nothing particularly mysterious.
- def_class is used to define the members of a class. Including public_member is used to store publicly visible member variables; private_member is used to store private members; protected_member is used to store visible members of the current class and derived classes. The order of these three is arbitrary, which can be missing or multiple - very flexible.
Step 4: how to design a constructor
Typedef struct my found_ class1_ cfg_ T corresponding code block:
typedef struct my_class1_cfg_t {

    //! put your configuration members here

} my_class1_cfg_t;
As you can see, this is an ordinary structure. It is used to pass the parameters required to initialize the class to our constructor. In the class header file, you can easily find the function prototype of the constructor:
/*! \brief the constructor of the class: my_class1 */
extern
my_class1_t * my_class1_init(my_class1_t *ptObj, my_class1_cfg_t *ptCFG);
You can see that the first parameter is a pointer to the class instance, and the second parameter is our configuration structure. In the C source code file of the class, you can find the entity of the constructor:
#undef this
#define this        (*ptThis)
/*! \brief the constructor of the class: my_class1 */
my_class1_t * my_class1_init(my_class1_t *ptObj, my_class1_cfg_t *ptCFG)
{
    /* initialise "this" (i.e. ptThis) to access class members */
    class_internal(ptObj, ptThis, my_class1_t);
    ASSERT(NULL != ptObj && NULL != ptCFG);

    return ptObj;
}
At this point, in the constructor, we can use this XXXX to access the members of the class, so as to initialize the class according to the contents passed in the configuration structure.
As you may have noticed, there is no code in our template to apply for space for classes. This is intentional. The reasons are as follows:
- Object orientation does not necessarily use dynamic memory allocation, which is a bias
- We only provide constructors, and class users are free to decide how to allocate storage space for class instances.
- Since the class we created (such as my_class1_t) is essentially a complete structure type, users can use it like ordinary structures:
- Static allocation: define static variables or global variables
- Use pool allocation: directly build a dedicated pool for the target class to effectively avoid fragmentation.
- Heap allocation: normal malloc() is used for allocation. The size of the class can be obtained through sizeof(), for example:
my_class1_cfg_t tCFG = {
    ...
};
my_class1_t *ptNewItem = my_class1_init(
     (my_class1_t *)malloc(sizeof(my_class1_t),
     &tCFG);
if (NULL == ptNewItem) {
    printf("Failed to new my_class1_t \r\n");
}

...

free(ptNewItem);
Of course, if you say I want that formalism, you can define a macro:
#define new_class(__name, ...)                \
({__name##_cfg_t tCFG = {                     \
    __VA_ARGS__                               \
};                                            \
__name##_init(                                \
     (__name##_t *)malloc(sizeof(__name##_t), \
     &tCFG);})
Isn't this a new() method with root positive seedling red, for example:
my_class1_t *ptItem = new_class(my_class, <Parameter list for construction>);
if (NULL == ptItem) {
    printf("Failed to new my_class1_t \r\n");
}

...

free(ptItem);
What's up? Is that the smell? Destructors are similar, such as my_ class1_ The deposit () function is also not responsible for the release of resources - the decision is still in the hands of the user. Of course, you can also complete a set:
#define free_class(__name, __obj)               \
    do {                                        \
        __name##_depose((__name##_t *)(__obj)); \
        free(__obj);                            \
    } while(0)
Form a combined fist, from resource allocation, structure, structure analysis to the final release of resources at one go:
my_class1_t *ptItem = new_class(my_class, <Parameter list for construction>);
if (NULL == ptItem) {
    printf("Failed to new my_class1_t \r\n");
}

...

free_class(my_class, ptItem);
Step 5: how to design the method of constructing classes
We said at the beginning that the most important thing to practice object-oriented is function, not formalism. Suppose there is a class method called method1. Ideally, you must think that the following usage is the most "orthodox":
my_class1_t *ptItem = new_class(my_class, <Parameter list for construction>);
if (NULL == ptItem) {
    printf("Failed to new my_class1_t \r\n");
}

ptItem.method1(<Argument list>);

free_class(my_class, ptItem);
In C language, we can achieve a similar effect - as long as you add function pointers to the class definition - in fact, many OOC templates do so (such as lw_oopc). But think carefully about the advantages and disadvantages of adding function pointers to the structure of a class:
Let's start with the benefits:
- You can call methods in an "elegant" way;
- Support overload at runtime;
Let's talk about the disadvantages:
- In embedded applications, most class methods do not need overloading, let alone runtime overloading;
- The function pointer will occupy 4 bytes;
- The efficiency of indirect call realized by function pointer is lower than that of ordinary function direct call.
In other words, for most cases of most classes, we do not need to consider the problem of class method overloading. Even if there is, it is often static overloading at compile time (plooc_example shows the implementation method of static overloading). Then in the application scenario without considering dynamic overloading at run time, The method of directly using ordinary functions to implement classes is a pragmatic choice.
Based on this consideration, the above example should actually be written as:
my_class1_t *ptItem = new_class(my_class, <Parameter list for construction>);
if (NULL == ptItem) {
    printf("Failed to new my_class1_t \r\n");
}

my_class1_method1(ptItem,<Argument list>);

free_class(my_class, ptItem);
Here, my_class1_method1() is my_class1.h. provide statement, my_class1.c provides a function to implement. Prefix my_class1_ Used to prevent namespace contamination.
Another noteworthy detail is that in OOPC, the first parameter of the function of any class method must be a pointer to the class instance - that is, the so-called this pointer. With my_class1_method1() as an example, its form is:
#undef this
#define this        (*ptThis)

void my_class1_method(my_class1_t *ptObj, <parameter list >)
{
    /* initialise "this" (i.e. ptThis) to access class members */
    class_internal(ptObj, ptThis, my_class1_t);

    ...
}
Here, class_internal() is used to convert ptObj into the required this pointer (ptThis here). With the help of macros, we can implement this XXXX is such a cost-free formalism.
Step 6: how to design the Interface of the class
Our template also provides an interface for each class and includes constructors and destructors by default. For example, we can construct and destruct classes more gracefully:
static my_class1_t s_tMyClass;
...
MY_CLASS.Init(&s_tMyClass, ...);
...
MY_CLASS.Depose(&s_tMyClass);
In my_ class1. In H, we can find such a structure:
//! \name interface i_my_class1_t
//! @{
def_interface(i_my_class1_t)
    my_class1_t *  (*Init)       (my_class1_t *ptObj, my_class1_cfg_t *ptCFG);
    void           (*Depose)     (my_class1_t *ptObj);
    /* other methods */

end_def_interface(i_my_class1_t) /*do not remove this for forward compatibility */
//! @}
Suppose we want to add a new method, we only need to add it in I_ my_ class1_ Add the corresponding function pointer to the interface definition of T, for example:
//! \name interface i_my_class1_t
//! @{
def_interface(i_my_class1_t)
    my_class1_t *  (*Init)       (my_class1_t *ptObj, my_class1_cfg_t *ptCFG);
    void           (*Depose)     (my_class1_t *ptObj);
    /* other methods */
    void           (*Method1)    (my_class1_t *ptObj, <parameter list >);
end_def_interface(i_my_class1_t) /*do not remove this for forward compatibility */
//! @}
Next, we're going to_ class1. Add the function declaration of the corresponding method in H:
extern
void my_class1_method1(my_class1_t *ptObj, <parameter list >);
Here, it is worth noting that in addition to the case skew, there is a simple correspondence between the naming of functions and interfaces: that is, all "." Directly replace with "", For example, in use:
MY_CLASS1.Method1()
It corresponds to:
my_class1_method1()
At the same time, we need to_ class1. Add my to C_ class1_ Entity of method1() function:
void my_class1_method1(my_class1_t *ptObj, <parameter list >)
{
    class_internal(ptObj, ptThis, my_class1_t);
    ...
}
And find the name my_ Interface instance of Class1:
const i_my_class1_t MY_CLASS1 = {
    .Init =             &my_class1_init,
    .Depose =           &my_class1_depose,

    /* other methods */
};
In which to initialize our new method (new function pointer) Method1:
const i_my_class1_t MY_CLASS1 = {
    .Init =             &my_class1_init,
    .Depose =           &my_class1_depose,

    /* other methods */
    .Method1 =          &my_class1_method1,
};
So far, we have completed the addition and initialization of class methods. In the future, it can be passed anywhere
<Class name capitalization>.<Method name in interface>()
To access the operation function of the class -- it's elegant to some extent.
Step 6: how to design Derived Class
The basic steps of creating a derived class are basically the same as those of an ordinary class. In addition to using the corresponding template in the template selection phase, the following two replacement steps need to be added in the format phase:
- Set < base_ CLASS_ Name > replace with the uppercase name of the base class;
- Set < base_ class_ Name > replace with the lowercase name of the base class;
In the class definition phase, we note that:
//! \name class <class_name>_t
//! @{
declare_class(<class_name>_t)

def_class(<class_name>_t,  which(implement(<base_class_name>_t))
    ...
)

end_def_class(<class_name>_t) /* do not remove this for forward compatibility  */
//! @}
Derived classes have extra structures based on the original class definition, separated by "," and the type name of the class:
which(implement(<base_class_name>_t))
Here, which() is actually a list that allows us to implement multiple inheritance. Suppose we have multiple base classes or inherit multiple interfaces, it can be written as follows:
which(
    implement(<base_class_name1>_t)
    implement(<base_class_name2>_t)
    implement(<interface_name1>_t)
    implement(<interface_name2>_t)
)
It should be noted that if there are members with name conflicts (duplicate names) in the base class or interface, you can replace implementation () with inherit() to avoid such conflicts. For example, < interface_ name2>_ T and < base_ class_ name1>_ T has a member called wID, so you can avoid conflicts in the new derived class by replacing the implementation() of one of them with inherit:
which(
    inherit(<base_class_name1>_t)
    implement(<base_class_name2>_t)
    implement(<interface_name1>_t)
    implement(<interface_name2>_t)
)
As shown here, PLOOC supports multiple inheritance, which is not supported by C + + or C # before. This is also one of the charms of using C language to implement OO. You can explore the specific methods by yourself, which will not be repeated here.
As we all know, in object-oriented, there is a class of members that only the current class and derived classes can access - we call it protected member. In the definition of a class, you can use protected_member() includes these members, such as:
//! \name class byte_queue_t
//! @{
declare_class(byte_queue_t)

def_class(byte_queue_t,

    private_member(
        implement(mem_t)                    //!< queue buffer
        void        *pTarget;               //!< user target
    )

    protected_member(
        uint16_t    hwHead;                 //!< head pointer
        uint16_t    hwTail;                 //!< tail pointer
        uint16_t    hwCount;                //!< byte count
    )
)

end_def_class(byte_queue_t) /* do not remove this for forward compatibility  */
//! @}
Here, hwHead, hwTail and hwCount are accessible only to the current class and derived classes.
For those methods (functions) that only allow access to derived classes, we generally use the form of precompiled macros to protect them conditionally:
#if defined(__BYTE_QUEUE_CLASS_IMPLEMENT) || defined(__BYTE_QUEUE_CLASS_INHERIT__)
extern mem_t byte_queue_buffer_get(byte_queue_t *ptObj);
#endif
Here, by macro__ BYTE_QUEUE_CLASS_IMPLEMENT and__ BYTE_ QUEUE_ CLASS_ Inhrit protection, function byte_queue_buffer_get() can only allow class byte_queue_t itself and its derived classes can only be accessed.
My created before us_ class1. We have a similar example in H:
#if defined(__MY_CLASS1_CLASS_IMPLEMENT) || defined(__MY_CLASS1_CLASS_INHERIT__)
/*! \brief a method only visible for current class and derived class */
extern void my_class1_protected_method_example(my_class1_t *ptObj);
#endif
Function my_class1_protected_method_example() is an example_ Class1 and its derived classes access protected methods.
In a derived class, if you want to access the protected members of the base class, you can use protected_ Help from internal(), for example:
#undef this
#define this        (*ptThis)

#undef base
#define base        (*ptBase)

void enhanced_byte_queue_peek_reset(enhanced_byte_queue_t *ptObj)
{
    /* initialise "this" (i.e. ptThis) to access class members */
    class_internal(ptObj, ptThis, enhanced_byte_queue_t);
    /* initialise "base" (i.e. ptBase) to access protected members */
    protected_internal(&this.use_as__byte_queue_t, ptBase, byte_queue_t);

    ASSERT(NULL != ptObj);
    /* ------------------atomicity sensitive start---------------- */
    this.hwPeek = base.hwTail;
    this.hwPeekCount = base.hwCount;
    /* ------------------atomicity sensitive end---------------- */
}
Here, the derived class uses this use_ as__ byte_queue_t obtains a "reference" to the base class and uses protected_internal() converts it to a pointer named ptBase. With the help of base macro, we can pass base XXXX to access the members of the base class. In the example, we see that base Hwtail and base Hwcount is the byte shown above_ queue_ Protected member of T.
[say later]
No matter what template is used, one of the core concepts of OOPC should be "pragmatic", that is, taking the greatest advantage (from the benefits of OO) at the lowest cost (preferably zero cost).
Previously, I wrote in the article< Real sword and real gun modularization (2.5) -- gentleman's agreement >The principle and manual deployment technology of PLOOC are introduced in detail. With the help of CMSIS pack and RTE in MDK, the originally cumbersome manual deployment and class creation process have been unprecedentedly simplified. The development using OOPC has never been so simple - almost the same as using C + + directly.
Unconsciously, PLOOC has gained more than 100 stars since it was first published two years ago - it is a Star project in my warehouse. From the log, PLOOC is quite stable. It was more than a year ago when I last "felt it necessary to update", and joining CMSIS pack was just a icing on the cake.

Finally, thank you for your support - it is your Star that supports me to continuously update the project all the way. thank you!