MogileFS deployment document
brief introduction
MogileFS is an open-source distributed file system, which is used to build a distributed file cluster. It is developed by Danga interactive, a subsidiary of LiveJournal. The Danga team has developed good open-source projects including Memcached, MogileFS, Perlbal and so on. At present, there are many companies using MogileFS, such as some foreign companies and the top companies in Japan, which are basically using this. The companies known to use MogileFS in China include yupoo remake, digg, Tudou, Douban, store 1, Dianping, Sogou, anjuke and so on. Basically, many websites have more than 30T images.
Characteristic
- Application layer provides services without core components
- No single point: three components (tracker, mogstore, database) can achieve high availability
- Automatic file copying: the minimum unit of copying is not file, but class. Files can be automatically copied to multiple storage nodes with enough storage space
- Transport neutrality: no special protocol, can communicate through NFS or HTTP
- Simple namespace: the file is determined by a given key. It is a global namespace. No directory implements file isolation based on the domain
- Do not share any data: no need to share disks through expensive SAN, each storage node only needs to maintain its own storage device (device)
principle
Component
Trackers (trackers)
Mobilefsd is the tracker program, which is the core of the whole system. The trackers are responsible for the scheduling work, including Replication, Deletion, Query, Reaper, Monitor, etc. All operations of mogadm and mogtool have to deal with trackers. Some operations of the Client also need to define trackers. Therefore, it is better to run multiple trackers at the same time for load balancing. Trackers can also run on only one machine, or with other programs. As long as you configure its configuration file, the default is / etc/mogilefs/mogilefsd.conf.
Storage (storage node)
The startup of the mogstored program will make the machine a storage node. At startup, read / etc/mogilefs/mogstored.conf by default. For specific configuration, please refer to the configuration section. After mogstored is started, you can add this machine to the cluster through mogadm. A machine can run only one mogstored as a storage node, or run other programs at the same time.
Database (database)
The database holds all the metadata of Mogilefs. This part is very important. It is similar to the authentication center of the mail system. If this part is hung, the whole Mogilefs will be unavailable. This should set up a high availability (HA) environment to prevent a single point of failure.
Terminology explanation
A storage node of a device can have multiple devices, that is, the directory used to store files. Each device has a device ID, which needs to be configured as docroot in the mogstroed configuration file. The device cannot be deleted, but the device status can only be set to dead. After setting to dead, the data cannot be recovered, and the device ID cannot be used. (it is recommended that each node has only one device. When files are stored in multiple copies, redundant data is backed up in other devices of the current node, which is equal to no backup. If only two copies are backed up, the node will fail and the data will be lost.)
**Domain * the key value in a domain is unique. A MogileFS can have multiple domains, which can be used to store containers of data of different application types.
Class the minimum unit of file replication (up to 64M, if a single file exceeds this size, it will be split into multiple class stores). There can be multiple classes in a domain, which are mainly used to control the replication unit. Classes are used for attribute management. Classes are one level lower than domain domain, and can define the number of copies of a file stored in different device s. A file must be located through domain, class, and key.
Deployment process
Installation environment description
System environment: CentOS release 6.9 (Final)
Note: all the following steps are passed under CentOS Release 6.9. The service is compiled and installed with source code, which is universal in theory.
Role division:
| role | hostname | IP | Installation software |
|---|---|---|---|
| Storage node storage01 | Rybh101 | 172.16.1.101 | MogileFS |
| Storage node storage02 | Rybh102 | 172.16.1.102 | MogileFS |
| Tracker,Database | Rybh103 | 172.16.1.103 | MogileFS,MariaDB |
setup script
1. Install the MogileFS service (all hosts)
- Installation environment dependency
RedHat/CentOS
yum install -y epel-release
yum -y install make gcc unzip perl-DBD-MySQL perl perl-CPAN perl- YAML perl-Time-HiRes perl-ExtUtils-MakeMaker perl-Net-Netmask perl-IO-AIO
- MogileFS is a Perl based project. Therefore, it is necessary to download the MogileFS module from CPAN. Therefore, it is necessary to ensure that the deployed machine can connect to the Internet directly or through an agent. If it is unable to connect to the Internet, it is necessary to sort out the dependency of the module, Download all the required Perl modules through other ways, and compile and install them manually.
First, install the cpanm tool on two machines to install the module:
curl -L https://cpanmin.us/ -o /usr/bin/cpanm
chmod +x /usr/bin/cpanm
Set environment variables:
export LC_ALL=C
alias cpanm='cpanm --sudo --mirror http://mirrors.163.com/cpan --mirror-only'
After cpanm is installed, install the modules required by MogileFS on two machines
cpanm App::cpanminus
cpanm IO::AIO
cpanm IO::WrapTie
cpanm Danga::Socket
cpanm DBD::mysql
cpanm MogileFS::Server
cpanm MogileFS::Client
cpanm MogileFS::Utils
After installation, the generated commands are as follows:
2. Configure the MogileFS service (all hosts)
First, create / etc/mogilefs directory on three machines to store configuration files. Secondly, we create mogilefs group and mogilefs users on two machines to run mogilefs related processes (the above users and groups are created as system users and system groups by the author). Then create the / alidata directory on the two machines to simulate the parent directory of the storage device directory, and give the mogilefs user and the mogilefs user group permission.
mkdir /etc/mogilefs
groupadd -r mogilefs
useradd -r -g mogilefs -d /home/mogilefs -s /bin/bash -m mogilefs
mkdir /alidata/
chown mogilefs.mogilefs /alidata
Since the MogileFS installed with CPAN does not involve the configuration file, the mogilefsd.conf file and mogstored.conf file provided on the GitHub are used as the configuration files of the MogileFS system. The mobilefsd.conf file is used as the configuration of the tracker, while the mogstored.conf file is used for the storage. Download the above two files and copy them to the / etc/mogilefs directory of the two machines:
wget https://github.com/hachi/MogileFS-Server/archive/master.zip -O /opt/MogileFS-Server-master.zip
cd /opt
unzip MogileFS-Server-master.zip
cp MogileFS-Server-master/conf/* /etc/mogilefs
- Database node configuration (172.16.1.103)
Configure the yum installation source for mariadb
cat >>/etc/yum.repos.d/MariaDB.repo<<'EOF'
[mariadb]
name = MariaDB
baseurl = http://yum.mariadb.org/10.0/centos7-amd64
gpkgkey=https://yum.mariadb.org/RPM-GPG-KEY-MariaDB
gpgcheck=1
EOF
Install mariadb and start the database service
yum install -y MariaDB-server MariaDB-client
To create the connection user of mogilefs, the account and password here need to be used in the tracker service
MariaDB [(none)]> USE mysql;
Database changed

MariaDB [mysql]> GRANT ALL ON mogilefs.* TO 'moguser'@'172.16.%.%'  IDENTIFIED BY 'mogpass';
Query OK, 0 rows affected (0.00 sec)

MariaDB [mysql]> GRANT ALL ON *.* TO 'root'@'172.16.%.%' IDENTIFIED BY 'rootpass';
Query OK, 0 rows affected (0.00 sec)

MariaDB [mysql]> FLUSH PRIVILEGES;
Query OK, 0 rows affected (0.00 sec)
- Tracker node configuration (172.16.1.103
Initialize the mogilefs database.
mogdbsetup --dbhost=172.16.1.103 --dbrootuser=root \
--dbrootpass=rootpass --dbuser=moguser --dbpass=mogpass --dbname=mogilefs --yes
After the initialization of the database, log in to the database to see if the data table is generated.
MariaDB [(none)]> use mogilefs;
Reading table information for completion of table and column names
You can turn off this feature to get a quicker startup with -A

Database changed
MariaDB [mogilefs]>> show tables;
+----------------------+
| Tables_in_mogilefs   |
+----------------------+
| checksum             |
| class               |
| device               |
| domain               |
| file                 |
| file_on             |
| file_on_corrupt     |
| file_to_delete       |
| file_to_delete2     |
| file_to_delete_later |
| file_to_queue       |
| file_to_replicate   |
| fsck_log             |
| host                 |
| server_settings     |
| tempfile             |
| unreachable_fids     |
+----------------------+
17 rows in set (0.00 sec)
To modify the main configuration file of trakcer:
# cat /etc/mogilefs/mogilefsd.conf
daemonize = 1                           #Run as daemons or not
pidfile = /home/mogilefs/mogilefsd.pid
db_dsn = DBI:mysql:mogilefs:host=172.16.1.103  #Define database name and host
db_user = moguser                       #Database user name
db_pass = mogpass                       #Database user password
listen = 172.16.1.103:7001                  #Monitor address
conf_port = 7001
query_jobs = 10
delete_jobs = 1
replicate_jobs = 5
reaper_jobs = 1
Start trakcer service
su - mogilefs -c "/usr/local/bin/mogilefsd -c /etc/mogilefs/mogilefsd.conf --daemon"
- Storage node configuration (172.16.1.101 and 172.16.1.102)
Modify the main configuration file of the storage node to define the root directory (the parent directory of all device directories) as / alidata.
# cat /etc/mogilefs/mogstored.conf
maxconns = 10000
httplisten = 0.0.0.0:7500
mgmtlisten = 0.0.0.0:7501
docroot = /alidata/
Start storage service
su - mogilefs -c "/usr/local/bin/mogstored -c /etc/mogilefs/mogstored.conf --daemon"
You can also encapsulate the startup command as a startup script:
Mogilefsd startup script:
#!/bin/bash
#
# chkconfig: - 85 15
# description: MogileFS tracker
# processname: mogilefsd
# config: /etc/mogilefs/mogilefsd.conf
# pidfile: /home/mogilefs/mogilefsd.pid

. /etc/rc.d/init.d/functions

lockfile=${LOCKFILE-/var/lock/subsys/mogilefsd}
RETVAL=0

pidfile='/home/mogilefs/mogilefsd.pid'

start() {
       ulimit -n 65535
        echo -n $"Starting mogilefsd"
        su - mogilefs -c "/usr/local/bin/mogilefsd -c /etc/mogilefs/mogilefsd.conf --daemon" &> /dev/null
        RETVAL=$?
       [ $RETVAL = 0 ] && success && touch ${lockfile} && pidof /usr/local/bin/mogilefsd > $pidfile || failure
        echo
       return $RETVAL
}

stop() {
        echo -n $"Stopping mogilefsd"
       netstat -nlp|grep "mogilefsd"|grep -v grep|awk '{print $7}' |awk -F"/" '{print $1}'|xargs kill -9
        RETVAL=$?
       [ $RETVAL = 0 ] && success && rm -f ${lockfile} || failure
        echo
}

reload() {
        echo -n $"Reloading mogilefsd: "
        killall mogilefsd -HUP
        RETVAL=$?
       [ $RETVAL = 0 ] && success || failure
        echo
}

case "$1" in
        start)
                start
               ;;
        stop)
                stop
               ;;
       status)
               status mogilefsd
                RETVAL=$?
               ;;
        restart)
                stop
                sleep 1
                start
               ;;
       reload)
               reload
               ;;
       *)
                echo $"Usage: mogilefsd {start|stop|restart|reload|status}"
                exit 1
esac
exit $RETVAL
Mogstored startup script:
#!/bin/bash
#
# chkconfig: - 86 14
# description: MogileFS storage
# processname: mogstored
# config: /etc/mogilefs/mogstored.conf
# pidfile: /home/mogilefs/mogstored.pid

. /etc/rc.d/init.d/functions

lockfile=${LOCKFILE-/var/lock/subsys/mogstored}
RETVAL=0

configfile="/etc/mogilefs/mogstored.conf"
pidfile="/home/mogilefs/mogstored.pid"

prog=$(which mogstored)

start() {
       ulimit -n 65535
        echo -n $"Starting mogstored"
        su - mogilefs -c "/usr/local/bin/mogstored -c $configfile --daemon" &> /dev/null
        RETVAL=$?
       [ $RETVAL = 0 ] && success && touch ${lockfile} && pidof /usr/local/bin/mogstored > $pidfile || failure
        echo
       return $RETVAL
}

stop() {
        echo -n $"Stopping mogstored"
       netstat -nlp|grep "mogstored"|grep -v grep|awk '{print $7}'|awk -F"/" '{print $1}'|xargs kill -9
        RETVAL=$?
       [ $RETVAL = 0 ] && success && rm -f ${lockfile} ${pidfile} || failure
        echo
}

reload() {
        echo -n $"Reloading mogstored: "
        killall mogstored -HUP
        RETVAL=$?
       [ $RETVAL = 0 ] && success || failure
        echo
}

case "$1" in
        start)
                start
               ;;
        stop)
                stop
               ;;
       status)
               status mogstored
                RETVAL=$?
               ;;
        restart)
                stop
                sleep 1
                start
               ;;
       reload)
               reload
               ;;
       *)
                echo $"Usage: mogstored {start|stop|restart|reload|status}"
                exit 1
esac
exit $RETVAL
After the service is started, you can use the netstat command to check whether the related ports listen normally. 7001 is the port of mogilefsd, and 7500 is the port of mogstored:
netstat -lntup|egrep "7500|7001"
3. Manage the MogileFS cluster
- Use the mogadm command to detect the cluster status, and specify the tracker node as 172.16.1.103
$ mogadm --trackers=172.16.1.103:7001 check
Checking trackers...
  172.16.1.103:7001 ... OK

Checking hosts...
No devices found on tracker(s).
- Add Storage node
Add hosts, the storage node. Name the added storage node store1 and store2 respectively. After adding, check and host list subcommands are used to view the status. Normally, you can see that the storage node has been added and the status is alive.
$ mogadm --trackers=172.16.1.103:7001 host add store1 --ip=172.16.1.101 --status=alive
$ mogadm --trackers=172.16.1.103:7001 host list
store1 [1]: alive
 IP:       172.16.1.101:7500

$ mogadm --trackers=172.16.1.103:7001 host add store2 --ip=172.16.1.102 --status=alive
$ mogadm --trackers=172.16.1.103:7001 host list
store1 [1]: alive
 IP:       172.16.1.101:7500

store2 [2]: alive
 IP:       172.16.1.102:7500

$ mogadm --trackers=172.16.1.103:7001 check
Checking trackers...
  172.16.1.103:7001 ... OK

Checking hosts...
 [ 1] store1 ... OK
 [ 2] store2 ... OK

Checking devices...
 host device         size(G)   used(G)   free(G)   use%   ob state   I/O%
  ---- ------------ ---------- ---------- ---------- ------ ---------- -----
  ---- ------------ ---------- ---------- ---------- ------
             total:     0.000      0.000      0.000   0.00%
- Add device to Storage node
At present, the docroot of the cluster is defined as / alidata. First, create the corresponding directory on the node, and give mogilefs user permission and mogilefs group permission:
1) Node storage01: / alidata/dev1
2) Node storage02: / alidata/dev2
Node storage01:
$ mkdir -pv /alidata/dev1
$ chown mogilefs.mogilefs /alidata/dev1
Node storage02:
$ mkdir -pv /alidata/dev2
$ chown mogilefs.mogilefs /alidata/dev2
Through the device add subcommand of mogadm, add dev1 on node storage01 and dev2 on node storage02. After adding, use the device list subcommand to view. Under normal circumstances, you can see that there are more dev1 and dev2 devices under store1 and store2, as well as the availability of dev1 and dev2 devices. Note: when adding, the node number of dev1 is 1, the node number of dev2 is 2, and so on, and the node number of devn is n
$ mogadm --trackers=172.16.1.103:7001 device add store1 1
$ mogadm --trackers=172.16.1.103:7001 device add store2 2
$ mogadm --trackers=172.16.1.103:7001 device list
store1 [1]: alive
                   used(G)   free(G)   total(G) weight(%)
   dev1:   alive      1.072     36.378     37.450        100

store2 [2]: alive
                   used(G)   free(G)   total(G) weight(%)
   dev2:   alive      1.010     36.440     37.450        100
After execution, a series of files are generated in the device directory, with the structure as follows:

- Create Domain
MogileFS uses Domain to hold files. Each Domain instance manages a set of "metadata data" objects of key value. You can create an instance of Domain with the name of text, which is used to specially store text files. You can create an instance of another Domain with the name of images, which is used to specially store picture files. The key below each Domain instance represents the metadata index of a stored file, which corresponds to the stored file itself, that is, value.
$ mogadm --trackers=172.16.1.103:7001 domain add images
$ mogadm --trackers=172.16.1.103:7001 domain add text
$ mogadm --trackers=172.16.1.103:7001 domain list
domain               class               mindevcount   replpolicy   hashtype
-------------------- -------------------- ------------- ------------ -------
 images               default                   2       MultipleHosts() NONE

 text                 default                   2       MultipleHosts() NONE
Create a class in each area, that is, the minimum unit of file copying:
$ mogadm --trackers=172.16.1.103:7001 class add images class1 --mindevcount=2
$ mogadm --trackers=172.16.1.103:7001 class add images class2 --mindevcount=2
$ mogadm --trackers=172.16.1.103:7001 class add text class1 --mindevcount=2
$ mogadm --trackers=172.16.1.103:7001 class add text class2 --mindevcount=2
$ mogadm --trackers=172.16.1.103:7001 class list
domain               class               mindevcount   replpolicy   hashtype
-------------------- -------------------- ------------- ------------ -------
 images               class1                    2       MultipleHosts() NONE
 images               class2                    2       MultipleHosts() NONE
 images               default                   2       MultipleHosts() NONE

 text                 class1                    2       MultipleHosts() NONE
 text                 class2                    2       MultipleHosts() NONE
 text                 default                   2       MultipleHosts() NONE
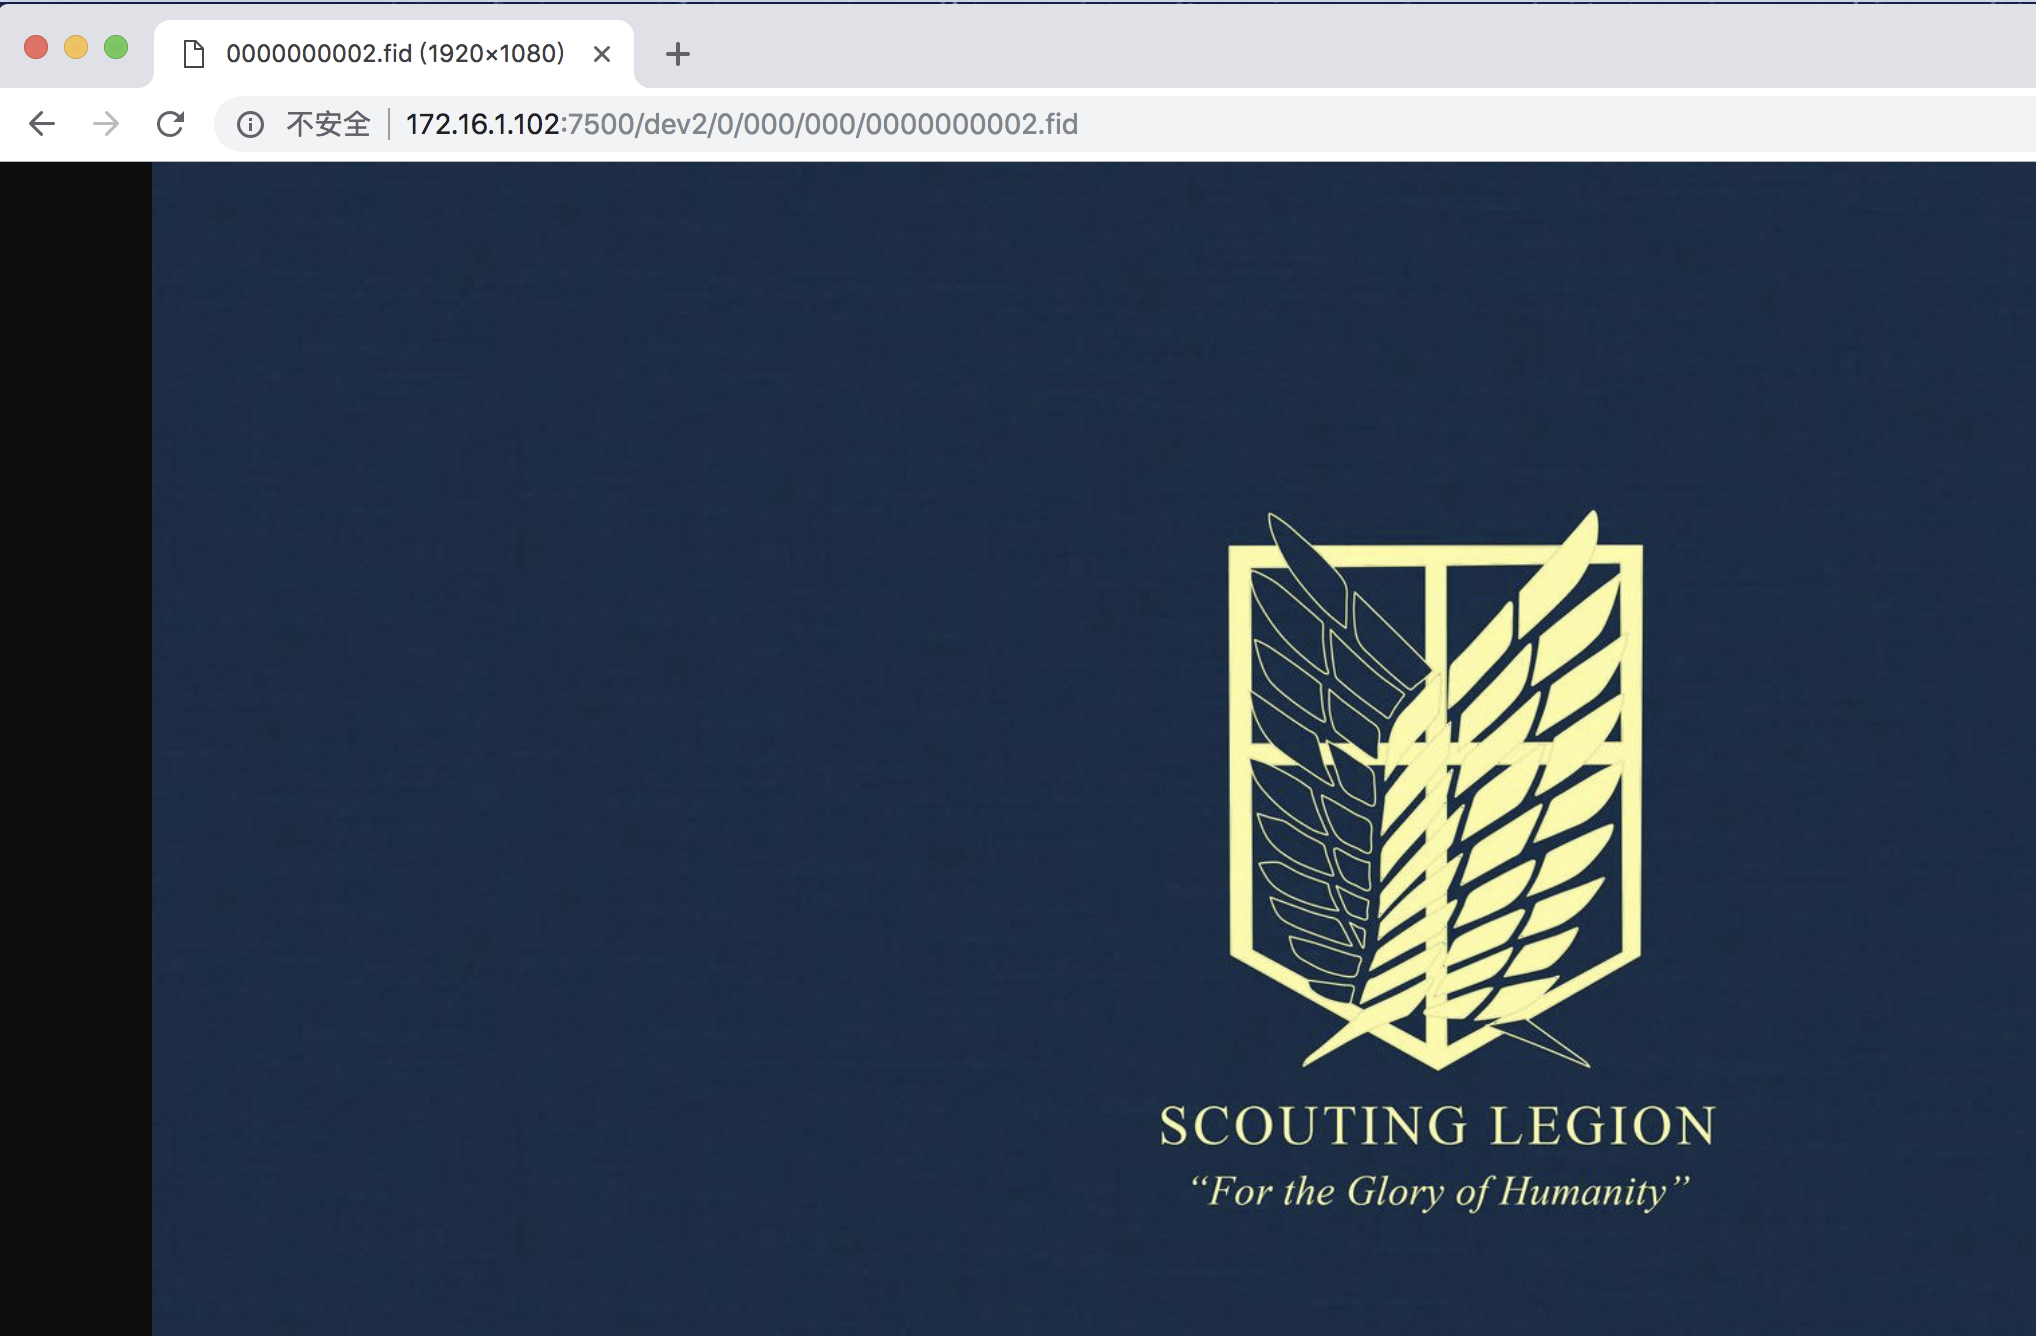
- Use mogupload to upload the file test, and use the mogfileinfo command to view the file information
## Upload pictures
$ mogupload --trackers=172.16.1.103:7001 --domain=images --key='/images/1k.jpg' \
--file='/root/wings.jpg'
$ moglistkeys --trackers=172.16.1.103:7001 --domain=images
/images/1k.jpg
$ mogfileinfo --trackers=172.16.1.103:7001 --domain=images --key=/images/1k.jpg
- file: /images/1k.jpg
class: default
devcount: 1
domain: images
fid: 2
key: /images/1k.jpg
length: 96225
- http://172.16.1.102:7500/dev2/0/000/000/0000000002.fid
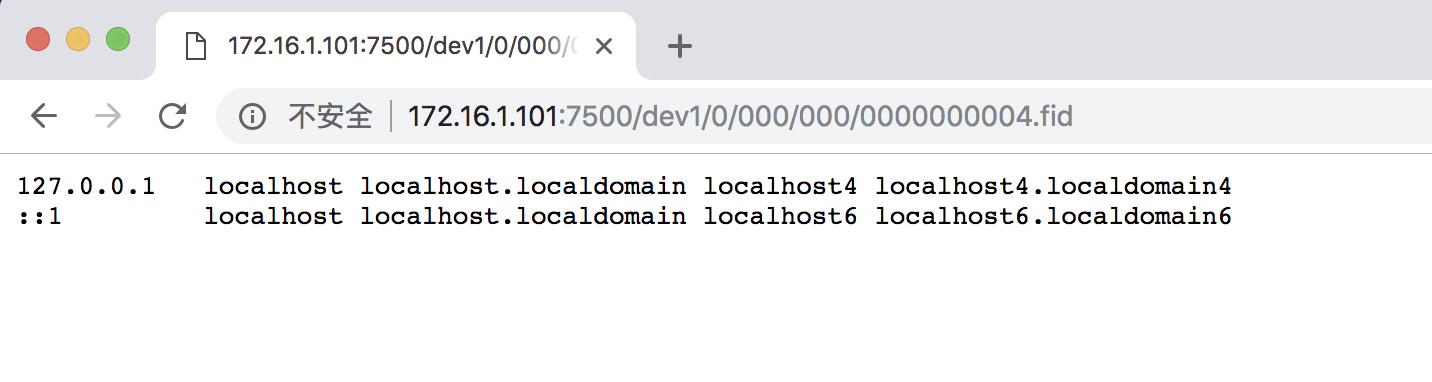
## Upload text
$ mogupload --trackers=172.16.1.103:7001 --domain=text --key='/text/hosts.html' --file='/etc/hosts'
$ moglistkeys --trackers=172.16.1.103:7001 --domain=text
/text/hosts.html
$ mogfileinfo --trackers=172.16.1.103:7001 --domain=text --key=/text/hosts.html
- file: /text/hosts.html
class: default
devcount: 1
domain: text
fid: 4
key: /text/hosts.html
length: 158
- http://172.16.1.101:7500/dev1/0/000/000/0000000004.fid
You can see the file information under the relevant path on the storage node:
## Node storage01
$ /alidata/dev1/0/000/000/0000000004.fid: ASCII text

## Node storage02:
$ file /alidata/dev2/0/000/000/0000000002.fid
/alidata/dev2/0/000/000/0000000002.fid: JPEG image data, JFIF standard 1.01
- Access the HTTP address on the resource through the browser:
Using Nginx proxy MogileFS cluster
By default, the identifier in the form of fid is used to access resources directly, which is inconvenient. Using nginx's third-party module, mobilefs module, nginx can be used as the reverse agent of tracker and storage to access the defined key value to obtain the specified resources. Because of the static compilation of third-party modules, nginx here needs to be compiled and installed using source code.
cd /tmp
wget http://nginx.org/download/nginx-1.9.1.tar.gz
wget http://www.grid.net.ru/nginx/download/nginx_mogilefs_module-1.0.4.tar.gz
① Ensure installation dependency before Compilation
yum install pcre-devel openssl-devel -y
yum install make zlib zlib-devel gcc-c++ libtool
groupadd www && useradd www -g www -M -s /sbin/nologin
cd /tmp
wget http://nginx.org/download/nginx-1.8.1.tar.gz
git clone https://github.com/vkholodkov/nginx-mogilefs-module.git
tar zxf nginx-1.8.1.tar.gz
cd nginx-1.8.1
② Compile and install nginx (here is a copy of your common compilation parameters)
./configure --prefix=/usr/local/nginx \
    --sbin-path=${prefix}/sbin/nginx \
    --conf-path=${prefix}/conf/nginx.conf   \
    --error-log-path=${prefix}/logs/error.log \
    --http-log-path=${prefix}/logs/access.log   \
    --pid-path=${prefix}/logs/nginx.pid   \
    --lock-path=${prefix}/logs/nginx.lock \
    --http-client-body-temp-path=${prefix}/cache/client_temp \
    --http-proxy-temp-path=${prefix}/cache/proxy_temp \
    --http-fastcgi-temp-path=${prefix}/cache/fastcgi_temp \
    --http-uwsgi-temp-path=${prefix}/cache/uwsgi_temp \
    --http-scgi-temp-path=${prefix}/cache/scgi_temp \
    --user=www \
    --group=www   \
    --with-pcre \
    --with-http_ssl_module \
    --with-http_spdy_module \
    --with-http_stub_status_module \
    --with-http_realip_module \
    --with-http_addition_module \
    --with-http_sub_module \
    --with-http_dav_module \
    --with-http_flv_module \
    --with-http_mp4_module \
    --with-http_gunzip_module \
    --with-http_gzip_static_module \
    --with-http_random_index_module \
    --with-http_secure_link_module \
    --with-http_degradation_module \
    --with-http_auth_request_module \
    --with-file-aio \
    --add-module=../nginx-mogilefs-module
Here is a bug. You need to manually modify the Makefile generated by compilation:
$ vim objs/Makefile
CFLAGS =  -pipe  -O -W -Wall -Wpointer-arith -Wno-unused-parameter -Werror -g
//Modified to
CFLAGS =  -pipe  -O -W -Wall -Wpointer-arith -Wno-unused-parameter -g
//Compile and install after modification:
make -j8 && make install
③ For nginx configuration, the configuration file is as follows:
For details, please refer to:
http://www.grid.net.ru/nginx/mogilefs.en.html
worker_processes  1;
events {
   worker_connections  1024;
}
http {
   include       mime.types;
   default_type application/octet-stream;
   sendfile       on;
   keepalive_timeout  65;

   upstream mogfs_cluster {
       server 172.16.1.103:7001;
   }
   server {
       listen       80;
       server_name localhost;
       location / {
           root   html;
           index index.html index.htm;
       }
       location ~* ^(/images/.*)$ {
           mogilefs_tracker mogfs_cluster;
           mogilefs_domain images;
           mogilefs_noverify on;
           mogilefs_pass $1 {
               proxy_pass $mogilefs_path;
               proxy_hide_header Content-Type;
               proxy_buffering off;
           }
       }
       location ~* ^(/text/.*)$ {
           mogilefs_tracker mogfs_cluster;
           mogilefs_domain text;
           mogilefs_noverify on;
           mogilefs_pass $1 {
               proxy_pass $mogilefs_path;
               proxy_hide_header Content-Type;
               proxy_buffering off;
           }
       }
       error_page   500 502 503 504 /50x.html;
       location = /50x.html {
           root   html;
       }
   }
}
After the Nginx configuration is completed and started, the resource can be accessed through the user-defined key value:


