1, MongoDB replica set
The main significance of MongoDB replica set is to achieve high service availability, which is similar to the sentinel mode in Redis.
1. Copy set function
It mainly provides two functions:
1. When the data is written to the Primary node, copy the data to another Secondary node;
2. When the primary node fails, a new replacement node is automatically selected
While achieving high availability, replication sets achieve several other functions:
-
Data distribution: copy data from one region to another to reduce the read latency of another region
-
Read write separation: different types of pressure are executed on different nodes
-
Remote disaster recovery: quickly switch to a remote location in case of data center failure
two Typical replica set structure
A typical replica set consists of three or more nodes with voting rights:
- A Primary node: receives write operations, read operations, and voting during elections
- Two or more secondary nodes: copy new data on the master node and vote at election
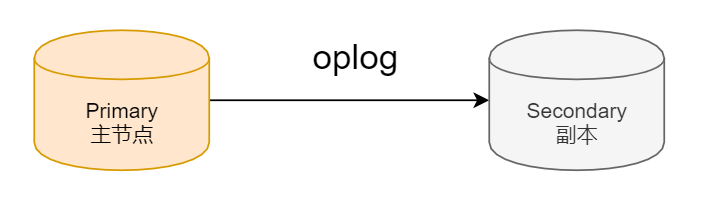
three How is data replicated
When a modification operation, whether insert, update or delete, reaches the master node, its operation on the data will be recorded (after some necessary conversion). These records are called oplog.
The slave node continuously obtains the oplog of the new master node from the master node and plays it back on its own data, so as to keep consistent with the data of the master node.
4. Complete fault recovery through elections
Nodes with voting rights send heartbeat to each other;
When five heartbeats are not received, it is judged that the node is lost
If the host node is lost, the slave node will initiate an election to select a new master node
If the lost node is a slave node, no new election will be generated
The election is based on RAFT consistency algorithm. The necessary condition for successful election is that most voting nodes survive
There can be up to 50 nodes in the replication set, but there can be up to 7 nodes with voting rights
five Factors affecting the election
Most nodes in the whole cluster must survive, and the nodes elected as the master node must:
- Ability to establish connections with most nodes
- With newer oplog
- With higher priority (if configured)
six The replica set node has the following options
-
Have voting rights (v parameter): If yes, participate in voting
-
Priority (priority parameter): the higher the priority, the more priority the node will become the primary node. The node with priority 0 cannot become the master node. The default value is 1
-
Hide (hidden parameter): copies data but is not visible to the application. Hidden nodes can have voting rights, but the priority must be 0
-
Delay (slaveDelay parameter): copy the data before n seconds and maintain the time difference with the primary node
-
Do not build indexes from node (buildIndexes)
seven Replication set considerations
Hardware:
Because normal replica set nodes may become master nodes, their positions are the same, so the hardware configuration must be consistent.
In order to ensure that nodes will not go down at the same time, the hardware of each node must be independent.
Software:
The software version of each node of the replica set must be consistent to avoid unpredictable problems.
Adding nodes does not increase system write performance.
2, Replication set setup
1. Create data directory file
mkdir -p /data/db{1,2,3}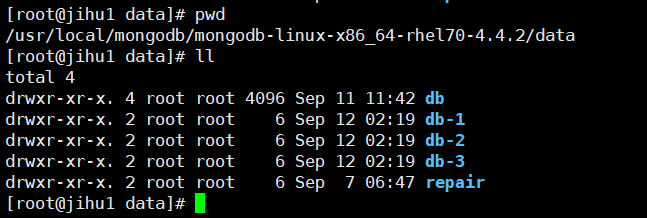
2. Prepare the configuration file for each database
Each mongod process of the replica set should be located on a different server. We are now running three instances on one server, so we need to configure each of them.
1. Different ports: 280172801828019
2. Different data directories
/usr/local/mongodb/mongodb-linux-x86_64-rhel70-4.4.2/data/db-1
/usr/local/mongodb/mongodb-linux-x86_64-rhel70-4.4.2/data/db-2
/usr/local/mongodb/mongodb-linux-x86_64-rhel70-4.4.2/data/db-3
3. Same log file path, used in the instance
/usr/local/mongodb/mongodb-linux-x86_64-rhel70-4.4.2/data/db-1/mongod.log
/usr/local/mongodb/mongodb-linux-x86_64-rhel70-4.4.2/data/db-2/mongod.log
/usr/local/mongodb/mongodb-linux-x86_64-rhel70-4.4.2/data/db-3/mongod.log
4. Configuration file
Create the following conf directory and configuration file respectively:
/usr/local/mongodb/mongodb-linux-x86_64-rhel70-4.4.2/conf/mongodb-1.conf
systemLog:
  destination: file
  path: /usr/local/mongodb/mongodb-linux-x86_64-rhel70-4.4.2/data/db-1/mongod.log
  logAppend: true
storage:
  dbPath: /usr/local/mongodb/mongodb-linux-x86_64-rhel70-4.4.2/data/db-1
net:
  bindIp: 0.0.0.0
  port: 28017
replication:
  replSetName: rs0
processManagement:
  fork: true
/usr/local/mongodb/mongodb-linux-x86_64-rhel70-4.4.2/conf/mongodb-2.conf
systemLog:
  destination: file
  path: /usr/local/mongodb/mongodb-linux-x86_64-rhel70-4.4.2/data/db-2/mongod.log
  logAppend: true
storage:
  dbPath: /usr/local/mongodb/mongodb-linux-x86_64-rhel70-4.4.2/data/db-2
net:
  bindIp: 0.0.0.0
  port: 28018
replication:
  replSetName: rs0
processManagement:
  fork: true
/usr/local/mongodb/mongodb-linux-x86_64-rhel70-4.4.2/conf/mongodb-3.conf
systemLog:
  destination: file
  path: /usr/local/mongodb/mongodb-linux-x86_64-rhel70-4.4.2/data/db-3/mongod.log
  logAppend: true
storage:
  dbPath: /usr/local/mongodb/mongodb-linux-x86_64-rhel70-4.4.2/data/db-3
net:
  bindIp: 0.0.0.0
  port: 28019
replication:
  replSetName: rs0
processManagement:
  fork: true
3. Start three services
mongod -f ./conf/mongodb-1.conf
mongod -f ./conf/mongodb-2.conf
mongod -f ./conf/mongodb-3.conf
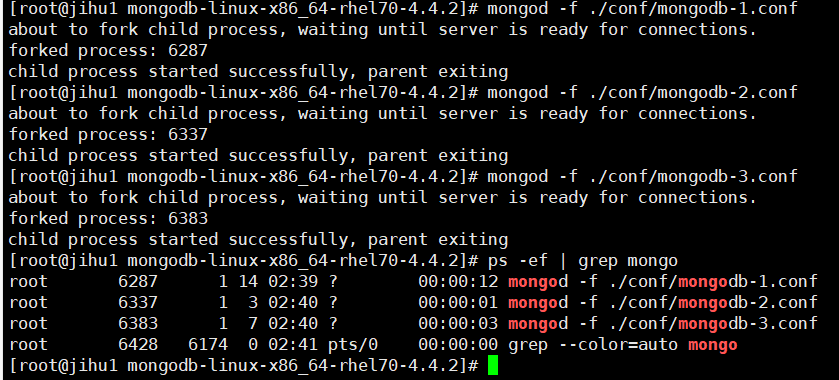
If the window cannot fork, it can only be opened by the foreground process. Three command windows need to be opened to start respectively.
four Configure replication set
First, we connect to the client:
mongo --host 192.168.131.171 --port 28017
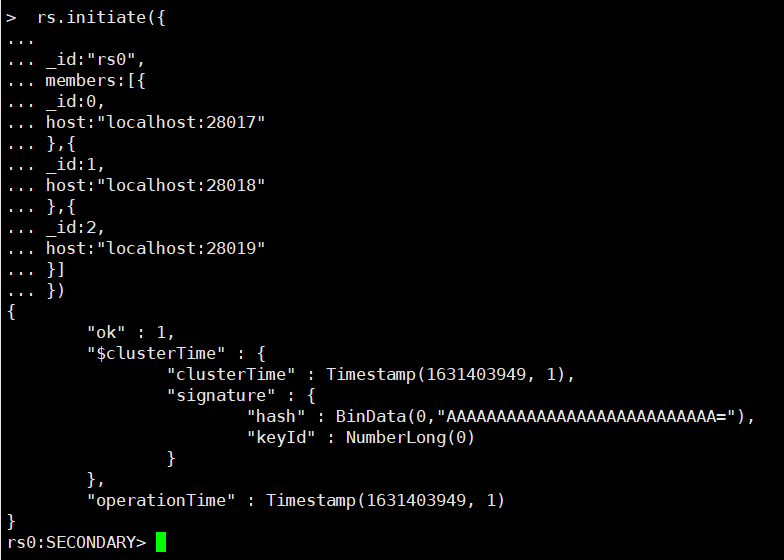
Then start configuring the replication set. Note that if necessary, you can replace localhost with your own server IP address. Note that the port numbers of the three services should be consistent with those in the configuration file!
rs.initiate({

_id:"rs0",
members:[{
_id:0,
host:"localhost:28017"
},{
_id:1,
host:"localhost:28018"
},{
_id:2,
host:"localhost:28019"
}]
})
be careful:
- By default, non primary nodes are not allowed to read data
- You can enable read permission by executing rs.secondaryOk() (you need to execute this command on the slave node!)
We are now setting the replication set on 28017. bane28017 should be the master node. Although rs0:SECONDARY is displayed immediately after setting, it will automatically switch to rs0:PRIMARY.
5. Test replication set
After successful setup, let's test next.
First, mongo --host 192.168.131.171 --port 28017 is connected to the master node. Then create a test database and add a document.
use test

db.users.insertOne({"userName":"xiaoyan", "age":"24"})
Then we mongo --host 192.168.131.171 --port 28018 connect to the slave node, and then enable the read permission:
rs.secondaryOk()
Then we try to query the data just set on the master node:
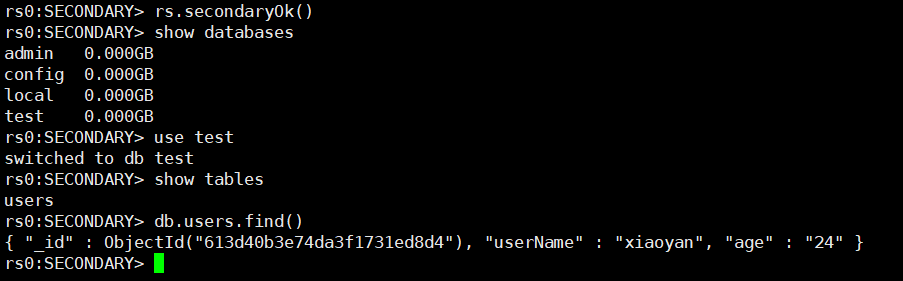
You can see that the slave node has synchronized the data we set on the master node! Note that you must execute rs.secondaryOk() to enable read permission!