This paper mainly introduces the method of backup and recovery of MongoDB replica set, common commands, and some specific operation procedures. Finally, a backup scheme is introduced.
I. Backup Method
0,oplog
0.1 What is oplog
oplog is a capped collection, located in the local library
0.2 local Library
local libraries are the system libraries of MongoDB, which record information such as timestamps, indexes and replication sets.
0.2.1 When a replica set is not established
> show collections
startup_log
After 0.2.2 replica sets are established (3.4, 3.6 and 4.0 are all these sets)
replSet27017:PRIMARY> use local
switched to db local
replSet27017:PRIMARY> show collections
me       #The me collection holds the server name.
oplog.rs    #The oplog.rs collection records all operations on nodes
replset.election
replset.minvalid    #The replset.minvalid collection holds the timestamp of the latest database operation
replset.oplogTruncateAfterPoint
startup_log         #The startup_log collection records the mongod start-up information for each time
system.replset      #system.replset records the member configuration information of the replicated set, which is read by rs.conf().
system.rollback.id
0.3 View oplog
0.3.1 oplog field description
replSet27017:PRIMARY> db.oplog.rs.find().pretty().limit(1)
{
    "ts" : Timestamp(1558940829, 599),
    "t" : NumberLong(12),
    "h" : NumberLong("6800425020320237930"),
    "v" : 2,
    "op" : "i",
    "ns" : "config.system.sessions",
    "ui" : UUID("10b4d6ac-37df-4586-8a2d-83a3389d7406"),
    "wall" : ISODate("2019-05-16T08:44:39.629Z"),
    "o" : {
        "_id" : {
            "id" : UUID("fa4f2ff2-8251-4dec-b517-ebcab6db2eca"),
            "uid" : BinData(0,"LkqZkoMQbGtpaIwmLLkI3wtgnsDvRhwXsdiic1EAMLE=")
        },
        "lastUse" : ISODate("2019-05-16T08:44:39.629Z"),
        "user" : {
            "name" : "test@test01"
        }
    }
ts: Operation time, 8-byte timestamp, represented by 4-byte unix timestamp + 4-byte incremental count (indicating the number of operations in a second)
h: Global Unique Identification of Operations
 v: oplog version information
 op: 1 byte operation type
 i: Insert operation
 u: Update operation
 d: Delete operation
 c: Execute commands (such as create database, drop database)
n: Empty operations are performed regularly to ensure timeliness
 ns: The set for which the operation is directed
 o: Operational content
 o2: where condition when updating operation is performed, this property is only available for update
#View oplog information
replSet27017:PRIMARY> db.printReplicationInfo()
configured oplog size:   1024MB
log length start to end: 1866871secs (518.58hrs)
oplog first event time:  Tue May 14 2019 23:15:10 GMT+0800 (CST)
oplog last event time:   Wed Jun 05 2019 13:49:41 GMT+0800 (CST)
now:                     Mon May 20 2019 03:20:48 GMT+0800 (CST)

#View the synchronization status of slave
replSet27017:PRIMARY> db.printSlaveReplicationInfo()
source: 192.168.1.12:27017
    syncedTo: Wed Jun 05 2019 13:49:41 GMT+0800 (CST)
    0 secs (0 hrs) behind the primary
source: 192.168.1.13:27017
    syncedTo: Wed Jun 05 2019 13:49:41 GMT+0800 (CST)
    0 secs (0 hrs) behind the primary
0.3.2 Check the operation according to the type of operation
query oplog Li's insert Record, correspondence op by i Records:
replSet27017:PRIMARY> db.oplog.rs.find({"op" : "i"}).pretty().limit(3)

//Check the update operation command:
replSet27017:PRIMARY> db.oplog.rs.find({"op" : "u"}).pretty().limit(3)
test:PRIMARY>
//Check the delete operation command:
replSet27017:PRIMARY> db.oplog.rs.find({"op" : "d"}).pretty().limit(3)
0.3.3 Time-based query operations
mongodb Time inside
#Operating system time
#date
Mon May 20 02:33:45 CST 2019

#mongo shows local time
replSet27017:PRIMARY> Date()
Mon May 20 2019 02:34:21 GMT+0800 (CST)
#To build a Greenwich Time, we're East Eighth District, so we need to subtract eight hours.
replSet27017:PRIMARY> new Date
ISODate("2019-05-19T18:34:24.157Z")
#It's Greenwich Time, too.
replSet27017:PRIMARY> ISODate()
ISODate("2019-05-19T18:34:28.820Z")

#time stamp
ISODate().valueOf()
1558291032161
1. Copy files
1.1 File System Snapshot
To create a consistent backup, the database must be locked and all writes to the database must be suspended during the backup process.
The snapshot reflects all the data and the start of the journal log without incremental backup.
1.1.1 Use LVM to create snapshots
lvcreate --size 100M --snapshot --name mdb-snap01 /dev/vg0/mdb-snap01
-- snapshot creates an LVM snapshot
-- The maximum size of the size of the size snapshot. If you run out of space, the snapshot will not be available
1.1.2 Archived snapshots
If the above snapshot is mounted and compressed
umount /dev/vg0/mdb-snap01
dd if=/dev/vg0/mdb-snap01 | gzip > mdb-snap01.gz
1.1.3 Recovery snapshot
lvcreate --size 1G --name mdb-new vg0
gzip -d -c mdb-snap01.gz | dd of=/dev/vg0/mdb-new
mount /dev/vg0/mdb-new /srv/mongodb
Decompress mdb-snap01.gz and put it into mdb-new
Mount mdb-new to the / srv/mongodb directory and modify the mount point as needed to correspond to the location of the MongoDB data file
-
Be careful:
The restored snapshot will have a mongod.lock file. If this file is not deleted from the snapshot, MongoDB may be considered closed normally.
If storage.journal.enabled is enabled and db.fsyncLock () is not used, there is no need to delete the mongod.lock file; if db.fsyncLock (), the mongod.lock file needs to be deleted.
1.1.4 Place backups in remote storage
The process is the same as above, except that SSH is used to archive and compress backups on remote systems.
umount /dev/vg0/mdb-snap01
dd if=/dev/vg0/mdb-snap01 | ssh username@example.com gzip > /opt/backup/mdb-snap01.gz
lvcreate --size 1G --name mdb-new vg0
ssh username@example.com gzip -d -c /opt/backup/mdb-snap01.gz | dd of=/dev/vg0/mdb-new
mount /dev/vg0/mdb-new /srv/mongodb
1.1.5 General Process
- Lock the database, using db.fsyncLock()
- Execute the above snapshot backup command
- The snapshot is completed, the database is unlocked, and db.fsyncUnlock()
1.2 Direct Copy of Files
Direct copying of files is simpler than filesystem snapshots
1.2.1 Copy data files
Direct cp data files cannot copy all files, so it is necessary to prevent data files from changing when backing up, and the fsynclock command is also used.
replSet27017:PRIMARY> db.fsyncLock()
This command lock s the database, forbids any writing, and fsync s all dirty pages to disk. Mongod will add all subsequent write operations to the waiting queue
cp -R /data1/mongodb27017/* /backup/mongodb27017_20190704
After data replication is completed, the database is unlocked:
replSet27017:PRIMARY> db.fsyncUnlock();
- Be careful:
If authentication is enabled, do not close the shell during calls to fsyncLock() and fsynUnlock(). If you disconnect, you may not be able to reconnect and have to restart mongod. FsyncLok() is not set to remain valid after reboot, and mongod always starts in unlocked mode.
Of course, in addition to using fsyncLock(), closing mongod, copying files, and then starting mongod is another way.
2. mongodump and mongorestore
2.1 mongodump
2.1.1 Common parameters
  - d: Database name
  - c: Collection name
  - o: The name of the file to export
  - q: filtering conditions for exported data
  --authenticationDatabase: A database that holds user credentials
  gzip: Compression for backup
  Oplog: Generate an oplog.bson file at the same time as the export, and store all oplogs between the beginning of dump and the end of dump
2.1.2 Common Backup Operations
#Back up all libraries
./mongodump -h192.168.1.11:27017 -uroot -prootroot --authenticationDatabase admin -o /data/mongodb/backup/full_20190525
#Backup test01 Library
./mongodump -h192.168.1.11:27017 -uroot -prootroot --authenticationDatabase admin -d test01 -o /data/mongodb/backup/20190525
#Backup the testCollection Collection Tes01 Library
./mongodump -h192.168.1.11:27017 -uroot -prootroot --authenticationDatabase admin -d test01 -c testCollection -o /data/mongodb/backup/20190525
2.2 mongorestore
2.2.1 Common parameters
-- drop: Delete each collection before restoring it
 Oplog Replay: Replay the oplog.bson operation
 --oplog Limit: When used with -- oplog Replay, you can limit the time point for replay
2.3 Simulate backup and recovery during insertion operation (restore to single node)
Simulate inserting set test.table continuously
use test1
for(var i = 0; i < 10000; i++) {
db.test.table.insert({a: i});
}
During insertion, mongodump backs up and specifies -- oplog:
./mongodump -vv -h127.0.0.1:27017 -uroot -prootroot --authenticationDatabase admin --oplog -o /data/mongodb/backup
Restore the test1 library (restore at a single node)
./mongorestore -h127.0.0.1:27018 -d test1 /data/backup1/test1
See how many bars have been inserted
> db.test.table.count()
4029
Applying oplog recorded during insertion
mongorestore -vv -h127.0.0.1:27018 --oplogReplay /data/backup1
See how many bars were inserted after the oplog was applied (indicating that these were inserted during backup)
> db.test.table.count()
4044
Note: The - oplog option is only valid for all library exports, so the - d option cannot be specified.
View oplog.bson content
./bsondump /data/mongodb/backup1/oplog.bson
3. mongoexport and mongoimport
3.1 mongoexport
Parameters:
- csv: specifies the format to be exported to CSV
 - f: Specifies the fields that need to be imported
Backup collection 1
./mongoexport -h 192.168.1.12:27017 -uroot -prootroot --authenticationDatabase admin -d db01 -c collection1 -o /data/mongodb/backup1/collection1.json
Exported data
{"_id":{"$oid":"5cf8c674bd10185cb185067f"},"name":"hushi","num":0.0}
...
Export to csv format
./mongoexport -h 192.168.1.12:27017 -uroot -prootroot --authenticationDatabase admin -d db01 -c collection1 --type=csv -f _id,name,num -o /data/mongodb/backup1/collection1.csv
Exported data
_id,name,num
ObjectId(5cf8c674bd10185cb185067f),hushi,0
ObjectId(5cf8c674bd10185cb185068b),hushi,12
...
3.2 mongoimport
Parameters:
headerline: Indicates that the first row is a column name and does not need to be imported
 - csv: specifies that the format to be imported is CSV
 - f: Specifies the fields that need to be imported
Sets backed up before recovery
mongoimport -h192.168.1.14:27018 -d test -c collection1 /data/collection1.json
Sets backed up before recovery
mongoimport -h 127.0.0.1:27018 -d test1 -c collection1 --type=csv --headerline --file /data/collection1.csv
4,Percona Server for MongoDB
4.1 Hot Standby Principle
Think of it as the xtrabackup tool
Backup:
First, a background detection process will be started to detect the changes of MongoDB Oplog in real time. Once the oplog is found to have new log writing, the log will be written to the log file WiredTiger.backup immediately (you can strings WiredTiger.backup to see the changes of oplog operation log);
Copy the data file and index file of MongoDB dbpath to the specified backup directory.
Recovery:
Play back the WiredTiger.backup log, apply the operation log changes to the WiredTiger engine, and eventually get a consistent snapshot recovery; copy the data files in the backup directory directly to your dbpath, then start MongoDB, and automatically access the replica cluster.
4.2 Download and Installation
4.2.1 Download
Hot standby is implemented by the mongodb version of percon, so you can use the mongodb version of percona directly, or you can use percona mongo as a secondary node of a replica set.
https://www.percona.com/downloads/percona-server-mongodb-3.6/LATEST/
4.2.2 Installation Start
Because you want to join the replica set, modify the configuration file and start:
cp mongodb27017/mg27017.conf mongodb27018/mg27018.conf

cp ../mongodb27017/mongo.keyfile .
./mongod -f /data1/mongodb27018/mg27018.conf
4.2.3 Add Copy Set
percona slave node:
Execute on the primary node:
replSet27017:PRIMARY> rs.add({host: "192.168.1.12:27018", priority: 1, hidden: false})
percona changed from:
>
replSet27017:OTHER>
Execute slaveOk() for validation
replSet27017:OTHER> rs.slaveOk()
replSet27017:SECONDARY>
4.3 Backup
Backup from the node:
replSet27017:SECONDARY> use admin
switched to db admin
replSet27017:SECONDARY> db.runCommand({createBackup: 1, backupDir: "/backup/mongodb_20180704"})
{
    "ok" : 1,
...
//Once you start backup, start writing data to a new collection:
replSet27017:PRIMARY> for (i = 0; i < 10000; i++){ db.test6.save({'name':'hushi','num':i,date:new Date()}); }
Data directory after backup:
[root@vm4 /backup/mongodb_20180722]#ll -ht
total 240K
drwx------ 2 root root  221 Jul 22 14:43 test1
drwx------ 2 root root 4.0K Jul 22 14:43 test01
drwx------ 2 root root 4.0K Jul 22 14:43 test
drwx------ 2 root root 4.0K Jul 22 14:43 mms_test
drwx------ 2 root root 4.0K Jul 22 14:43 local
drwx------ 2 root root   38 Jul 22 14:43 journal
drwx------ 2 root root  301 Jul 22 14:43 db01
drwx------ 2 root root  216 Jul 22 14:43 config
drwx------ 2 root root 4.0K Jul 22 14:43 admin
-rw------- 1 root root  44K Jul 22 14:43 sizeStorer.wt
-rw------- 1 root root  114 Jul 22 14:43 storage.bson
-rw------- 1 root root  44K Jul 22 14:43 _mdb_catalog.wt
-rw------- 1 root root 123K Jul 22 14:43 WiredTiger.backup
-rw------- 1 root root   45 Jul 22 14:43 WiredTiger
4.4 Recovery
Recovery is single node, so remove the replica set information from the configuration file
transmission
rsync -r /backup/mongodb_20180704 192.168.1.13:/backup/
Copy the file to the configuration file directory
cp -R /backup/mongodb_20180704/* /data1/mongodb27018
Copy keyFile and configuration files (you can also directly remove validation and annotate security-related parameters)
After modifying the configuration file, start
./mongod -f /data1/mongodb27018/mg27018.conf
It was found that the date of the last data was later than the date of the start of backup, so it was verified that log replay would be performed directly after recovery.
5,MongoDB Cloud Manager
5.1 Introduction
MongoDB Cloud Manager is the official operation and maintenance automation management system, which is supported by the enterprise edition. Community users can also download and try it out.
Cloud Manager's main functions include
- Automated deployment of MongoDB cluster (replication set, fragmentation)
- Cluster Monitoring and Alarm Customization
- Automatic Data Backup and Restore
5.2 Deployment of MongoDB Cloud Manager
5.2.1 Download agent and Installation
curl -OL https://cloud.mongodb.com/download/agent/automation/mongodb-mms-automation-agent-10.2.0.5851-1.rhel7_x86_64.tar.gz
tar -xvf mongodb-mms-automation-agent-10.2.0.5851-1.rhel7_x86_64.tar.gz

cd mongodb-mms-automation-agent-10.2.0.5851-1.rhel7_x86_64
5.2.2 Configuration
vi local.config
    mmsGroupId=5d2f52fc9ccf64f3c73b2188
    mmsApiKey=          #Generating ApiKey
mkdir /var/lib/mongodb-mms-automation   #Create a directory, following the path in the configuration file
mkdir /var/log/mongodb-mms-automation
chown `whoami` /var/lib/mongodb-mms-automation      #Modify Attribution
chown `whoami` /var/log/mongodb-mms-automation
5.2.3 Start agent
nohup ./mongodb-mms-automation-agent --config=local.config >> /var/log/mongodb-mms-automation/automation-agent-fatal.log 2>&1 &
5.3 Backup
5.3.1 Backup Principle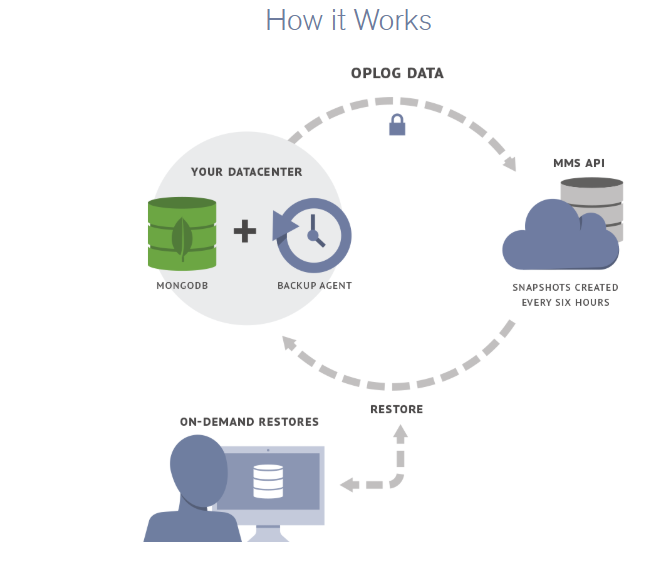
When an agent is deployed, the entire replica set is synchronized to the MongoDB data center. After the initial synchronization is completed, the agent streams encrypted and compressed oplog data to Cloud Manager to provide a continuous backup of data.
5.3.2 Start Backup
Click Start to start the backup
You can see that oplog has always had minimal latency
mongodb backup, default 6 hours. Then the oplog is backed up all the time, with a second delay.
Data directory after backup:
[root@vm4 /backup/replSet27017]#ll -ht
total 288K
drwxr-xr-x 2 root root  176 Jul 18 16:04 test1
drwxr-xr-x 2 root root 4.0K Jul 18 16:04 test01
drwxr-xr-x 2 root root 4.0K Jul 18 16:04 test
drwxr-xr-x 2 root root  172 Jul 18 16:04 mms_test
drwxr-xr-x 2 root root  299 Jul 18 16:04 db01
drwxr-xr-x 2 root root 4.0K Jul 18 16:04 admin
-rw-r--r-- 1 root root  114 Jul 18 16:04 storage.bson
-rw-r--r-- 1 root root  36K Jul 18 16:04 sizeStorer.wt
-rw-r--r-- 1 root root  40K Jul 18 16:04 _mdb_catalog.wt
-rw-r--r-- 1 root root  373 Jul 18 16:04 restoreInfo.txt
-rw-r--r-- 1 root root  755 Jul 18 16:04 seedSecondary.bat
-r-x---r-x 1 root root  768 Jul 18 16:04 seedSecondary.sh
-rw-r--r-- 1 root root 4.0K Jul 18 16:04 WiredTigerLAS.wt
-rw-r--r-- 1 root root 168K Jul 18 16:04 WiredTiger.wt
-rw-r--r-- 1 root root   45 Jul 18 16:04 WiredTiger
-rw-r--r-- 1 root root   21 Jul 18 16:04 WiredTiger.lock
-rw-r--r-- 1 root root 1.2K Jul 18 16:04 WiredTiger.turtle
Download to local recovery, you can find that the oplog application point and snapshot point time are basically the same:
[root@vm4 /backup/replSet27017]#cat restoreInfo.txt
Restore Information
Group Name: testProject1
Replica Set: replSet27017
Snapshot timestamp: Thu Jul 18 04:12:24 GMT 2019
Last Oplog Applied: Thu Jul 18 04:12:23 GMT 2019 (1563423143, 1)
It can be found that there are no local libraries and journal libraries, so it can not be directly restored into the replica set, which is more suitable for data deletion recovery.
5.4 Recovery
5.4.1 Recovery Principle
The backup file is a physical file, and the downloaded data is the data at the end of the backup (oplog during backup is applied)
Because of mongodb's backup, the default is 6 hours. Then the oplog is backed up all the time, with a second delay. So when you recover, you have an oplog at any time.
There are three options for recovery:
- Restore snapshots (that is, restore to the end of the backup)
- Restore to oplog timestamp
- Restore to point in time (also converted to oplog timestamp)
5.4.2 began to recover

Online recovery can only be restored to a new replica set
To download only the backup is the end of the backup; to select the oplog point is to continue to apply oplog
 Selecting a time point as shown in the figure above generates a corresponding command:
./mongodb-backup-restore-util --host --port --rsId replSet27017 --groupId 5d2d88adf2a30bbee892ef0d --opStart 1563423143:1 --opEnd 1563430620:502 --oplogSourceAddr https://api-backup.us-east-1.mongodb.com --apiKey
mongodb's official API is directly invoked and oplog is applied.
mongodb-backup-restore-util is an official recovery tool.
Select point time:
./mongodb-backup-restore-util --host --port --rsId replSet27017 --groupId 5d2d88adf2a30bbee892ef0d --opStart 1563423143:1 --opEnd 1563429600:0 --oplogSourceAddr https://api-backup.us-east-1.mongodb.com --apiKey
It is found that the generated command is the same as the oplog timestamp selection, except that the point time is converted to oplog timestamp.
seedSecondary.sh file:
Because there is no local library after full recovery provided by mongodb cloud manager, a file creating oplog is automatically generated. Used to create oplog, insert a data, and specify the point of replication of the replica set.
[root@vm4 /backup/replSet27017]#cat seedSecondary.sh
#!/bin/sh
if [ "$#" -ne 4 ]; then
    echo "Usage: $0 MONGODB_PORT OPLOG_SIZE_GB RS_NAME PRIMARY_HOST:PRIMARY_PORT"
    exit 1
fi
mongo --port ${1} --eval "var res=db.getSiblingDB('local').runCommand({ create: 'oplog.rs', capped: true, size: (${2} * 1024 * 1024 * 1024)}); if(!res.ok){throw res.errmsg;} else{db.getSiblingDB('local').oplog.rs.insert({ts : Timestamp((db.version().match(/^2\.[012]/) ? 1000 : 1) * 1563423143, 1), h : NumberLong('8796150802864664169'), t : NumberLong('113'), op : 'n', ns : '', o : { msg : 'seed from backup service' }});if (db.getSiblingDB('local').system.replset.count({'_id': '${3}'}) == 0) { db.getSiblingDB('local').system.replset.insert({'_id' : '${3}','version' : 1,'members' : [{'_id' : 0,'host' :'${4}'}],'settings' : {}});}}"
2. Backup Recovery Exercise
1. Restore to replica set
After MongoDB has been running for a period of time, in order to add a new node, it is necessary to restore the backup data to a single node, and then add a single node to the replica set. The following will demonstrate how to restore the data backed up by percona server.
1.1 Get all physical backups
replSet27017:SECONDARY> db.runCommand({createBackup: 1, backupDir: "/backup/mongodb_20180722"})
Start writing data to the new collection immediately after you start backup:
replSet27017:PRIMARY> for (i = 0; i < 10000; i++){ db.test5.save({'name':'hushi','num':i,date:new Date()}); }
WriteResult({ "nInserted" : 1 })
Transfer the backup to the new physical machine:
rsync -r /backup/mongodb_20180722 192.168.1.14:/backup/
1.2 Recovery
In order to join the replica set, start it directly with the configuration file, copy mg27017.conf and mongo.keyfile to the local, and then copy the data file to the directory set by the configuration file.
To modify the configuration file, first remove the parameters related to the replica set.
start-up
./mongod -f /data1/mongodb27017/mg27017.conf
View the last non-empty oplog after recovery
> db.oplog.rs.find({op:{$ne:'n'}}).sort({$natural:-1}).limit(1).pretty()
{
    "ts" : Timestamp(1563777601, 5),
    "t" : NumberLong(123),
    "h" : NumberLong("-6583634829168454121"),
    "v" : 2,
    "op" : "i",
    "ns" : "config.system.sessions",
    "ui" : UUID("10b4d6ac-37df-4586-8a2d-83a3389d7406"),
    "wall" : ISODate("2019-07-22T06:40:01.172Z"),
    "o" : {
        "_id" : {
            "id" : UUID("9805a821-9a88-43bf-a85d-9a0b63b98632"),
            "uid" : BinData(0,"Y5mrDaxi8gv8RmdTsQ+1j7fmkr7JUsabhNmXAheU0fg=")
        },
        "lastUse" : ISODate("2019-07-22T06:40:01.175Z"),
        "user" : {
            "name" : "root@admin"
        }
    }
}
Find that it is a system library, so look directly for operations on the test5 collection:
> db.getSiblingDB('local').oplog.rs.find({op:{$ne:'n'},ns:'mms_test.test5'}).sort({$natural:-1}).limit(1).pretty()
{
    "ts" : Timestamp(1563777479, 674),
    "t" : NumberLong(123),
    "h" : NumberLong("6274301431493104273"),
    "v" : 2,
    "op" : "i",
    "ns" : "mms_test.test5",
    "ui" : UUID("3fd00235-24ea-447a-96c5-2d79071ad9df"),
    "wall" : ISODate("2019-07-22T06:37:59.619Z"),
    "o" : {
        "_id" : ObjectId("5d3559c7dde424d0301c3d21"),
        "name" : "hushi",
        "num" : 41015,
        "date" : ISODate("2019-07-22T06:37:59.623Z")
    }
}
1.3 Backup
Because of the characteristics of oplog, it doesn't matter to run more, so the above is to directly find the oplog point of the operation on the set of test5, and now to find the latest point. Mainly to ensure that the oplog between the above point and the latest point must exist.
Find the nearest point in the first replica set:
replSet27017:SECONDARY> db.oplog.rs.find({op:{$ne:'n'}}).sort({$natural:-1}).limit(1).pretty()
{
    "ts" : Timestamp(1563780036, 337),
    "t" : NumberLong(123),
    "h" : NumberLong("-2687468098839248386"),
    "v" : 2,
    "op" : "i",
    "ns" : "admin.test10",
    "ui" : UUID("083637d7-6209-4d28-9b4d-529ba26e836c"),
    "wall" : ISODate("2019-07-22T07:20:36.370Z"),
    "o" : {
        "_id" : ObjectId("5d3563c4fc6d8027c7545934"),
        "name" : "hushi",
        "num" : 41881,
        "date" : ISODate("2019-07-22T07:20:36.373Z")
    }
dump according to the above oplog points:
./mongodump -vv -h192.168.1.11:27017 -uroot -prootroot --authenticationDatabase admin  -d local -c oplog.rs  -o /backup --query='{ts:{$gte:Timestamp(1563777479, 674),$lt:Timestamp(1563780036, 337)}}'
2019-07-22T15:42:40.338+0800    done dumping local.oplog.rs (52140 documents)
2019-07-22T15:42:40.342+0800    dump phase III: the oplog
2019-07-22T15:42:40.342+0800    finishing dump
1.4 Recovery of increments
mv /backup/local/oplog.rs.bson
rsync /backup/local/oplog.bson 192.168.1.14:/backup/local/
Reporting errors when recovering:
Failed: restore error: error applying oplog: applyOps: not authorized on admin to execute command { applyOps: [ { ts: Timestamp(1563777601, 1), h: 2702590434054582905, v: 2, op: "d", ns: "config.system.sessions", o: { _id: { id: UUID("9f7a5b0b-a1e1-407a-b9dd-7506a3220d9e"), uid: BinData(0, 6399AB0DAC62F20BFC466753B10FB58FB7E692BEC952C69B84D997021794D1F8) } }, o2: {} } ], $db: "admin" }
Solution (executed in admin database):
db.createRole({role:'sysadmin',roles:[], privileges:[ {resource:{anyResource:true},actions:['anyAction']}]})
db.grantRolesToUser( "root" , [ { role: "sysadmin", db: "admin" } ])
Recovery
#./mongorestore -vv -h127.0.0.1:27017 -uroot -prootroot --authenticationDatabase admin --oplogReplay /backup/local/
2019-07-22T16:11:03.901+0800    oplog  7.71MB
2019-07-22T16:11:06.401+0800    applied 51899 ops
2019-07-22T16:11:06.401+0800    oplog  9.13MB
2019-07-22T16:11:06.401+0800    done
Data has been restored:
switched to db admin
> db.test10.find().sort({$natural:-1}).limit(1).pretty()
{
    "_id" : ObjectId("5d3563c4fc6d8027c7545933"),
    "name" : "hushi",
    "num" : 41880,
    "date" : ISODate("2019-07-22T07:20:36.373Z")
}
If a single node is started with a new single node replica set, all oplog s need to be deleted and restarted. That's the same as adding nodes directly to the replica set.
> db.getSiblingDB('local').oplog.rs.find({op:{$ne:'n'}}).sort({$natural:-1}).limit(1).pretty()
{
    "ts" : Timestamp(1563777601, 5),
    "t" : NumberLong(123),
    "h" : NumberLong("-6583634829168454121"),
    "v" : 2,
    "op" : "i",
    "ns" : "config.system.sessions",
    "ui" : UUID("10b4d6ac-37df-4586-8a2d-83a3389d7406"),
    "wall" : ISODate("2019-07-22T06:40:01.172Z"),
    "o" : {
        "_id" : {
            "id" : UUID("9805a821-9a88-43bf-a85d-9a0b63b98632"),
            "uid" : BinData(0,"Y5mrDaxi8gv8RmdTsQ+1j7fmkr7JUsabhNmXAheU0fg=")
        },
        "lastUse" : ISODate("2019-07-22T06:40:01.175Z"),
        "user" : {
            "name" : "root@admin"
        }
    }
}
If a single node is started with a new single node replica set, all oplog s need to be deleted and restarted. That's the same as adding nodes directly to the replica set.
1.5 Add to the replica set
replSet27017:PRIMARY> rs.add({host: "192.168.1.14:27017", priority: 1, hidden: false})
{
    "ok" : 1,
After joining, the oplog record is the same:
replSet27017:SECONDARY> db.getSiblingDB('local').oplog.rs.find({op:{$ne:'n'},ts:{$lte:Timestamp(1563780036, 337)}}).sort({$natural:-1}).limit(1).pretty()
{
    "ts" : Timestamp(1563780036, 337),
    "t" : NumberLong(123),
    "h" : NumberLong("-2687468098839248386"),
    "v" : 2,
    "op" : "i",
    "ns" : "admin.test10",
    "ui" : UUID("083637d7-6209-4d28-9b4d-529ba26e836c"),
    "wall" : ISODate("2019-07-22T07:20:36.370Z"),
    "o" : {
        "_id" : ObjectId("5d3563c4fc6d8027c7545934"),
        "name" : "hushi",
        "num" : 41881,
        "date" : ISODate("2019-07-22T07:20:36.373Z")
    }
}
2. Recovery of a single set of deletions
insert data
for (i = 0; i < 10000; i++){ db.collection1.save({'name':'hushi','num':i}); }
Collection 1 Collection Backup
./mongodump -vv -h192.168.1.11:27017 -uroot -prootroot --authenticationDatabase admin -d db01 -c collection1 -o /data/mongodb/backup
Insert data again (do some work)
for (i = 0; i < 1000; i++){ db.collection1.save({'name':'hushi','num':i,date:new Date()}); }
Misdeletion
db.collection1.drop()
Find and delete
db.oplog.rs.find({op:{$ne:'n'},o:{'drop':'collection1'}}).sort({ts:-1}).pretty().limit(5)
{
    "ts" : Timestamp(1559803854, 1),
    "t" : NumberLong(44),
    "h" : NumberLong("-514875429754097077"),
    "v" : 2,
    "op" : "c",
    "ns" : "db01.$cmd",
    "ui" : UUID("b8fe3553-8249-4f18-b652-5bba86760d43"),
    "wall" : ISODate("2019-06-06T06:50:54.406Z"),
    "o" : {
        "drop" : "collection1"
    }
}
Backup oplog
./mongodump -vv -h192.168.1.11:27017 -uroot -prootroot --authenticationDatabase admin -d local -c oplog.rs -o /tmp
When restore, oplog.bson is needed.
mv /tmp/local/oplog.rs.bson /data/mongodb/backup/oplog.bson
Recovery collection1
./mongorestore -v -h127.0.0.1:27018 -d db01 -c collection1 /data/backup1/db01/collection1.bson
View insert records 1 W before recovery
db.collection1.count()
10000
Applying oplog
mongorestore -vv -h127.0.0.1:27018 --oplogReplay --oplogLimit=1559803854:1 /data/backup1/
Look at the insert record again
db.collection1.count()
11000
3. Restoring Misdeleted Documents
Misdeletion of documents
replSet27017:PRIMARY> for (i = 0; i < 1000; i++){ db.test4.save({'name':'hushi','num':i,date:new Date()}); }

replSet27017:PRIMARY> db.test4.remove({$and:[{num:{$gte:100,$lte:300}}]})
WriteResult({ "nRemoved" : 201 })

replSet27017:PRIMARY> for (i = 1000; i < 1500; i++){ db.test4.save({'name':'hushi','num':i,date:new Date()}); }
WriteResult({ "nInserted" : 1 })
Find the start time of deletion
replSet27017:PRIMARY> db.getSiblingDB('local').oplog.rs.find({op:{$ne:'n'},ns:'mms_test.test4'},{ts:1,op:1}).sort({$natural:-1}).limit(10).skip(695)
{ "ts" : Timestamp(1563431039, 6), "op" : "d" }
{ "ts" : Timestamp(1563431039, 5), "op" : "d" }
{ "ts" : Timestamp(1563431039, 4), "op" : "d" }
{ "ts" : Timestamp(1563431039, 3), "op" : "d" }
{ "ts" : Timestamp(1563431039, 2), "op" : "d" }
{ "ts" : Timestamp(1563431039, 1), "op" : "d" }
{ "ts" : Timestamp(1563430620, 502), "op" : "i" }
{ "ts" : Timestamp(1563430620, 501), "op" : "i" }
{ "ts" : Timestamp(1563430620, 500), "op" : "i" }
{ "ts" : Timestamp(1563430620, 499), "op" : "i" }
More than or equal to this time point, 201 data were deleted.
replSet27017:PRIMARY> db.getSiblingDB('local').oplog.rs.find({op:{$ne:'n'},ns:'mms_test.test4',op:'d',ts:{$gte:Timestamp(1563431039, 1)}}).sort({$natural:-1}).limit(1).count()
201
replSet27017:PRIMARY> db.getSiblingDB('local').oplog.rs.find({op:{$ne:'n'},ns:'mms_test.test4',op:'d',ts:{$gte:Timestamp(1563431039, 1)}}).sort({$natural:-1}).limit(1).pretty()
{
    "ts" : Timestamp(1563431039, 201),
    "t" : NumberLong(113),
    "h" : NumberLong("-1345379834581505732"),
    "v" : 2,
    "op" : "d",
    "ns" : "mms_test.test4",
    "ui" : UUID("9a3dbae7-4f7c-465d-b420-1b7818531fc8"),
    "wall" : ISODate("2019-07-18T06:23:59.997Z"),
    "o" : {
        "_id" : ObjectId("5d300edb42389abced5f7bae")
    }
}
replSet27017:PRIMARY> db.getSiblingDB('local').oplog.rs.find({op:{$ne:'n'},ns:'mms_test.test4',op:'d',ts:{$gte:Timestamp(1563431039, 1)}}).sort({$natural:1}).limit(1).pretty()
{
    "ts" : Timestamp(1563431039, 1),
    "t" : NumberLong(113),
    "h" : NumberLong("-4777761962883174315"),
    "v" : 2,
    "op" : "d",
    "ns" : "mms_test.test4",
    "ui" : UUID("9a3dbae7-4f7c-465d-b420-1b7818531fc8"),
    "wall" : ISODate("2019-07-18T06:23:59.997Z"),
    "o" : {
        "_id" : ObjectId("5d300edb42389abced5f7ae6")
    }
}
Finally, try ongodb-backup-restore-util. If you use mongorestore, it's the same, but you need to dump the oplog according to the time point, and then restore it.
#./mongodb-backup-restore-util --host 127.0.0.1 --port 27017  --rsId replSet27017 --groupId 5d2d88adf2a30bbee892ef0d --opStart 1563423143:1 --opEnd 1563430620:502   --oplogSourceAddr https://api-backup.us-east-1.mongodb.com --apiKey 5d2f0fbbff7a252987d03c00086f7a1040706ba4c6c634b8f4c09b9e
[2019/07/18 19:13:55.843] [pit-restore.debug] [pit-restore/standalone-pit-restore.go:main:116] Creating restore
[2019/07/18 19:14:05.406] [pit-restore.debug] [pit-restore/standalone-pit-restore.go:main:137] Successfully completed restore.
[2019/07/18 19:14:05.406] [pit-restore.debug] [pit-restore/standalone-pit-restore.go:main:138] Successfully completed restore.
[2019/07/18 19:14:05.406] [pit-restore.info] [restore/restore.go:Stop:121] Stopping Restore
It has been restored.
db.test4.find({$and:[{num:{$gte:100,$lte:300}}]}).count()
201
3. Backup and Recovery Scheme
1. Backup strategy
1.1 Backup strategy of MongoDB Cloud Manager:
The rate is based on your having 28 snapshots at steady state:
The six-hour snapshots are kept for two days;
The daily snapshots for one week,
The weekly snapshots for one month,
The monthly for one year.
This is the official time point for full and full reservations.
The oplog is backed up all the time, with a second delay.
1.2 Complete + oplog
Following this line of thought, the full backup can be separated from the spare. The full backup can be done every 6 hours or every day as required. Then oplog backups every second or every five seconds or every minute.
Full-fledged can use percona server for physical hot standby, oplog can be backed up at set intervals.
Then you can backup some important documents by using mysqldump, so that in case of misoperation, it can be quickly restored.
2. Additional oplog
2.1 Supplementary
#./mongodump -vv -h192.168.1.11:27017 -uroot -prootroot --authenticationDatabase admin -d local -c oplog.rs -o /backup --query='{ts:{$gte:Timestamp(1563703200, 1),$lt:Timestamp(1563703500, 1)}}'
Here's a five-minute oplog supplement
Rename the additional oplog:
mv oplog.rs.bson oplog.bson.backup
./mongodump -vv -h192.168.1.11:27017 -uroot -prootroot --authenticationDatabase admin -d local -c oplog.rs -o /backup --query='{ts:{$gte:Timestamp(1563771600, 1),$lt:Timestamp(1563775200, 1)}}'
Again, add the additional oplog to a bson file
cat oplog.rs.bson >>oplog.bson.backup
Next, continue to add all the additions to a document.
Every day can be added to a file.
3. Verification backup
After the backup, it is necessary to carry out the relevant verification. The verification is divided into two parts, one is the integrity verification after the backup file is restored, and the other is the successful verification of the oplog backup.
One idea is to restore full files and additional files to a single node every day.
3.1 Verification Complete
It is recommended to use physical hot standby. If percona server is used, the last insert record of the WiredTiger.backup file can exist on the restored node; if there is no insert record, or if there is no content in the WiredTiger.backup file, you can simply compare the set data of the replica set with the restored node. Are the nodes the same? Similarly, if you use tools such as mongodb cloud manager that do not record oplog s, you can also compare the number of collections.
3.2 Verification Supplementary
Verify the add-on to see what the last data inserted in the bson file is and whether the restored file has this data.