1. Introduction to ZABBIX
zabbix is an enterprise class open source solution based on WEB interface to provide distributed system monitoring and network monitoring functions.
zabbix can monitor various network parameters to ensure the safe operation of the server system; Flexible notification mechanism is provided to enable system administrators to quickly locate / solve various problems.
zabbix consists of two parts, zabbix server and optional component zabbix agent.
zabbix server can provide remote server / network status monitoring, data collection and other functions through SNMP, zabbix agent, ping, port monitoring and other methods. It can run on Linux, Ubuntu, Solaris, HP-UX, AIX, Free BSD, Open BSD, OS X and other platforms.
zabbix agent needs to be installed on the monitored target server. It mainly collects hardware information or memory, CPU and other information related to the operating system.
zabbix server can independently monitor the service status of the remote server; At the same time, it can also cooperate with zabbix agent, poll zabbix agent to actively receive monitoring data (agent mode), and passively receive data sent by zabbix agent (trapping mode).
In addition, the zabbix server also supports SNMP (v1,v2) and can be used with SNMP software (e.g. net SNMP).
2. zabbix features
Main features of zabbix:
-
Simple installation and configuration, low learning cost
-
Support multiple languages (including Chinese)
-
Free open source
-
Automatically discover servers and network devices
-
Distributed monitoring and WEB centralized management
-
Can be monitored without agent
-
User security authentication and soft authorization
-
Set or view the monitoring results through the WEB interface
-
Notification functions such as email
Main functions of Zabbix: -
CPU load
-
Memory usage
-
Disk usage
-
Network status
-
Port monitoring
-
Log monitoring
3.RAID
Disk array:
Redundant Arrays of Independent Disks (RAID) means "an array composed of independent disks with redundancy capability".
Disk array consists of many independent disks, which are combined into a disk group with huge capacity. The bonus effect generated by the data provided by individual disks is used to improve the performance of the whole disk system. Using this technology, the data is cut into many sections and stored on each hard disk.
The disk array can also use the concept of Parity Check to read data when any hard disk in the array fails. During data reconstruction, the data can be re placed into a new hard disk after calculation.

Function:
RAID technology mainly has the following three basic functions:
1) By striping the data on the disk, the block access of data is realized, the mechanical seek time of the disk is reduced, and the data access speed is improved.
2) By reading several disks in an array at the same time, the mechanical seek time of the disk is reduced and the data access speed is improved.
3) The redundancy protection of data is realized by mirroring or storing parity information.
Principle:
As an independent system, the disk array is directly connected outside the host or connected to the host through the network. The disk array has multiple ports that can be connected by different hosts or different ports. A host connects to different ports of the array to increase transmission speed.
Like the internal integrated cache of single disk used by PC at that time, a certain amount of buffer memory is provided in the disk array to speed up the interaction with the host. Cache interaction between the host and the disk array, and cache interaction data with specific disks.
In applications, some commonly used data needs to be read frequently. The disk array finds these frequently read data according to the internal algorithm and stores them in the cache to speed up the host's reading of these data. For data not in other caches, if the host wants to read, the array will read it directly from the disk and transfer it to the host. The data written by the host is only written in the cache, and the host can complete the write operation immediately. Then it is slowly written to disk by the cache.
Advantages and disadvantages:
advantage
Increase transmission rate. RAID greatly improves the data Throughput of the storage system by storing and reading data on multiple disks at the same time. In RAID, many disk drives can transmit data at the same time, and these disk drives are logically one disk drive, so RAID can achieve several times, tens of times or even hundreds of times the speed of a single disk drive. This is also the problem that RAID originally wanted to solve. At that time, the speed of CPU increased rapidly, and the data transmission rate of disk drive could not be greatly improved, so a solution was needed to solve the contradiction between the two. RAID finally succeeded.
Provide fault tolerance through data verification. Ordinary disk drives cannot provide fault tolerance if the CRC (cyclic redundancy check) code written on the disk is not included. Raid fault tolerance is based on the hardware fault tolerance of each disk drive, so it provides higher security. In many raid modes, there are relatively complete mutual verification / recovery measures, even direct mutual mirror backup, which greatly improves the fault tolerance of the RAID system and the stability and redundancy of the system.
shortcoming
RAID0 has no redundancy function. If a disk (physical) is damaged, all data cannot be used. [2]
The utilization of RAID1 disk can only reach 50% (when two disks are used), which is the lowest among all RAID levels.
RAID0+1 is understood as a compromise between RAID 0 and RAID 1. RAID 0+1 can provide data security for the system, but the degree of security is lower than Mirror, and the utilization of disk space is higher than Mirror.
RAID level:
-
RAID 0: if you have n disks, you can only write one disk at the same time, and then the next one when it is full. After RAID 0, n disks can be written at the same time, which improves the speed very quickly, but there is no backup, so the reliability is very poor. N is at least 2.
-
RAID 1: because RAID 0 is too unreliable, RAID 1 is derived. If you have n disks, take n/2 of them as mirror disks. When you write data to one disk, you also write data to the other. When one of them is broken, the mirrored disk is automatically on top, with the best reliability, but the space utilization is too low. N is at least 2.
-
RAID2: with Hamming code verification. Conceptually, RAID 2 is similar to RAID 3. Both of them strip data on different hard disks in bits or bytes. However, RAID 2 uses certain coding techniques to provide error checking and recovery. This coding technology requires multiple disks to store inspection and recovery information, which makes the implementation of RAID 2 technology more complex. Therefore, it is rarely used in the business environment. On each disk on the left are the bits of data. The Hamming check code obtained by the operation of different bits of a data can be saved on another group of disks. Due to the characteristics of Hamming code, it can correct the error in case of data error to ensure the correct output. Its data transmission rate is quite high. If you want to achieve an ideal speed, you'd better improve the hard disk that stores the check code ECC code. For the design of the controller, it is simpler than RAID3, 4 or 5. There is no free lunch. It is the same here. To use Hamming code, we must pay the price of data redundancy. The rate of output data is equal to the slowest in the drive set.
-
RAID 3: in order to understand RAID 5, let's first talk about RAID 3.RAID 3 is that if you have n disks, one disk is used as the verification disk, and the remaining n-1 disks are equivalent to reading and writing RAID 0 at the same time. When one disk is broken, you can restore the original data of the broken disk through the verification code. This verification method is special. Parity check, 1 XOR 0 XOR 1=0, 0 XOR 1 XOR 0=1. The last data is the verification data. When a data is missing in the middle, it can be calculated from the data and verification data of other disks. However, there is a problem. Because n-1 disks are RAID 0, every read and write must involve all disks to serve it, and it will be over in case the verification disk breaks. At most one bad disk is allowed. N min. 3
-
RAID4 (independent disk structure with parity code). RAID4 is very similar to RAID3. The difference is that it accesses data by data block, that is, by disk, one disk at a time. In this way, RAID3 is a horizontal bar at a time, while RAID4 is a vertical bar at a time. Its features are similar to RAID3, but it is much more difficult than RAID3 in failure recovery, the design of the controller is much more difficult, and the efficiency of accessing data is not very good.
-
RAID 5: different from RAID 3, it is also equivalent to the size of one disk as the verification disk and the size of n-1 disk as the data disk, but the verification codes are distributed in each disk, not a single disk, that is, a distributed verification disk. This has many benefits. At most one disk is broken. N min. 3
-
RAID 6: on the basis of RAID 5, a check code is added, which is like a reconciliation equation. One check code has one equation, and there are at most two unknowns, that is, at most two bad disks
zabbix configuration:
There are two types of zabbix configuration files:
- Server side configuration file (/ usr/local/etc/zabbix_server.conf)
- Client configuration file (/ usr/local/etc/zabbix_agentd.conf)
- ZABBIX proxy configuration file (/ usr/local/etc/zabbix_proxy.conf)
4. Deploy zabbix
Because zabbix is developed in php, you must first deploy the lamp architecture to support running php web pages
4.1 installing httpd
//Install EPEL release source
[root@localhost ~]# yum -y install epel-release

//Installing the SDK
[root@localhost ~]# yum groups mark install 'Development Tools' -y

//Create users and groups for apache services
[root@localhost ~]# useradd -r -M -s /sbin/nologin apache

//Install dependent packages
[root@localhost ~]# yum -y install openssl-devel pcre-devel expat-devel libtool gcc gcc-c++ make

//Download and install apr and apr util
[root@localhost ~]# cd /usr/src/
[root@localhost src]# wget https://dlcdn.apache.org/httpd/httpd-2.4.49.tar.gz
[root@localhost src]# wget https://dlcdn.apache.org/apr/apr-1.7.0.tar.gz
[root@localhost src]# wget https://dlcdn.apache.org/apr/apr-util-1.6.1.tar.gz
[root@localhost src]# ls
apr-1.7.0.tar.gz  apr-util-1.6.1.tar.gz  debug  httpd-2.4.49.tar.gz  kernels
[root@localhost src]#

//decompression
[root@localhost src]# tar xf apr-1.7.0.tar.gz
[root@localhost src]# tar xf apr-util-1.6.1.tar.gz
[root@localhost src]# tar xf httpd-2.4.49.tar.gz
[root@localhost src]# ls
apr-1.7.0         apr-util-1.6.1         debug         httpd-2.4.49.tar.gz
apr-1.7.0.tar.gz  apr-util-1.6.1.tar.gz  httpd-2.4.49  kernels
[root@localhost src]#
[root@localhost src]# cd apr-1.7.0/
[root@localhost apr-1.7.0]# vim configure
31878     cfgfile=${ofile}T
31879     trap "$RM \"$cfgfile\"; exit 1" 1 2 15
31880 #    $RM "$cfgfile" / / comment this line

[root@localhost apr-1.7.0]# ./configure --prefix=/usr/local/apr
[root@localhost apr-1.7.0]# make
[root@localhost apr-1.7.0]# make install

[root@localhost apr-1.7.0]# cd ../apr-util-1.6.1/
[root@localhost apr-util-1.6.1]# ./configure --prefix=/usr/local/apr-util --with-apr=/usr/local/apr
[root@localhost apr-util-1.6.1]# make
[root@localhost apr-util-1.6.1]# make install

[root@localhost apr-util-1.6.1]# cd ../httpd-2.4.49/
[root@localhost httpd-2.4.49]# ./configure --prefix=/usr/local/apache \
--enable-so \
--enable-ssl \
--enable-cgi \
--enable-rewrite \
--with-zlib \
--with-pcre \
--with-apr=/usr/local/apr \
--with-apr-util=/usr/local/apr-util/ \
--enable-modules=most \
--enable-mpms-shared=all \
--with-mpm=prefork
[root@localhost httpd-2.4.49]# make
[root@localhost httpd-2.4.49]# make install

//Post installation configuration
[root@localhost ~]# echo 'export PATH=/usr/local/apache/bin:$PATH' > /etc/profile.d/httpd.sh[root@localhost ~]# source /etc/profile.d/httpd.sh
[root@localhost ~]# which httpd
/usr/local/apache/bin/httpd
[root@localhost ~]# ln -s /usr/local/apache/include/ /usr/include/apache
[root@localhost ~]# vim /etc/man_db.conf
 20 MANDATORY_MANPATH                       /usr/man
 21 MANDATORY_MANPATH                       /usr/share/man
 22 MANDATORY_MANPATH                       /usr/local/share/man
 23 MANDATORY_MANPATH                       /usr/local/apache/man   //Add this line
 24 #---------------------------------------------------------

[root@localhost ~]# vim /usr/local/apache/conf/httpd.conf
201 # If your host doesn't have a registered DNS name, enter its IP address here.
202 #
203 ServerName www.example.com:80   //Uncomment this line
204
205 #

//Using service to control apache
[root@localhost ~]# vim /usr/lib/systemd/system/httpd.service
[root@localhost ~]# cat /usr/lib/systemd/system/httpd.service
[Unit]
Description=Httpd server daemon
After=network.target

[Service]
Type=forking
ExecStart=/usr/local/apache/bin/apachectl start
ExecStop=/usr/local/apache/bin/apachectl stop
ExecReload=/bin/kill -HUP $MAINPID

[Install]
WantedBy=multi-user.target
[root@localhost ~]#
[root@localhost ~]# systemctl daemon-reload
[root@localhost ~]# systemctl enable --now httpd
Created symlink /etc/systemd/system/multi-user.target.wants/httpd.service → /usr/lib/systemd/system/httpd.service.
[root@localhost ~]# ss -antl
State       Recv-Q      Send-Q           Local Address:Port           Peer Address:Port
LISTEN      0           128                    0.0.0.0:111                 0.0.0.0:*
LISTEN      0           32               192.168.122.1:53                  0.0.0.0:*
LISTEN      0           128                    0.0.0.0:22                  0.0.0.0:*
LISTEN      0           5                    127.0.0.1:631                 0.0.0.0:*
LISTEN      0           128                  127.0.0.1:6010                0.0.0.0:*
LISTEN      0           128                       [::]:111                    [::]:*
LISTEN      0           128                          *:80                        *:*
LISTEN      0           128                       [::]:22                     [::]:*
LISTEN      0           5                        [::1]:631                    [::]:*
LISTEN      0           128                      [::1]:6010                   [::]:*
[root@localhost ~]#
4.2 installing mysql
Deploying zabbix requires mysql-5.7.28 or above
//Install dependent packages
[root@localhost ~]# yum -y install ncurses-devel openssl-devel openssl cmake mariadb-devel

//Create users and groups
[root@localhost ~]# useradd -r -M -s /sbin/nologin mysql

//Download the mysql package in binary format and upload it to / usr/src
[root@localhost src]# ls
apr-1.7.0         apr-util-1.6.1.tar.gz  httpd-2.4.49.tar.gz
apr-1.7.0.tar.gz  debug                  kernels
apr-util-1.6.1    httpd-2.4.49           mysql-5.7.34-linux-glibc2.12-x86_64.tar.gz

//Unzip the software to / usr/local/
[root@localhost src]# tar xf mysql-5.7.34-linux-glibc2.12-x86_64.tar.gz -C /usr/local/
[root@localhost src]#
[root@localhost ~]# cd /usr/local/
[root@localhost local]# ls
apache  apr-util  etc    include  lib64    mysql-5.7.34-linux-glibc2.12-x86_64  share
apr     bin       games  lib      libexec  sbin                                 src
[root@localhost local]# mv mysql-5.7.34-linux-glibc2.12-x86_64 mysql
[root@localhost local]# chown -R mysql.mysql mysql
[root@localhost local]#

//Add environment variable
[root@localhost ~]# echo 'export PATH=/usr/local/mysql/bin:$PATH' > /etc/profile.d/mysql.sh
[root@localhost ~]# source /etc/profile.d/mysql.sh
[root@localhost ~]# echo $PATH
/usr/local/mysql/bin:/usr/local/apache/bin:/usr/local/sbin:/usr/local/bin:/usr/sbin:/usr/bin:/root/bin
[root@localhost ~]#
[root@localhost ~]# ln -s /usr/local/mysql/include/ /usr/include/mysql
[root@localhost ~]# vim /etc/man_db.conf
 20 MANDATORY_MANPATH                       /usr/man
 21 MANDATORY_MANPATH                       /usr/share/man
 22 MANDATORY_MANPATH                       /usr/local/share/man
 23 MANDATORY_MANPATH                       /usr/local/apache/man
 24 MANDATORY_MANPATH                       /usr/local/mysql/man   //Add this line

[root@localhost ~]# vim /etc/ld.so.conf.d/mysql.conf
[root@localhost ~]# cat /etc/ld.so.conf.d/mysql.conf
/usr/local/mysql/lib
[root@localhost ~]# ldconfig
[root@localhost ~]#

//Establish data storage directory
[root@localhost ~]# mkdir -p /opt/data
[root@localhost ~]# chown -R mysql.mysql /opt/data/

//Initialize database
[root@localhost ~]# mysqld --initialize-insecure --user mysql --datadir /opt/data/
2021-09-23T10:49:13.943769Z 0 [Warning] TIMESTAMP with implicit DEFAULT value is deprecated. Please use --explicit_defaults_for_timestamp server option (see documentation for more details).
2021-09-23T10:49:15.135201Z 0 [Warning] InnoDB: New log files created, LSN=45790
2021-09-23T10:49:15.300616Z 0 [Warning] InnoDB: Creating foreign key constraint system tables.
2021-09-23T10:49:15.319952Z 0 [Warning] No existing UUID has been found, so we assume that this is the first time that this server has been started. Generating a new UUID: e51e1956-1c5b-11ec-82b9-000c29fb6a38.
2021-09-23T10:49:15.321052Z 0 [Warning] Gtid table is not ready to be used. Table 'mysql.gtid_executed' cannot be opened.
2021-09-23T10:49:15.708527Z 0 [Warning] CA certificate ca.pem is self signed.
2021-09-23T10:49:15.884677Z 1 [Warning] root@localhost is created with an empty password ! Please consider switching off the --initialize-insecure option.
[root@localhost ~]#

//Generate profile
[root@localhost ~]# cat > /etc/my.cnf <<EOF
> [mysqld]
> basedir = /usr/local/mysql
> datadir = /opt/data
> socket = /tmp/mysql.sock
> port = 3306
> pid-file = /opt/data/mysql.pid
> user = mysql
> skip-name-resolve
> EOF
[root@localhost ~]#

//Using service to control mysql
[root@localhost ~]# cp /usr/lib/systemd/system/httpd.service /usr/lib/systemd/system/mysqld.service
[root@localhost ~]# vim /usr/lib/systemd/system/mysqld.service
[root@localhost ~]# cat /usr/lib/systemd/system/mysqld.service
[Unit]
Description=Mysql server daemon
After=network.target

[Service]
Type=forking
ExecStart=/usr/local/mysql/support-files/mysql.server start
ExecStop=/usr/local/mysql/support-files/mysql.server stop
ExecReload=/bin/kill -HUP $MAINPID

[Install]
WantedBy=multi-user.target
[root@localhost ~]#

[root@localhost ~]# vim /usr/local/mysql/support-files/mysql.server
46 basedir=/usr/local   //Modify these two lines
47 datadir=/opt/data

[root@localhost ~]# systemctl daemon-reload
[root@localhost ~]# systemctl enable --now mysqld.service
Created symlink /etc/systemd/system/multi-user.target.wants/mysqld.service → /usr/lib/systemd/system/mysqld.service.
[root@localhost ~]# ss -antl
State       Recv-Q      Send-Q           Local Address:Port           Peer Address:Port
LISTEN      0           128                    0.0.0.0:111                 0.0.0.0:*
LISTEN      0           32               192.168.122.1:53                  0.0.0.0:*
LISTEN      0           128                    0.0.0.0:22                  0.0.0.0:*
LISTEN      0           5                    127.0.0.1:631                 0.0.0.0:*
LISTEN      0           128                  127.0.0.1:6010                0.0.0.0:*
LISTEN      0           128                       [::]:111                    [::]:*
LISTEN      0           128                          *:80                        *:*
LISTEN      0           128                       [::]:22                     [::]:*
LISTEN      0           5                        [::1]:631                    [::]:*
LISTEN      0           128                      [::1]:6010                   [::]:*
LISTEN      0           80                           *:3306                      *:*
[root@localhost ~]#

//Set password
[root@localhost ~]# yum -y install ncurses-compat-libs
[root@localhost ~]# mysql
Welcome to the MySQL monitor.  Commands end with ; or \g.
Your MySQL connection id is 2
Server version: 5.7.34 MySQL Community Server (GPL)

Copyright (c) 2000, 2021, Oracle and/or its affiliates.

Oracle is a registered trademark of Oracle Corporation and/or its
affiliates. Other names may be trademarks of their respective
owners.

Type 'help;' or '\h' for help. Type '\c' to clear the current input statement.

mysql> set password = password("1");
Query OK, 0 rows affected, 1 warning (0.00 sec)

mysql> quit
Bye
[root@localhost ~]# mysql -uroot -p1
mysql: [Warning] Using a password on the command line interface can be insecure.
Welcome to the MySQL monitor.  Commands end with ; or \g.
Your MySQL connection id is 3
Server version: 5.7.34 MySQL Community Server (GPL)

Copyright (c) 2000, 2021, Oracle and/or its affiliates.

Oracle is a registered trademark of Oracle Corporation and/or its
affiliates. Other names may be trademarks of their respective
owners.

Type 'help;' or '\h' for help. Type '\c' to clear the current input statement.

mysql> exit
Bye
[root@localhost ~]#
4.3 installing php
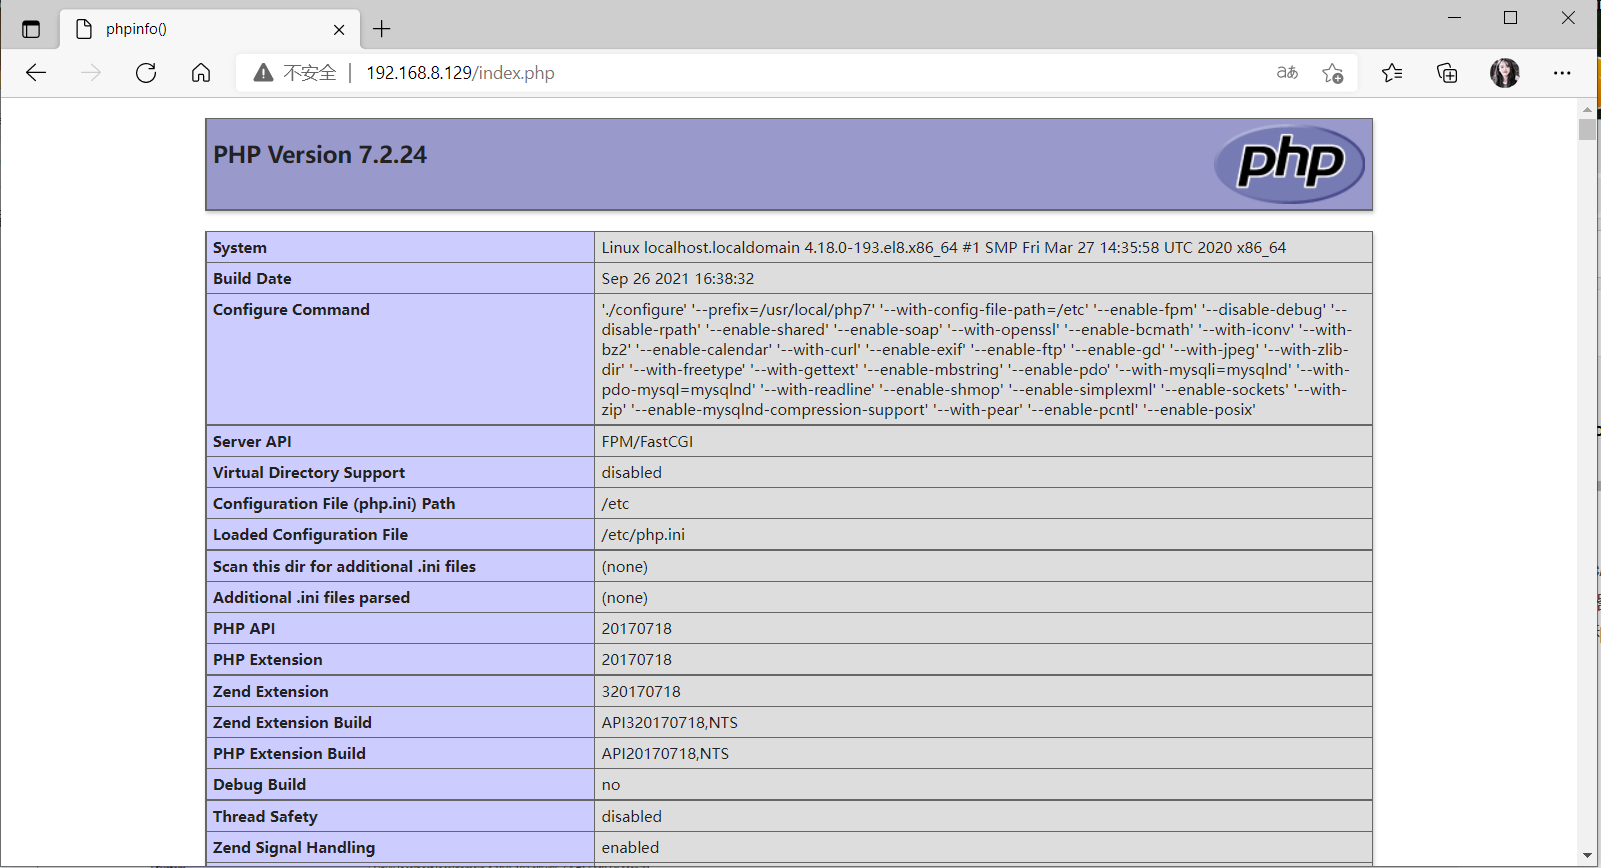
//php7.4 is required to install zabbix
//Install dependent packages

[root@localhost ~]# yum -y install libxml2 libxml2-devel openssl openssl-devel bzip2 bzip2-devel libcurl libcurl-devel libicu-devel libjpeg libjpeg-devel libpng libpng-devel openldap-devel  pcre-devel freetype freetype-devel gmp gmp-devel libmcrypt libmcrypt-devel readline readline-devel libxslt libxslt-devel mhash mhash-devel libsqlite3x-devel php-mysqlnd libzip-devel

[root@localhost ~]# yum -y install http://mirror.centos.org/centos/8-stream/PowerTools/x86_64/os/Packages/oniguruma-devel-6.8.2-2.el8.x86_64.rpm

//Download php
[root@localhost local]# wget https://www.php.net/distributions/php-7.2.24.tar.gz
[root@localhost local]# tar xf php-7.2.24.tar.gz
[root@localhost local]# cd php-7.2.24/
[root@localhost php-7.2.24]#

//Compile and install php
[root@localhost php-7.2.24]# ./configure --prefix=/usr/local/php7  \
--with-config-file-path=/etc \
--enable-fpm \
--enable-inline-optimization \
--disable-debug \
--disable-rpath \
--enable-shared \
--enable-soap \
--with-openssl \
--enable-bcmath \
--with-iconv \
--with-bz2 \
--enable-calendar \
--with-curl \
--enable-exif  \
--enable-ftp \
--with-gd \
--with-jpeg-dir \
--with-png-dir \
--with-zlib-dir \
--with-freetype-dir \
--with-gettext \
--enable-json \
--enable-mbstring \
--enable-pdo \
--with-mysqli=mysqlnd \
--with-pdo-mysql=mysqlnd \
--with-readline \
--enable-shmop \
--enable-simplexml \
--enable-sockets \
--enable-zip \
--enable-mysqlnd-compression-support \
--with-pear \
--enable-pcntl \
--enable-posix

[root@localhost php-7.2.24]# make && make install

//Post installation configuration
[root@localhost php-7.2.24]# echo 'export PATH=/usr/local/php7/bin:$PATH' > /etc/profile.d/php.sh
[root@localhost php-7.2.24]# source /etc/profile.d/php.sh
[root@localhost php-7.2.24]# which php
[root@localhost php-7.2.24]# php -v
PHP 7.2.24 (cli) (built: Sep 26 2021 16:40:58) ( NTS )
Copyright (c) 1997-2018 The PHP Group
Zend Engine v3.2.0, Copyright (c) 1998-2018 Zend Technologies

//Configure PHP FPM
[root@localhost php-7.2.24]# cp php.ini-production /etc/php.ini
[root@localhost php-7.2.24]# cp sapi/fpm/init.d.php-fpm /etc/init.d/php-fpm
[root@localhost php-7.2.24]# chmod +x /etc/rc.d/init.d/php-fpm
[root@localhost php-7.2.24]# cd /usr/local/php7
[root@localhost php7]# ls
bin  etc  include  lib  php  sbin  var
[root@localhost php7]# cd etc/
[root@localhost etc]# cp php-fpm.conf.default php-fpm.conf
[root@localhost etc]# cd php-fpm.d/
[root@localhost php-fpm.d]# ls
www.conf.default
[root@localhost php-fpm.d]# cp www.conf.default www.conf
[root@localhost php-fpm.d]# service php-fpm start
Starting php-fpm  done
[root@localhost php-fpm.d]# ss -antl
State          Recv-Q         Send-Q                 Local Address:Port                 Peer Address:Port
LISTEN         0              32                     192.168.122.1:53                        0.0.0.0:*
LISTEN         0              128                          0.0.0.0:22                        0.0.0.0:*
LISTEN         0              5                          127.0.0.1:631                       0.0.0.0:*
LISTEN         0              128                        127.0.0.1:6010                      0.0.0.0:*
LISTEN         0              128                        127.0.0.1:9000                      0.0.0.0:*
LISTEN         0              128                          0.0.0.0:111                       0.0.0.0:*
LISTEN         0              128                             [::]:22                           [::]:*
LISTEN         0              5                              [::1]:631                          [::]:*
LISTEN         0              128                            [::1]:6010                         [::]:*
LISTEN         0              80                                 *:3306                            *:*
LISTEN         0              128                             [::]:111                          [::]:*
LISTEN         0              128                                *:80                              *:*
[root@localhost php-fpm.d]#

//Using service to control php
[root@localhost ~]# vim /usr/lib/systemd/system/php-fpm.service
[root@localhost ~]# cat /usr/lib/systemd/system/php-fpm.service
[Unit]
Description=php server daemon
After=network.target

[Service]
Type=forking
ExecStart=/etc/init.d/php-fpm start
ExecStop=/etc/init.d/php-fpm stop
ExecReload=/bin/kill -HUP $MAINPID

[Install]
WantedBy=multi-user.target
[root@localhost ~]# systemctl daemon-reload
[root@localhost ~]# systemctl enable --now php-fpm.service
Synchronizing state of php-fpm.service with SysV service script with /usr/lib/systemd/systemd-sysv-install.
Executing: /usr/lib/systemd/systemd-sysv-install enable php-fpm
Created symlink /etc/systemd/system/multi-user.target.wants/php-fpm.service → /usr/lib/systemd/system/php-fpm.service.
[root@localhost ~]# ss -antl
State          Recv-Q         Send-Q                 Local Address:Port                 Peer Address:Port
LISTEN         0              32                     192.168.122.1:53                        0.0.0.0:*
LISTEN         0              128                          0.0.0.0:22                        0.0.0.0:*
LISTEN         0              5                          127.0.0.1:631                       0.0.0.0:*
LISTEN         0              128                        127.0.0.1:6010                      0.0.0.0:*
LISTEN         0              128                        127.0.0.1:9000                      0.0.0.0:*
LISTEN         0              128                          0.0.0.0:111                       0.0.0.0:*
LISTEN         0              128                             [::]:22                           [::]:*
LISTEN         0              5                              [::1]:631                          [::]:*
LISTEN         0              128                            [::1]:6010                         [::]:*
LISTEN         0              80                                 *:3306                            *:*
LISTEN         0              128                             [::]:111                          [::]:*
LISTEN         0              128                                *:80                              *:*
Configuring apache
Enable agent module
[root@localhost php-8.0.10]# vim /usr/local/apache/conf/httpd.conf
119 #LoadModule remoteip_module modules/mod_remoteip.so
120 LoadModule proxy_module modules/mod_proxy.so   //note off
121 #LoadModule proxy_connect_module modules/mod_proxy_connect.so
122 #LoadModule proxy_ftp_module modules/mod_proxy_ftp.so
123 #LoadModule proxy_http_module modules/mod_proxy_http.so
124 LoadModule proxy_fcgi_module modules/mod_proxy_fcgi.so   //note off
Configure virtual host
//Create a virtual host directory and generate a php test page
[root@localhost ~]# cd /usr/local/apache/
[root@localhost apache]# ls
bin  build  cgi-bin  conf  error  htdocs  icons  include  logs  man  manual  modules

[root@localhost apache]# ls htdocs/
index.html
[root@localhost apache]# mkdir htdocs/test/
[root@localhost apache]# vim htdocs/test/index.php
[root@localhost apache]# cat htdocs/test/index.php
<?php
        phpinfo();
?>
[root@localhost apache]#
[root@localhost apache]# chown -R apache.apache /usr/local/apache/htdocs/

[root@localhost ~]# vim /usr/local/apache/conf/httpd.conf
//Add the following at the end of the configuration file
<VirtualHost *:80>
    DocumentRoot "/usr/local/apache/htdocs/test"
    ServerName www.wangqing.com
    ProxyRequests Off
    ProxyPassMatch ^/(.*\.php)$ fcgi://127.0.0.1:9000/usr/local/apache/htdocs/test/$1
    <Directory "/usr/local/apache/htdocs/test">
        Options none
        AllowOverride none
        Require all granted
    </Directory>
</VirtualHost>

[root@localhost ~]# vim /usr/local/apache/conf/httpd.conf
//Search AddType and add the following
397     AddType application/x-compress .Z
398     AddType application/x-gzip .gz .tgz
399     AddType application/x-httpd-php .php   //Add this line
400     AddType application/x-httpd-php-source .phps   //Add this line

[root@localhost ~]# vim /usr/local/apache/conf/httpd.conf
//Search index.html and add the following
260 <IfModule dir_module>
261     DirectoryIndex index.php index.html   //Modify this line
262 </IfModule>

//Restart apache service
[root@localhost ~]# systemctl restart httpd.service
[root@localhost ~]#
[root@localhost ~]# ss -antl
State       Recv-Q      Send-Q           Local Address:Port           Peer Address:Port
LISTEN      0           128                    0.0.0.0:111                 0.0.0.0:*
LISTEN      0           32               192.168.122.1:53                  0.0.0.0:*
LISTEN      0           128                    0.0.0.0:22                  0.0.0.0:*
LISTEN      0           5                    127.0.0.1:631                 0.0.0.0:*
LISTEN      0           128                  127.0.0.1:6010                0.0.0.0:*
LISTEN      0           128                  127.0.0.1:6011                0.0.0.0:*
LISTEN      0           128                  127.0.0.1:9000                0.0.0.0:*
LISTEN      0           128                       [::]:111                    [::]:*
LISTEN      0           128                          *:80                        *:*
LISTEN      0           128                       [::]:22                     [::]:*
LISTEN      0           5                        [::1]:631                    [::]:*
LISTEN      0           128                      [::1]:6010                   [::]:*
LISTEN      0           128                      [::1]:6011                   [::]:*
LISTEN      0           80                           *:3306                      *:*
[root@localhost ~]#
verification
1. Modify the / etc/hosts file and add the mapping between domain name and IP
2. Use the domain name on the browser to access. If you see the following interface, it means that the lamp architecture is successfully built. Otherwise, please check your operation and whether the firewall is closed
4.4 zabbix server installation
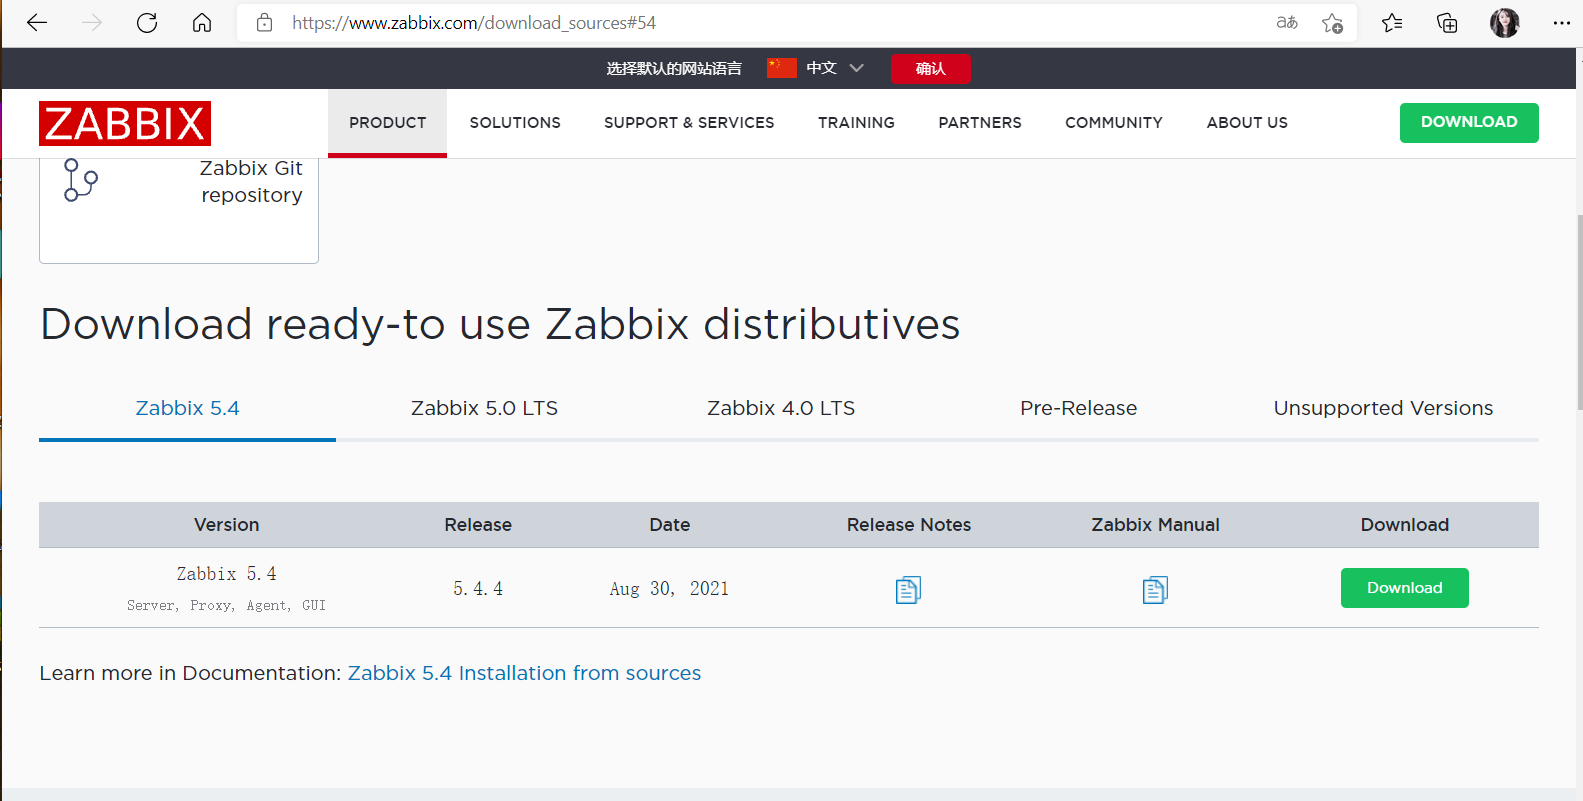
//Install dependent software
[root@server ~]# yum -y install net-snmp-devel libevent-devel

//Download zabbix
https://www.zabbix.com/download_sources
//After downloading, upload it to the / usr/src directory
[root@server src]# ls
apr-1.7.0         apr-util-1.6.1.tar.gz  httpd-2.4.49.tar.gz                         zabbix-5.4.4.tar.gz
apr-1.7.0.tar.gz  debug                  kernels
apr-util-1.6.1    httpd-2.4.49           mysql-5.7.34-linux-glibc2.12-x86_64.tar.gz
[root@server src]# tar xf zabbix-5.4.4.tar.gz

//Create zabbix user
[root@server src]# useradd -r -M -s /sbin/nologin zabbix

//Configure abbix database
[root@server src]# mysql -uroot -p1
mysql: [Warning] Using a password on the command line interface can be insecure.
Welcome to the MySQL monitor.  Commands end with ; or \g.
Your MySQL connection id is 2
Server version: 5.7.34 MySQL Community Server (GPL)

Copyright (c) 2000, 2021, Oracle and/or its affiliates.

Oracle is a registered trademark of Oracle Corporation and/or its
affiliates. Other names may be trademarks of their respective
owners.

Type 'help;' or '\h' for help. Type '\c' to clear the current input statement.

mysql> create database zabbix character set utf8 collate utf8_bin;   //Create database
Query OK, 1 row affected (0.00 sec)

mysql> grant all privileges on zabbix.* to zabbix@localhost identified by '1';   //Authorized user
Query OK, 0 rows affected, 2 warnings (0.00 sec)

mysql> flush privileges;   //Refresh permissions
Query OK, 0 rows affected (0.00 sec)

mysql>

[root@server src]# cd zabbix-5.4.4/database/mysql/
[root@server mysql]# ls
data.sql  double.sql  images.sql  Makefile.am  Makefile.in  schema.sql
[root@server mysql]# mysql -uroot -p1 zabbix < schema.sql
mysql: [Warning] Using a password on the command line interface can be insecure.
[root@server mysql]# mysql -uroot -p1 zabbix < images.sql
mysql: [Warning] Using a password on the command line interface can be insecure.
[root@server mysql]# mysql -uroot -p1 zabbix < data.sql
mysql: [Warning] Using a password on the command line interface can be insecure.
[root@server mysql]#

//Compile and install zabbix
[root@server zabbix-5.4.4]# ./configure --enable-server \
--enable-agent \
--with-mysql \
--with-net-snmp \
--with-libcurl \
--with-libxml2

[root@server zabbix-5.4.4]# make install
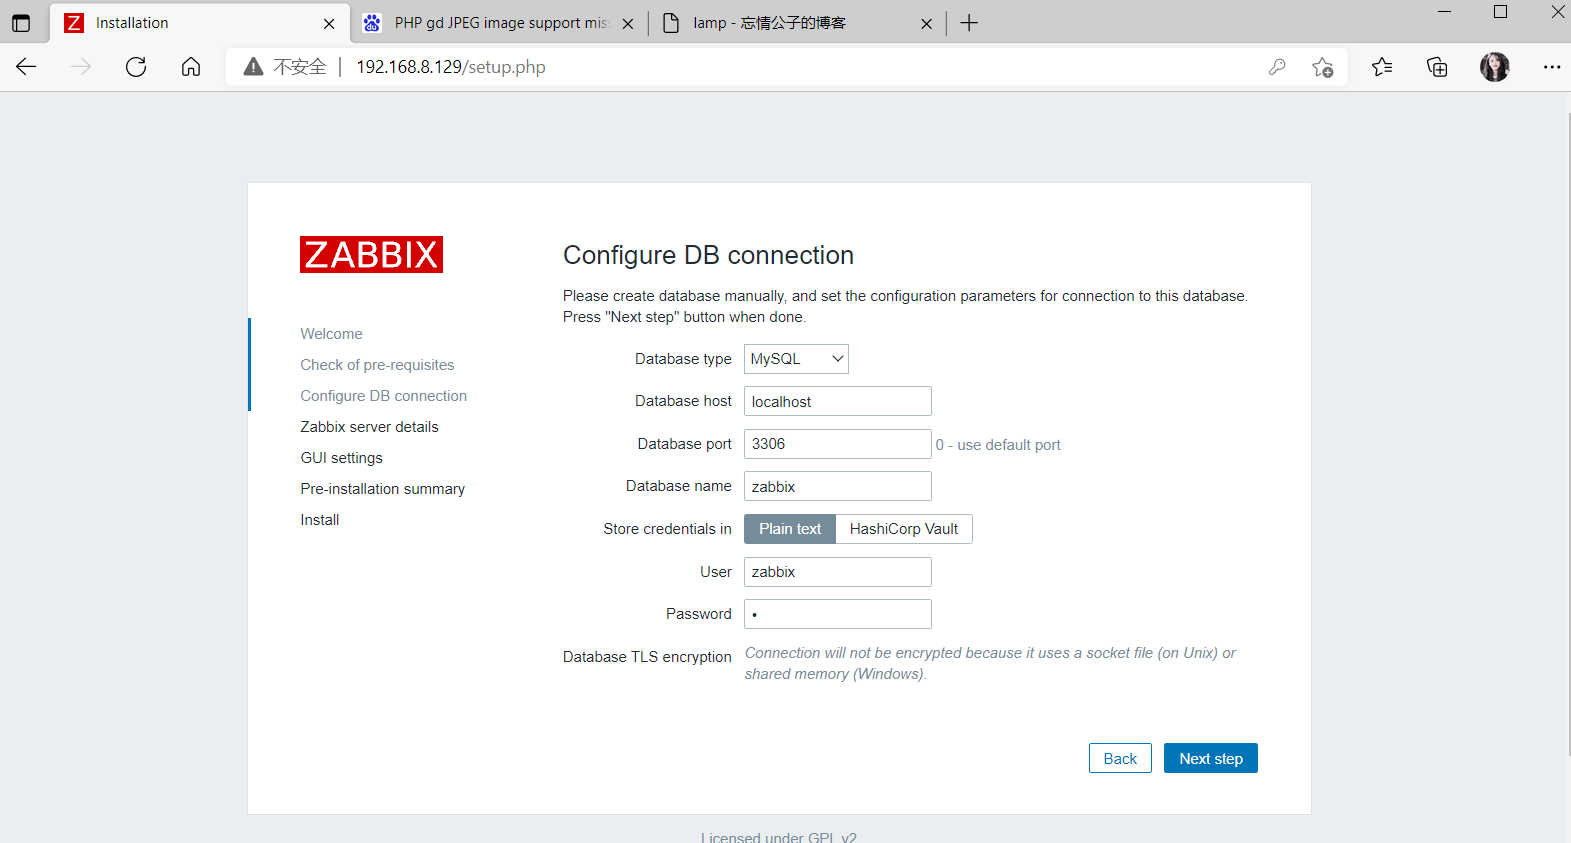
4.5 configuration of ZABBIX server
[root@server zabbix-5.4.4]# ls /usr/local/etc/
zabbix_agentd.conf  zabbix_agentd.conf.d  zabbix_server.conf  zabbix_server.conf.d
[root@server zabbix-5.4.4]# vim /usr/local/etc/zabbix_server.conf
121 # Mandatory: no
122 # Default:
123 DBPassword= 1   //Uncomment and set the zabbix database password
124

//Start service
[root@server ~]# mkdir /var/lib/mysql
[root@server ~]# ln -s /tmp/mysql.sock /var/lib/mysql/
[root@server ~]# zabbix_server
[root@server ~]# zabbix_agentd
[root@server ~]# ss -antl
State         Recv-Q        Send-Q                 Local Address:Port                  Peer Address:Port
LISTEN        0             128                          0.0.0.0:10050                      0.0.0.0:*
LISTEN        0             128                          0.0.0.0:10051                      0.0.0.0:*
LISTEN        0             128                        127.0.0.1:9000                       0.0.0.0:*
LISTEN        0             128                          0.0.0.0:111                        0.0.0.0:*
LISTEN        0             32                     192.168.122.1:53                         0.0.0.0:*
LISTEN        0             128                          0.0.0.0:22                         0.0.0.0:*
LISTEN        0             5                          127.0.0.1:631                        0.0.0.0:*
LISTEN        0             128                        127.0.0.1:6010                       0.0.0.0:*
LISTEN        0             80                                 *:3306                             *:*
LISTEN        0             128                             [::]:111                           [::]:*
LISTEN        0             128                                *:80                               *:*
LISTEN        0             128                             [::]:22                            [::]:*
LISTEN        0             5                              [::1]:631                           [::]:*
LISTEN        0             128                            [::1]:6010                          [::]:*
[root@server ~]#
4.5 zabbix server web interface installation
[root@server ~]# cd /usr/local/apache/htdocs/
[root@server htdocs]# mkdir zabbix
[root@server htdocs]# chown -R apache.apache /usr/local/apache/htdocs/
[root@server src]# cd zabbix-5.4.4/
[root@server zabbix-5.4.4]# cp -r ui/* /usr/local/apache/htdocs/zabbix/

//httpd file
[root@server ~]# vim /usr/local/apache/conf/httpd.conf   //Modify profile
<VirtualHost *:80>
    DocumentRoot "/usr/local/apache/htdocs/zabbix"
    ServerName www.test.com
    ProxyRequests Off
    ProxyPassMatch ^/(.*\.php)$ fcgi://127.0.0.1:9000/usr/local/apache/htdocs/zabbix/$1
    <Directory "/usr/local/apache/htdocs/zabbix">
        Options none
        AllowOverride none
        Require all granted
    </Directory>
</VirtualHost>

[root@server ~]# systemctl restart httpd
[root@server ~]# sed -ri 's/(post_max_size =).*/\1 16M/g' /etc/php.ini
[root@server ~]# sed -ri 's/(max_execution_time =).*/\1 300/g' /etc/php.ini
[root@server ~]# sed -ri 's/(max_input_time =).*/\1 300/g' /etc/php.ini
[root@server ~]# sed -i '/;date.timezone/a date.timezone = Asia/Shanghai' /etc/php.ini
[root@server ~]# systemctl restart php-fpm
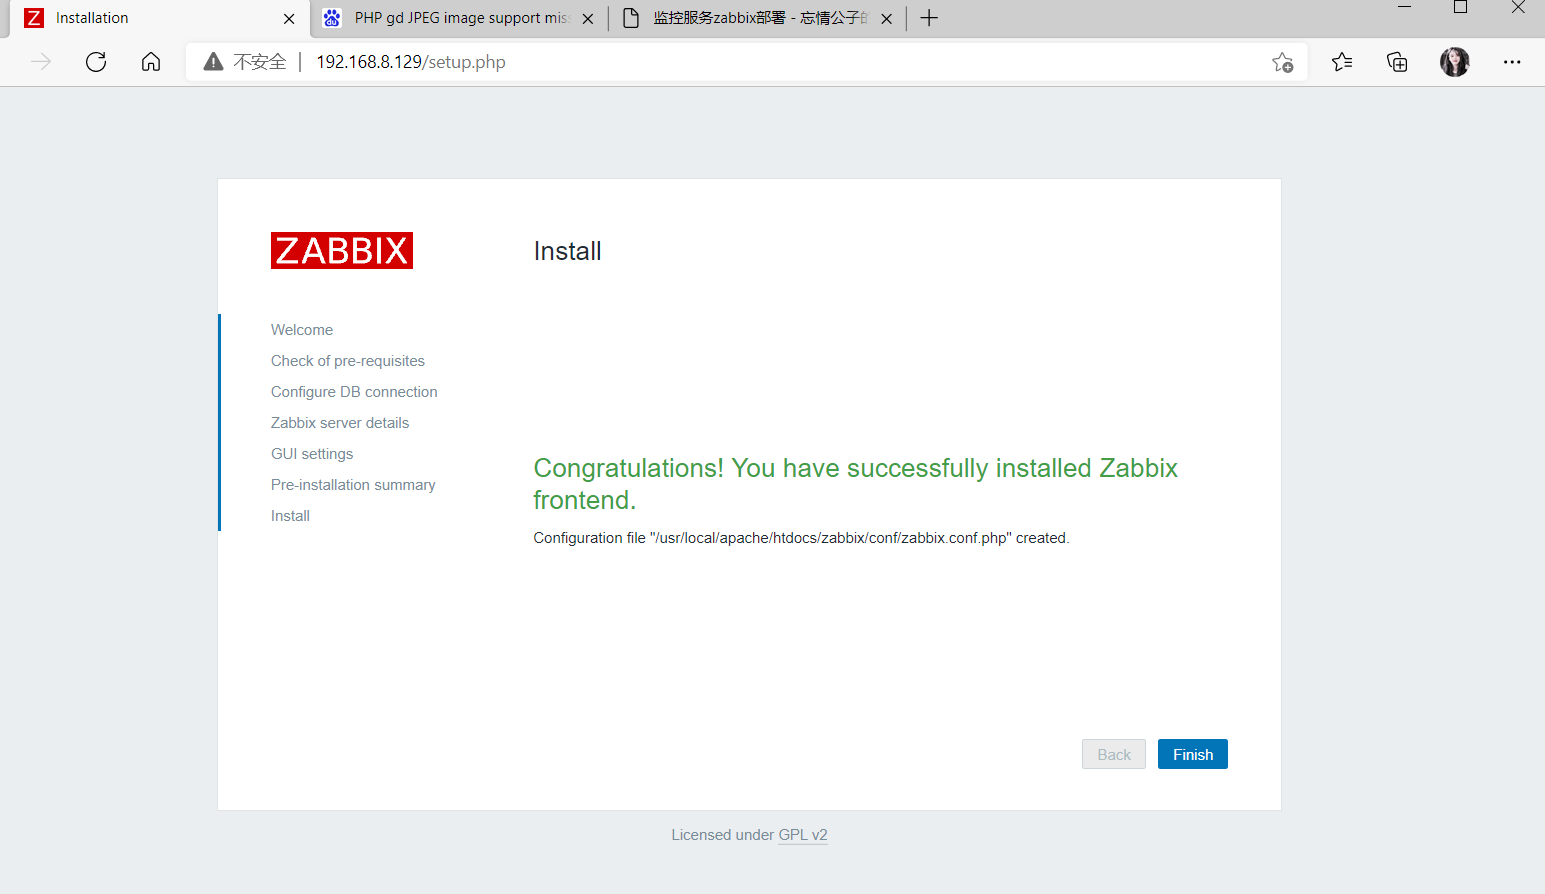
4.7 installing zabbix web interface
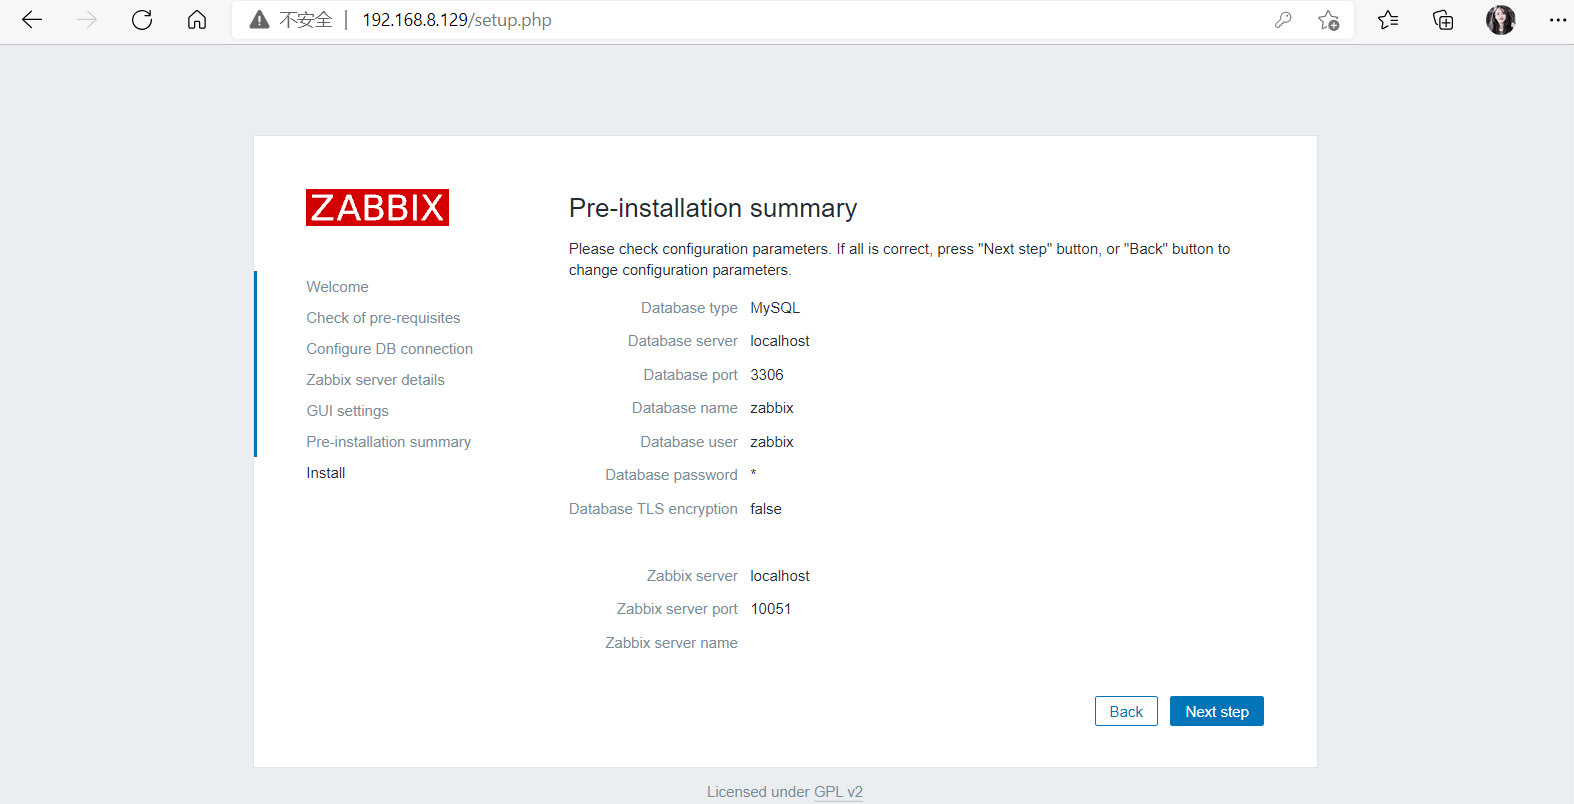
//Modify permissions
[root@server php-7.2.24]# chown -R apache.apache /usr/local/apache/htdocs/zabbix
[root@server php-7.2.24]# chmod 777 /usr/local/apache/htdocs/zabbix/conf/
[root@server php-7.2.24]# ll -d /usr/local/apache/htdocs/zabbix/conf
drwxrwxrwx 3 apache apache 94 9 June 26-20:47 /usr/local/apache/htdocs/zabbix/conf
[root@server php-7.2.24]#
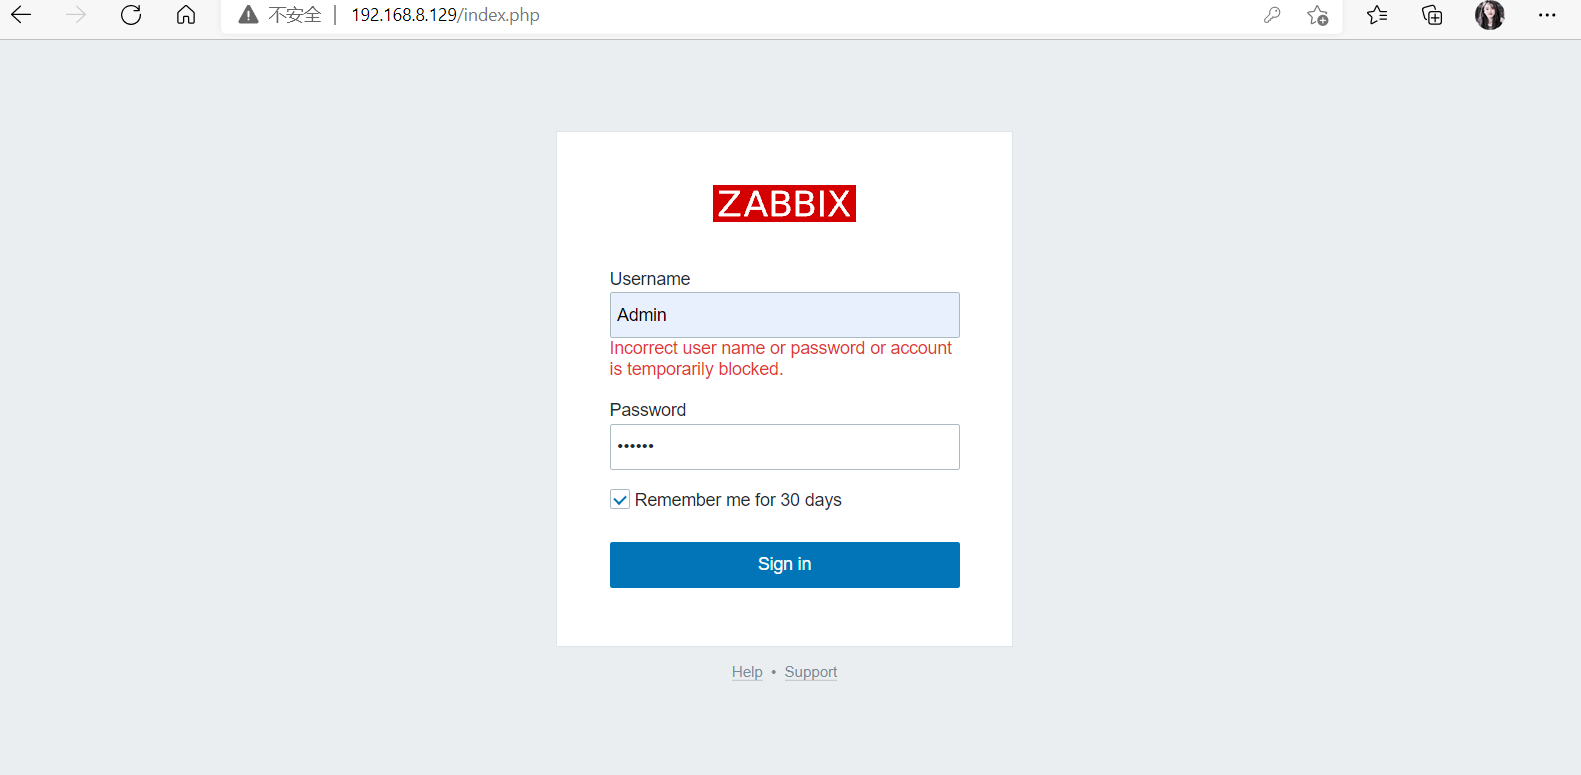
zabbix default login user name: Admin, password: zabbix
The permission to restore the zabbix/conf directory is 755:
[root@server ~]# chmod 755 /usr/local/apache/htdocs/zabbix/conf
[root@server ~]# ll -d /usr/local/apache/htdocs/zabbix/conf
drwxr-xr-x 3 apache apache 117 9 June 26-21:35 /usr/local/apache/htdocs/zabbix/conf
[root@server ~]#