1, Introduction
This is a new series. In this series, I will study and study Canvas with you through a series of practical cases, so as to master the ability to write Canvas special effects.
HTML5 canvas element is used for drawing graphics, which is completed by scripts (usually JavaScript).
The canvas tag is just a graphics container, and you must use scripts to draw graphics.
You can use canvas to draw paths, boxes, circles, characters and add images in many ways.
This is an example that pays attention to practical cases. I hope to take you to learn the technology of Canvas through specific cases rather than abstract documents and explanations. So, without much nonsense, let's look at this case directly.
2, Case introduction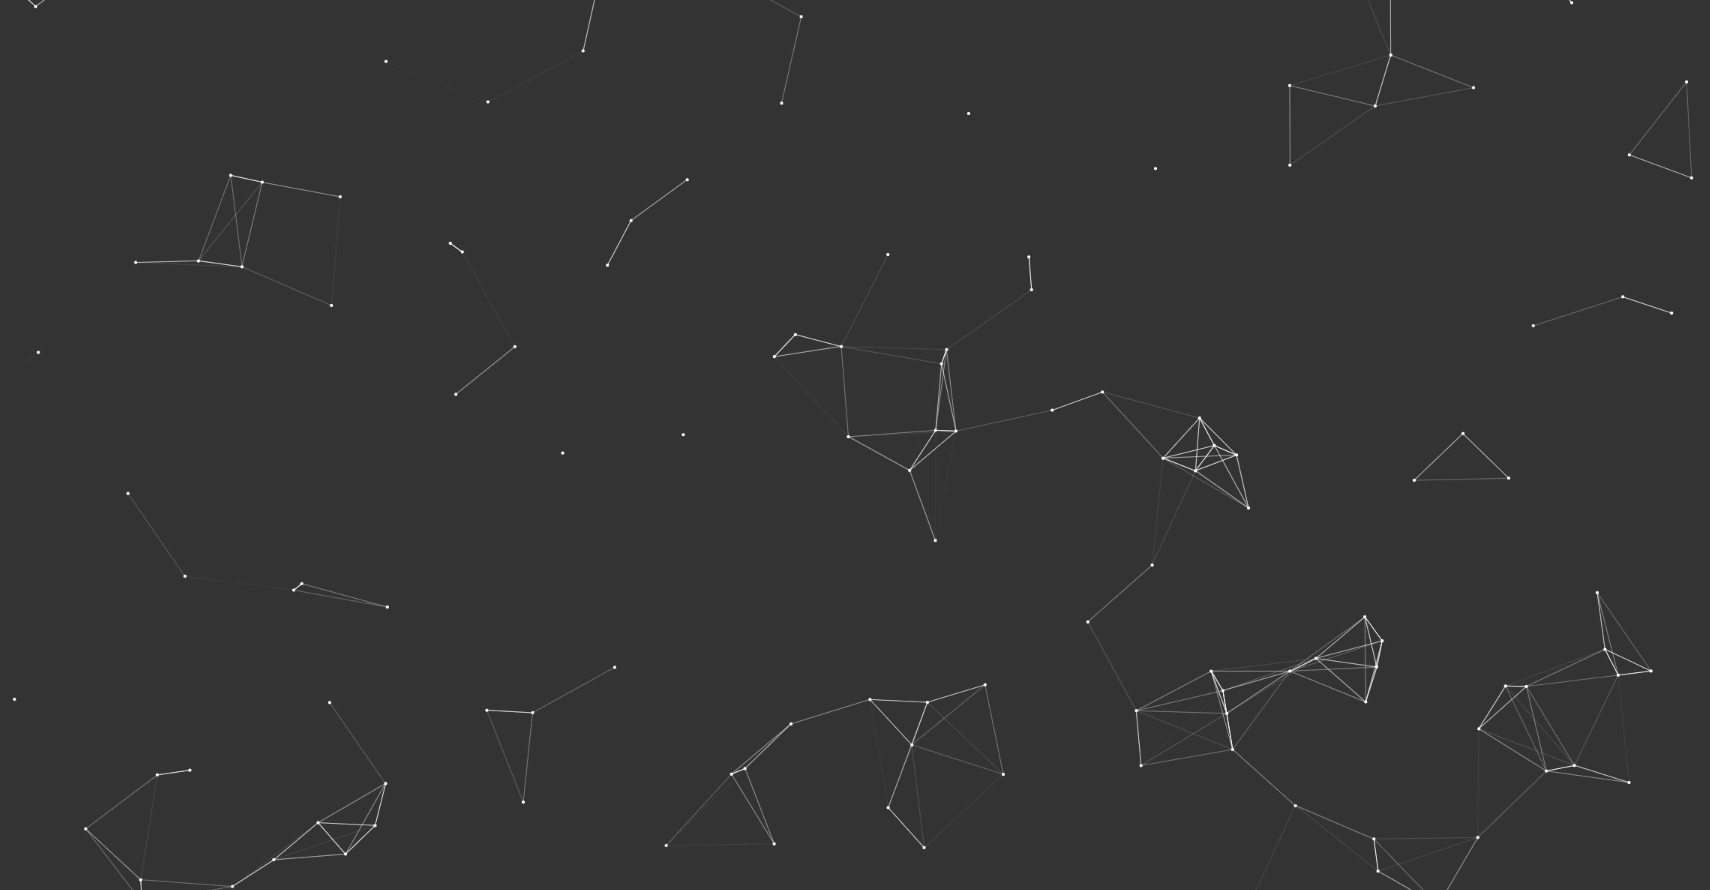
This is a very common background effect on many Blog websites. On the open canvas, there are many random moving points. If these points are close enough, they will produce a connection. When the mouse moves in, lines will also be created for the surrounding points, and the points connected to the mouse will be pulled by the mouse.
We can easily divide this case into three implementation stages from easy to difficult:
- Simple effect: complete the free movement of points and the automatic generation of connecting lines.
- Complex effect: when the mouse moves in, complete the connection between the mouse and the surrounding points.
- Final effect: when the mouse moves, the points connected to the mouse are pulled.
After learning this article, I suggest you master it at least to the second stage. Whether the final effect can be mastered depends on whether you are interested.
3, Progressive realization
1. File creation
First, create an html file:
<!DOCTYPE html>
<html lang="cn">
<head>
    <meta charset="UTF-8">
    <meta http-equiv="X-UA-Compatible" content="IE=edge">
    <meta name="viewport" content="width=device-width, initial-scale=1.0">
    <link rel="stylesheet" href="style.css">
    <script src="script.js" defer></script>
    <title>Document</title>
</head>
<body>
    <canvas id="canvas"></canvas>
</body>
</html>
At the same time, create the corresponding CSS file:
*{
    margin: 0;
    padding: 0;
}

body{
    background-color: #333;
    overflow: hidden;
}

#canvas{
    position:fixed;
    left:0;
    top:0;
}
Finally, create a js file. Next, we will edit it in the js file.
2. Realization of simple effect
Because this is the first issue of this series, I will talk about the method calls of Canvas in more detail.
First, we need to create a canvas object.
var canvas = document.getElementById("canvas");
canvas.width = window.innerWidth;
canvas.height = window.innerHeight;
var ctx = canvas.getContext("2d");
First, we need to find the Canvas object, and then set the width and height for the Canvas object.
Next, we need to get the context object of Canvas. getContext("2d") object is a built-in HTML5 object, which has a variety of drawing paths, rectangles, circles, characters and methods to add images. When drawing, we need to call its properties and methods.
var particles = []
var count = parseInt(canvas.height/150*canvas.width/150);
var maxDis = 150;
Next, we create an array of particles to store all particle objects, then specify the number of particles to be one per 150 * 150 pixels, and finally define that the maximum distance between lines is 150 pixels.
After completing the above series of preparatory actions, we need to design a Particle class.
class Particle{
    constructor(x,y) {
        this.x = x;
        this.y = y;
        this.directionY = 0.5 - Math.random();
        this.directionX = 0.5 - Math.random();
    }
}
We first define the construction method of the Particle class, which defines the position x and y, and the velocity variables directionX and directionY.
Next, we need to design an update method to update the next state of particles:
    update() {
        this.x += this.directionX;
        this.y += this.directionY;
    }
Finally, we need to design a draw method for the particle object. The canvas method is directly called in the draw function to draw particles on the view:
    draw() {
        ctx.beginPath();
        ctx.arc(this.x,this.y,2,0,Math.PI*2);
        ctx.fillStyle = "white";
        ctx.fill();
    }
In this method, we use the context object we got at the beginning, and use the attributes and methods on this object to draw particles. When painting particles, we first call ctx.beginPath(); Indicates to start drawing, and then call ctx.arc(this.x,this.y,2,0,Math.PI*2); Draw a circle with a radius of 2 at the position of the particle, and finally use ctx.stroke(); Indicates the end of the drawing.
To draw a circle in canvas, we will use the following method:
arc(x,y,r,start,stop)
Through the above methods, we have completed the definition of Particle class. The complete code is as follows:
class Particle{
    constructor(x,y) {
        this.x = x;
        this.y = y;
        this.directionY = 0.5 - Math.random();
        this.directionX = 0.5 - Math.random();
    }
    update() {
        this.x += this.directionX;
        this.y += this.directionY;
    }
    draw() {
        ctx.beginPath();
        ctx.arc(this.x,this.y,2,0,Math.PI*2);
        ctx.fillStyle = "white";
        ctx.fill();
    }
}
Next, we need to implement a method to create particles:
function createParticle(){
    let x = Math.random() * canvas.width;
    let y = Math.random() * canvas.height;
    particles.push(new Particle(x, y));
}
Every time we create a particle, we put the particle into our particles array.
Next, we implement a method to process particles:
function handleParticle(){
    particles.forEach((element,index) => {
        element.update();
        element.draw();
        if(element.x < 0 || element.x > canvas.width){
            element.directionX = - element.directionX;
        }
        if(element.y < 0 || element.y > canvas.height) {
            element.directionY = - element.directionY;
        }
        particles.forEach((aElement,index) => {
    		distance = Math.sqrt( Math.pow(element.x - aElement.x,2) + Math.pow(element.y - aElement.y,2) );
    		if(distance < maxDis) {
        		ctx.beginPath();
        		ctx.strokeStyle = "rgba(255,255,255," + (1 - distance / maxDis) + ")";
        		ctx.moveTo(element.x,element.y);
        		ctx.lineTo(aElement.x,aElement.y);
        		ctx.lineWidth = 1;
        		ctx.stroke();
    		}
		})
    });
}
In the particle processing function, we traverse each particle through the forEach function, and then call the update method and draw method of the particle respectively to update the state of the particle and draw the particle. Then check that if the particle exceeds the boundary of the canvas element, it bounces back by changing its velocity direction.
After that, we need to perform another internal traversal to check the distance between the current particle and other particles. If the distance is less than maxDis, draw the line segment between particles. The transparency of the drawn color can be set to be related to the distance. The drawing method is similar to the draw function above, so I won't be verbose here.
Finally, we call a timer to complete the dynamic effect of particles:
function draw(){
    ctx.clearRect(0,0,canvas.width,canvas.height);
    //Empty canvas content
    if(particles.length < count) {
        createParticle();
    }
    handleParticle();
}

setInterval(draw,10);
So far, we have completed the simple effect, that is, the free movement of the completion point and the automatic generation of the connection. This is the complete code to achieve a simple effect:
var canvas = document.getElementById("canvas");
canvas.width = window.innerWidth;
canvas.height = window.innerHeight;
var ctx = canvas.getContext("2d");
var particles = []
var count = parseInt(canvas.height/150*canvas.width/150);
var maxDis = 150;

class Particle{
    constructor(x,y) {
        this.x = x;
        this.y = y;
        this.directionY = 0.5 - Math.random();
        this.directionX = 0.5 - Math.random();
    }
    update() {
        this.x += this.directionX;
        this.y += this.directionY;
    }
    draw() {
        ctx.beginPath();
        ctx.arc(this.x,this.y,2,0,Math.PI*2);
        ctx.fillStyle = "white";
        ctx.fill();
    }
}

function createParticle(){
    let x = Math.random() * canvas.width;
    let y = Math.random() * canvas.height;
    particles.push(new Particle(x, y));
}

function handleParticle(){
    particles.forEach((element,index) => {
        element.update();
        element.draw();
        if(element.x < 0 || element.x > canvas.width){
            element.directionX = - element.directionX;
        }
        if(element.y < 0 || element.y > canvas.height) {
            element.directionY = - element.directionY;
        }
        particles.forEach((aElement,index) => {
            distance = Math.sqrt( Math.pow(element.x - aElement.x,2) + Math.pow(element.y - aElement.y,2) );
            if(distance < maxDis) {
                ctx.beginPath();
                ctx.strokeStyle = "rgba(255,255,255," + (1 - distance / maxDis) + ")";
                ctx.moveTo(element.x,element.y);
                ctx.lineTo(aElement.x,aElement.y);
                ctx.lineWidth = 1;
                ctx.stroke();
            }
        })
    });
}

function draw(){
    ctx.clearRect(0,0,canvas.width,canvas.height);
    if(particles.length < count) {
        createParticle();
    }
    handleParticle();
}

setInterval(draw,10);
3. Realization of complex effects
After realizing the simple effect, next, we will demonstrate how to realize the more complex effect, that is, when the mouse is moved in, complete the connection between the mouse and the surrounding points.
In fact, this function is not difficult. The most important thing in implementation is to obtain the current mouse position.
Here, we choose to use the global variables mouseX and mouseY to save the mouse information. At the same time, set a maximum mouse capture distance maxMouseDis.
var mouseX = -1,mouseY = -1;
var maxMouseDis = 250;
At the same time, by adding the following mouse events to the canvas object,
canvas.addEventListener("mousemove",function(e) {
    mouseX = e.clientX;
    mouseY = e.clientY;
})
canvas.addEventListener("mouseout",function(){
    mouseX = -1;
    mouseY = -1;
})
When the mouse moves over the canvas element, the mouse position will be updated in real time. Once the mouse moves out of the canvas element, we will set mouseX and mouseY to - 1 as markers.
After adding mouse events, we also need to design a mouse processing function:
function handleMouse(){
    if(mouseX == -1 || mouseY == -1) return;
    particles.forEach((element,index) => {
        let distance = Math.sqrt( Math.pow(element.x - mouseX,2) + Math.pow(element.y - mouseY,2) );
        if(distance < maxMouseDis) {
            ctx.beginPath();
            ctx.strokeStyle = "rgba(255,255,255," + (1 - distance / maxMouseDis) + ")";
            ctx.moveTo(element.x,element.y);
            ctx.lineTo(mouseX,mouseY);
            ctx.lineWidth = 1;
            ctx.stroke();
        }
    })
}
In the handleMouse function, we need to traverse all particles. Once the distance between the mouse and particles is less than the set maxMouseDis, we will start connecting. The connecting method is the same as that in the handleParticle above.
Finally, don't forget to add handleMouse to the timer function draw:
function draw(){
    ctx.clearRect(0,0,canvas.width,canvas.height);
    if(particles.length < count) {
        createParticle();
    }
    handleParticle();
    handleMouse();
}
Through the above series of operations, we have completed the complex effect, that is, when the mouse moves in, we complete the connection between the mouse and the surrounding points. This is the complete code:
var canvas = document.getElementById("canvas");
canvas.width = window.innerWidth;
canvas.height = window.innerHeight;
var ctx = canvas.getContext("2d");
var particles = []
var count = parseInt(canvas.height/150*canvas.width/150);
var maxDis = 150;
var maxMouseDis = 250;
var mouseX = -1,mouseY = -1;

class Particle{
    constructor(x,y) {
        this.x = x;
        this.y = y;
        this.directionY = 0.5 - Math.random();
        this.directionX = 0.5 - Math.random();
    }
    update() {
        this.x += this.directionX;
        this.y += this.directionY;
    }
    draw() {
        ctx.beginPath();
        ctx.arc(this.x,this.y,2,0,Math.PI*2);
        ctx.fillStyle = "white";
        ctx.fill();
    }
}

function createParticle(){
    let x = Math.random() * canvas.width;
    let y = Math.random() * canvas.height;
    particles.push(new Particle(x, y));
}

function handleParticle(){
    particles.forEach((element,index) => {
        element.update();
        element.draw();
        if(element.x < 0 || element.x > canvas.width){
            element.directionX = - element.directionX;
        }
        if(element.y < 0 || element.y > canvas.height) {
            element.directionY = - element.directionY;
        }
        particles.forEach((aElement,index) => {
            distance = Math.sqrt( Math.pow(element.x - aElement.x,2) + Math.pow(element.y - aElement.y,2) );
            if(distance < maxDis) {
                ctx.beginPath();
                ctx.strokeStyle = "rgba(255,255,255," + (1 - distance / maxDis) + ")";
                ctx.moveTo(element.x,element.y);
                ctx.lineTo(aElement.x,aElement.y);
                ctx.lineWidth = 1;
                ctx.stroke();
            }
        })
    });
}

function handleMouse(){
    if(mouseX == -1 || mouseY == -1) return;
    particles.forEach((element,index) => {
        let distance = Math.sqrt( Math.pow(element.x - mouseX,2) + Math.pow(element.y - mouseY,2) );
        if(distance < maxMouseDis) {
            ctx.beginPath();
            ctx.strokeStyle = "rgba(255,255,255," + (1 - distance / maxMouseDis) + ")";
            ctx.moveTo(element.x,element.y);
            ctx.lineTo(mouseX,mouseY);
            ctx.lineWidth = 1;
            ctx.stroke();
        }
    })
}

function draw(){
    ctx.clearRect(0,0,canvas.width,canvas.height);
    if(particles.length < count) {
        createParticle();
    }
    handleParticle();
    handleMouse();
}

setInterval(draw,10);

canvas.addEventListener("mousemove",function(e) {
    mouseX = e.clientX;
    mouseY = e.clientY;
})

canvas.addEventListener("mouseout",function(){
    mouseX = -1;
    mouseY = -1;
})
4. Realization of final effect
The final effect is that when the mouse moves, the points connected with the mouse are pulled. It sounds a little difficult, but in fact, you only need to write in the handleMouse function. Insert the code slice here
Consider this scenario: when the mouse moves into the Canvas element, the particles adjacent to it will form a connection with the mouse. You can consider the connection as an elastic rope. But because the wire itself has no force, the particle will continue to move in its original direction. Until the distance between the particle and the mouse is greater than a certain value, the particle will be pulled by the line, so it will be subjected to a force in the direction of the line in an instant, and the moving speed of the particle will also change.
Therefore, we stipulate that the connection is not elastic within maxMouseDis / 3 * 2, and it is elastic between maxMouseDis / 3 * 2 and maxMouseDis, which will pull the particles towards the mouse.
Therefore, we need to add the following code snippet in handleMouse:
let velocity = Math.sqrt( Math.pow(element.directionX,2) + Math.pow(element.directionY,2) );
if(distance > maxMouseDis / 3 * 2) {
     element.directionX = - velocity * (element.x - mouseX) / distance * 1;
     element.directionY = - velocity * (element.y - mouseY) / distance * 1;
}
When the traction condition is reached, we keep the particle's speed unchanged and change its speed direction to the direction towards the mouse.
After such a modification, the effect that particles are captured and dragged by the mouse has been realized.
But this effect makes people feel unreal. Because it only changes the direction of the original speed of the particles, when the mouse moves, it is impossible to achieve the effect that the particles are pulled by the mouse. Therefore, it can also be optimized as follows:
var maxVelocity = 0.6;
var lastMouseX = -1,lastMouseY = -1;
var mouseVelocity = 0;
First, add three global variables: maximum particle speed, mouse position at the last moment and mouse moving speed.
    if(lastMouseX == -1 || lastMouseY == -1) {
        mouseVelocity = 0;
    } else {
        mouseVelocity = Math.sqrt( Math.pow(lastMouseX - mouseX,2) + Math.pow(lastMouseY - mouseY,2) )
    }
    lastMouseX = mouseX;
    lastMouseY = mouseY;
Then, in the event listener of mouse movement, add the above code to get the current mouse movement speed.
if(distance > maxMouseDis / 3 * 2) {
       element.directionX = - Math.min(Math.max(mouseVelocity,velocity),maxVelocity) * (element.x - mouseX) / distance * 1;
       element.directionY = - Math.min(Math.max(mouseVelocity,velocity),maxVelocity) * (element.y - mouseY) / distance * 1;
}
Finally, in the handleMouse function, the traction effect is improved through the above code. The particle speed during traction will be the larger of the mouse speed and the particle speed, but it cannot exceed the predetermined maximum speed.
Through the above series of modifications, we have completed the final effect. This is the complete code:
var canvas = document.getElementById("canvas");
canvas.width = window.innerWidth;
canvas.height = window.innerHeight;
var ctx = canvas.getContext("2d");
var particles = []
var count = parseInt(canvas.height/150*canvas.width/150);
var maxDis = 150;
var maxMouseDis = 250;
var maxVelocity = 0.6;
var mouseX = -1,mouseY = -1;
var lastMouseX = -1,lastMouseY = -1;
var mouseVelocity = 0;

class Particle{
    constructor(x,y) {
        this.x = x;
        this.y = y;
        this.directionY = 0.5 - Math.random();
        this.directionX = 0.5 - Math.random();
    }
    update() {
        this.x += this.directionX;
        this.y += this.directionY;
    }
    draw() {
        ctx.beginPath();
        ctx.arc(this.x,this.y,2,0,Math.PI*2);
        ctx.fillStyle = "white";
        ctx.fill();
    }
}

function createParticle(){
    let x = Math.random() * canvas.width;
    let y = Math.random() * canvas.height;
    particles.push(new Particle(x, y));
}

function handleParticle(){
    particles.forEach((element,index) => {
        element.update();
        element.draw();
        if(element.x < 0 || element.x > canvas.width){
            element.directionX = - element.directionX;
        }
        if(element.y < 0 || element.y > canvas.height) {
            element.directionY = - element.directionY;
        }
        particles.forEach((aElement,index) => {
            distance = Math.sqrt( Math.pow(element.x - aElement.x,2) + Math.pow(element.y - aElement.y,2) );
            if(distance < maxDis) {
                ctx.beginPath();
                ctx.strokeStyle = "rgba(255,255,255," + (1 - distance / maxDis) + ")";
                ctx.moveTo(element.x,element.y);
                ctx.lineTo(aElement.x,aElement.y);
                ctx.lineWidth = 1;
                ctx.stroke();
            }
        })
    });
}

function handleMouse(){
    if(mouseX == -1 || mouseY == -1) return;
    particles.forEach((element,index) => {
        let distance = Math.sqrt( Math.pow(element.x - mouseX,2) + Math.pow(element.y - mouseY,2) );
        if(distance < maxMouseDis) {
            ctx.beginPath();
            ctx.strokeStyle = "rgba(255,255,255," + (1 - distance / maxMouseDis) + ")";
            ctx.moveTo(element.x,element.y);
            ctx.lineTo(mouseX,mouseY);
            ctx.lineWidth = 1;
            ctx.stroke();

            let velocity = Math.sqrt( Math.pow(element.directionX,2) + Math.pow(element.directionY,2) );
            if(distance > maxMouseDis / 3 * 2) {
                element.directionX = - Math.min(Math.max(mouseVelocity,velocity),maxVelocity) * (element.x - mouseX) / distance * 1;
                element.directionY = - Math.min(Math.max(mouseVelocity,velocity),maxVelocity) * (element.y - mouseY) / distance * 1;
            }
        }
    })
}

function draw(){
    ctx.clearRect(0,0,canvas.width,canvas.height);
    if(particles.length < count) {
        createParticle();
    }
    handleParticle();
    handleMouse();
}

setInterval(draw,10);

canvas.addEventListener("mousemove",function(e) {
    mouseX = e.clientX;
    mouseY = e.clientY;
    if(lastMouseX == -1 || lastMouseY == -1) {
        mouseVelocity = 0;
    } else {
        mouseVelocity = Math.sqrt( Math.pow(lastMouseX - mouseX,2) + Math.pow(lastMouseY - mouseY,2) )
    }
    lastMouseX = mouseX;
    lastMouseY = mouseY;
})

canvas.addEventListener("mouseout",function(){
    mouseX = -1;
    mouseY = -1;
})
4, Simple summary
This time, we realized the particle background effect. Also learned about the power of Canvas.
To realize continuous animation with Canvas, the following ideas are often referred to:
A timer is used to complete the corresponding clearing Canvas, updating element status and redrawing every moment. Through such repeated calculation and rendering, continuous Canvas dynamic effect can be realized.
I believe that through this period of teaching, you have mastered the general usage of Canvas. It is suggested to strike while the iron is hot and try it yourself!
This series will continue to be updated. In the next issue, I will continue to study the front-end special effects of Canvas with you with the help of practical cases, and update them on time every Saturday. Welcome to this column!