Introduction to MVVM mode
MVVM pattern is composed of View layer, ViewModel layer and Model layer.
The View layer controls the layout and appearance
The Model layer is to obtain the business data Model
ViewModel is responsible for processing business logic and data in View
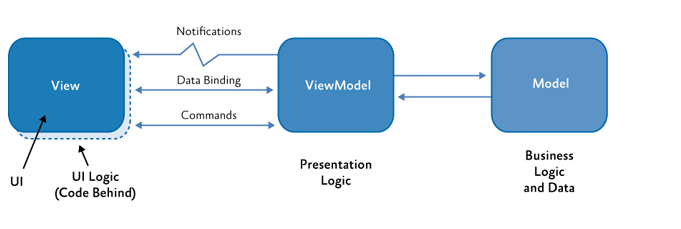
In MVVM mode, we no longer need to use findviewbyid and other methods to set the content for the specific view. Instead, we use the DataBinding tool to bind the data and view Bi directionally with ViewModel as the bridge. When either party changes, the other party will also change.
JAVA instance:
Let's make a simple data display
First, you need to introduce:
In the module's build Introducing DataBinding into gradle file
android {
	...
	// Add DataBinding dependency
	dataBinding{
	    enabled = true
	}
)
Then define our entity class JAVABean
There are two ways:
Method 1 original format get/set
public class JAVABean{
private String  test;

public void setTest(String test){
this.test=test;
}
public String getTest(){
return test;
}

Method 2: define the data into ObservableField<>()
public class JAVABean{
public ObservableField<String> test =new ObservableField<>();
}
}
The second is personal preference. The code redundancy brought by the first is not acceptable to me.
The creation of an activity is omitted here (temporarily named MainActivity for convenience later)
Define layout (the standard definition root layout in databinding is layout, which contains a data node and a layout node (the same as normal layout))
It should be noted here that for convenience, I have written some bindings in the layout. In practice, I can create the viewmodel first and then bind it. It depends on my personal habits.
<?xml version="1.0" encoding="utf-8"?>
<layout xmlns:android="http://schemas.android.com/apk/res/android">

    <!--Define the data name and type that the layout needs to bind-->
    <data>
        <variable
            name="TestViewModel"
            type="****.TestViewModel" />
    </data>

    <!-- The following part is the same as the usual layout file -->
    <LinearLayout
        android:layout_width="match_parent"
        android:layout_height="match_parent"
        android:orientation="vertical">
        <TextView
        android:layout_heigh="wrap_content"
        android:layout_width="match_parent"
        android:layout_margin="20dp"
        android:text="@={TestViewModel.javabean.test}"

        <EditText
            android:layout_width="match_parent"
            android:layout_height="wrap_content"
            android:layout_margin="20dp"
            android:hint="Please enter the content"
            android:text="@={TestViewModel.javabean.test}" />

        <Button
            android:layout_width="wrap_content"
            android:layout_height="wrap_content"
            android:layout_gravity="center_horizontal"
            android:onClick="@{TestViewModel.setClickListener}"
            android:text="change text Medium content" />
		<Button
            android:layout_width="wrap_content"
            android:layout_height="wrap_content"
            android:layout_gravity="center_horizontal"
            android:onClick="@{TestViewModel.getClickListener}"
            android:text="obtain Edit Medium content" />

    </LinearLayout>
</layout>
Then create TestViewModelest
Bind databinding to viewmodel in viewmodel, and then write some methods and data classes previously bound to view
It should be noted that the method name bound in the layout must be the same as the method name written in the view, otherwise an error will occur!
public class TestViewModel{
public JAVABean javabean;

public TestViewModel(ActivityMainBinding binding){
javabean = new JAVABean;
binding.setTestViewModel(this);
}
public View.OnClickListener setClickListener =new View.OnClickListener(){
@Override
public void onClick(View v){
javabean.test.set("test A");
}
}

public View.OnClickListener getClickListener(){
@Override
public void onClick(View v){
Log.d("test",javabean.test.get())
}
}
}
Finally, the binding in Activity:
public class MainActivity extends AppCompatActivity {

    @Override
    protected void onCreate(Bundle savedInstanceState) {
        super.onCreate(savedInstanceState);
        ActivityMainBinding binding = DataBindingUtil.setContentView(this, R.layout.activity_main);
        new TestViewModel(binding);
    }
}
Because it is modified on the basis of drawing lessons from some other people's codes, I did not compile this set of codes. Errors may occur due to pure hand typing. I hope you can help me correct it, brothers
Here is the reference address
MVVM realizes bidirectional data binding
Because we are studying Kotlin and JetPack, here are some problems that may be encountered in mvvm architecture
1. In kotlin, we can avoid complicated set/get when we write entity classes
2. In the scenario of replacing ObservableField with livedata for Data Binding, we need to set lifecycleOwer for binding during initialization
binding.lifecyclerOwer=this
Write a detailed one to others for your brothers' reference
Android uses LiveData to replace ObservableField for Data Binding
Finally, once again: This article is a technology accumulation article, and there may be errors. If there are errors, please correct them. Thank you!
Some picture References: MVVM development mode of Android