1, Create your own database
Download and install MySQL
1.windows Download: http://dev.mysql.com/downloads/mysql/
2. Open the server: enter the bin directory of the download path in the terminal (cmd), and execute mysqld -- initialize executor to start the server and initialize, but an error will be reported. The reason is that there is no data folder in your directory. At this time, you need to create a new data folder, and then execute it again, and it will succeed. You will find that there are many files in your data folder ;
3. Client connection: enter the command through the terminal: MySQL - U root - P, that is, log on to the root user (need to enter the password), the root user is empty by default, and you can enter the sql statement after connecting;
4. To avoid having to enter the bin directory every time you start the service, you can add the bin directory to the environment variable path, so that you can input mysqld to start the server in any directory terminal; 5. You can also make mysql server into a Windows service by inputting mysqld --install in the bin directory; net start mysql and other commands are to start and stop mysql service in the already made windows service in the terminal; you can also open and close the server in Task Manager -- service;
Create your own database
After connecting to mysql server, operate in terminal cmd:
create database mydb;
    -- Created a name for mydb Database of;
show databases;
    -- Check all your databases;
Create table
In order to make our database have some data, let's create a student table
create table student(
    nid int not null auto_increment PRIMARY key,
    name varchar(10),
    age int DEFAULT 18
)engine = innodb DEFAULT charset = utf8
    -- Created a student surface
More database statement operations
View blog: https://www.cnblogs.com/luyi001/p/12803398.html
2, Download driver package
Download path: https://mvnrepository.com/artifact/mysql/mysql-connector-java Note: the version downloaded here should be the same as the version of mysql we installed. Check your mysql statement:
select version() from dual;
My version is 8.0.17, so I downloaded mysql-connector-java-8.0.17
3, Let our MyEclipse see our database
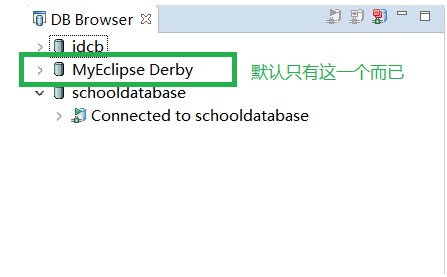
1. Open our MyEclipse -- "Window --" show View -- "Other --" DB Browser -- "double click it, and the following screen will appear:
2. Then a new database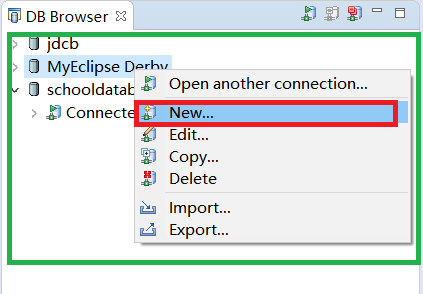
3. After new, such a screen will appear and operate according to the prompts in the figure
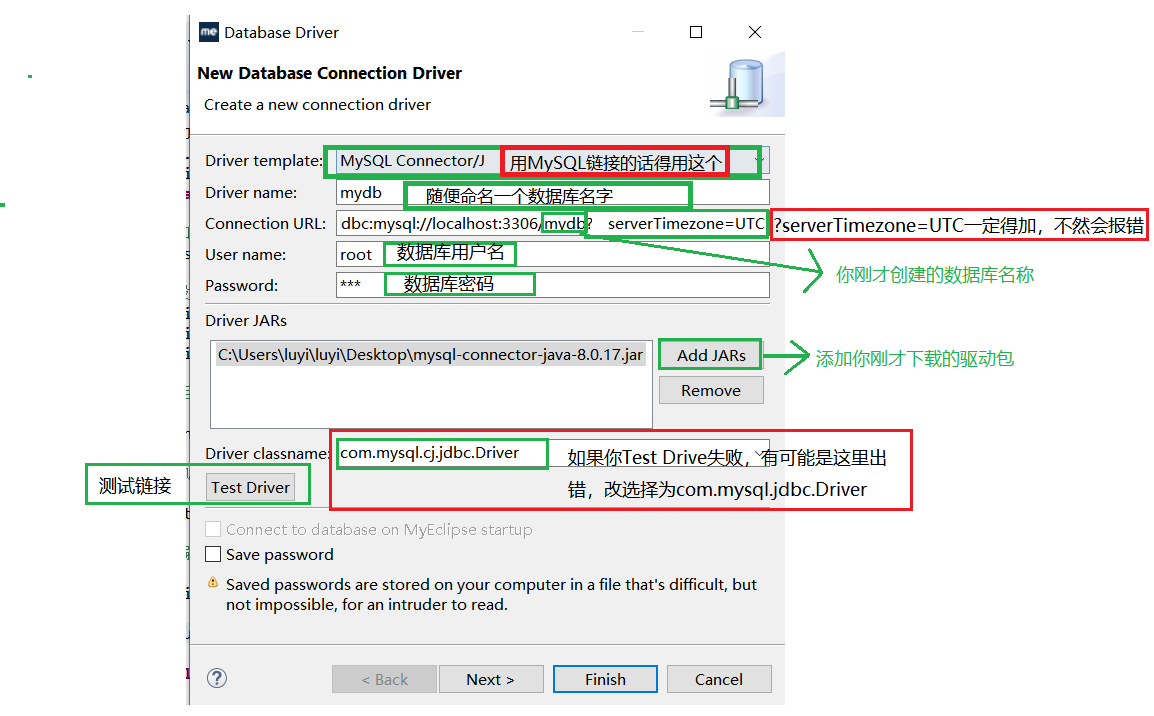
Connection URL Code inside:
jdbc:mysql://localhost:3306/mydb?serverTimezone=UTC
4. If you press Test Driver to test successfully, you can press Finish. Note that you need to enter your database password during the test;
After the test is successful, you will see:

5. When you click Finish, you will see your new database. Double click your database, you will be linked to the database, and then you will see the tables in your database

4, Create your own first JDBC
Let's finally get to the point, come on!!
1. First, you need to create a new Web Project in MyEclipse
2. Then perform the following operations:
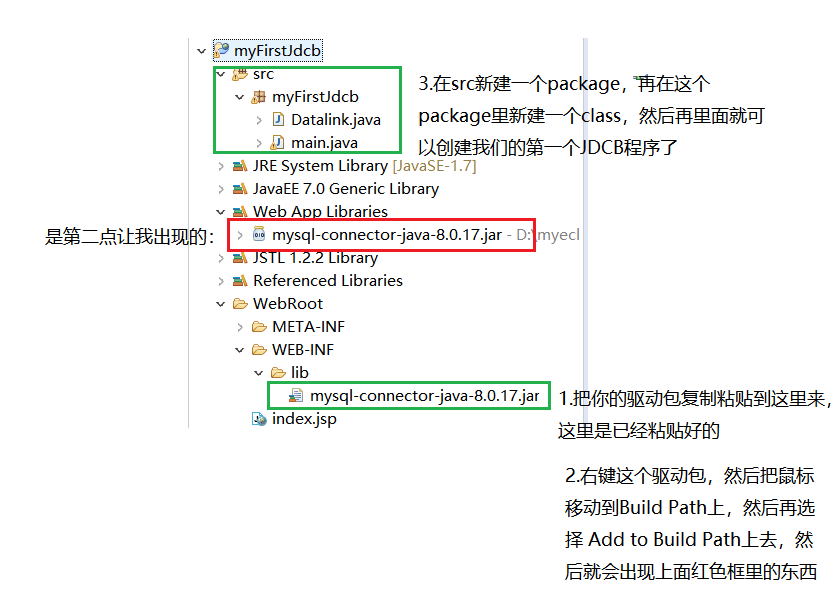
3. After execution, you can enter the following code in the java file you just created:
package myFirstJdcb;
import java.sql.*;
public class main {
  public static void main(String[] args) throws Exception {
    //Load driver
    Class.forName("com.mysql.jdbc.Driver");

    //Set database information
    String url = "jdbc:mysql://localhost:3306/mydb?useUnicode=true&characterEncoding=utf-8&serverTimezone=UTC";
    String username = "root";
    String password = "Your database password";

    //Connect to database

    Connection connection = DriverManager.getConnection(url, username, password);

    //Execute database object

    Statement statement = connection.createStatement();

    //Writing sql statements

    String sql = "select * from student";

    ResultSet resultSet = statement.executeQuery(sql);

    while (resultSet.next()){
        System.out.println(resultSet.getObject("nid"));
        System.out.println(resultSet.getObject("name"));
        System.out.println(resultSet.getObject("age"));

    }
    //Release resources
    resultSet.close();
    statement.close();
    connection.close();

}
}
//Code source: https://blog.csdn.net/weixin_44834291/article/details/105892959
4. Done!!