1, Introduction
1. Characteristics
MyBatis is a semi-automatic ORM framework. MyBatis-Plus (MP for short) yes MyBatis On the basis of MyBatis, the enhancement tool is only enhanced without change, and is born to simplify development and improve efficiency. [tip] the version used in this article is 3.1.1
2. Characteristics
1) No invasion: only enhancement without change, and its introduction will not affect the existing project, which is as smooth as silk;
2) Low loss: the basic CURD will be injected automatically upon startup, with basically no loss of performance and direct object-oriented operation;
3) Powerful crud operation: built in general Mapper and general Service, most CRUD operations of a single table can be realized only through a small number of configurations, and there is a powerful condition constructor to meet various use needs;
4) Support Lambda form call: through Lambda expression, it is convenient to write various query conditions without worrying about wrong fields;
5) Support multiple databases: support MySQL, MariaDB, Oracle, DB2, H2, HSQL, SQLite, Postgre, SQLServer2005, QLServer and other databases;
6) Support automatic generation of primary key: support up to 4 kinds of primary key strategies (including distributed unique ID generator - Sequence), which can be configured freely to perfectly solve the problem of primary key;
7) Support XML hot loading: Mapper's corresponding XML supports hot loading. For simple CRUD operations, it can even be started without XML, but the latest version has been removed;
8) Support ActiveRecord mode: support ActiveRecord formal calls. Entity classes only need to inherit Model classes to perform powerful CRUD operations. ActiveRecord is mainly a data access design pattern, which can realize the mapping of data objects to relational databases.
9) Support custom global general operations: support global general method injection, Write once, use anywhere;
10) Support keyword automatic escape: support automatic escape of database keywords (order, key...), and customize keywords;
11) Built in code generator: code or Maven plug-in can be used to quickly generate Mapper, Model, Service and Controller layer code, support template engine, and have more custom configurations for you to use;
12) Built in paging plug-in: Based on MyBatis physical paging, developers do not need to care about specific operations. After configuring the plug-in, writing paging is equivalent to ordinary List query;
13) Built in performance analysis plug-in: it can output Sql statements and their execution time. It is recommended to enable this function during development and testing to quickly find out slow queries;
14) Built in global interception plug-in: it provides intelligent analysis and blocking of full table delete and update operations, and can also customize interception rules to prevent misoperation;
15) Built in Sql injection stripper: it supports Sql injection stripping and effectively prevents Sql injection attacks;
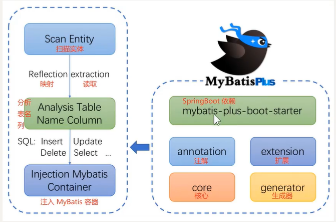
2, Frame structure
3, Basic development environment
- Based on Java development, JDK version 1.8 + is recommended.
- Spring Boot is required
- Maven needs to be used
- MySQL is required
1. Prepare data
- We need to prepare a user form
DROP TABLE IF EXISTS t_user;

CREATE TABLE t_user
(
	id BIGINT(20) NOT NULL COMMENT 'Primary key ID',
	name VARCHAR(30) NULL DEFAULT NULL COMMENT 'full name',
	age INT(11) NULL DEFAULT NULL COMMENT 'Age',
	email VARCHAR(50) NULL DEFAULT NULL COMMENT 'mailbox',
	PRIMARY KEY (id)
);
- Then give t_ Add some data to the user table
DELETE FROM t_user;

INSERT INTO t_user (id, name, age, email) VALUES
(1, 'Zhang San', 13, 'zhangsan@qq.com'),
(2, 'Li Si', 14, 'lisi@qq.com'),
(3, 'Wang Wu', 15, 'wangwu@qq.com'),
(4, 'Zhao Liu', 16, 'zhaoliu@qq.com'),
(5, 'Brother Zhong', 18, 'azhongxiaoge@qq.com');
2. Hello World
Our goal: through a few simple steps, we can achieve t_ The CRUD function of the user table does not even need to write XML files!
Step 1: create a Spring Boot project
Recommended, login https://start.spring.io Build and download a clean Spring Boot project.
Step 2: edit POM Add related dependencies to the XML file
<parent>
    <groupId>org.springframework.boot</groupId>
    <artifactId>spring-boot-starter-parent</artifactId>
    <version>2.1.4.RELEASE</version>
</parent>

<dependencies>
    <dependency>
        <groupId>org.springframework.boot</groupId>
        <artifactId>spring-boot-starter</artifactId>
    </dependency>
    <dependency>
        <groupId>org.springframework.boot</groupId>
        <artifactId>spring-boot-starter-web</artifactId>
    </dependency>
    <dependency>
        <groupId>org.springframework.boot</groupId>
        <artifactId>spring-boot-starter-test</artifactId>
        <scope>test</scope>
    </dependency>
    <dependency>
        <groupId>org.projectlombok</groupId>
        <artifactId>lombok</artifactId>
        <version>1.18.8</version>
        <scope>provided</scope>
    </dependency>
    <dependency>
        <groupId>com.baomidou</groupId>
        <artifactId>mybatis-plus-boot-starter</artifactId>
        <version>3.1.1</version>
    </dependency>
    <dependency>
        <groupId>com.h2database</groupId>
        <artifactId>h2</artifactId>
        <scope>runtime</scope>
    </dependency>
    <dependency>
        <groupId>com.alibaba</groupId>
        <artifactId>druid-spring-boot-starter</artifactId>
        <version>1.1.10</version>
    </dependency>
    <dependency>
        <groupId>mysql</groupId>
        <artifactId>mysql-connector-java</artifactId>
        <version>5.1.47</version>
    </dependency>
</dependencies>

<build>
    <plugins>
        <plugin>
            <groupId>org.springframework.boot</groupId>
            <artifactId>spring-boot-maven-plugin</artifactId>
        </plugin>
    </plugins>
</build>
[note] after introducing MyBatis plus, please do not introduce MyBatis and MyBatis spring again to avoid problems caused by version differences.
[in case of spring MVC project]
<dependency>
    <groupId>com.baomidou</groupId>
    <artifactId>mybatis-plus</artifactId>
    <version>3.1.1</version>
</dependency>
Step 3: configure application YML file
Edit application The YML configuration file is mainly used to add the related configuration of druid database:
# DataSource Config
spring:
  datasource:
    # druid data source is used here
    type: com.alibaba.druid.pool.DruidDataSource
    driver-class-name: com.mysql.jdbc.Driver
    url: jdbc:mysql://localhost:3306/test?allowMultiQueries=true&useUnicode=true&characterEncoding=UTF-8
    username: root
    password: root
    filters: stat
    maxActive: 20
    initialSize: 1
    maxWait: 60000
    minIdle: 1
    timeBetweenEvictionRunsMillis: 60000
    minEvictableIdleTimeMillis: 300000
    validationQuery: select 1 FROM DUAL
    testWhileIdle: true
    testOnBorrow: false
    testOnReturn: false
    poolPreparedStatements: true
    maxOpenPreparedStatements: 20
Add the @ MapperScan annotation in the Spring Boot startup class to scan the Mapper folder:
@SpringBootApplication
@MapperScan("com.learn.mapper")
public class Application {
    public static void main(String[] args) {
        SpringApplication.run(QuickStartApplication.class, args);
    }
}
[note] if it is a spring MVC project, you need to configure MapperScan in the < bean > tab.
<bean class="org.mybatis.spring.mapper.MapperScannerConfigurer">
    <property name="basePackage" value="com.learn.mapper"/>
</bean>
Then you can also adjust the SqlSessionFactory to the SqlSessionFactory of mybatis plus.
<bean id="sqlSessionFactory" class="com.baomidou.mybatisplus.extension.spring.MybatisSqlSessionFactoryBean">
    <property name="dataSource" ref="dataSource"/>
</bean>
Step 4: create the corresponding class
New User class:
@Data
public class User {
    private Long id;
    private String name;
    private Integer age;
    private String email;
}
[note] @ Data is an annotation provided by Lombok that can make the code more concise and reduce a lot of template code. On the class, the annotation provides read-write attributes for the class. In addition, it also provides equal (), hashCode(), toString() methods.
If it is used in Eclipse, we need to install it manually. Please refer to https://www.projectlombok.org/setup/eclipse
[reference: Lombok common notes]
@NonNull : Annotation on parameter, If this type of parameter is null , An exception will be reported,  throw new NullPointException(Parameter name)
@Cleanup : Comments before referencing variables, Auto recycle default call close() method
@Getter/@Setter : Annotation on class, Provide read and write properties for the class
@Getter(lazy=true) :
@ToString : Annotation on class, Provide for class toString() method
@EqualsAndHashCode : Annotation on class, Provide for class equals() and hashCode() method
@NoArgsConstructor, @RequiredArgsConstructor, @AllArgsConstructor : Annotation on class, Provide no parameters for class,You must specify a parameter, All parameter constructor
@Data : Annotation on class, Provide read and write properties for the class, It also provides equals(),hashCode(),toString() method
@Value :
@Builder : Annotation on class, Provide an internal for the class Builder
@SneakThrows :
@Synchronized : Annotation on method, Provide synchronization lock for method
@Log :
@Log4j : Annotation on class, Provide the class with a property named log of log4j Log object for
@Slf4j : Annotation on class, Provide the class with a property named log of log4j Log object for
Create a new UserMapper mapping interface class:
public interface UserMapper extends BaseMapper<User> {
}
Step 5: Test happily
New Test class
@RunWith(SpringRunner.class)
@SpringBootTest
public class myTest {

    @Autowired
    private UserMapper userMapper;

	@Test
	public void testSelect(){
		// null here means that you do not need to query according to parameters
		// There are many ways to call CRUD

		// 1. Query all data
		List<User> userList = userMapper.selectList(null);
		userList.forEach(user -> System.out.println(user.getName()));

		// 2. Delete by id
		userMapper.deleteById(1);

		// 3. Add data
		User user = new User();
		user.setName("Ah Zhong");
		user.setEmail("azhong@qq.com");
		user.setAge(18);
		userMapper.insert(user);

		// 4. Update data
		user.setId(1);
		user.setName("Brother Zhong");
		user.setEmail("azhongxiaoge@qq.com");
		userMapper.updateById(user);
	}
}
4, Common notes
- @TableName: table name Description
- @TableId: primary key comment
- @TableField: field annotation (non primary key)
- @Version: optimistic lock annotation, which is mainly used to mark on the field
- @EnumValue: General enumeration class annotation (annotation on enumeration field)
- @TableLogic: table field logical processing annotation (logical deletion)
- @SqlParser: Tenant annotation (annotation on mapper is supported)
- @KeySequence: sequence primary key policy. The attributes include: value and resultMap
Case: multi table associated query
1. Prepare data
User table (as before)
CREATE TABLE T_USER
(
	id BIGINT(20) NOT NULL COMMENT 'Primary key ID',
	name VARCHAR(30) NULL DEFAULT NULL COMMENT 'full name',
	age INT(11) NULL DEFAULT NULL COMMENT 'Age',
	email VARCHAR(50) NULL DEFAULT NULL COMMENT 'mailbox',
	PRIMARY KEY (id)
);

INSERT INTO T_USER (id, name, age, email) VALUES
(1, 'Zhang San', 13, 'zhangsan@qq.com'),
(2, 'Li Si', 14, 'lisi@qq.com'),
(3, 'Wang Wu', 15, 'wangwu@qq.com'),
(4, 'Zhao Liu', 16, 'zhaoliu@qq.com'),
(5, 'Brother Zhong', 18, 'azhongxiaoge@qq.com');
Role table
CREATE TABLE t_role (
	id BIGINT(20) NOT NULL COMMENT 'Primary key ID',
	rolecode VARCHAR(100) NULL DEFAULT NULL COMMENT 'Role number',
	rolename VARCHAR(100) NULL DEFAULT NULL COMMENT 'Character name',
	PRIMARY KEY (id)
 );

 INSERT INTO t_role(id, rolecode, rolename) VALUES
 (1, '001', 'chairman'),
 (2, '002', 'CEO'),
 (3, '003', 'CFO');
 (4, '004', 'CTO');
Permission table
CREATE TABLE t_permission (
	id BIGINT(20) NOT NULL COMMENT 'Primary key ID',
	permissioncode VARCHAR(100) NULL DEFAULT NULL COMMENT 'Authority number',
	permissionname VARCHAR(100) NULL DEFAULT NULL COMMENT 'Permission name',
	path VARCHAR(100) NULL DEFAULT NULL COMMENT 'Mapping path',
	PRIMARY KEY (id)
 );

INSERT INTO t_permission(id, permissioncode, permissionname) VALUES
 (1, '001', 'Recruitment of talents'),
 (2, '002', 'Dismiss mediocre talents'),
 (3, '003', 'promotion increase ');
UserRole user role association table
CREATE TABLE t_userrole (
	id BIGINT(20) NOT NULL COMMENT 'Primary key ID',
	username VARCHAR(100) NULL DEFAULT NULL COMMENT 'user name',
	rolecode VARCHAR(100) NULL DEFAULT NULL COMMENT 'Role number',
	PRIMARY KEY (id)
 );

 INSERT INTO t_userrole(id, username, rolecode) VALUES
 (1, 'Brother Zhong', '001')
 (2, 'Zhang San', '002'),
 (3, 'Li Si', '003'),
 (4, 'Wang Wu', '004')
 (5, 'Zhao Liu', '004');
RolePermission role permission association table
CREATE TABLE t_rolepermission (
	id BIGINT(20) NOT NULL COMMENT 'Primary key ID',
	rolecode VARCHAR(100) NULL DEFAULT NULL COMMENT 'Role number',
	permissioncode VARCHAR(100) NULL DEFAULT NULL COMMENT 'Authority number',
	PRIMARY KEY (id)
 );

 INSERT INTO t_rolepermission(id, rolecode, permissioncode) VALUES
 (1, '001', '001'),
 (2, '002', '002'),
 (3, '003', '003');
2. Create entity class
File path: com test. pojo
User class
@Data
@TableName("user")
@ApiModel("User class")
public class User implements Serializable {

    @ApiModelProperty(name = "id", value = "ID Primary key")
    @TableId(type = IdType.AUTO)
    private String id;

    @ApiModelProperty(name = "name", value = "user name")
    @TableField(fill = FieldFill.INSERT_UPDATE)
    private String name;

    @ApiModelProperty(name = "age", value = "Age")
    @TableField(fill = FieldFill.INSERT_UPDATE)
    private Integer age;

    @ApiModelProperty(name = "email", value = "mailbox")
    @TableField(fill = FieldFill.INSERT_UPDATE)
    private String email;

    @TableField(exist = false)
    private Set<Role> roles = new HashSet<>();

}
[simple understanding] the @ ApiModel and @ ApiModelProperty annotations in the code are from Swagger This API simplifies the development of open source framework. If you are interested, you can learn about it.
To use it in Springboot, you need to use it in POM Introduce its dependencies into the XML file.
<dependency>
    <groupId>com.spring4all</groupId>
    <artifactId>swagger-spring-boot-starter</artifactId>
    <version>1.7.0.RELEASE</version>
</dependency>
In addition, its dependencies can also be introduced separately, and the corresponding or latest version can be specified by yourself.
<dependency>
    <groupId>io.springfox</groupId>
    <artifactId>springfox-swagger2</artifactId>
    <version>lastest version</version>
</dependency>

<dependency>
    <groupId>io.springfox</groupId>
    <artifactId>springfox-swagger-ui</artifactId>
    <version>lastest version</version>
</dependency>
Role class
@Data
@TableName("role")
@ApiModel("Role class")
public class Role implements Serializable {

    @ApiModelProperty(name = "id", value = "ID Primary key")
    @TableId(type = IdType.AUTO)
    private String id;

    @ApiModelProperty(name = "roleCode", value = "Role number")
    @TableField(fill = FieldFill.INSERT_UPDATE)
    private String roleCode;

    @ApiModelProperty(name = "roleName", value = "Role name")
    @TableField(fill = FieldFill.INSERT_UPDATE)
    private String roleName;

    @TableField(exist = false)
    private Set<Permission> permissions = new HashSet<>();

}
Permission class
@Data
@TableName("permission")
@ApiModel("Permission class")
public class Permission implements Serializable {

    @ApiModelProperty(name = "id", value = "ID Primary key")
    @TableId(type = IdType.AUTO)
    private String id;

    @ApiModelProperty(name = "permissionCode", value = "Authority number")
    @TableField(fill = FieldFill.INSERT_UPDATE)
    private String permissionCode;

    @ApiModelProperty(name = "permissionName", value = "Permission name")
    @TableField(fill = FieldFill.INSERT_UPDATE)
    private String permissionName;

    @ApiModelProperty(name = "path", value = "Mapping path")
    @TableField(fill = FieldFill.INSERT_UPDATE)
    private String path;

}
UserRole class
@Data
@TableName("userRole")
@ApiModel("User role relationship class")
public class UserRole implements Serializable{

    @ApiModelProperty(name = "id", value = "ID Primary key")
    @TableId(type = IdType.AUTO)
    private String id;

    @ApiModelProperty(name = "username", value = "user name")
    @TableField(fill = FieldFill.INSERT_UPDATE)
    private String username;

    @ApiModelProperty(name = "roleCode", value = "Role number")
    @TableField(fill = FieldFill.INSERT_UPDATE)
    private Integer roleCode;

}
RolePermission class
@Data
@TableName("rolePermission")
@ApiModel("Role permission relationship class")
public class RolePermission implements Serializable{

    @ApiModelProperty(name = "id", value = "ID Primary key")
    @TableId(type = IdType.AUTO)
    private String id;

    @ApiModelProperty(name = "roleCode", value = "Role number")
    @TableField(fill = FieldFill.INSERT_UPDATE)
    private Integer roleCode;

    @ApiModelProperty(name = "permission", value = "Authority number")
    @TableField(fill = FieldFill.INSERT_UPDATE)
    private String permissionCode;

}
3. Create Mapper interface class
File path: com test. mapper
UserMapper interface class
public interface UserMapper extends BaseMapper<User> {

    @Select("select * from t_user where name = #{name}")
    public User findUserByName(String username);

    // Get the role owned by the user
    @Select("select * from t_role where rolecode in(select rolecode from t_userrole where username = #{userName})")
    public Set<Role> getUserRoles(String username);
}
RoleMapper interface class
public interface RoleMapper extends BaseMapper<User> {

    // Get the permissions of the role
    @Select("select * from t_permission where permissioncode in (select permissioncode from t_rolepermission where rolecode = #{roleCode})")
    public Set<Permission> getRolePermissions(String roleCode);

}
4. Scan mapper in startup class
@SpringBootApplication
@MapperScan("com.test.mapper")
public class App {
    public static void main(String[] args) {
        SpringApplication.run(App.class, args);
    }
}
5. Edit application YML file
mybatis-plus:
   type-aliases-package: com.test.pojo
   configuration:
    map-underscore-to-camel-case: true
6. Test happily together
@RunWith(SpringRunner.class)
@SpringBootTest
public class Demo {

    @Autowired
    private UserMapper userMapper;
    @Autowired
    private RoleMapper roleMapper;

    @Test
    public void testUserRole() {

        User user = userMapper.findUserByName("Brother Zhong");
        Set<Role> roles = userMapper.getUserRoles("Brother Zhong");
        for (Role role : roles) {
            role.setPermissions(roleMapper.getRolePermissions(role.getRoleCode()));
        }
        user.setRoles(roles);
        System.out.println(user);
    }
}