The article has been included in my Github collection. Welcome Star: https://github.com/yehongzhi/learningSummary
Write in front
The last article introduced the function of dynamic datasource roughly. It is really convenient to use. You can complete the switching of multiple data sources with only one @ DS annotation and some simple configurations. How to do it and how to realize it at the bottom? With this question, we studied the source code together.
Because the framework itself has many function points, there are many small functions, such as support for spel, regular expression matching, and dynamic addition and deletion of data sources. The source code of this function will not be discussed in detail. We only care about the core function, that is, the switching of multiple data sources.
Source code analysis
First of all, we all remember that we need to introduce spring boot starter at the beginning:
<dependency>
    <groupId>com.baomidou</groupId>
    <artifactId>dynamic-datasource-spring-boot-starter</artifactId>
    <version>3.3.0</version>
</dependency>
Generally, the automatic configuration of starter is to specify the automatic configuration class from the META-INF/spring.factories file:
org.springframework.boot.autoconfigure.EnableAutoConfiguration=\
com.baomidou.dynamic.datasource.spring.boot.autoconfigure.DynamicDataSourceAutoConfiguration
Then open the class:
/**
 * Dynamic data source core auto configuration class
 *
 * @author TaoYu Kanyuxia
 * @see DynamicDataSourceProvider
 * @see DynamicDataSourceStrategy
 * @see DynamicRoutingDataSource
 * @since 1.0.0
 */
@Slf4j
@Configuration
@AllArgsConstructor
//Read the configuration with spring.datasource.dynamic as the prefix
@EnableConfigurationProperties(DynamicDataSourceProperties.class)
//Before SpringBoot injects the bean auto configuration of DataSourceAutoConfiguration, load the bean injected into the current class into the container
@AutoConfigureBefore(DataSourceAutoConfiguration.class)
//The autoConfig of Druid and the Creator of various data source connection pools are introduced
@Import(value = {DruidDynamicDataSourceConfiguration.class, DynamicDataSourceCreatorAutoConfiguration.class})
//Conditional loading, enable this autoConfig when the prefix is "spring.datasource.dynamic"
@ConditionalOnProperty(prefix = DynamicDataSourceProperties.PREFIX, name = "enabled", havingValue = "true", matchIfMissing = true)
public class DynamicDataSourceAutoConfiguration {

    private final DynamicDataSourceProperties properties;

    //Read the multi data source configuration and inject it into the spring container
    @Bean
    @ConditionalOnMissingBean
    public DynamicDataSourceProvider dynamicDataSourceProvider() {
        Map<String, DataSourceProperty> datasourceMap = properties.getDatasource();
        return new YmlDynamicDataSourceProvider(datasourceMap);
    }

    //Register your own dynamic multisource DataSource
    @Bean
    @ConditionalOnMissingBean
    public DataSource dataSource(DynamicDataSourceProvider dynamicDataSourceProvider) {
        DynamicRoutingDataSource dataSource = new DynamicRoutingDataSource();
        dataSource.setPrimary(properties.getPrimary());
        dataSource.setStrict(properties.getStrict());
        dataSource.setStrategy(properties.getStrategy());
        dataSource.setProvider(dynamicDataSourceProvider);
        dataSource.setP6spy(properties.getP6spy());
        dataSource.setSeata(properties.getSeata());
        return dataSource;
    }

    //AOP aspect, enhance the DS annotated method to achieve the purpose of switching data sources
    @Role(value = BeanDefinition.ROLE_INFRASTRUCTURE)
    @Bean
    @ConditionalOnMissingBean
    public DynamicDataSourceAnnotationAdvisor dynamicDatasourceAnnotationAdvisor(DsProcessor dsProcessor) {
        DynamicDataSourceAnnotationInterceptor interceptor = new DynamicDataSourceAnnotationInterceptor(properties.isAllowedPublicOnly(), dsProcessor);
        DynamicDataSourceAnnotationAdvisor advisor = new DynamicDataSourceAnnotationAdvisor(interceptor);
        advisor.setOrder(properties.getOrder());
        return advisor;
    }

    //About distributed transaction hardening
    @Role(value = BeanDefinition.ROLE_INFRASTRUCTURE)
    @ConditionalOnProperty(prefix = DynamicDataSourceProperties.PREFIX, name = "seata", havingValue = "false", matchIfMissing = true)
    @Bean
    public Advisor dynamicTransactionAdvisor() {
        AspectJExpressionPointcut pointcut = new AspectJExpressionPointcut();
        pointcut.setExpression("@annotation(com.baomidou.dynamic.datasource.annotation.DSTransactional)");
        return new DefaultPointcutAdvisor(pointcut, new DynamicTransactionAdvisor());
    }

    //Dynamic parameter parser chain
    @Bean
    @ConditionalOnMissingBean
    public DsProcessor dsProcessor() {
        DsHeaderProcessor headerProcessor = new DsHeaderProcessor();
        DsSessionProcessor sessionProcessor = new DsSessionProcessor();
        DsSpelExpressionProcessor spelExpressionProcessor = new DsSpelExpressionProcessor();
        headerProcessor.setNextProcessor(sessionProcessor);
        sessionProcessor.setNextProcessor(spelExpressionProcessor);
        return headerProcessor;
    }

}
We can find that when used, the configuration prefixed with spring.datasource.dynamic will be read into the DynamicDataSourceProperties class and injected into the Spring container as a Bean. In fact, this way of reading configuration file information is also very common in daily development.
@Slf4j
@Getter
@Setter
@ConfigurationProperties(prefix = DynamicDataSourceProperties.PREFIX)
public class DynamicDataSourceProperties {

    public static final String PREFIX = "spring.datasource.dynamic";
    public static final String HEALTH = PREFIX + ".health";

    /**
     * You must set the default library, the default master
     */
    private String primary = "master";
    /**
     * Whether to enable strict mode. It will not be started by default. In strict mode, errors will be reported directly if no data source is matched. In non strict mode, the data source set by the default data source primary will be used
     */
    private Boolean strict = false;
    /**
     * Whether to use p6spy output. It is not output by default
     */
    private Boolean p6spy = false;
    /**
     * Whether to enable seata. It is not enabled by default
     */
    private Boolean seata = false;
    /**
     * seata Use mode, default AT
     */
    private SeataMode seataMode = SeataMode.AT;
    /**
     * Whether to use spring actor to monitor and check. It does not check by default
     */
    private boolean health = false;
    /**
     * Every data source
     */
    private Map<String, DataSourceProperty> datasource = new LinkedHashMap<>();
    /**
     * Multi data source selection algorithm clazz, default load balancing algorithm
     */
    private Class<? extends DynamicDataSourceStrategy> strategy = LoadBalanceDynamicDataSourceStrategy.class;
    /**
     * aop Slice order, the default priority is the highest
     */
    private Integer order = Ordered.HIGHEST_PRECEDENCE;
    /**
     * Druid Global parameter configuration
     */
    @NestedConfigurationProperty
    private DruidConfig druid = new DruidConfig();
    /**
     * HikariCp Global parameter configuration
     */
    @NestedConfigurationProperty
    private HikariCpConfig hikari = new HikariCpConfig();

    /**
     * Global default publicKey
     */
    private String publicKey = CryptoUtils.DEFAULT_PUBLIC_KEY_STRING;
    /**
     * aop Whether only public methods are allowed for faceting
     */
    private boolean allowedPublicOnly = true;
}
But how to combine the configuration file information with spring's DataSource after reading the configuration file? We use reverse thinking to push back from the results. To integrate a data source into spring, we need to implement the DataSource interface, so the dynamic data source of mybatis plus is also implemented, which is this:
/**
 * Abstract dynamic data source
 *
 * @author TaoYu
 * @since 2.2.0
 */
public abstract class AbstractRoutingDataSource extends AbstractDataSource {

    //Abstract methods are implemented by subclasses, which determine the final data source
    protected abstract DataSource determineDataSource();

    //Rewrite getConnection() method to realize the function of switching data sources
    @Override
    public Connection getConnection() throws SQLException {
        //Here xid involves the processing of distributed transactions
        String xid = TransactionContext.getXID();
        if (StringUtils.isEmpty(xid)) {
            //Instead of using distributed transactions, you return a data connection directly
            return determineDataSource().getConnection();
        } else {
            String ds = DynamicDataSourceContextHolder.peek();
            ConnectionProxy connection = ConnectionFactory.getConnection(ds);
            return connection == null ? getConnectionProxy(ds, determineDataSource().getConnection()) : connection;
        }
    }
}
If you have studied the above source code, you must be familiar with the template pattern. He extends the behavior of obtaining DataSource to the implementation of subclasses, so the key is to look at the implementation of subclasses:
@Slf4j
public class DynamicRoutingDataSource extends AbstractRoutingDataSource implements InitializingBean, DisposableBean {

    private static final String UNDERLINE = "_";
    /**
     * All databases
     */
    private final Map<String, DataSource> dataSourceMap = new ConcurrentHashMap<>();
    /**
     * Grouping database
     */
    private final Map<String, GroupDataSource> groupDataSources = new ConcurrentHashMap<>();
    @Setter
    private DynamicDataSourceProvider provider;
    @Setter
    private Class<? extends DynamicDataSourceStrategy> strategy = LoadBalanceDynamicDataSourceStrategy.class;
    @Setter
    private String primary = "master";
    @Setter
    private Boolean strict = false;
    @Setter
    private Boolean p6spy = false;
    @Setter
    private Boolean seata = false;

    @Override
    public DataSource determineDataSource() {
        return getDataSource(DynamicDataSourceContextHolder.peek());
    }

    private DataSource determinePrimaryDataSource() {
        log.debug("dynamic-datasource switch to the primary datasource");
        return groupDataSources.containsKey(primary) ? groupDataSources.get(primary).determineDataSource() : dataSourceMap.get(primary);
    }

    @Override
    public void afterPropertiesSet() throws Exception {
        // Check that the configuration is enabled but there are no related dependencies
        checkEnv();
        // Add and group data sources
        Map<String, DataSource> dataSources = provider.loadDataSources();
        for (Map.Entry<String, DataSource> dsItem : dataSources.entrySet()) {
            addDataSource(dsItem.getKey(), dsItem.getValue());
        }
        // Check whether the default data source is set
        if (groupDataSources.containsKey(primary)) {
            log.info("dynamic-datasource initial loaded [{}] datasource,primary group datasource named [{}]", dataSources.size(), primary);
        } else if (dataSourceMap.containsKey(primary)) {
            log.info("dynamic-datasource initial loaded [{}] datasource,primary datasource named [{}]", dataSources.size(), primary);
        } else {
            throw new RuntimeException("dynamic-datasource Please check the setting of primary");
        }
    }
}
He implements the InitializingBean interface, which needs to implement the afterpropertieset () method, which is a Bean's life cycle function, and does some operations during Bean initialization.
The operation here is to check the configuration, and then obtain the Map collection about the DataSource by calling the provider.loadDataSources() method. The Key is the name of the DataSource and the Value is the DataSource.
@Slf4j
@AllArgsConstructor
public class YmlDynamicDataSourceProvider extends AbstractDataSourceProvider {
    /**
     * All data sources
     */
    private final Map<String, DataSourceProperty> dataSourcePropertiesMap;

    @Override
    public Map<String, DataSource> loadDataSources() {
        //Call the createDataSourceMap() method of AbstractDataSourceProvider
        return createDataSourceMap(dataSourcePropertiesMap);
    }
}

@Slf4j
public abstract class AbstractDataSourceProvider implements DynamicDataSourceProvider {

    @Autowired
    private DefaultDataSourceCreator defaultDataSourceCreator;

    protected Map<String, DataSource> createDataSourceMap(
            Map<String, DataSourceProperty> dataSourcePropertiesMap) {
        Map<String, DataSource> dataSourceMap = new HashMap<>(dataSourcePropertiesMap.size() * 2);
        for (Map.Entry<String, DataSourceProperty> item : dataSourcePropertiesMap.entrySet()) {
            DataSourceProperty dataSourceProperty = item.getValue();
            String poolName = dataSourceProperty.getPoolName();
            if (poolName == null || "".equals(poolName)) {
                poolName = item.getKey();
            }
            dataSourceProperty.setPoolName(poolName);
            dataSourceMap.put(poolName, defaultDataSourceCreator.createDataSource(dataSourceProperty));
        }
        return dataSourceMap;
    }
}
The defaultDataSourceCreator.createDataSource() method here uses the adapter pattern.
Because the DataSource implementation classes created by each configured data source are not necessarily the same, you need to create a specific DataSource according to the configured data source type.
@Override
public DataSource createDataSource(DataSourceProperty dataSourceProperty, String publicKey) {
    DataSourceCreator dataSourceCreator = null;
    //this.creators is the DataSourceCreator implementation class for all adaptations
    for (DataSourceCreator creator : this.creators) {
        //Match the corresponding dataSourceCreator according to the configuration
        if (creator.support(dataSourceProperty)) {
            //If it matches, the corresponding dataSourceCreator is used
            dataSourceCreator = creator;
            break;
        }
    }
    if (dataSourceCreator == null) {
        throw new IllegalStateException("creator must not be null,please check the DataSourceCreator");
    }
    //Then call the createDataSource method to create the corresponding DataSource
    DataSource dataSource = dataSourceCreator.createDataSource(dataSourceProperty, publicKey);
    this.runScrip(dataSource, dataSourceProperty);
    return wrapDataSource(dataSource, dataSourceProperty);
}
All corresponding implementation classes are placed under the creator package:
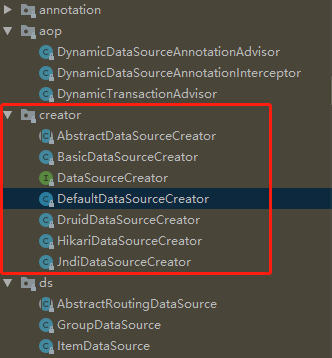
Let's look at one of the implementation classes:
@Data
@AllArgsConstructor
public class HikariDataSourceCreator extends AbstractDataSourceCreator implements DataSourceCreator {

    private static Boolean hikariExists = false;

    static {
        try {
            Class.forName(HIKARI_DATASOURCE);
            hikariExists = true;
        } catch (ClassNotFoundException ignored) {
        }
    }

    private HikariCpConfig hikariCpConfig;

    //Create HikariCp data source
    @Override
    public DataSource createDataSource(DataSourceProperty dataSourceProperty, String publicKey) {
        if (StringUtils.isEmpty(dataSourceProperty.getPublicKey())) {
            dataSourceProperty.setPublicKey(publicKey);
        }
        HikariConfig config = dataSourceProperty.getHikari().toHikariConfig(hikariCpConfig);
        config.setUsername(dataSourceProperty.getUsername());
        config.setPassword(dataSourceProperty.getPassword());
        config.setJdbcUrl(dataSourceProperty.getUrl());
        config.setPoolName(dataSourceProperty.getPoolName());
        String driverClassName = dataSourceProperty.getDriverClassName();
        if (!StringUtils.isEmpty(driverClassName)) {
            config.setDriverClassName(driverClassName);
        }
        return new HikariDataSource(config);
    }

	//Determine whether it is a HikariCp data source
    @Override
    public boolean support(DataSourceProperty dataSourceProperty) {
        Class<? extends DataSource> type = dataSourceProperty.getType();
        return (type == null && hikariExists) || (type != null && HIKARI_DATASOURCE.equals(type.getName()));
    }
}
Back to the previous, what will you do after you get the Map collection of the DataSource?
Then call the addDataSource() method, which groups the data sources according to the underscore "" and finally puts them into the groupDataSources member variable.
/**
     * Add new data source to group
     *
     * @param ds         Name of the new data source
     * @param dataSource New data source
     */
private void addGroupDataSource(String ds, DataSource dataSource) {
    if (ds.contains(UNDERLINE)) {
        String group = ds.split(UNDERLINE)[0];
        GroupDataSource groupDataSource = groupDataSources.get(group);
        if (groupDataSource == null) {
            try {
                //By the way, set the load balancing strategy. The default strategy is loadbalancedynamic datasourcestrategy
                groupDataSource = new GroupDataSource(group, strategy.getDeclaredConstructor().newInstance());
                groupDataSources.put(group, groupDataSource);
            } catch (Exception e) {
                throw new RuntimeException("dynamic-datasource - add the datasource named " + ds + " error", e);
            }
        }
        groupDataSource.addDatasource(ds, dataSource);
    }
}
When grouping, the load balancing strategy will be set together. What does this load balancing do?
For example, there are three data sources (A, B and C) in A group master, which need to reasonably allocate the frequency of use. It is impossible to use all of them, so A load balancing strategy is required. Polling is the default, and the corresponding class is:
public class LoadBalanceDynamicDataSourceStrategy implements DynamicDataSourceStrategy {

    /**
     * Load balancing counter
     */
    private final AtomicInteger index = new AtomicInteger(0);

    @Override
    public DataSource determineDataSource(List<DataSource> dataSources) {
        return dataSources.get(Math.abs(index.getAndAdd(1) % dataSources.size()));
    }
}
When obtaining the data source, you can use:
@Override
public DataSource determineDataSource() {
    return getDataSource(DynamicDataSourceContextHolder.peek());
}

/**
     * Get data source
     *
     * @param ds Data source name
     * @return data source
     */
public DataSource getDataSource(String ds) {
    //There is no data source name. The primary data source is used by default
    if (StringUtils.isEmpty(ds)) {
        return determinePrimaryDataSource();
    //Judge whether the packet data source contains. If it contains, it will be obtained and returned from the packet data source
    } else if (!groupDataSources.isEmpty() && groupDataSources.containsKey(ds)) {
        log.debug("dynamic-datasource switch to the datasource named [{}]", ds);
        return groupDataSources.get(ds).determineDataSource();
    //If the normal data source contains, it is returned from the normal data source
    } else if (dataSourceMap.containsKey(ds)) {
        log.debug("dynamic-datasource switch to the datasource named [{}]", ds);
        return dataSourceMap.get(ds);
    }
    if (strict) {
        throw new RuntimeException("dynamic-datasource could not find a datasource named" + ds);
    }
    return determinePrimaryDataSource();
}
So what is the DynamicDataSourceContextHolder class above? How is the value of annotation @ DS passed in?
Back to the initial automatic configuration class, one of them is to configure the DynamicDataSourceAnnotationAdvisor, and an interceptor is also set:
@Role(value = BeanDefinition.ROLE_INFRASTRUCTURE)
@Bean
@ConditionalOnMissingBean
public DynamicDataSourceAnnotationAdvisor dynamicDatasourceAnnotationAdvisor(DsProcessor dsProcessor) {
    //Create interceptor
    DynamicDataSourceAnnotationInterceptor interceptor = new DynamicDataSourceAnnotationInterceptor(properties.isAllowedPublicOnly(), dsProcessor);
    DynamicDataSourceAnnotationAdvisor advisor = new DynamicDataSourceAnnotationAdvisor(interceptor);
    advisor.setOrder(properties.getOrder());
    return advisor;
}
The DynamicDataSourceAnnotationAdvisor is used for AOP aspect programming and handles the aspect of annotation @ DS:
public class DynamicDataSourceAnnotationAdvisor extends AbstractPointcutAdvisor implements BeanFactoryAware {

    //notice
    private final Advice advice;

    //breakthrough point
    private final Pointcut pointcut;

    public DynamicDataSourceAnnotationAdvisor(@NonNull DynamicDataSourceAnnotationInterceptor dynamicDataSourceAnnotationInterceptor) {
        this.advice = dynamicDataSourceAnnotationInterceptor;
        this.pointcut = buildPointcut();
    }

    @Override
    public Pointcut getPointcut() {
        return this.pointcut;
    }

    @Override
    public Advice getAdvice() {
        return this.advice;
    }

    @Override
    public void setBeanFactory(BeanFactory beanFactory) throws BeansException {
        if (this.advice instanceof BeanFactoryAware) {
            ((BeanFactoryAware) this.advice).setBeanFactory(beanFactory);
        }
    }

    private Pointcut buildPointcut() {
        //Class is annotated
        Pointcut cpc = new AnnotationMatchingPointcut(DS.class, true);
        //Method
        Pointcut mpc = new AnnotationMethodPoint(DS.class);
        //Method is better than class
        return new ComposablePointcut(cpc).union(mpc);
    }
}
We all know the entry point. It's @ DS annotation. So what to do depends mainly on the advice, that is, the interceptor passed in
DynamicDataSourceAnnotationInterceptor.
public class DynamicDataSourceAnnotationInterceptor implements MethodInterceptor {

    /**
     * The identification of SPEL.
     */
    private static final String DYNAMIC_PREFIX = "#";

    private final DataSourceClassResolver dataSourceClassResolver;
    private final DsProcessor dsProcessor;

    public DynamicDataSourceAnnotationInterceptor(Boolean allowedPublicOnly, DsProcessor dsProcessor) {
        dataSourceClassResolver = new DataSourceClassResolver(allowedPublicOnly);
        this.dsProcessor = dsProcessor;
    }

    @Override
    public Object invoke(MethodInvocation invocation) throws Throwable {
        //Find the attribute value of @ DS annotation, that is, the data source name
        String dsKey = determineDatasourceKey(invocation);
        //push the data source name to the stack of the current thread
        DynamicDataSourceContextHolder.push(dsKey);
        try {
            //Execute current method
            return invocation.proceed();
        } finally {
            //Release data source from stack
            DynamicDataSourceContextHolder.poll();
        }
    }

    //This is to use the responsibility chain mode for some processing. You can ignore it first
    private String determineDatasourceKey(MethodInvocation invocation) {
        String key = dataSourceClassResolver.findDSKey(invocation.getMethod(), invocation.getThis());
        return (!key.isEmpty() && key.startsWith(DYNAMIC_PREFIX)) ? dsProcessor.determineDatasource(invocation, key) : key;
    }
}
There is also a DynamicDataSourceContextHolder, which is associated with the data connection obtained earlier. Finally, let's take a look at the source code of this class:
/**
 * Core data source switching tool class based on ThreadLocal
 *
 * @author TaoYu Kanyuxia
 * @since 1.0.0
 */
public final class DynamicDataSourceContextHolder {

    /**
     * Why use linked list to store (exactly stack)
     * <pre>
     * To support nested switching, such as ABC, the three service s are different data sources
     * A business of a needs to call the method of B, and the method of B needs to call the method of C. Level by level call switching, forming a chain.
     * The traditional method of setting only the current thread can not meet this business requirement. You must use stack, last in, first out.
     * </pre>
     */
    private static final ThreadLocal<Deque<String>> LOOKUP_KEY_HOLDER = new NamedThreadLocal<Deque<String>>("dynamic-datasource") {
        @Override
        protected Deque<String> initialValue() {
            return new ArrayDeque<>();
        }
    };

    private DynamicDataSourceContextHolder() {
    }

    /**
     * Get current thread data source
     *
     * @return Data source name
     */
    public static String peek() {
        return LOOKUP_KEY_HOLDER.get().peek();
    }

    /**
     * Set current thread data source
     * <p>
     * If it is not necessary to call manually, make sure that it is finally cleared after calling
     * </p>
     *
     * @param ds Data source name
     */
    public static void push(String ds) {
        LOOKUP_KEY_HOLDER.get().push(StringUtils.isEmpty(ds) ? "" : ds);
    }

    /**
     * Clear current thread data source
     * <p>
     * If the current thread switches data sources continuously, only the data source name of the current thread will be removed
     * </p>
     */
    public static void poll() {
        Deque<String> deque = LOOKUP_KEY_HOLDER.get();
        deque.poll();
        if (deque.isEmpty()) {
            LOOKUP_KEY_HOLDER.remove();
        }
    }

    /**
     * Force empty local thread
     * <p>
     * Prevent memory leakage. For example, if push is called manually, this method can be called to ensure that it is cleared
     * </p>
     */
    public static void clear() {
        LOOKUP_KEY_HOLDER.remove();
    }
}
The reason why stack is used here is that there will be nested switching data sources, that is, the innermost layer of data sources should be released first, and the outermost layer of data sources should be released last. Therefore, stack data structure needs to be used.
Overall process
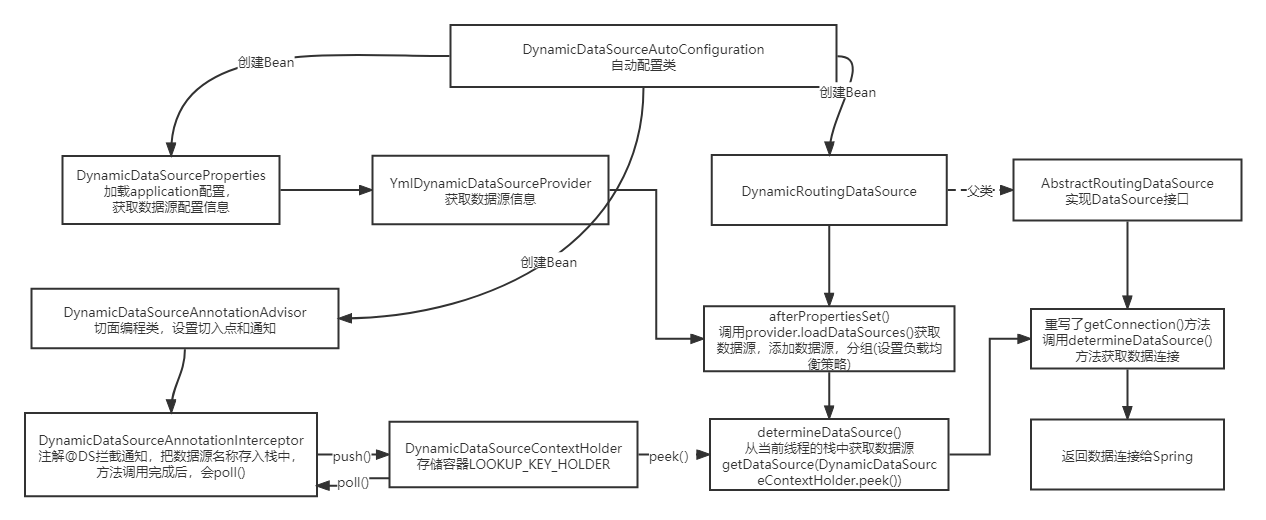
Maybe everyone is still a little dizzy. After all, it's a little windy. It's normal. If you want to study it thoroughly, I suggest you open the IDEA yourself and study it with reference to what I wrote. Here I draw an overall flow chart to give a general IDEA:
summary
Source code analysis can improve the ability to read code. I think the ability to read code is very important, because when we join a new company, we are not familiar with the project, so we need to understand the project from the documents and code. Read the code to modify and expand.
The source code analysis of the framework introduced in this article only involves the core code, so it is not very difficult. Interested students can read it several times. The application of multiple data sources is also a common scenario in daily projects.
Thank you very much for reading. I hope this article can help and inspire you.
If you think it's useful, just praise it. Your praise is the biggest driving force for my creation~
I am a programmer trying to make everyone remember. See you next time!!!

Limited ability. If there are any mistakes or improper places, please criticize and correct them and learn and communicate together!