
Explain the integration process of MyBatis and Spring through examples.
preface
This example of MyBatis and Spring integration was written when I needed to be familiar with MyBatis when I first transferred in March this year. I mainly wanted to know how the project uses MyBatis in Spring from 0 to 1. This example refers to the "C language Chinese network", but the examples in it can't run directly. It may be because of the version and other reasons. At that time, you struggled for several days to integrate MyBatis and Spring. Now look back. If you don't understand the basic knowledge of MyBatis, you can directly draw gourds and ladles, although you can also solve the problem, However, the process of troubleshooting is actually very painful. Next, I will give a complete example of the integration of the two, so that you can avoid detours.
Project preparation
The DB uses Mysql, POM Dependency packages to be added to XML:
<dependency>
    <groupId>org.mybatis</groupId>
    <artifactId>mybatis</artifactId>
    <version>3.4.6</version>
</dependency>
<dependency>
    <groupId>org.mybatis</groupId>
    <artifactId>mybatis-spring</artifactId>
    <version>2.0.0</version>
</dependency>
<dependency>
    <groupId>mysql</groupId>
    <artifactId>mysql-connector-java</artifactId>
    <version>6.0.6</version>
</dependency>
DB structure:
CREATE TABLE `user_test` (
  `uid` tinyint(2) NOT NULL,
  `uname` varchar(20) DEFAULT NULL,
  `usex` varchar(10) DEFAULT NULL,
  PRIMARY KEY (`uid`)
) ENGINE=InnoDB DEFAULT CHARSET=utf8
DB initial data:
| uid | uname | usex |
|---|---|---|
| 1 | Zhang San | female |
| 2 | Chen Heng | male |
| 3 | Lou Zi | male |
Integration example
Step 1: create a persistent class
@Data
public class MyUser {
    private Integer uid; //Primary key
    private String uname;
    private String usex;
}
Step 2: create a mapping file
<?xml version="1.0" encoding="UTF-8"?>
<!DOCTYPE mapper
        PUBLIC "-//mybatis.org//DTD Mapper 3.0//EN"
        "http://mybatis.org/dtd/mybatis-3-mapper.dtd">
<mapper namespace="com.mybatis.dao.UserDao">
    <!-- according to uid Query a user information -->
    <select id="selectUserById" parameterType="Integer" resultType="com.mybatis.entity.MyUser">
        select * from user_test where uid = #{uid}
    </select>
    <!-- Query all user information -->
    <select id="selectAllUser" resultType="com.mybatis.entity.MyUser">
        select * from user_test
    </select>
    <!-- Add a user,#{uname} is com mybatis. po. Attribute value of myuser -- >
    <insert id="addUser" parameterType="com.mybatis.entity.MyUser">
        insert into user_test (uid,uname,usex)
        values(#{uid},#{uname},#{usex})
    </insert>
    <!--Modify a user -->
    <update id="updateUser" parameterType="com.mybatis.entity.MyUser">
        update user_test set uname =#{uname},usex = #{usex} where uid = #{uid}
    </update>
    <!-- Delete a user -->
    <delete id="deleteUser" parameterType="Integer">
        delete from user_test where uid= #{uid}
    </delete>
</mapper>
Step 3: create the interface corresponding to the mapping file
@Repository("userDao")
@Mapper
/*
 * Use Spring to automatically scan and assemble the interfaces of MyBatis (Spring will automatically assemble all the interfaces marked by @ Mapper annotation in the specified package as the mapping interfaces of MyBatis
 */
public interface UserDao {
    /**
     * id in the SQL mapping file corresponding to the interface method
     */
    public MyUser selectUserById(Integer uid);
    public List<MyUser> selectAllUser();
    public int addUser(MyUser user);
    public int updateUser(MyUser user);
    public int deleteUser(Integer uid);
}
When mybatis was used directly before, there was no interface file. This file was added to enable the operations of Spring and mybatis to be associated through this file, that is, the operations on DB can be realized through the interface provided above.
Step 4: create a new mybatis configuration
<?xml version="1.0" encoding="utf-8"?>
<!DOCTYPE configuration PUBLIC "-//mybatis.org//DTD Config 3.0//EN"
        "http://mybatis.org/dtd/mybatis-3-config.dtd">
<configuration>
    <settings>
        <setting name="logImpl" value="LOG4J" />
        <setting name="cacheEnabled" value="false"/>
        <setting name="defaultExecutorType" value="REUSE"/>
        <setting name="useGeneratedKeys" value="true"/>
    </settings>
</configuration>
Since the two will be integrated later, the configuration of environments and mappers in MyBatis will be moved to ApplicationContext In XML, this is a big difference between using MyBatis directly.
Step 5: add a DB configuration file
Add DB configuration file JDBC Properties to save DB configuration information:
jdbc.shop.url=jdbc:mysql://xxx:3104/xm_jointly?characterEncoding=utf8
jdbc.shop.username=jointly_xx
jdbc.shop.password=G-uTlU-xxx
Step 6: add configuration information
Need to be in ApplicationContext Add configuration information in XML. Here is the key to the whole integration:
<!-- Used to load configuration files -->
    <bean class="org.springframework.beans.factory.config.PropertyPlaceholderConfigurer">
        <property name="location">
            <value>classpath:com/mybatis/config/datasources/jdbc.properties</value>
        </property>
    </bean>

    <!-- Define data source -->
    <bean id="dataSource" class="org.springframework.jdbc.datasource.DriverManagerDataSource">
        <property name="url" value="${jdbc.shop.url}"></property>
        <property name="username" value="${jdbc.shop.username}"></property>
        <property name="password" value="${jdbc.shop.password}"></property>
    </bean>

    <!-- Add transaction support -->
    <bean id="txManager"
          class="org.springframework.jdbc.datasource.DataSourceTransactionManager">
        <property name="dataSource" ref="dataSource" />
    </bean>
    <!-- Registration transaction management driver -->
    <tx:annotation-driven transaction-manager="txManager" />

    <!-- to configure SqlSessionFactoryBean -->
    <bean id="sqlSessionFactory" class="org.mybatis.spring.SqlSessionFactoryBean">
        <!-- Reference data source component -->
        <property name="dataSource" ref="dataSource" />
        <!-- quote DB XML configuration file -->
        <property name="mapperLocations" value="classpath*:com/mybatis/mapper/UserMapper.xml" />
        <!-- quote MyBatis Configuration in configuration file -->
        <property name="configLocation" value="classpath:com/mybatis/config/datasources/mybatis-config.xml" />
    </bean>

    <!-- Mapper Agent development, use Spring Automatic scanning MyBatis Interface and assembly (Spring All of the specified packages will be@Mapper Automatic assembly of interfaces marked as MyBatis Mapping interface) -->
    <bean class="org.mybatis.spring.mapper.MapperScannerConfigurer">
        <!-- mybatis-spring Scanner of the component, com.dao Only interfaces are required (interface methods and SQL Same in mapping file) -->
        <property name="basePackage" value="com.mybatis.dao" />
        <property name="sqlSessionFactoryBeanName" value="sqlSessionFactory" />
    </bean>
This configuration needs to be interpreted:
-
Used to load the configuration file: used to store the configuration information of the DB, which is the JDBC mentioned above Properties configuration file, which has the advantage that you do not need to write the DB configuration information in XML.
-
Define data source: This is the DB account and password, JDBC shop. URL and JDBC shop. Username is the configuration information of DB, which is saved in JDBC Properties configuration file.
-
Add transaction support: the configuration of transaction support was in environments in MyBatis before. Now it is moved here, or JDBC is adopted. Note that to add a transaction, you must register the transaction management driver.
-
Configuring SqlSessionFactoryBean: This is actually the previous configuration in MyBatis. dataSource is the data source, maperlocations is the XML Mapping file, and configLocation is the original configuration of MyBatis. It is equivalent to splitting the previously unintegrated MyBatis configuration and moving the environments and mappers here. This is actually used to build the sqlSessionFactory session factory. We can review the call process of MyBatis:
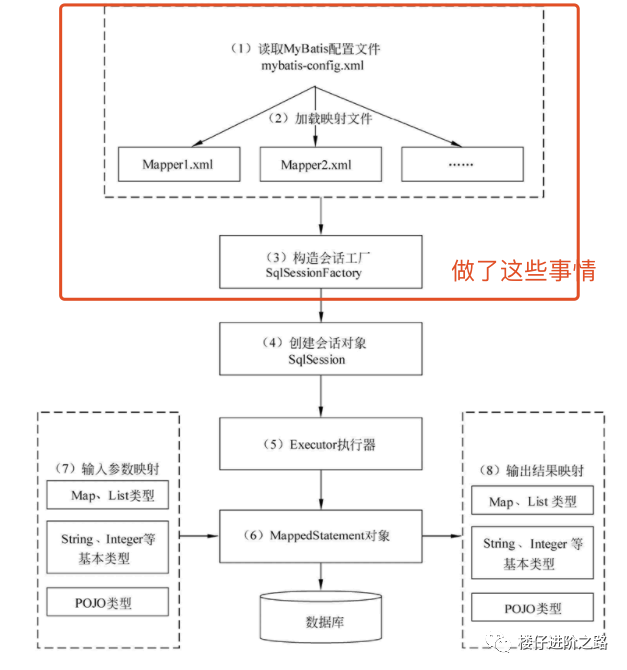
I suggest you look at the article "basic knowledge of [MyBatis Series 1] (Part 2) and you can clearly see their differences. Therefore, why do you need to master the non integrated implementation method of MyBatis so that you can know its original appearance, including inheriting Spring Boost later. The principle is the same, but a different display method is used.
-
Spring automatically scans and assembles the interface of MyBatis: here is the core of the combination of the two. How to combine them? Via COM MyBatis. dao. Userdao interface is our "step 3: create the interface corresponding to the mapping file", so this is the core of the integration of the two. The basePackage specifies the interface path, and sqlSessionFactoryBeanName is the sqlSessionFactory session factory used.
Here, is it very clear? I will compare and explain it in combination with the non integrated way of MyBatis, so as to know what Spring has done for the integration of the two.
Step 7: test example
Let's start with a common test class:
@Controller("userController")
public class UserController {
    @Autowired
    private UserDao userDao;
    public void test() {
        //Query a user
        MyUser auser = userDao.selectUserById(1);
        System.out.println(auser);
        System.out.println("============================");
        //Query all users
        List<MyUser> list = userDao.selectAllUser();
        for (MyUser myUser : list) {
            System.out.println(myUser);
        }
    }
}
Test example:
//Used to test the integration of MyBatis and Spring
public class SpringMyBatisTest {
    public static void main(String[] args) {
        String xmlPath = "applicationContext.xml";
        ApplicationContext applicationContext = new ClassPathXmlApplicationContext(xmlPath);
        UserController uc = (UserController) applicationContext.getBean("userController");
        uc.test();
    }
}
Output results:
MyUser(uid=1, uname=Zhang San, usex=female)
MyUser(uid=2, uname=Chen Heng, usex=male)
MyUser(uid=3, uname=Lou Zi, usex=male)
Project framework
If you only want to make the project run according to the above example, it is still a little difficult for Xiaobai, because you don't know where to put the file. Here I give the project view directly. Do you feel that brother Lou is super warm.

Postscript
To learn a tool, you still need to learn from the source of evolution. For example, to learn MyBatis, first learn the integration of MyBatis and Spring Boost. Although you know how to use it, you don't know how to locate it when there is a problem, so you still need to master the basic processes and principles. For example, learning annotations evolved from XML at the beginning. If you don't understand XML and learn annotations directly, you don't have a deep understanding.
In the MyBatis series, I will also write about the integration of MyBatis and Spring Boost. After the program is written, I will publish this article again!
Welcome to the many more articles, please pay attention to the official account of WeChat public, "the road of Lou Tsai", pay attention to it and not lose your way.
