
Mainly explain the integration process of MyBatis and Spring Boost through examples.
preface
Last month, I saw the project code written by my colleague and found that there was no XML file in MyBatis. I asked him, "MyBatis is integrated with Spring. I have written a Demo before. Shouldn't there be XML file configuration?", Then he said, "this is Spring Boost and does not need XML file configuration". I was surrounded. At that time, I felt that there were really TM many Java tools. For one time, I couldn't even understand the code.
The article [MyBatis Series 2] integration of MyBatis and Spring has described the integration with Spring. Let's take a look at how MyBatis and Spring Boost are integrated.
Project preparation
DB structure:
CREATE TABLE `user_test` (
  `uid` tinyint(2) NOT NULL,
  `uname` varchar(20) DEFAULT NULL,
  `usex` varchar(10) DEFAULT NULL,
  PRIMARY KEY (`uid`)
) ENGINE=InnoDB DEFAULT CHARSET=utf8
DB initial data:
| uid | uname | usex |
|---|---|---|
| 1 | Zhang San | female |
| 2 | Chen Heng | male |
| 3 | Lou Zi | male |
Integration example
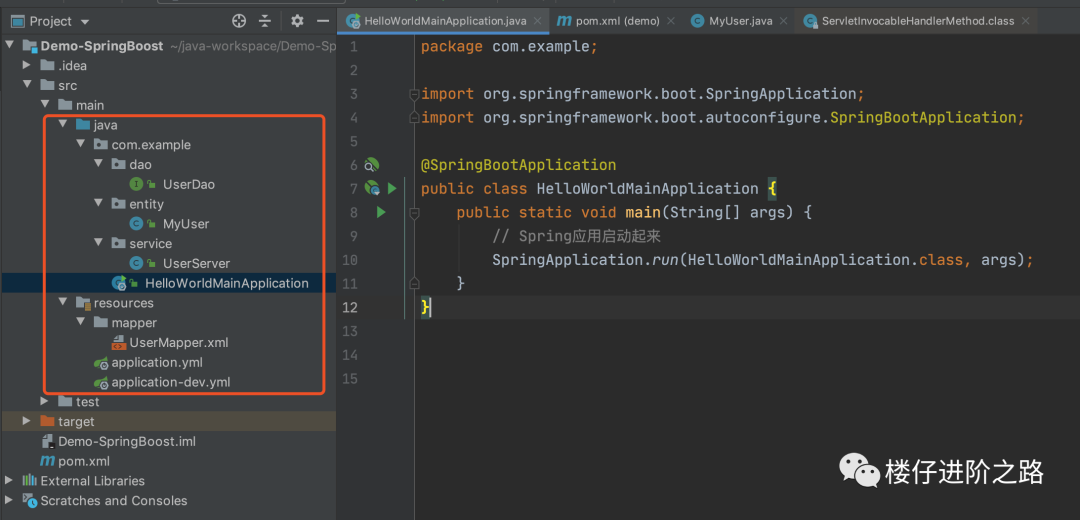
Project structure
Let's take a look at the project structure first:
pom.xml
The DB uses Mysql, POM The XML file is as follows:
<?xml version="1.0" encoding="UTF-8"?>
<project xmlns="http://maven.apache.org/POM/4.0.0" xmlns:xsi="http://www.w3.org/2001/XMLSchema-instance"
         xsi:schemaLocation="http://maven.apache.org/POM/4.0.0 http://maven.apache.org/xsd/maven-4.0.0.xsd">
    <modelVersion>4.0.0</modelVersion>

    <groupId>com.example</groupId>
    <artifactId>demo</artifactId>
    <version>0.0.1-SNAPSHOT</version>
    <packaging>jar</packaging>

    <name>demo</name>
    <description>Demo project for Spring Boot</description>

    <parent>
        <groupId>org.springframework.boot</groupId>
        <artifactId>spring-boot-starter-parent</artifactId>
        <version>2.0.5.RELEASE</version>
        <relativePath/> <!-- lookup parent from repository -->
    </parent>

    <properties>
        <project.build.sourceEncoding>UTF-8</project.build.sourceEncoding>
        <project.reporting.outputEncoding>UTF-8</project.reporting.outputEncoding>
        <java.version>1.8</java.version>
    </properties>

    <dependencies>
        <dependency>
            <groupId>org.springframework.boot</groupId>
            <artifactId>spring-boot-starter-jdbc</artifactId>
        </dependency>
        <dependency>
            <groupId>org.springframework.boot</groupId>
            <artifactId>spring-boot-starter-web</artifactId>
        </dependency>
        <dependency>
            <groupId>org.mybatis.spring.boot</groupId>
            <artifactId>mybatis-spring-boot-starter</artifactId>
            <version>1.3.2</version>
        </dependency>

        <dependency>
            <groupId>mysql</groupId>
            <artifactId>mysql-connector-java</artifactId>
            <scope>runtime</scope>
        </dependency>
        <dependency>
            <groupId>org.springframework.boot</groupId>
            <artifactId>spring-boot-starter-test</artifactId>
            <scope>test</scope>
        </dependency>

        <dependency>
            <groupId>org.projectlombok</groupId>
            <artifactId>lombok</artifactId>
            <version>1.16.10</version>
        </dependency>
    </dependencies>

    <build>
        <plugins>
            <plugin>
                <groupId>org.springframework.boot</groupId>
                <artifactId>spring-boot-maven-plugin</artifactId>
            </plugin>
        </plugins>
    </build>
</project>
resource file
This article does not use application Properties file, using a more concise application YML file. Put the original application. In the resource folder Delete the properties file and create the application YML configuration file (Note: in fact, the bottom layer of SpringBoot will parse the application.yml file into application.properties). This paper creates two YML files (application.yml and application dev.yml). Let's take a look at the contents respectively:
application.yml
spring:
  profiles:
    active: dev
application-dev.yml
server:
  port: 8080

spring:
  datasource:
    driver-class-name: com.mysql.jdbc.Driver
    url: jdbc:mysql://xxx:3104/xm_jointly?characterEncoding=utf8
    username: xx
    password: xxx

mybatis:
  mapper-locations: classpath:mapper/*Mapper.xml
  type-aliases-package: com.example.entity

#showSql
logging:
  level:
    com:
      example:
        mapper : debug
Now a project has many environments, development environment, test environment, quasi production environment and production environment. The parameters of each environment are different, so we can configure the parameters of each environment into the YML file. In this way, when we want to use which environment, we only need to write the configuration file in the main configuration file, such as application yml.
In Spring Boot, the multi environment configuration file name needs to meet the requirements of application - {profile} YML format, where {profile} corresponds to your environment ID, such as:
-
application-dev.yml: development environment
-
application-test.yml: Test Environment
-
application-prod.yml: production environment
As for which specific configuration file will be loaded, you need to click application YML file through spring profiles. The active property, whose value corresponds to the {profile} value.
UserMapper.xml
<?xml version="1.0" encoding="UTF-8"?>
<!DOCTYPE mapper
        PUBLIC "-//mybatis.org//DTD Mapper 3.0//EN"
        "http://mybatis.org/dtd/mybatis-3-mapper.dtd">
<mapper namespace="com.example.dao.UserDao">
    <!-- according to uid Query a user information -->
    <select id="selectUserById" parameterType="Integer" resultType="com.example.entity.MyUser">
        select * from user_test where uid = #{uid}
    </select>
    <!-- Query all user information -->
    <select id="selectAllUser" resultType="com.example.entity.MyUser">
        select * from user_test
    </select>
    <!-- Add a user,#{uname} is com mybatis. po. Attribute value of myuser -- >
    <insert id="addUser" parameterType="com.example.entity.MyUser">
        insert into user_test (uid,uname,usex)
        values(#{uid},#{uname},#{usex})
    </insert>
    <!--Modify a user -->
    <update id="updateUser" parameterType="com.example.entity.MyUser">
        update user_test set uname =#{uname},usex = #{usex} where uid = #{uid}
    </update>
    <!-- Delete a user -->
    <delete id="deleteUser" parameterType="Integer">
        delete from user_test where uid= #{uid}
    </delete>
</mapper>
Code file
MyUser.java
/**
 * springtest Persistent class of user table in database
 */
@Data
public class MyUser {
    private Integer uid; //Primary key
    private String uname;
    private String usex;
}
UserDao.java
@Repository
@Mapper
public interface UserDao {
    /**
     * id in the SQL mapping file corresponding to the interface method
     */
    public MyUser selectUserById(Integer uid);
    public List<MyUser> selectAllUser();
    public int addUser(MyUser user);
    public int updateUser(MyUser user);
    public int deleteUser(Integer uid);
}
UserServer.java
@Service
@RequestMapping("user")
public class UserServer {
    @Autowired
    private UserDao userMapper;
    @ResponseBody
    @RequestMapping("getuser/{id}")
    public String test(@PathVariable int id) {
        MyUser user = userMapper.selectUserById(id);
        System.out.println(user.toString());
        return user.toString();
    }
}
HelloWorldMainApplication.java
@SpringBootApplication
public class HelloWorldMainApplication {
    public static void main(String[] args) {
        //The Spring application starts
        SpringApplication.run(HelloWorldMainApplication.class, args);
    }
}
test
Start the service, and then enter“ http://localhost:8080/user/getuser/1 ", the results are as follows:

Input“ http://localhost:8080/user/getuser/2 ", the results are as follows:

I basically didn't explain why this integration is needed in the whole example, because the principle is basically similar to that of Spring integration. If you are very clear about the integration of MyBatis and Spring, it will look very simple. For the specific reasons for each step, please refer to the article [MyBatis Series 2] integration of MyBatis and Spring. I will explain different parts later.
Spring Boost vs Spring
The two are the same:
-
The principle and core mechanism are the same;
-
The coding part of the code is the same. You need DB class MyUser, interface UserDao and mapping file usermapper xml.
The two are different:
-
Some previous configurations during Spring and MyBatis integration, such as sqlSessionFactory, mappercannerconfigurer, and MyBatis config XML, etc. previously, it was written in applicationContext.xml in Spirng XML configuration, but it can't be found in Spring Boost. It becomes application Configuration of YML and application-dev.yml.
-
Find usermapper The XML file is directly written in application-dev.yml, which is also used as the configuration item of MyBatis.
Another thing, I don't know if I used it wrong. In Spring, I can write a Test to Test the integration of the two. However, in Spring Boost, I can't make internal calls through Test. I need to use the way of URL request. It may be that the Spring Boost framework was loaded when the program was started. I wrote my own Demo and didn't start the Spring Boost framework. This is only my own understanding, I'll study it later when I'm free.
Postscript
I have basically finished learning the basic knowledge of MyBatis. It took me a week. Of course, it is only the basic part of learning. In the next two days, I will look at the places where MyBatis is used in the project, pull out the core knowledge, and then complete the last article. This series will come to an end first.
Today's Dragon Boat Festival, I also wish you a happy Dragon Boat Festival!!!
Welcome to the many more articles, please pay attention to the official account of WeChat public, "the road of Lou Tsai", pay attention to it and not lose your way.
