Master-slave replication: in short, it means that after the master node adds, deletes and modifies the data, it will be synchronized to the slave database. It can easily realize multiple automatic backup of data and expand the database. Multiple data backups can not only strengthen the security of data, but also further improve the load performance of the database by separating read from write.
1. Pull the image
docker pull mysql:8.0.12
2 deploy master node
2.1 creating a mapping file
Since we use docker to deploy the mysql server, in order to avoid frequent operations into the container, we map the files in the container to the files in the host.
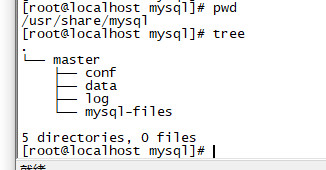
First, create a master directory in the / usr/share/mysql path to store the relevant files of the master server. Then create conf, data, log and MySQL files directories in the master directory. As follows:
2.2 run mysql master node
Execute the following instructions:
docker run -p 3306:3306 --name mysql_master -h mysql_master --restart=always --privileged=true \
-v /etc/localtime:/etc/localtime:ro \
-v /usr/share/mysql/master/log:/var/log/mysql \
-v /usr/share/mysql/master/data:/var/lib/mysql \
-v /usr/share/mysql/master/conf:/etc/mysql \
-v /usr/share/mysql/master/mysql-files:/var/lib/mysql-files \
-e MYSQL_ROOT_PASSWORD=root -d ee1e8adfcefb
Use the docker ps command to check whether the container is started successfully:

2.3 configuring the configuration file of the master node
Since we have mapped the files in the container, we do not need to enter the container to write its configuration file. We can edit it directly under master/conf.
vi /usr/share/mysql/master/conf/my.cnf
Write the following in the configuration file:
[client]
default-character-set=utf8mb4
[mysql]
default-character-set=utf8mb4
[mysqld]
init_connect='set collation_connection=utf8mb4_unicode_ci; set names utf8mb4;'
character-set-server=utf8mb4
collation-server=utf8mb4_unicode_ci
skip-character-set-client-handshake
skip-name-resolve
server-id=1 #Important, the server ID of the master node cannot be the same as that of the slave node
log-bin=mysql-bin
binlog-ignore-db=mysql
binlog_cache_size=1M
binlog_format=mixed
expire_logs_days=7
[note] the most important one is the configuration of server ID, which cannot be repeated in the same cluster.
After the configuration is completed, we restart the master node:
docker restart mysql_master
2.4 creating users
Create a user for the slave node that can be replicated.
docker exec -it mysql_master mysql -uroot -proot
create user 'mysql_slave'@'%' identified with mysql_native_password by 'slave123';
grant replication slave, replication client on *.* to 'mysql_slave'@'%';
3 deploy slave nodes
3.1 creating a mapping file
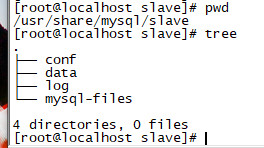
Create a slave directory in / usr/share/mysql directory, and then enter the slave directory to create conf, data, log and MySQL files directories.
3.2 running mysql slave node
Execute the following command:
docker run -p 3316:3306 --name mysql_slave -h mysql_slave --restart=always --privileged=true \
-v /etc/localtime:/etc/localtime:ro \
-v /usr/share/mysql/slave/log:/var/log/mysql \
-v /usr/share/mysql/slave/data:/var/lib/mysql \
-v /usr/share/mysql/slave/conf:/etc/mysql \
-v /usr/share/mysql/slave/mysql-files:/var/lib/mysql-files -e MYSQL_ROOT_PASSWORD=root -d ee1e8adfcefb
3.3 configuration file of slave node
We can edit / usr/share/mysql/slave/conf/my.cnf directly:
vi /usr/share/mysql/slave/conf/my.cnf
And write the following:
[client]
default-character-set=utf8mb4
[mysql]
default-character-set=utf8mb4
[mysqld]
init_connect='set collation_connection=utf8mb4_unicode_ci; set names utf8mb4;'
character-set-server=utf8mb4
collation-server=utf8mb4_unicode_ci
skip-character-set-client-handshake
skip-name-resolve
server-id=2 # Different from the master node
log-bin=mysql-slave-bin
#binlog-do-db=test_db
binlog-ignore-db=mysql
relay_log=mysql-relay-bin
binlog_cache_size=1M
binlog_format=mixed
expire_logs_days=7
slave_skip_errors=1062
read_only=1 #read-only
log_slave_updates=1
After configuration, restart the slave node:
docker restart mysql_slave
After the previous operation, we have the master node mysql_master and slave nodes MySQL_ After the slave is started, it will be the master to copy the relevant content from the slave.
4 configuration replication
(1) View the log file and location of the master node to determine where the slave node starts replication from the master node.
Enter mysql_master container:
docker exec -it mysql_master mysql -uroot -proot
Then view the master node status:
show master status;
As shown below:
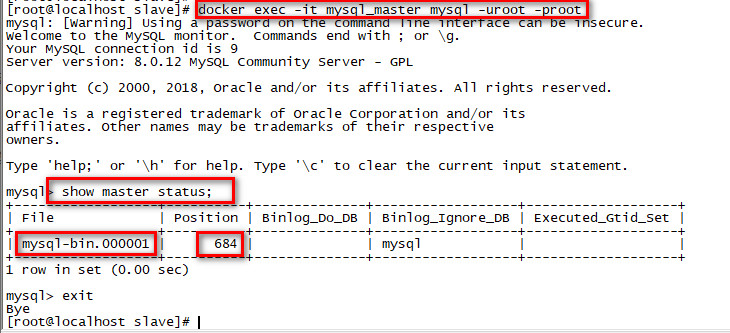
You can see that the binary log file name is mysql-bin.00000 1 and the location is 684 (yours may be different from mine. Record your own). It is required for configuring the slave node later.
(2) Log in to the slave node and establish an association with the master node.
Login slave node:
docker exec -it mysql_slave mysql -uroot -proot
Connect the slave node to the master node:
change master to master_host='192.168.10.39', master_user='mysql_slave', master_password='slave123', master_port=3306, master_log_file='mysql-bin.000001', master_log_pos=684, master_connect_retry=30;
Configuration Description:
master_host = '192.168.10.39'. For simplicity, write the ip address of your host.
master_user and master_password is the account we created on the master node earlier.
master_log_file and master_log_pos obtained when viewing the status of the master node in the previous step. You need to write your own.
Then view the slave node status:
show slave status\G;
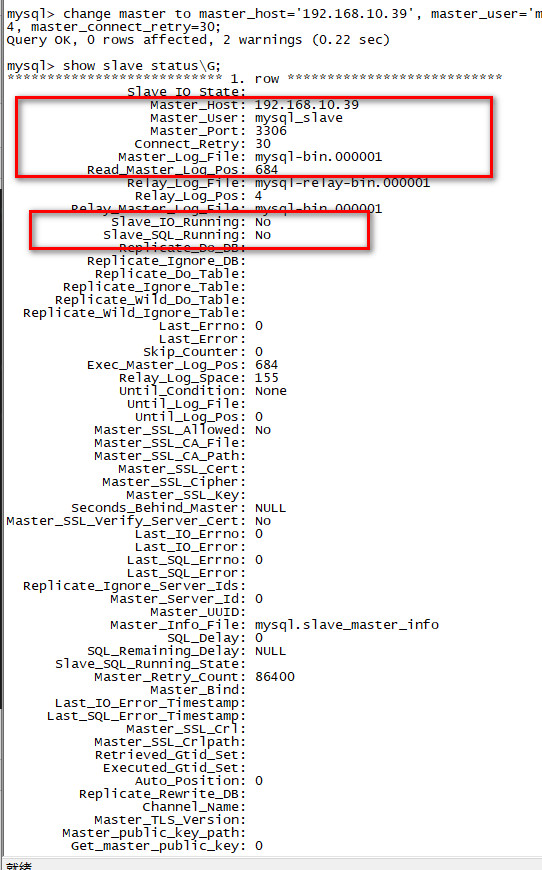
From the information of the master node in the picture, we can also see the current binary log file and its location of the master node. At this time, the IO thread and SQL thread of the slave node have not been started, indicating that the slave node has not replicated from the master node.
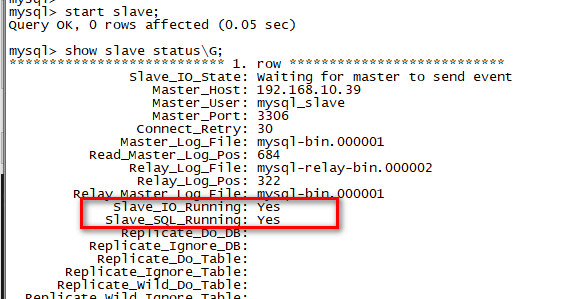
Then we need to start master-slave replication:
start slave;
Check the slave node status again, and the two threads have been started:
5 test
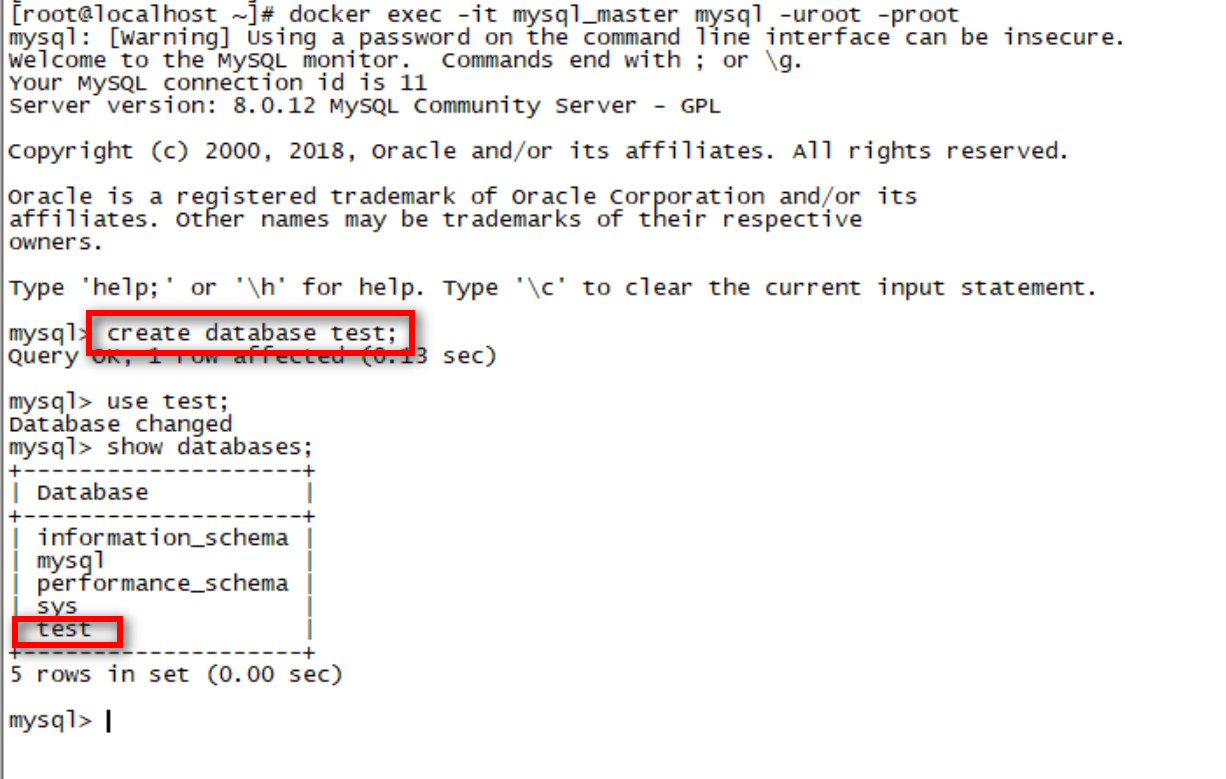
So far, we have set up the master-slave replication, and then we will simply test it.
First, create a database test on the master node.
Then we connect from the node to see if there is the database.
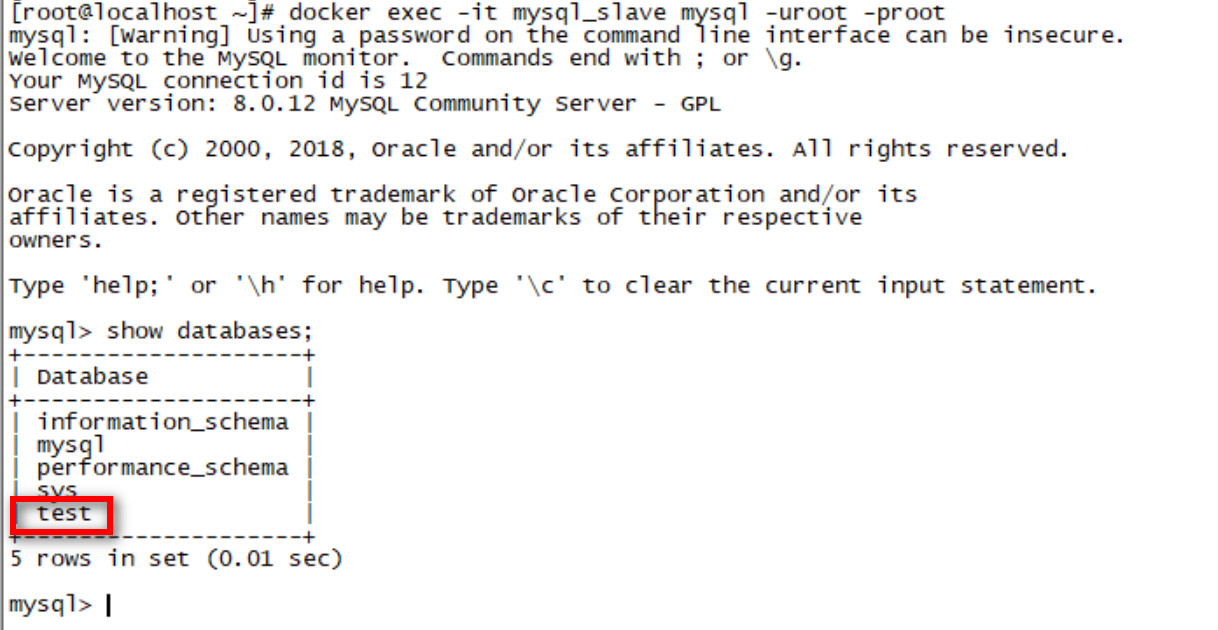
As can be seen from the above figure, the test database is also available in the slave node, indicating that the master-slave replication is set up.
Create the user table in the test database of the master node and insert the data:
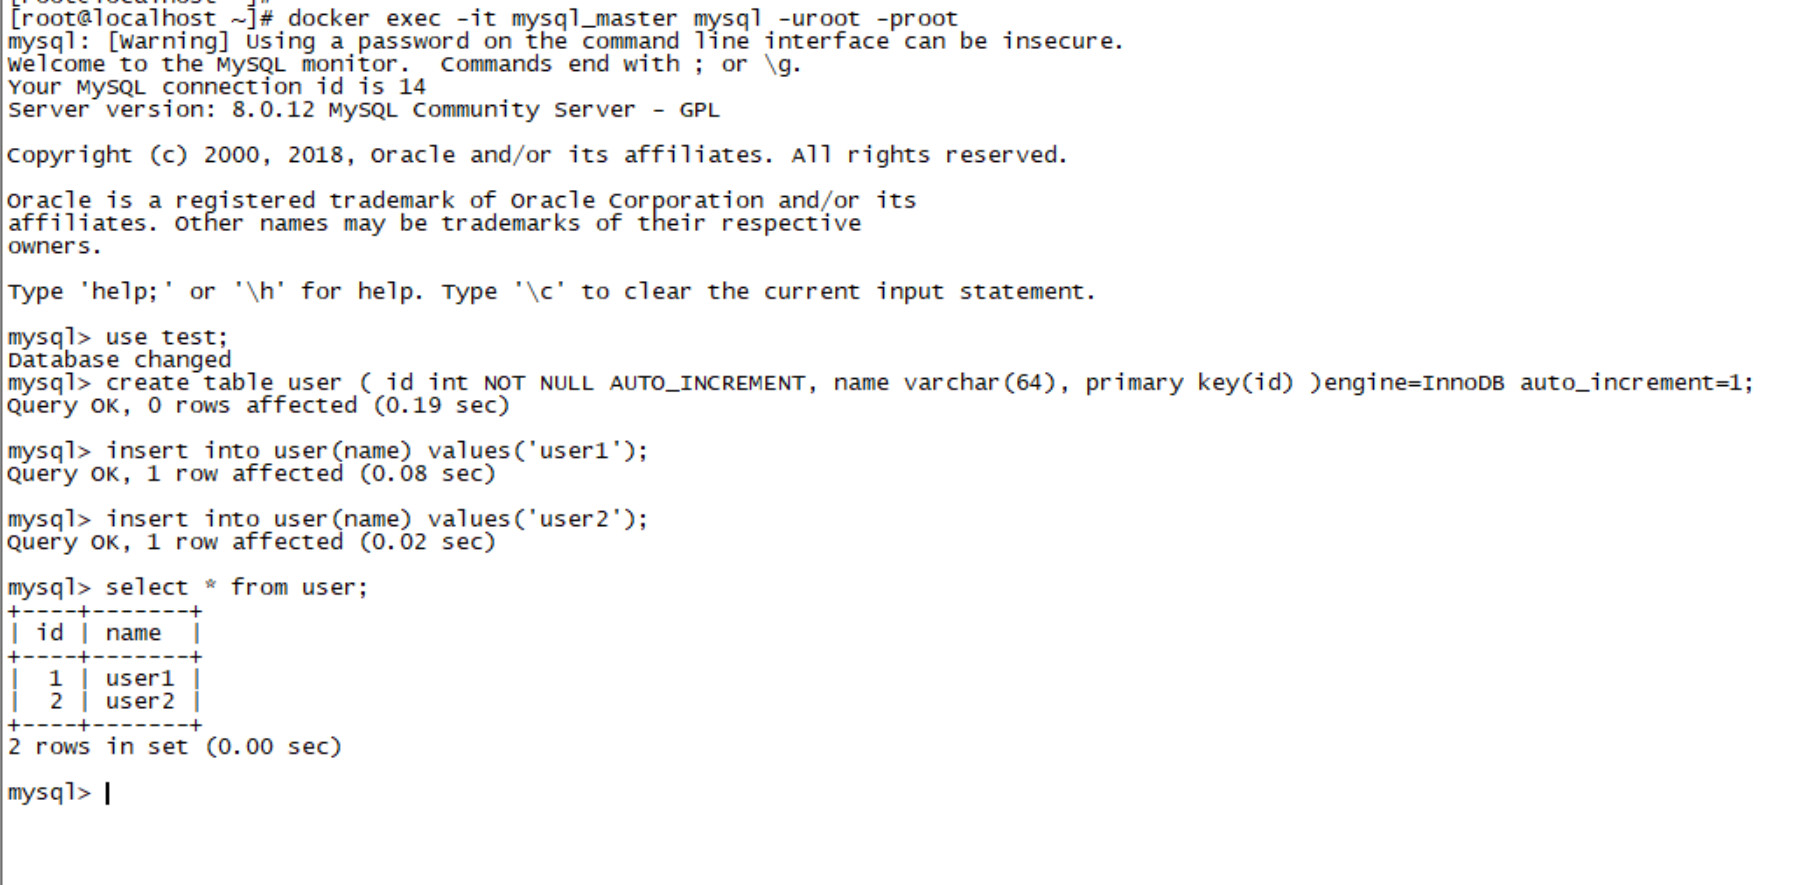
Then we go to the node to see if the data in the user table is copied.
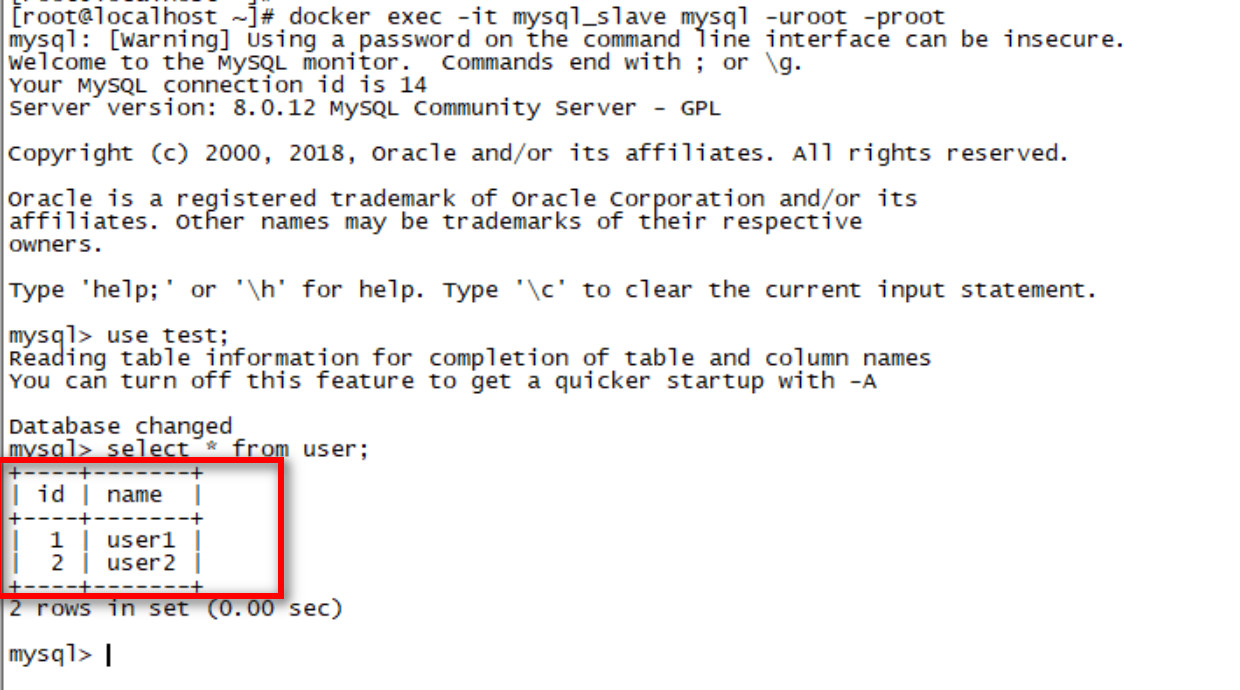
This article only introduces one master and one slave. If you want to deploy one master and many slaves, it is similar to this article, but only deploy several slave nodes.