Author: Yicun HUI
source: https://www.cnblogs.com/zsql/
For DBAs, data backup and recovery is a very basic operation. Under unexpected circumstances (server downtime, disk damage, RAID card damage, etc.), every DBA should be concerned about database backup at all times to ensure that data is not lost or to the minimum extent. The backup tools, principles and use are described in the original instructions.
1, Overview of backup and recovery
According to whether the service can continue to be provided, the database backup types are divided into:
Hot backup: (online backup) backup during the operation of the database without affecting any operation of the database
Warm backup: it can read but not write. It is backed up during the data operation, but it has an impact on the data. If it is necessary to add a global lock to ensure the consistency of the data.
Cold backup: (offline backup) copy the physical files of the backup database when the database is stopped.
Classification according to the contents of files after backup:
Logical backup: text files readable when backing up files, such as sql statements, are suitable for database migration and upgrade, but the recovery time is relatively long.
Raw file backup: copy the physical files of the database
According to the content of the backup database:
Full backup: a full backup of the database
Incremental backup: incremental backup of the database based on full backup
Log backup: as long as it is a backup of binlog
2, Cold standby
Just backup mysql Database frm Files, shared tablespace files, standalone tablespace files(*.ibd),Redo log files, and msyql Configuration file for my.cnf.
advantage:
Backup is simple, just copy files
Recovery is simple. You only need to restore the file to the specified location
Fast recovery,
Disadvantages:
The backup file is large because there are a lot of other data in the table space, such as undo segment, insert buffer, etc
You can't always cross platform easily
3, Logical backup
3.1,mysqldump
Syntax:
mysqldump [OPTIONS] database [tables]
mysqldump [OPTIONS] --databases [OPTIONS] DB1 [DB2 DB3...]
mysqldump [OPTIONS] --all-databases [OPTIONS]
Options:
-u, --user=name        #Specify user name
-S, --socket=name      #Specify socket path
-p, --password[=name]  #Specify password
-P, --port=3306        #Specify port
-h, --host=name        #Specify the host name
-r, --result-file=name #Saving the export results to the specified file is equivalent to overwriting redirection in Linux.
--all-databases, -A    #Specify dump all databases. Equivalent to using -- databases to select all libraries
--databases, -B        #Specify the library that needs dump. All contents after this option are treated as database names; Each database in the output file will be preceded by a database creation statement and a use statement
--ignore-table=db_name.tbl_name   #Ignore the specified tables in the specified database during export, which can also be used to ignore views. To ignore multiple tables, write this option multiple times
-d, --no-data          #Table data is not exported, which can be used when only table structure is exported.
--events, -E           #Export event scheduler
--routines, -R         #Export stored procedures and functions. However, their attribute values will not be exported. To export their attributes, you can export mysql Proc table and reload
--triggers             #Export trigger, turned on by default
--tables               #Overwrite the -- databases option to export the specified table. However, only tables in one library can be exported. The format is -- tables database_name tab_list
--where='where_condition', -w 'where_condition'   #Specify the filter criteria and export the data in the table that meets the filter, such as -- where="user='jim '"
--add-drop-database    #Add the drop database statement before the create database statement in the output to delete the database first
--add-drop-table       #Add a drop table statement before the output create table statement to delete the table. It is enabled by default
--add-drop-trigger     #Add a drop trigger statement before the create trigger statement in the output to delete the trigger first
-n, --no-create-db     #When the -- databases or -- all databases option is specified, the database creation statement will be added by default. This option suppresses the output of the database creation statement
-t, --no-create-info   #Do not include table creation statements in the output
--replace              #Use replace instead of insert statement
--default-character-set=charset_name  #In the process of exporting data, specify the exported character set. It is very important that the character sets of the client and server are different. It may be garbled when exporting. utf8 is used by default
--set-charset          #Add set names charset to the export result_ Name statement. Enabled by default.
--compact              #Simplify the output of exported content, and almost all comments will not be output
--complete-insert, -c  #Add the inserted column information to the insert statement
--create-options       #Add all table creation options to the exported table creation statement
--tab=dir_name, -T dir_name #Export the structure definition and data of each table to the file with the same table name in the specified directory sql and txt files, where txt
                            #Field separators in files are tabs. It is required that mysqldump must be on the same host as MySQL Server, and mysql uses
                            #The user has write permission to the specified directory, and the user connecting to the database must have file permission. And specify the table to dump, which cannot be the same as
                            #--Databases or -- all databases. Its essence is to execute select into outfile.
--fields-terminated-by=name #Specifies the field separator in the output file
--fields-enclosed-by=name   #Specifies the enclosing character of the field value in the output file, such as enclosing the string with quotation marks
--fields-optionally-enclosed-by=name   #Specifies optional field references in the output file
--fields-escaped-by=name               #Specifies the escape character in the output file
--lines-terminated-by=name             #Specifies the newline character in the output file
-Q, --quote-names                      #The identifier used when referencing table name and column name. By default, the backquote "`" is used
--delayed-insert         #For non transaction tables, the delayed function is supported during insert, but in MySQL 5 6.6 start this option is obsolete
--disable-keys, -K       #Add disable and enable index statements before and after insert statements. This option is very suitable for large amount of data insertion. Default on
--insert-ignore          #Replace the insert statement with the insert ignore statement
--quick, -q              #Quickly export data. This option is very useful for exporting large tables. By default, when exporting data, all data in the table will be retrieved and added at one time
                         #To memory, and this option retrieves one row at a time and exports one row at a time
--add-locks              #Add the lock tables and unlock tables statements before and after the insert statement, which is enabled by default.
--flush-logs, -F         #Flush logs before dump. If -- all databases is used at the same time, flush logs before dump of each database in turn,
                         #If -- lock all tables, -- master data or -- single transaction are used at the same time, only flush is used
                         #Once, it is equivalent to using flush tables with read lock to lock all tables, so that dump and flush can be completely refined
                         #Exactly at the same time.
--flush-privileges       #After dump ing all databases, add a flush privileges statement at the end of the data file. The exported data involves mysql library or
                         #This option should be used when the user depends on the mysql library
--lock-all-tables, -x    #Add a global read lock to all tables that lasts until the end of dump. This option only adds one lock in the dump phase. One lock is permanent and all locks are locked.
                         #This option automatically disables the -- lock tables and -- single transaction options
--lock-tables, -l        #Before dump each database, apply read local locks to all tables in the database (lock tables... Read local for multiple times),
                         #This allows concurrent inserts into the myisam table. For innodb storage engine, use -- single transaction ratio
--lock-tables            #Better, because it does not fully lock the table. Because this option locks the database separately, each number can only be guaranteed
                         #According to the consistency of the database, the consistency between all databases cannot be guaranteed. This option is mainly used for myisam tables. If there are both myisam and
                         #innodb, you can only use -- lock tables or dump separately
--single-transaction     #This option will set the transaction isolation level to repeatable read before dump and send a start transaction statement to
                         #Server. This option is useful for exporting transaction tables, such as innodb table, because it can ensure the import after issuing start transaction
                         #The consistency of the database is not blocked from time to time. This option can only ensure the consistency of innodb table, not myisam table
                         #Consistency. When using this option, make sure that no other connection is using alter table or create table,
                         #DROP TABLE,RENAME TABLE,TRUNCATE TABLE statements because consistent reads cannot isolate these statements.
                         #--The single transaction option and -- lock tables option are mutually exclusive because lock tables implicitly commits transactions.
                         #To export large innodb tables, this option is better combined with the -- quick option
--no-autocommit          #Add SET autocommit = 0 before and after the insert statement, and add a COMMIT statement where submission is required
--order-by-primary       #If there is a primary key or unique index in the table, it will be exported in order after sorting. It is useful when migrating from myisam table to innobd table, but
                         #This makes transactions very long and slow
Simple use (not specified due to its simplicity):
mysqldump -uroot -p123456 -A -r all.sql        #Back up all databases
mysqldump -uroot -p123456 -A > all.sql        #Back up all databases
mysqldump -uroot -p123456 -B test test1 > db_test.sql #Back up the test and test1 databases
mysqldump -uroot -p123456 --single-transaction -A > all.sql #innodb starts a transaction to back up all data
mysqldump -uroot -p123456 --default-character-set=latin1 -A > all.sql #Specifies the character set to back up all data
mysqldump -uroot -p123456 --tables test gxt1 -r gxt.sql  #Back up the gxt1 table of the test library
Suggestions for using mysqldump tool:
1. In terms of performance: when a large amount of data needs to be exported, use the – quick option to speed up the export, but the import speed remains the same. If it is an innodb table, you can add the – no autocommit option at the same time, which will greatly improve the performance when importing a large amount of data.
2. Consistency considerations: for innodb tables, there is almost no reason not to use the – single transaction option. For myisam tables, it is better to use the – lock all tables option than – lock tables. When there are both innodb and myisam tables, they can be exported separately to ensure consistency and efficiency.
3. Convenience of management and Maintainability: flush log is necessary when exporting. Add the – flush logs option. In addition, it is generally used together with the – lock all tables option or – single transaction option, because when used at the same time, you only need to refresh the log once, and the consistency can be guaranteed. At the same time, it can also cooperate with – master data = 2, so that you can easily know the location of the backup end point in the binary log.
4. Consideration of character set: if a table involves Chinese data, the character set of dump must be set the same as that of the table during dump.
5. Miscellaneous considerations: binary logs will be generated during backup, but this is not necessary. So you can turn it off before backup and turn it on after backup. set sql_log_bin=0, close, set sql_log_bin=1 on.
msyqldump combined with binlog log log to realize incremental backup
1. First of all: mysqldump - uroot - p123456 - Q -- no autocommit -- flush logs -- single transaction -- master data = 2 -- tables test gxt1 > GXT sql
2. Modify the data in the table: insert into test Gxt1 values (1, 'Wang Mazi');
3. Backup binary log: MySQL binlog MySQL bin 000002 >new_ gxt. SQL # here, you need to specify the time or position to back up the increment
4. Simulation delete: drop table test gxt1;
5. Recovery:
mysql>use test;
mysql>source gxt.sql;
mysql>source new_gxt.sql;
summary
msyqldump It belongs to logical backup sql Statement, simple, but because the recovery is through insert Insertion, slow recovery, mysqldump backups myisam Because you have to add--lock-all-tables,At this time, all databases to be backed up are locked, readable and writable, so warm backup is realized. mysqldump backups innodb Because you have to add--single-transaction,The isolation level is automatically set to repeatable read And start a transaction mysqldump Will get dump Execute the previous line version and stay in a long transaction until dump end. Therefore, it does not affect the use of the target database. It can be read or written, that is, it realizes hot standby
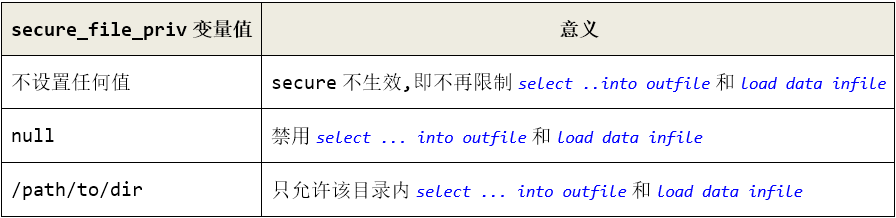
3.2,select ... into outfile
The load data infile and select into outfile statements are matched. You can use the parameter secure_ file_ Can priv be used to control it
Description of common custom formats:
fields terminated by 'string'Specify the field separator;
enclosed by 'char'Specifies that all fields use char Symbol surround, if specified optionally It is only used in fields such as string and date data type, which is not specified by default;
escaped by 'char'Specifies the escape character.
lines starting by 'string'Specify the line start character, such as a blank tab character before the start record of each line;
lines terminated by 'string'Is a line separator.
Default:
fileds terminated by '\t' enclosed by '' escaped by '\\'
lines terminated by '\n' starting by ''
Simple use example:
select * from test into outfile '/data/t_data.sql';
select *  into outfile '/data/t_data.sql' from test;
select id,name from test into outfile '/data/t_data.sql';
select * from t into outfile '/data/t_data1.sql' fields terminated by ',' enclosed by '\'' lines starting by '\t' terminated by '\n';
3.3 recovery of logical backup
The syntax is simple:
mysql -uroot -p123456 < all_bak.sql
mysql>source /root/all_bak.sql #Login to mysql
3.4,load data infile
The option is the same as select into outfile. gnore N lines|rows is added to indicate that the first N rows of data are ignored and will not be imported. set col_name=expr means to perform some expression operations on the column
Basic usage:
load data infile '/home/data1.sql' into table test.gxt fields terminated by ',' (id,name)set is_enable=1; #Specify field
load data infile '/home/data1.sql' into table test.gxt fields terminated by ',' enclosed by '\'' escaped by '\\' lines starting by '\t' terminated by '\n';
load data infile '/home/data1.sql' into table test.gxt fields terminated by ',' enclosed by '\'' escaped by '\\' lines starting by '\t' terminated by '\n' ignore 2 rows; #Ignore the first two lines
load data infile '/home/data1.sql' into table test.gxt fields terminated by ',' enclosed by '\'' escaped by '\\' lines starting by '\t' terminated by '\n' set id=id+5; #Set column, the same below
load data infile '/home/data1.sql' into table test.gxt fields terminated by ',' enclosed by '\'' escaped by '\\' lines starting by '\t' terminated by '\n' set name=concat(name,'@qq.com');
load data infile '/home/data1.sql' into table test.gxt fields terminated by ',' enclosed by '\'' escaped by '\\' lines starting by '\t' terminated by '\n' set name=concat(name,'@qq.com'), id=id+5;
3.5. mysqldump export
The essence is the same as select into outfile
mysql -uroot -p123456 -e "select * from test.gxt" > a.txt # although data can be exported in this way, it has no format
Mysqldump - uroot - p123456 -- tab / data / test gxt1 # the directory specified here requires the mysql user to have write permission and set the parameter secure file priv = / data / test

The above export methods include both the definition of table structure and the export of table data.
mysqldump of"--tab"Options can also specify various separators. as"--fields-terminated-by=...,--fields-enclosed-by=...,--fields-optionally-enclosed-by=...,--fields-escaped-by=...". The following is the field separator specified as","
3.6. mysqlimport import
Mysqlimport is essentially the command interface of load data infile, and most of the syntax is similar to it. The difference is that mysqlimport can import multiple tables at the same time, and import different files concurrently through the parameter - user thread
Simple use example:
mysqlimport -uroot -p123456 --fields-terminated-by=',' test '/home/t.txt'
mysqlimport -uroot -p123456 --fields-terminated-by=',' --user-thread test '/home/t.txt' 'home/gxt1.txt'  #Import two tables concurrently
4, Hot standby
4.1. xtrabackup installation
Official website address: https://www.percona.com/downloads/Percona-XtraBackup-LATEST/
1. Configure Yum source: Yum ins tallhttps://repo.percona.com/yum/percona-release-latest.noarch.rpm (recommended)
2. Install: Yum install percona xtrabackup-24
Originally installed the latest version of Yum install percona xtrabackup-80, but... It's a little awkward (version 8.0 doesn't support mysql5.x). innobackupex is no longer available in the new version
After installation, the following tools will be generated:
[root@lgh3 ~]# rpm -ql percona-xtrabackup-24 | grep bin |xargs ls -l lrwxrwxrwx 1 root root 10 Sep 10 05:33 /usr/bin/innobackupex -> xtrabackup-rwxr-xr-x 1 root root 3846952 Jul 5 03:59 /usr/bin/xbcloud-rwxr-xr-x 1 root root 3020 Jul 5 03:53 /usr/bin/xbcloud_osenv-rwxr-xr-x 1 root root 3603744 Jul 5 03:59 /usr/bin/xbcrypt-rwxr-xr-x 1 root root 3612192 Jul 5 03:59 /usr/bin/xbstream-rwxr-xr-x 1 root root 21730616 Jul 5 03:59 /usr/bin/xtrabackup
Xbloop and xbloop_ Osenv is a new advanced feature of xtrabackup: cloud backup;
xbcrypt is also a new feature, encrypting backup sets;
xbstream is the stream data function of xtrabackup. Through the stream data function, the backup content can be packaged and transmitted to the compression tool after the pipeline for compression;
xtrabackup is the main program
Innobackup ex used to be a perl script that would call xtrabackup, a binary tool. Starting from xtrabackup 2.3, the tool has been rewritten in C language. At present, it is a soft connection to the xtabackup binary tool, but the actual use method is different, and the tool will be deleted in future versions
4.2 xtrabackup backup principle
The implementation process is divided into three stages: backup stage, prepare stage and copy back stage
4.2. 1. Backup process (backup phase)
The backup process can be divided into two cases, mainly based on whether the percona Server tool supports backup lock
Backup lock: only non innodb tables are locked globally. Therefore, after holding the lock, non innodb tables cannot be modified, but the DML of innodb tables will not be affected. Of course, because it is a global lock, DDL operations will also be blocked.
Binary log lock: locks the binary log globally, so it will block other sessions from modifying the binary log. This ensures that the consistent location coordinates in the binary log can be obtained
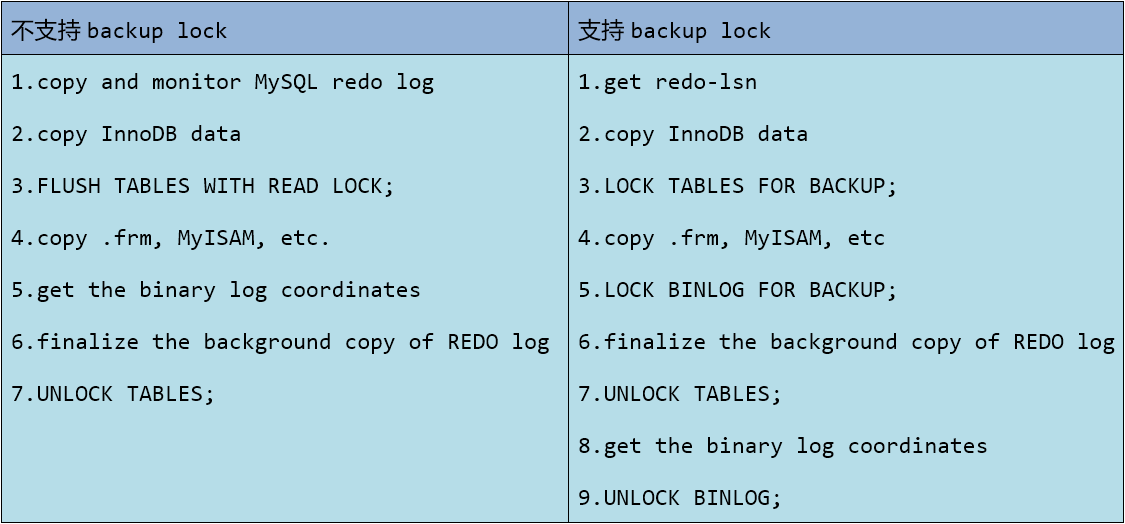
First case (support):
1. When starting xtrabackup, LSN will be recorded and redo log will be copied to xtrabackup_logfile file.
2. Copy the data file of innodb table (tablespace file *. ibd or ibdata1) and make up the frm file at this time
3. When copying non innodb files, you need to lock the non innodb tables before copying to prevent statements from modifying these types of table data during copying. Xtrabackup obtains lightweight backup locks through lock tables for backup to replace flush tables with read lock. Because it only locks non innodb tables, xtrabackup realizes the real hot standby of innodb tables.
4. Copy data and from non innodb tables frm files, copying files of other storage engine types.
5. After the copy phase is completed, finally obtain the coordinate point of the consistency position in the binary log, end the monitoring and copying of redo log, release the lock, etc. The process of the closing phase is as follows: first, obtain the binary log lock through lock binlog for bakcup, then end the monitoring and copying of redo log, then unlock tables to release the table lock, then obtain the coordinate points of the consistency position of the binary log, and finally unlock binlog to release the binary log lock
6. If everything is OK, xtrabackup will exit with status code 0.
The second case (not supported):
1. When starting xtrabackup, LSN will be recorded and redo log will be copied to xtrabackup_logfile file.
2. Copy the data file of innodb table (tablespace file *. ibd or ibdata1) and make up the frm file at this time
3. When copying non innodb files, you need to lock the non innodb tables before copying to prevent statements from modifying these types of table data during copying. The global read lock can only be obtained through flush tables with read lock, but it will also lock the innodb table, which is too lethal.
4. Copy data and from non innodb tables frm files, copying files of other storage engine types.
5. After the copy phase is completed, finally obtain the coordinate point of the consistency position in the binary log, end the monitoring and copying of redo log, release the lock, etc. The process in the closing phase is as follows: obtain the consistency coordinate point of the binary log, end the monitoring and copying of the redo log, and release the lock.
6. If everything is OK, xtrabackup will exit with status code 0.
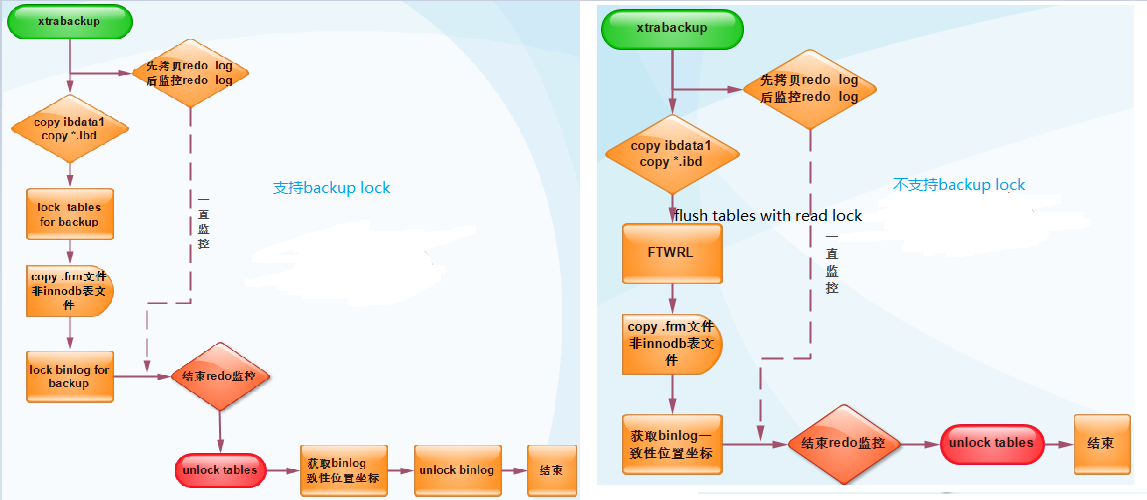
It can be seen from the figure that the comparison is more detailed, as shown in the figure below:
4.2. 2. Preparation process (prepare phase)
The essence of this stage is the backup innodb Data application redo log,The rollback of the rollback and the roll forward of the roll forward are finally guaranteed xtrabackup_logfile Recorded in redo log It has been fully applied to the backup data page and achieved consistency. When the application ends, it will be rewritten"xtrabackup_logfile"Reassure the redo log It corresponds to the backed up data.
4.2. 3. Recovery process (copy back phase)
xtrabackup The essence of the recovery process is to copy back the backed up data files, structure definitions and other files MySQL of datadir. It can also be copied to any machine. Before recovery is required MySQL Must be out of service, and datadir Is an empty directory
4.3 innobackupex tool
4.3. 1. Full backup and recovery
Conditions: account, password, and given backup directory (by default, xtrabackup reads the configuration related to backup from the configuration file when connecting to the database. You can use the option - defaults file to specify the parameter configuration file when connecting, but if you specify this option, this option can only be placed in the first option position.)
[root@lgh3 ~]# mkdir /backup           #New backup directory
[root@lgh3 ~]# chown -R mysql:mysql /backup        #Modify directory owner
[root@lgh3 ~]# innobackupex --user=root --password=123456 /backup/  #backups
Then we look at the directory / backup/

Under the backup directory is a directory named by time stamp, and then continue to look at the following:
[root@lgh3 ~]# ll /backup/2019-09-10_21-39-30/
total 12340
-rw-r----- 1 root root      490 Sep 10 21:39 backup-my.cnf
-rw-r----- 1 root root      365 Sep 10 21:39 ib_buffer_pool
-rw-r----- 1 root root 12582912 Sep 10 21:39 ibdata1
drwxr-x--- 2 root root     4096 Sep 10 21:39 mysql
drwxr-x--- 2 root root     8192 Sep 10 21:39 performance_schema
drwxr-x--- 2 root root     8192 Sep 10 21:39 sys
drwxr-x--- 2 root root       52 Sep 10 21:39 test
drwxr-x--- 2 root root       52 Sep 10 21:39 test1
-rw-r----- 1 root root       21 Sep 10 21:39 xtrabackup_binlog_info
-rw-r----- 1 root root      135 Sep 10 21:39 xtrabackup_checkpoints
-rw-r----- 1 root root      466 Sep 10 21:39 xtrabackup_info
-rw-r----- 1 root root     2560 Sep 10 21:39 xtrabackup_logfile
Of which:
mysql,performance_schemasys, test and test1 are database backups
ibdata1 is a shared tablespace
backup-my.cnf is a copied configuration file, but it only contains [mysqld] configuration fragments and backup related options
[root@lgh3 2019-09-10_21-39-30]# cat backup-my.cnf
# This MySQL options file was generated by innobackupex.

# The MySQL server
[mysqld]
innodb_checksum_algorithm=crc32
innodb_log_checksum_algorithm=strict_crc32
innodb_data_file_path=ibdata1:12M:autoextend
innodb_log_files_in_group=2
innodb_log_file_size=50331648
innodb_fast_checksum=false
innodb_page_size=16384
innodb_log_block_size=512
innodb_undo_directory=./
innodb_undo_tablespaces=0
server_id=1000
redo_log_version=1
server_uuid=74b64a5b-cfba-11e9-95d0-000c2994d425
master_key_id=0
xtrabackup_binlog_info records the binary log file currently in use
[root@lgh3 2019-09-10_21-39-30]# cat xtrabackup_binlog_info
mysql-bin.000008        154
xtrabackup_ The checkpoints record whether the backup type is full backup or additional backup, as well as the start and end LSN numbers of the backup
[root@lgh3 2019-09-10_21-39-30]# cat  xtrabackup_checkpoints
backup_type = full-backuped
from_lsn = 0
to_lsn = 2613099
last_lsn = 2613108
compact = 0
recover_binlog_info = 0
flushed_lsn = 2613108
xtrabackup_info records some information during the backup process.
xtrabackup_logfile is the redo log written after replication and monitoring. This log is the key to the "preparation" of the next operation after backup. Only through it can data consistency be achieved
 According to the previous section xtrabackup We know that there is a preparation process after full preparation, which is mainly to ensure the consistency of data. Because you exist innodb Data cannot be used for recovery. Because from xtrabackup Monitor when the backup starts MySQL of redo log,In copied innodb There are probably uncommitted transactions in the data file, and the copy is complete innodb After the data, a transaction may be committed or a new transaction may be opened, etc. In short, the state after full backup is not necessarily consistent.

Next, proceed to the preparation phase: the mode options used in the preparation phase are"--apply-log". No connection during preparation MySQL,Therefore, you do not need to specify connection options, such as--user Wait. There is another parameter"--use-memory",The default value of this option is 100 M,The higher the value, the faster the preparation process.
[root@lgh3 2019-09-10_21-39-30]# pwd
/backup/2019-09-10_21-39-30
[root@lgh3 2019-09-10_21-39-30]#  innobackupex --apply-log `pwd` #Equal to innobackupex -- apply log / backup / 2019-09-10_ 21-39-30

When the above status appears, it means that the preparation phase has been completed, and we can continue to the next step, that is, recovery. The recovery process requires that the server be stopped and the datadir directory be empty. So let's prepare these two conditions first:
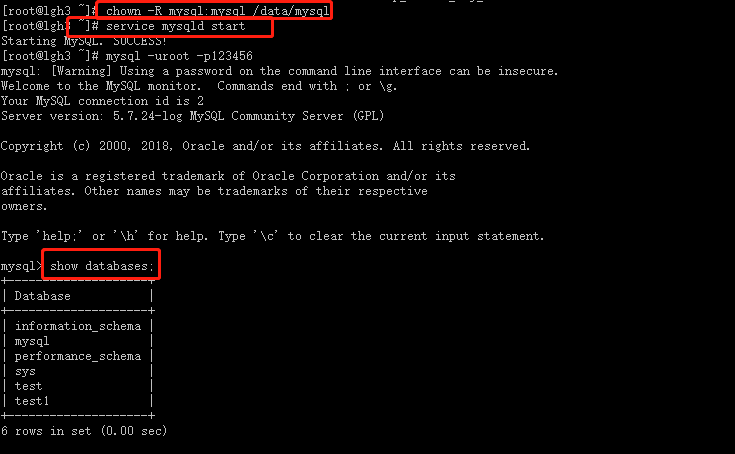
-rw-r--r--   1 root root   1975750 Jul 31 22:21 redis-5.0.5.tar.gz
[root@lgh3 ~]# cat /etc/my.cnf | grep datadir #Find the datadir directory
datadir=/data/mysql
[root@lgh3 ~]# service mysqld stop #Stop msyql service
Shutting down MySQL.. SUCCESS!
[root@lgh3 ~]# mv /data/mysql/ /data/mysql_bak #Backup file
[root@lgh3 ~]# mkdir /data/mysql
[root@lgh3 ~]# chown -R mysql:mysql /data/mysql #newly build
After the above conditions are met, we perform the recovery operation: the recovery mode is "– copy back", and the source backup directory to be recovered is specified after the option
[root@lgh3 ~]# innobackupex --copy-back /backup/2019-09-10_21-39-30/
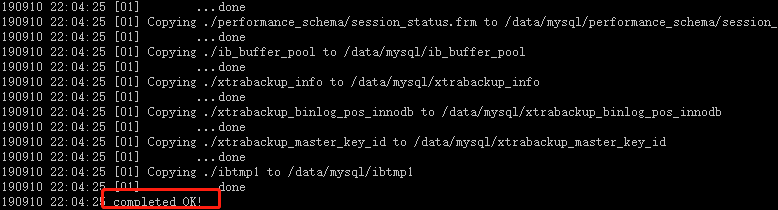
Then the end prompt: indicates success
Next, let's look at the datadir Directory:
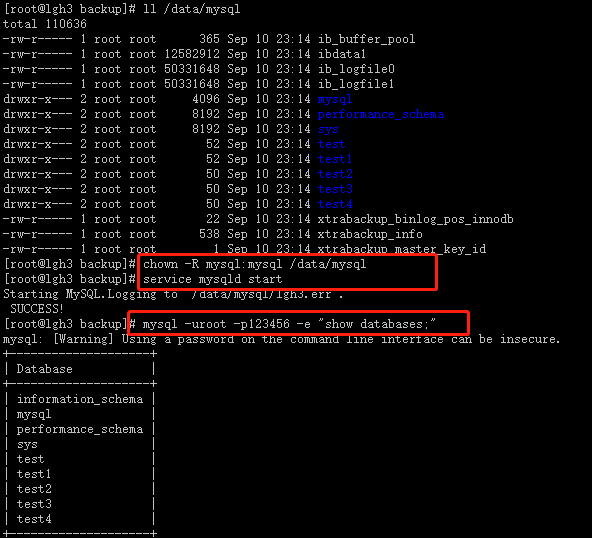
[root@lgh3 ~]# ll /data/mysql
total 122932
-rw-r----- 1 root  root       365 Sep 10 22:04 ib_buffer_pool
-rw-r----- 1 root  root  12582912 Sep 10 22:04 ibdata1
-rw-r----- 1 root  root  50331648 Sep 10 22:04 ib_logfile0
-rw-r----- 1 root  root  50331648 Sep 10 22:04 ib_logfile1
-rw-r----- 1 root  root  12582912 Sep 10 22:04 ibtmp1
-rw-r----- 1 mysql mysql     4996 Sep 10 22:06 lgh3.err
drwxr-x--- 2 root  root      4096 Sep 10 22:04 mysql
drwxr-x--- 2 root  root      8192 Sep 10 22:04 performance_schema
drwxr-x--- 2 root  root      8192 Sep 10 22:04 sys
drwxr-x--- 2 root  root        52 Sep 10 22:04 test
drwxr-x--- 2 root  root        52 Sep 10 22:04 test1
-rw-r----- 1 root  root        22 Sep 10 22:04 xtrabackup_binlog_pos_innodb
-rw-r----- 1 root  root       466 Sep 10 22:04 xtrabackup_info
-rw-r----- 1 root  root         1 Sep 10 22:04 xtrabackup_master_key_id
It is found that the owner of the directory is not a mysql user, and then we modify it: chown -R mysql:mysql /data/mysql, and then start the server
From the above, it can be seen that full readiness and recovery are successful
4.3. 2. Provisioning and recovery
Incremental backup is the backup of additional data on the basis of full backup. xtrabackup The principle of incremental backup is the end point of full backup LSN And current LSN For comparison, it will start from the end point when adding spare parts LSN Start backup to current LSN. Also available during backup redo log For the monitoring thread caused during the backup process LSN Growing operations are also written to the log. The realization of additional backup depends on LSN,So only for innodb Valid, right myisam When additional tables are used, full backup is performed behind them.
1. Perform a full backup. Here, backup again: innobackupex --user=root --password=123456 /backup/
2. In order to achieve the increment, we kill the test library: mysql -uroot -p123456 -e 'drop database test', and then add a new library and table
3. View xtrabackup_checkpoints can know the relevant LSN
[root@lgh3 2019-09-10_22-24-39]# cat xtrabackup_checkpoints backup_type = full-backupedfrom_lsn = 0to_lsn = 2613682last_lsn = 2613691compact = 0recover_binlog_info = 0flushed_lsn = 2613691
4. Add backup: use the "– incremental" option to represent incremental backup. During incremental backup, you need to specify the backup set based on "– incremental basedir = fullback_path". Because it is the first backup, it should be based on the full backup incremental set. The option "– incremental LSN = n" provided by xtrabackup can explicitly specify the starting LSN of the backup, which will be obtained automatically by default. When the LSN is explicitly specified, there is no need to provide an additional basedir.
innobackupex --user=root --password=123456 --incremental /backup/ --incremental-basedir=/backup/2019-09-10_22-24-39/
After the backup is completed, we check the / backup / directory. We can see that a new directory is added, and then we go in and have a look
[root@lgh3 backup]# ll
total 0
drwxr-x--- 7 root root 248 Sep 10 22:24 2019-09-10_22-24-39
drwxr-x--- 9 root root 301 Sep 10 22:34 2019-09-10_22-33-59
[root@lgh3 backup]# cd 2019-09-10_22-33-59
[root@lgh3 2019-09-10_22-33-59]# ll
total 1160
-rw-r----- 1 root root     490 Sep 10 22:34 backup-my.cnf
-rw-r----- 1 root root     365 Sep 10 22:34 ib_buffer_pool
-rw-r----- 1 root root 1130496 Sep 10 22:34 ibdata1.delta
-rw-r----- 1 root root      44 Sep 10 22:33 ibdata1.meta
drwxr-x--- 2 root root    4096 Sep 10 22:34 mysql
drwxr-x--- 2 root root    8192 Sep 10 22:34 performance_schema
drwxr-x--- 2 root root    8192 Sep 10 22:34 sys
drwxr-x--- 2 root root      79 Sep 10 22:34 test1
drwxr-x--- 2 root root      76 Sep 10 22:34 test2
drwxr-x--- 2 root root      76 Sep 10 22:34 test3
drwxr-x--- 2 root root      76 Sep 10 22:34 test4
-rw-r----- 1 root root      21 Sep 10 22:34 xtrabackup_binlog_info
-rw-r----- 1 root root     139 Sep 10 22:34 xtrabackup_checkpoints
-rw-r----- 1 root root     537 Sep 10 22:34 xtrabackup_info
-rw-r----- 1 root root    2560 Sep 10 22:34 xtrabackup_logfile
[root@lgh3 2019-09-10_22-33-59]# cat xtrabackup_checkpoints
backup_type = incremental
from_lsn = 2613682
to_lsn = 2640367
last_lsn = 2640376
compact = 0
recover_binlog_info = 0
flushed_lsn = 2640376
It can be seen from the above that we have realized incremental backup. Next is the preparation stage
  The preparation process of additional reserve is a little different from that of full reserve. No operation can be carried out until the final recovery"prepare"Process. In order to ensure the consolidation of all backup sets, you need to use the data in each backup set"prepare"Used in the process"--redo-only"Option, so that when applying logs"Straight forward"Until the last backup set. Its essence is to continuously add the logs in the application provisioning to the full provisioning. However, the last spare set needs to be the end point of backup set consolidation, so it cannot be used"--redo-only"Options. After the integration is completed, the original full backup is complete. At this time, the additional full backup set will be updated again"prepare"Can be used for subsequent recovery.

 Suppose we are in full (assuming bak_all)On the basis of, additional preparation is carried out bak1,bak2(bak If the files represent the directory named with time stamp) backed up twice, our preparation process is as follows:
# Apply logs to the consolidated start backup set - full backup set, and specify "-- redo only" to start log append
innobackupex --apply-log --redo-only /backup/2019-09-10_22-24-39  #Here, September 10, 2019_ 22-24-39 for bak_all

# Prepare the first additional backup set and add it to the full backup set
innobackupex --apply-log --redo-only /backup/bak_all --incremental-dir=/backup/bak1

# "Prepare" the second additional backup set and add it to the full backup set, but "-" redo only "is no longer applied, indicating the end point of integration
innobackupex --apply-log /backup/bak_all --incremental-dir=/backup/bak2

# Make an overall "preparation" for the integrated full set
innobackupex --apply-log /backup/bak_all
The next step is the recovery process. The steps are the same as full recovery. Clear the datadir directory and stop the service
rm -rf /data/mysql
service mysqld stop
innobackupex --copy-back /backup/2019-09-10_23-07-28/
The backup recovery has been completed here. We have experimented several times, so the names of several folders may be different.
4.3. 3. Import and export of tables
The export table is performed during "preparation", not during backup. For a backup set that has been backed up, use the "– apply log" and "– export" options to export the tables in the backup set
innobackupex --apply-log --export /backup/2019-09-10_23-07-28/
[root@lgh3 test2]# pwd
/backup/2019-09-10_23-07-28/test2
[root@lgh3 test2]# ll
total 132
-rw-r----- 1 root root    67 Sep 10 23:11 db.opt
-rw-r--r-- 1 root root   423 Sep 10 23:23 gxt.cfg
-rw-r----- 1 root root 16384 Sep 10 23:23 gxt.exp
-rw-r----- 1 root root  8586 Sep 10 23:11 gxt.frm
-rw-r----- 1 root root 98304 Sep 10 23:11 gxt.ibd
As above, there is an exp terminated file. Among them cfg file is a special innodb data dictionary file. Its function is similar to that of exp file, but the latter also supports import in xtradb
Import is to import an innodb table from other servers on the mysql server. You need to create a table with the same structure as the original table on the current server before importing the table. In the future, you can import the table from the "export" table ibd and The exp file can be copied to the data directory of the current server or it can also be copied cfg file. Modify the owner permission after copying: chown -R mysql:mysql /data/mysql
mysql> ALTER TABLE test2.gxt  DISCARD TABLESPACE; #Kill tablespaces
mysql> ALTER TABLE test2.gxt IMPORT TABLESPACE;
This completes the export and import of a single table
4.3. 4. Partial backup and recovery
There is only one thing to pay attention to in partial backup: do not pass during recovery"--copy-back"Copy back datadir,Instead, you should use the method of importing tables. Although copying is sometimes feasible, in many cases, the database is inconsistent.
There are three ways to create a partial backup:
1. With the "– include" option, you can specify regular to match the tables to be backed up. This method uses the full object reference format, namely db_name.tab_name.
2. Enumerate the rows of tables to be backed up into a file, and specify the file through "– tables file".
3. Or use "– databases" to specify the database or table to be backed up. When specifying the table to be backed up, the full object reference format shall be used, and multiple elements shall be separated by spaces.
Using the first two partial backup methods, only the innodb table can be backed up, and no myisam will be backed up. Even if it is specified, it will not be backed up. Moreover, the table to be backed up must have an independent tablespace file, that is, innodb must be enabled_ file_ per_ Table, more precisely, the table to be backed up is when innodb is enabled_ file_ per_ Created after the table option. The third backup method can back up the myisam table
For example:
innobackupex --user=root --password=123456 --include='^back*[.]num_*' /backup/
After the backup, a directory named with time stamp will be generated in the / backup / directory, which is the backup directory
The recovery process is the same as that of full backup: see 4.3.1 Section 1
4.4 xtrabackup tool
xtrabackup tool has two common operation modes: "– backup" and "– prepare". There are also two less used patterns: "– stats" and "– print param".
4.4. 1. Full backup and recovery
The backup path is specified by the parameter – target dir:
xtrabackup --backup --user=root --password=123456 --datadir=/data/mysql --target-dir=/backup/bak_all
get ready:
xtrabackup --prepare --target-dir=/backup/bak_all
Recovery: xtrabackup cannot recover itself, but can only be recovered by copying the backup set. For example, use rsync or cp. In addition, MySQL is also required to be in the stop state and datadir is an empty directory during recovery. After the copy is completed, the owner and group of the file in datadir should be changed to MySQL user and group.
service mysqld stop
rm -rf /data/mysql/*
rsync -azP /backup/bak_all/* /data/mysql
chown -R mysql.mysql /data/mysql
4.4. 2. Provisioning and recovery
1. All ready:
xtrabackup --backup --user=root --password=123456 --datadir=/data/mysql --target-dir=/backup/bak_all
2. Additional preparation
xtrabackup --backup --user=root --password=123456 --target-dir=/bacpup/bak1 --incremental-basedir=/backup/bak_all --datadir=/data/mysql/ #Add 1
xtrabackup --backup --user=root --password=123456 --target-dir=/bacpup/bak2 --incremental-basedir=/backup/bak1 --datadir=/data/mysql/ #Additional preparation 2
3. Prepare
xtrabackup --prepare --apply-log-only --target-dir=/backup/bak_all
xtrabackup --prepare --apply-log-only --target-dir=/backup/bak_all --incremental-dir=/backup/bak1
xtrabackup --prepare --target-dir=/backup/bak_all --incremental-dir=/backup/bak2
4. Recovery: see 4.3.1 Section 1 full recovery