1. Download the installation package from mysql official website
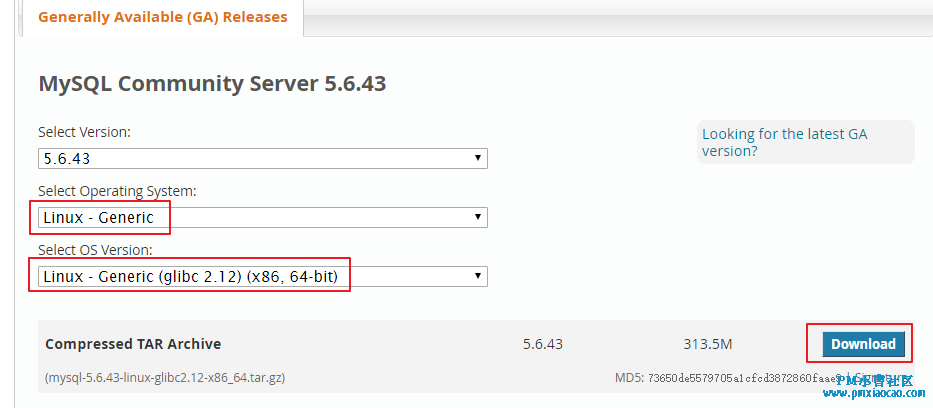
Download address: https://dev.mysql.com/downloads/mysql/5.6.html#downloads
Select the version in the screenshot below

2. Download and upload to linux or use wget
wget https://downloads.mysql.com/archives/get/p/23/file/mysql-5.6.43-linux-glibc2.12-x86_64.tar.gz
3. Installation
Uninstall mariadb from the system
[root@localhost soft]# rpm -qa | grep mariadb
mariadb-libs-5.5.56-2.el7.x86_64
[root@localhost soft]#
[root@localhost soft]#
[root@localhost soft]# rpm -e --nodeps mariadb-libs-5.5.56-2.el7.x86_64
Delete / etc under my cnf
[root@localhost soft]# rm /etc/my.cnf
rm: Cannot delete"/etc/my.cnf": There is no such file or directory
[root@localhost soft]#
It is possible that the file itself does not exist.
Create mysql user group
[root@localhost soft]# groupadd mysql
Create a user with the user name mysql and join the mysql user group
[root@localhost soft]# useradd -g mysql mysql
Unzip the installation package to / usr/local /
tar -xvf mysql-5.6.43-linux-glibc2.12-x86_64.tar.gz -C /usr/local/
Switch to / usr/local directory and check
[root@localhost soft]# cd /usr/local/
[root@localhost local]# ls
bin  etc  games  include  java  lib  lib64  libexec  mysql-5.6.43-linux-glibc2.12-x86_64  redis  sbin  share  src
[root@localhost local]#
[root@localhost local]# Rename the extracted folder to mysql
[root@localhost local]# mv mysql-5.6.43-linux-glibc2.12-x86_64/ mysql
[root@localhost local]# ls
bin  etc  games  include  java  lib  lib64  libexec  mysql  redis  sbin  share  src
[root@localhost local]#
Copy a copy of my default under / usr / local / MySQL / support files / CNF file to / etc
cp /usr/local/mysql/support-files/my-default.cnf /etc/my.cnf
Configure my. In the / etc directory CNF file
Through the vim editor, edit my The code of CNF is as follows
[mysql]
# Set the default character set of mysql client
default-character-set=utf8

[mysqld]
skip-name-resolve
#Set 3306 port
port = 3306
# Set mysql installation directory
basedir=/usr/local/mysql
# Set the storage directory of mysql database data
datadir=/usr/local/mysql/data
# Maximum connections allowed
max_connections=200
# The character set used by the server defaults to the 8-bit encoded latin1 character set
character-set-server=utf8
# The default storage engine that will be used when creating new tables
default-storage-engine=INNODB
lower_case_table_name=1
max_allowed_packet=16M
Enter the mysql software installation directory and execute the following command
[root@localhost mysql]# cd /usr/local/mysql/
[root@localhost mysql]# chown -R mysql:mysql ./
[root@localhost mysql]# ./scripts/mysql_install_db --user=mysql --basedir=/usr/local/mysql/ --datadir=/usr/local/mysql/data/
-bash: ./scripts/mysql_install_db: /usr/bin/perl: Bad interpreter: There is no such file or directory
[root@localhost mysql]#
[root@localhost mysql]#
If the above error is reported, perl needs to be installed
yum install perl
After installation, perform again/ scripts/mysql_install_db --user=mysql --basedir=/usr/local/mysql/ --datadir=/usr/local/mysql/data/
[root@localhost mysql]# ./scripts/mysql_install_db --user=mysql --basedir=/usr/local/mysql/ --datadir=/usr/local/mysql/data/
FATAL ERROR: please install the following Perl modules before executing ./scripts/mysql_install_db:
Data::Dumper
[root@localhost mysql]#
[root@localhost mysql]#
If the above error is reported, you need to install autoconf
yum install autoconf
After the installation is completed, execute the above command again.
After installation, modify the owner of the current data directory to mysql user
[root@localhost mysql]# chown -R mysql:mysql data
Installation of this database is complete!
4. Disposition
Grant my CNF permissions
chmod 644 /etc/my.cnf
Set startup and self startup service control script
Copy startup script to resource directory
[root@localhost mysql]# cp ./support-files/mysql.server /etc/rc.d/init.d/mysqld
Add mysqld service control script execution permission
chmod +x /etc/rc.d/init.d/mysqld
Add mysqld service to system service
chkconfig --add mysqld
Check whether mysqld service is effective
chkconfig --list mysqld
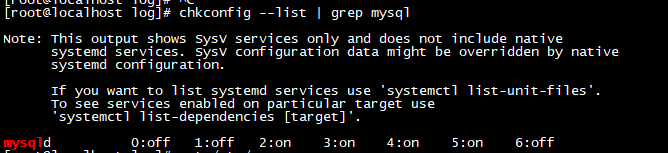
It indicates that the mysql D service has taken effect. It starts automatically with the system startup at the 2, 3, 4 and 5 operation levels. In the future, you can use the service command to control the start and stop of mysql
The command is:
service mysqld start

and

service mysqld stop
Start mysqld
[root@localhost mysql]# service mysqld start
Logging to ‘/usr/local/mysql/data/localhost.localdomain.err’. — At the beginning, the error report is normal and can be ignored
. SUCCESS!
View port:

Add the bin directory of mysql to the PATH environment variable and edit ~ / bash_profile file
Add the following information at the end of the file:
export PATH=$PATH:/usr/local/mysql/bin
 Save and exit.
Make the modification effective immediately
source ~/.bash_profile
Log in to mysql as the root account. There is no password by default
[root@localhost mysql]# mysql -uroot -p
Warning: World-writable config file '/etc/my.cnf' is ignored
Enter password:
Welcome to the MySQL monitor.  Commands end with ; or \g.
Your MySQL connection id is 1
Server version: 5.6.43 MySQL Community Server (GPL)

Copyright (c) 2000, 2019, Oracle and/or its affiliates. All rights reserved.

Oracle is a registered trademark of Oracle Corporation and/or its
affiliates. Other names may be trademarks of their respective
owners.

Type 'help;' or '\h' for help. Type '\c' to clear the current input statement.

mysql>
When you ask for a password, enter directly.
Set the password of the root account
mysql> use mysql;
Reading table information for completion of table and column names
You can turn off this feature to get a quicker startup with -A

Database changed
mysql> update user set password=password('Set password here') where user='root' and host='localhost';
Query OK, 1 row affected (0.00 sec)
Rows matched: 1  Changed: 1  Warnings: 0

mysql> flush privileges;
Query OK, 0 rows affected (0.00 sec)

mysql>
to grant authorization:
Set up remote host login
mysql> GRANT ALL PRIVILEGES ON *.* TO 'root'@'%' IDENTIFIED BY 'root' WITH GRANT OPTION;
Query OK, 0 rows affected (0.00 sec)

mysql>
Open 3306 port
[root@localhost mysql]# systemctl start firewalld
[root@localhost mysql]# firewall-cmd --zone=public --add-port=3306/tcp --permanent
success
[root@localhost mysql]# firewall-cmd --reload
success
So far, install mysql5.0 on Centos 7 6 is finished.