Distributed MySql Deployment Scheme
- Solution
- System Environment
- mysql master-slave backup
- MyCat Middleware Build
- haproxy load agent
- keepalived for single point failure
- mycat-eye monitoring web
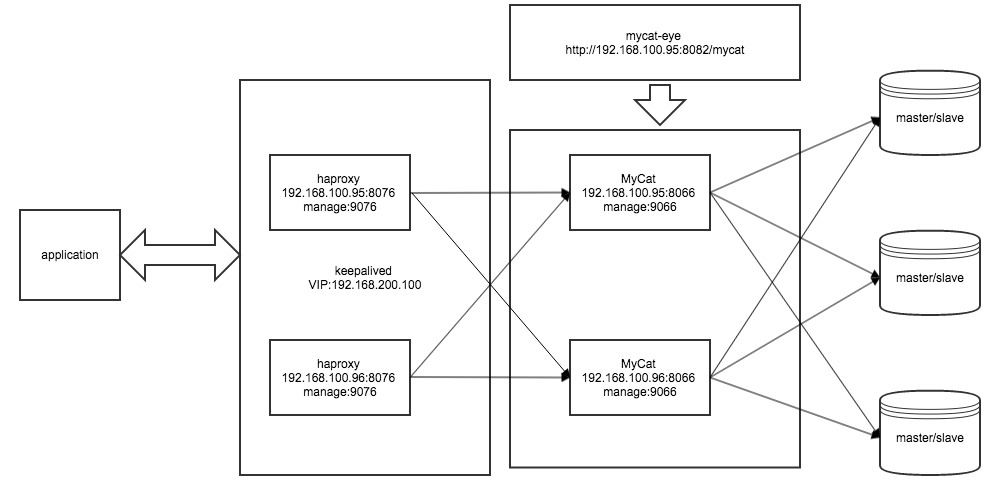
- Overall structure of experimental environment
- supplement
Solution
describe
1. Start mysql master-slave backup
 2. Scheduling and routing using Mycat Middleware
 3. Use haproxy proxy MyCat for load balancing
 4. Kekeepalived ensures high availability of haproxy and solves single point of failure.
Structural Diagram

System Environment
| system | ip | user | cpu | memory |
| --- |:---:| —–:|--- |:---:| —–:|8G|
Centos7 | 192.168.100.95 | root | cpu: Intel(R) Pentium(R) CPU G3220 @ 3.00GHz dual core | 8G|
Centos7 | 192.168.100.96 | root | cpu: Intel(R) Pentium(R) CPU G3220 @ 3.00GHz dual core | 8G|
Centos7 | 192.168.100.97 | root | cpu: Intel(R) Pentium(R) CPU G3220 @ 3.00GHz dual core | 8G|
mysql master-slave backup
Modify Configuration File (my.conf)
- Primary Library Configuration
Server-id = 1 #This is the database ID, this ID is unique, the main library defaults to 1, other sublibraries increment with this ID, ID value cannot be duplicated, otherwise synchronization error will occur;

log-bin = mysql-bin binary log file, which is required, otherwise data cannot be synchronized;

binlog-do-db = dbTest1 #Databases that need to be synchronized, if multiple databases need to be synchronized;

Continue adding this item.

binlog-do-db = dbTest2

binlog-ignore-db = mysql database that does not require synchronization;
- Configure from Library
log_bin           = mysql-bin
server_id         = 2
relay_log         = mysql-relay-bin
log_slave_updates = 1
read_only         = 1
user            = mysql
clear shutdown and startup
Add access to master database
create user repl;
GRANT REPLICATION SLAVE ON *.* TO 'repl'@'192.168.100.%' IDENTIFIED BY '1234'; #Access rights add
SHOW MASTER STATUS;  #Show primary node status
slave backup configuration
change master to master_host='192.168.100.96',   #master's host
master_port=3306,   #port
master_user='repl',   #user
master_password='1234',  #Password
master_log_file='mysql-bin.000001',   #Log File Name
master_log_pos=3204;   #Start location will start backup from this location
SHOW SLAVE STATUS;     #View slave status
START SLAVE;          #Turn on backup
STOP SLAVE;           #Stop backup


 //Note: After you start backup <SHOW SLAVE STATUS>you will see:
      Slave_IO_Runing=Yes
      Slave_SQL_Runing=Yes
      //Indicates that the backup started successfully.
MyCat Middleware Build
Download Address
http://dl.mycat.io/1.6-RELEASE/Mycat-server-1.6-RELEASE-20161028204710-linux.tar.gz
configuration file
server.xml
<?xml version="1.0" encoding="UTF-8"?>
<!DOCTYPE mycat:server SYSTEM "server.dtd">
<mycat:server xmlns:mycat="http://io.mycat/">
        <system>
                <property name="serverPort">8066</property>
                <property name="bindIp">192.168.100.96</property>
                <property name="managerPort">9066</property>
                <property name="systemReserveMemorySize">384m</property>
                <property name="defaultSqlParser">druidparser</property>
        </system>
     <user name="admin">
                <property name="password">mypass</property>
                <property name="schemas">dbTest</property>

                <!-- Table Level DML Permission Settings -->
                <!--
                <privileges check="false">
                        <schema name="TESTDB" dml="0110" >
                                <table name="tb01" dml="0000"></table>
                                <table name="tb02" dml="1111"></table>
                        </schema>
                </privileges>
                 -->
        </user>

        <!--<user name="admin">
                <property name="password">mypass</property>
                <property name="schemas">db</property>
                <property name="readOnly">false</property>
        </user>-->

</mycat:server>


Explain:
    1. It's easy to see what the configuration means when combined with documentation, not in the description.
    2. Mainly external user configuration, as well as management ports, service port configuration, and some other configurations.
schema.xml
<?xml version="1.0"?>
<!DOCTYPE mycat:schema SYSTEM "schema.dtd">
<mycat:schema xmlns:mycat="http://io.mycat/">

        <schema name="dbTest" checkSQLschema="true" sqlMaxLimit="100">
                <!-- auto sharding by id (long) -->
                <table name="t_user" primaryKey="id" dataNode="dn1,dn2" rule="rule1" />

                <!-- global table is auto cloned to all defined data nodes ,so can join
                        with any table whose sharding node is in the same data node -->
                <table name="t_company" primaryKey="id" type="global" dataNode="dn1,dn2" rule="rule1" />
</schema>
        <!-- <dataNode name="dn1$0-743" dataHost="localhost1" database="db$0-743"
                /> -->
        <dataNode name="dn1" dataHost="localhost1" database="dbTest1" />
        <dataNode name="dn2" dataHost="localhost1" database="dbTest2" />
 <dataHost name="localhost1" maxCon="1000" minCon="10" balance="0"
                          writeType="0" dbType="mysql" dbDriver="native" switchType="1"  slaveThreshold="100">
                <heartbeat>show status like 'wsrep%'</heartbeat>
                <!-- can have multi write hosts -->
                <writeHost host="hostM1" url="192.168.100.96:3306" user="admin"
                                   password="mypass">
                        <!-- can have multi read hosts -->
                        <readHost host="hostS2" url="192.168.100.97:3306" user="admin" password="mypass"/>
                </writeHost>
                <!-- <writeHost host="hostM2" url="localhost:3316" user="root" password="123456"/> -->
        </dataHost>
</mycat:schema>

//Explain:
     1. Database Corresponding Table Subtable Configuration,among rule Corresponding rule.xml The type of table in the.
     2. datanode The database name and datahost Name.
     3.  datahost Connection configuration, master database configuration, and slave database configuration.
rule.xml
<?xml version="1.0" encoding="UTF-8"?>
<!DOCTYPE mycat:rule SYSTEM "rule.dtd">
<mycat:rule xmlns:mycat="http://io.mycat/">
        <tableRule name="rule1">
                <rule>
                        <columns>id</columns>
                        <algorithm>func1</algorithm>
                </rule>
        </tableRule>
 <function name="func1" class="io.mycat.route.function.PartitionByLong">
                <property name="partitionCount">8</property>
                <property name="partitionLength">128</property>
 </function>
</mycat:rule>

Explain:
     1. There are many default table breaking rules, which can be used as appropriate.
start-up
1. ./bin/mycat start    #Start mycat
2. tail -n1000 -f ./logs/wrapper.log  #View startup log
3. tail -n1000 -f ./logs/mycat.log    #View the mycat.log service log
haproxy load agent
Download Address
http://www.haproxy.org/download/1.7/src/haproxy-1.7.3.tar.gz
Reference Documents
http://blog.csdn.net/zzhongcy/article/details/46443765
install
 uname -a    //View the Linux kernel version, TARGET is the kernel version, Write 26 at 2.6
  make TARGET=linux26 PREFIX=/usr/local/haproxy
  make install PREFIX=/usr/local/haproxy
To configure
 1. mkdir /etc/haproxy/conf
 2. vim /etc/haproxy/conf/haproxy.cfg


 global
log 127.0.0.1   local0 ##Logging capabilities
maxconn 4096
chroot /usr/local/haproxy
user haproxy
group haproxy
daemon
########Default Configuration############
defaults
log    global
mode tcp               #Default mode {tcp | http | health}, tcp is layer 4, HTTP is layer 7, health only returns OK
retries 3              #If the connection fails twice, the server is considered unavailable or can be set later
option redispatch      #Force targeting to other healthy servers when serverId's corresponding server hangs up
option abortonclose    #Automatically end links that have been queued for a long time when the server is under heavy load
maxconn 32000          #Default maximum number of connections
timeout connect 5000ms #connection timed out
timeout client 30000ms #Client Timeout
timeout server 30000ms #server time-out
timeout check 2000    #Heart beat detection timeout
#log 127.0.0.1 local0 err #[err warning info debug]

########test1 To configure#################
listen mycat_1
bind 0.0.0.0:8076
mode tcp
balance roundrobin
server s1 192.168.100.95:8066 weight 1 maxconn 10000 check inter 10s
server s2 192.168.100.96:8066 weight 1 maxconn 10000 check inter 10s
listen mycat_1_manage
bind 0.0.0.0:9076
mode tcp
balance roundrobin
server s1 192.168.100.95:9066 weight 1 maxconn 10000 check inter 10s
server s2 192.168.100.96:9066 weight 1 maxconn 10000 check inter 10s
###Start
/usr/local/haproxy/sbin/haproxy -f /usr/local/haproxy/haproxy.cfg
keepalived for single point failure
Download Address
http://www.keepalived.org/software/keepalived-1.3.5.tar.gz
File
http://www.keepalived.org/documentation.html
install
./configure && makeTo configure
1. mkdir -p  /usr/local/etc/keepalived/
2. vim /usr/local/etc/keepalived/keepalived.conf

global_defs {
    router_id NodeB
}
vrrp_instance VI_1 {
    state BACKUP    #Set as Master Server
    interface enp3s0  #Monitoring Network Interface
    virtual_router_id 51  #Both master and equipment must be the same
    priority 90   #(Primary and standby take different priority, host value is larger, backup value is smaller, value is larger, priority is higher)
    advert_int 1   #VRRP Multicast broadcast cycle seconds
    authentication {
    auth_type PASS  #VRRP authentication method, primary and secondary must be consistent
    auth_pass 1111   #(Password)
}
virtual_ipaddress {
    192.168.200.100/24  #VRRP HA Virtual Address
}
start-up
./bin/keepalived -D -f /usr/local/etc/keepalived/keepalived.confmycat-eye monitoring web
Download Address
http://dl.mycat.io/mycat-web-1.0/Mycat-web-1.0-SNAPSHOT-20170102153329-linux.tar.gzInstall zookeeper
docker run -d \
-e MYID=1 \
--name=zookeeper --net=host --restart=always sdvdxl/zookeeper
To configure
Modify zookeeper address:
       1. cd   /mycat-web/WEB-INF/classes
       2. vim mycat.properties
       3. zookeeper=127.0.0.1:2181
start-up
1. cd /mycat-web/
2. ./start.sh &
Overall structure of experimental environment
supplement
MyCat Password Clear Text Encryption
  1. java -cp Mycat-server-1.6-RELEASE.jar io.mycat.util.DecryptUtil   1:userB:root:321
  2. Modify configuration <property name="usingDecrypt">1</property> #Use encryption

  Explain:
     1.0 to provide external password encryption, 1.Backend is also the database connection password encryption
     2. userB username
     3.321 Clear Text Password