Tip: after writing the article, the directory can be generated automatically. For how to generate it, please refer to the help document on the right
preface
Database server downtime may be encountered in real projects, so the cluster deployment of load balancing is very important. The main mode of MySQL + Haproxy+keepalived is adopted, and the combination of Haproxy and Keepalived is adopted. The main mode of MySQL is used to ensure the consistency of data on both sides, so as to ensure that one database server can continue to be used after downtime.
Tip: the following is the main content of this article
1, Configuring and deploying MySQL master mode
Due to limited conditions, the deployment is implemented on the virtual machine. The system is CentOS7, and different systems support different commands. I found it after deployment. If uncontrollable problems occur during installation, I should search and solve them myself.
1. Install Myslq on Linux
1.1 Mysql download and decompression
Download the Mysql compressed package "mysql-5.7.26-linux-glibc2.12-x86_64.tar.gz" of Linux version and place it in the "/ usr/local" directory.

1. Enter the directory and extract the file:
cd  /usr/local
tar -zxvf mysql-5.7.26-linux-glibc2.12-x86_64.tar.gz
2. Unzip and put it into the directory you want to install, then move and rename it
mkdir /usr/local/mysql
mv -v mysql-5.7.26-linux-glibc2.12-x86_64/* /usr/local/mysql
1.2 database creation and configuration
1. Create users and user groups
groupadd mysql
useradd -r -g mysql mysql
2. Change the installation directory owner and group to mysql
chown -R mysql.mysql /usr/local/mysql
3. Create a data folder in the mysql directory
mkdir /usr/local//data
4. Initialize the database
/usr/local/mysql/bin/mysql_install_db --user=mysql --basedir=/usr/local/mysql/ --datadir=/usr/local/mysql/data

It doesn't matter if there is a warning. Just ignore it.
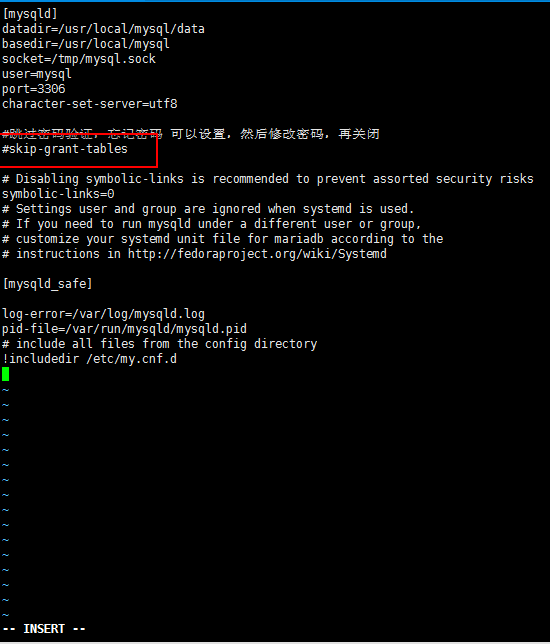
5. Edit the configuration file after initialization: VI / etc / my CNF, delete all the original files and replace them with the following new file contents. (edit with "i", exit after ESC + ": wq" is saved)
[mysqld]
lower_case_table_names=1
datadir=/usr/local/mysql/data
basedir=/usr/local/mysql
socket=/tmp/mysql.sock
user=mysql
port=3306
character-set-server=utf8
#Skip password verification, forget the password, set it, modify the password, and then close it
skip-grant-tables
# Disabling symbolic-links is recommended to prevent assorted security risks
symbolic-links=0
# Settings user and group are ignored when systemd is used.
# If you need to run mysqld under a different user or group,
# customize your systemd unit file for mariadb according to the
# instructions in http://fedoraproject.org/wiki/Systemd
[mysqld_safe]
log-error=/var/log/mysqld.log
pid-file=/var/run/mysqld/mysqld.pid
# include all files from the config directory
!includedir /etc/my.cnf.d
6. Add mysql to the service
cp /usr/local/mysql/support-files/mysql.server /etc/init.d/mysql
Power on
chkconfig mysql on
mysql start
service mysql start
Displays the successful start of Mysql

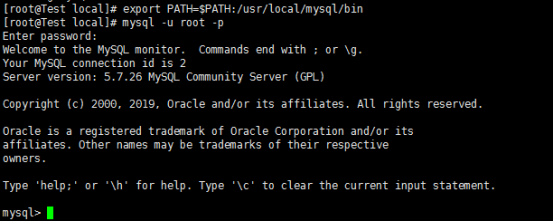
7. Configure environment variables
export PATH=$PATH:/usr/local/mysql/bin
mysql -u root -p
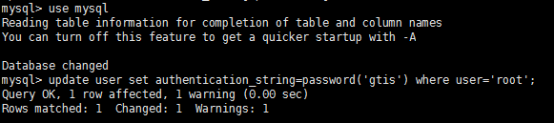
8. Set the mysql password (because password verification is canceled in the configuration file, you can press enter directly)
use mysql;
update user set authentication_string=password('Your password') where user='root';
9. After exiting, / etc / my Delete or comment out skip grant tables in CNF, and then restart Mysql
flush privileges;
exit
vi  /etc/my.cnf
Restart mysql
service mysql restart
1.3 database remote connection settings
1. Set remote connection
mysql -u root -p
Input password
use mysql;
The following prompt appears if you are operating:
You must reset your password using ALTER USER statement before executing this statement
sign out; (exit)
Just reset the password (the same as the original password):
mysql -u root -p
mysql> alter user 'root'@'localhost' identified by'Your password';
exit;
2. Set the remote connection again (the root user of the user table in the mysql database is modified to '%', that is, any host can access it)
mysql -u root -p
use mysql;
update user set host='%' where user = 'root';
flush privileges;
exit;
3. Turn off the firewall
View status:   systemctl status firewalld
Start:          systemctl start firewalld
 close:          systemctl stop firewalld(Run this)
Power on disable: systemctl disable firewalld(Run this)
Boot enable: systemctl enable firewalld
4. Test database connection

2. Mysql main mode deployment
The two servers are 192.168.50.103 and 192.168.50.151 respectively. They are the main servers of each other, so each database server should deploy corresponding Haproxy and keepalived, and Haproxy+keepalived should be deployed on another server, but the conditions are limited. They can only be deployed together on one virtual machine. In practice, one is deployed first, Then clone another one by cloning and modify the relevant configuration.
2.1 modify configuration
First modify the database configuration on 192.168.50.103
Modify the configuration file VI / etc / my CNF, add the configuration under node [mysqld]:
[mysqld]
server-id=1				#Any natural number n, as long as the two MySQL hosts do not duplicate, [the other server is modified to 2]
log-bin=mysql-bin		#Open binary log
auto_increment_increment=2	#Step value auto_increment. Generally, if there are n main MySQL, fill in n
auto_increment_offset=1		#The starting value is generally filled in the nth host mysql, which is the first host MySQL [the other server is modified to 2]
replicate-do-db=newstaixing	#The database to be synchronized is all libraries by default
lower_case_table_names=1
datadir=/usr/local/mysql/data
basedir=/usr/local/mysql
socket=/tmp/mysql.sock
user=mysql
port=3306
character-set-server=utf8
#Skip password verification, forget the password, set it, modify the password, and then close it
#skip-grant-tables
# Disabling symbolic-links is recommended to prevent assorted security risks
symbolic-links=0
# Settings user and group are ignored when systemd is used.
# If you need to run mysqld under a different user or group,
# customize your systemd unit file for mariadb according to the
# instructions in http://fedoraproject.org/wiki/Systemd
[mysqld_safe]
log-error=/var/log/mysqld.log
pid-file=/var/run/mysqld/mysqld.pid
# include all files from the config directory
!includedir /etc/my.cnf.d
Record one pit encountered:
Prompt me that the database cannot be started after modifying the configuration: The server quit without updating PID file
This problem can be solved by referring to: https://blog.csdn.net/chenrui310/article/details/100977849
Go to the mysql data directory / data to see if there is mysql bin index
2.2 database creation user
You need to create a login user in each of the two databases. I stole a lazy root user who can be used directly.
mysql>GRANT REPLICATION SLAVE ON *.* TO 'root'@'192.168.50.103' IDENTIFIED BY '123456'
mysql>FLUSH PRIVILEGES;
((another server will also execute)
View the binary file name and location of MySQL server 192.168.50.103:
mysql>SHOW MASTER STATUS;

On another server, 192.168.50.151 tells the binary file name and location:
CHANGE MASTER TO MASTER_HOST='192.168.50.103',MASTER_USER='root',MASTER_PASSWORD='123456',MASTER_LOG_FILE='mysql-

bin.000008',MASTER_LOG_POS=157301033;
(the same goes for the other one)
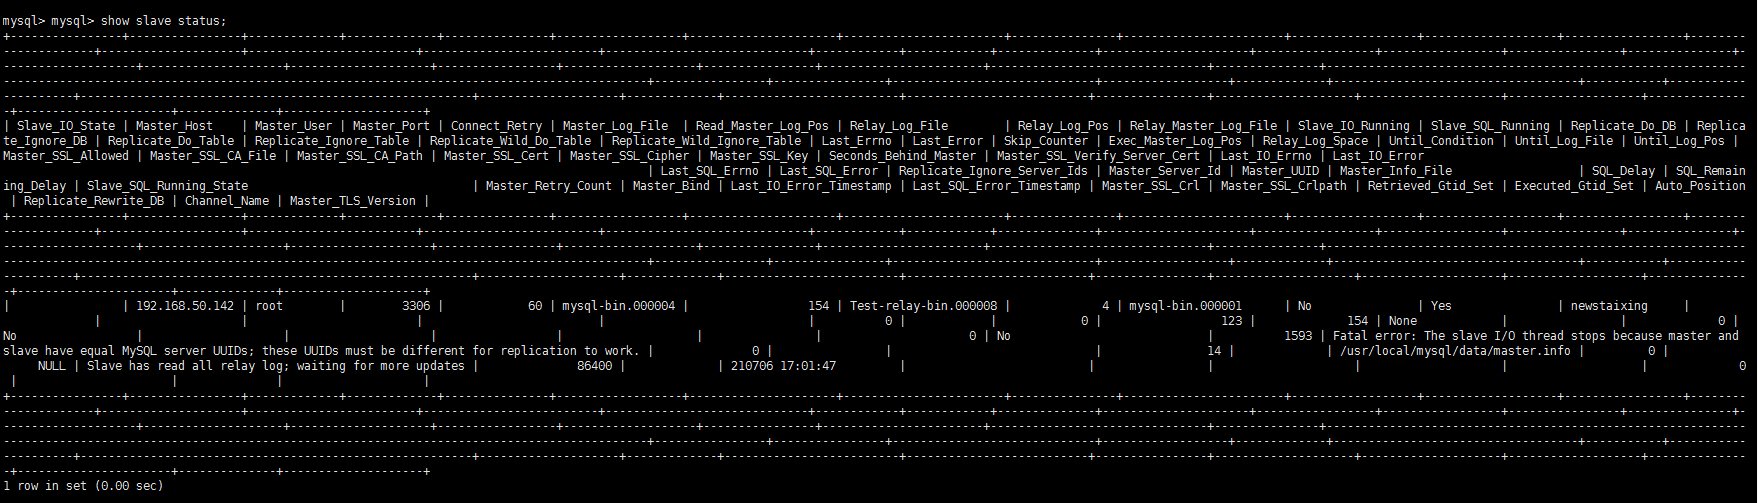
After configuration, enter in 192.168.50.103:
mysql>slave start;
mysql>show slave status;
(I have a fatal error, but it doesn't seem to affect the use. If some netizens know what the problem is, they are welcome to discuss it in the comment area. I suspect it may be the reason for using root)
3. Configure and deploy Haproxy
Thanks for your reference:
https://www.cnblogs.com/sgh1023/p/11215328.html
Install HAProxy
1. Download
Since FQ is required to download to the official website, baidu cloud link is provided here.
Link: https://pan.baidu.com/s/1uaSJa3NHFiE1E6dk7iHMwQ Extraction code: irz6
2. Replace haproxy-1.7.8 tar. GZ copy to / opt directory and extract:
tar zxvf haproxy-1.7.8.tar.gz
3. Enter the directory and compile it into an executable file.
After extracting the source code, you need to run make to compile HAProxy into an executable file. If it is in Linux 2 6. If the system is compiled, TARGET=linux26 needs to be set to enable epoll support, which is why it is written in many online blogs. For other UNIX systems, TARGET=generic is directly adopted. The system installed in this paper is CentOS7 and kernel version 3.10.
cd haproxy-1.7.8
make TARGET=generic
4. Configure environment variables
For ease of use, you can configure environment variables. Add the path of haproxy in / etc/profile:
export PATH=$PATH:/opt/haproxy-1.7.8/haproxy
5. Finally execute to make this environment variable effective.
source /etc/profile
Configure HAProxy
HAProxy profile description
The HAProxy configuration file is usually divided into three parts: global, defaults and listen. Global is the global configuration, defaults is the default configuration, and listen is the application component configuration.
Global is the global configuration part, which belongs to the process level configuration and is usually related to the operating system configuration used.
The defaults configuration item configures the default parameters, which will be inherited by the application component. If there is no special declaration in the application component, the default configuration parameters will be used.
Take configuring the load balancing of Mysql Cluster as an example, create a new haproxy under the installation directory CFG, enter the following configuration information:
global
log 127.0.0.1 local2
chroot /var/lib/haproxy
pidfile /var/run/haproxy.pid
maxconn 4000
user haproxy
group haproxy
daemon
stats socket /var/lib/haproxy/stats
defaults
mode tcp
log global
option dontlognull
option redispatch
retries 3
timeout http-request 10s
timeout queue 1m
timeout connect 10s
timeout client 1m
timeout server 1m
timeout http-keep-alive 10s
timeout check 10s
maxconn 600
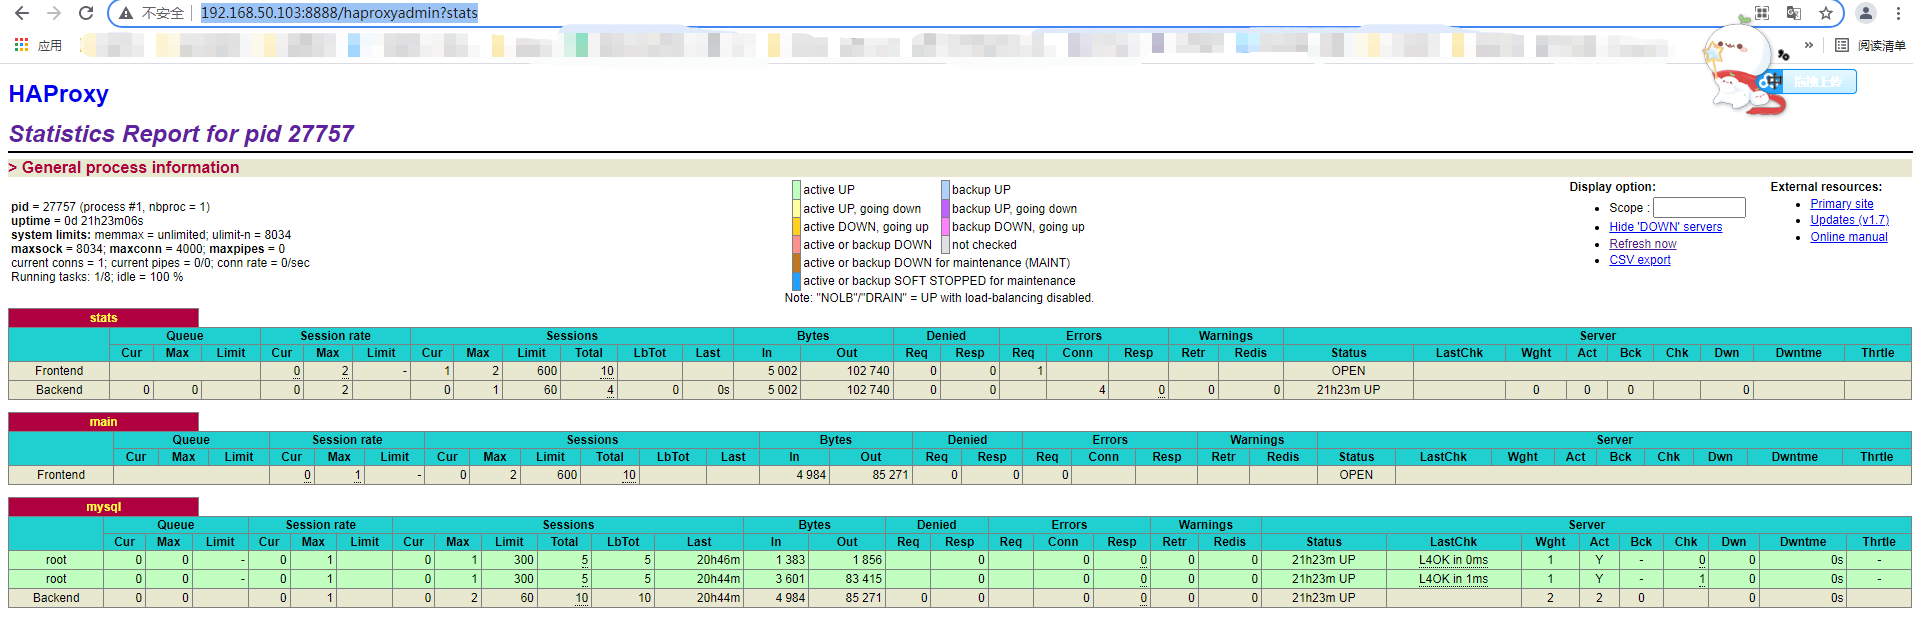
listen stats
mode http
bind :8888
stats enable
stats hide-version
stats uri /haproxyadmin?stats
stats realm Haproxy\ Statistics
stats auth admin:admin
frontend main
bind 0.0.0.0:3307 #Virtual database port 3307
default_backend mysql
backend mysql
balance roundrobin
server root 192.168.50.103:3306 check port 3306 maxconn 300 #Previously created database users
server root 192.168.50.151:3306 check port 3306 maxconn 300 #Previously created database users
6 start
Start command
/opt/haproxy-1.7.8/haproxy -f /opt/haproxy-1.7.8/haproxy.cfg
Verify successful startup:
[root@localhost haproxy-1.7.8]# lsof -i:8888
COMMAND   PID USER   FD   TYPE DEVICE SIZE/OFF NODE NAME
haproxy 45031 root    3u  IPv4 228341      0t0  TCP localhost.localdomain:ddi-tcp-1 (LISTEN)
Access on Browser http://192.168.50.103:8888/haproxyadmin?stats , enter the configured user name (admin) and password (admin) to log in, and you can see the following screen:
4.Keepalived deployment
1. Download to the / root folder
Link: https://pan.baidu.com/s/189AZKDTuI-Szoln1YtXJVg
Extraction code: g7lm
2. Decompression
tar -zxvf keepalived-1.2.19.tar.gz
cd keepalived-1.2.19
3. Installation and compilation
yum install curl gcc openssl-devel libnl3-devel net-snmp-devel libnfnetlink-devel -y
4. Start installation
./configure --prefix=/usr/local/keepalived --sbindir=/usr/sbin/ --sysconfdir=/etc/ --
mandir=/usr/local/share/man/ --with-kernel-dir=/usr/src/kernels/3.10.0-957.el7.x86_64/
make && make install
Note: 1. During installation/ In configure - several options after prefix are optional. If they are selected, they can be selected
You can use service to start directly. It is best to add all the suggestions; 2. – with kernel dir option
Fill in according to your own linux Version (you can check it by using the command cat /proc/version in linux)
To).
5. Create profile:
cd /etc/keepalived
mv keepalived.conf keepalived.conf.back
vim keepalived.conf
Repair the configuration according to the notes. Note: the notes should be removed in the actual configuration, otherwise some functions will be generated
The configuration file is as follows:
! Configuration File for keepalived #Simple header. It is mainly used to set email notification and alarm. It is not configured here
global_defs {
notificationd LVS_DEVEL #Each keepalived has a different name
}
vrrp_script chk_haproxy { #Define a script in advance to facilitate subsequent calls, or define multiple scripts to facilitate selection;
script "/etc/keepalived/chk.sh" #Specific script path
interval 2 #Script cycle run interval
}
#VRRP virtual routing redundancy protocol configuration
vrrp_instance VI_1 { #VI_1 is a user-defined name;
state MASTER #MASTER means a MASTER device and BACKUP means a standby device [we set it as on without preemption, so we set it as standby]
interface ens33 #ens33 is the physical network card to be bound, which can be viewed through ifconfig
virtual_router_id 11 #VRID virtual routing ID, also known as packet name. The devices in the group need to be the same
priority 130 #Define the priority of this device 1-254; No preemption is enabled, so the priority here must be higher than the other one
advert_int 1 #The multicast information sending interval during survival detection is consistent within the group
authentication { #Set authentication information to ensure consistency within the group
auth_type PASS #There are two kinds of PASS and AH, which are commonly used
auth_pass asd #password
}
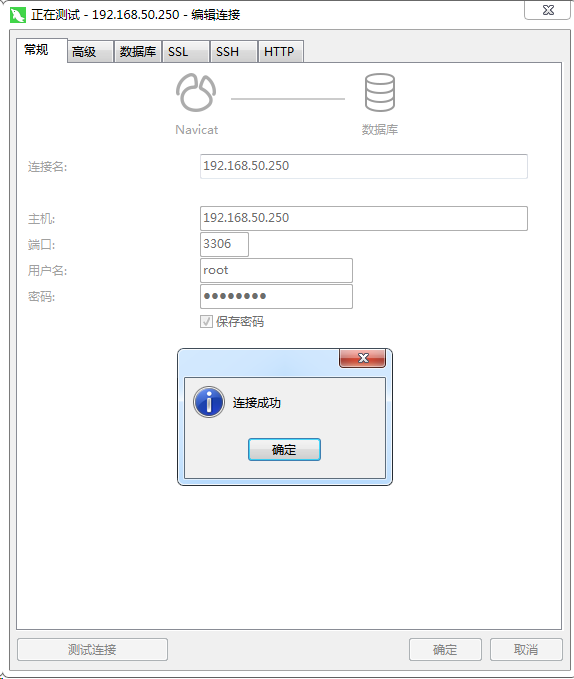
virtual_ipaddress {
192.168.50.250 #Specify the VIP address, which is consistent within the group. You can set multiple IPS (virtual database connection address)
}
track_script { #Use a predefined script in this field, as defined above
chk_haproxy
}
notify_backup "/etc/init.d/haproxy restart" #Indicates the script to be executed when switching to the backup state
notify_fault "/etc/init.d/haproxy stop" #Script to execute in case of failure
}
6. Create a monitoring file to monitor the operation of Haproxy:
vim chk.sh
The code is as follows:
if [ $(ps -C haproxy --no-header | wc -l) -eq 0 ]; then
       /etc/init.d/keepalived stop
fi
7. Authorization:
chmod +x /etc/keepalived/chk.sh
8. Start
service keepalived start
You can connect to a virtual database connection
5. Another server
Because I use a virtual machine that can be cloned, I can take a snapshot after the deployment of the above operations, and then directly clone it. It is necessary to modify the relevant configurations involving server ip (Mysql configuration, Haproxy configuration, keepalived network card configuration)