Preparation before configuration
1. Prepare 2 mysql environments
2. Interworking between two mysql networks
First step
Configure mysql configuration file [my.cnf] | [my.ini]
The [master] configuration is as follows:
[mysqld]
server-id = 1        # Node ID to ensure uniqueness
log config
log-bin = mysql-bin     #Enable the binlog function of mysql and the binlog location
sync_binlog = 1         #The binlog of the control database is brushed to the disk. 0 is not controlled and the performance is the best. 1 is brushed to the log file every time the transaction is submitted. The performance is the worst and the safest
binlog_format = mixed   #binlog log format, mysql adopts statement by default, and mixed is recommended
expire_logs_days = 7                           #binlog expiration cleanup time
max_binlog_size = 100m                    #binlog size of each log file
binlog_cache_size = 4m                        #binlog cache size

binlog-do-db=test1 #Databases that need to be synchronized
binlog-do-db=test2 #Databases that need to be synchronized

max_binlog_cache_size= 512m              #Maximum binlog cache size
binlog-ignore-db=mysql #For databases that do not generate log files, multiple ignored databases can be spliced with commas, or copy this sentence and write multiple lines

auto-increment-offset = 1     # Offset from increment
auto-increment-increment = 1  # Self increment
slave-skip-errors = all #Skip from library error
[slave]
[mysqld]
server-id=2
log-bin=mysql-bin #If you need not synchronize with other databases from the database, you can comment it out
relay-log=slave-relay-bin #Must be enabled. binlog synchronized from the primary database will be written to this directory
relay-log-index=slave-relay-bin
#If the master and slave database names are the same
replication-do-db=Database name
#If the master and slave database names are different
replication-rewrite-db= Primary database name -> From database name
Step 2
Restart service
service mysql restart
Step 3
Create a user for synchronization in the main library (of course, you can directly use the existing one without creating it, but it is recommended to create one for security)
CREATE USER centos1 IDENTIFIED BY 'maluole';
grant replication SLAVE on *.* to 'mycentos1'@'192.168.2.88' identified by 'maluole';
mysql8. After 0. Authorization may report an error.
#If you use navicate to create users, you need to modify the encryption method
alter user centos1 identified with mysql_native_password by 'maluole'
#Change host to all ip addresses
update user set host='%' where user='centos1'
#Authorization does not require a password
grant replication SLAVE on *.* to 'centos1'@'%'
Step 4
To view master information on the master server, remember [file] and [position]
show master status;
Step 5
Log in to the slave server mysql and add the master information to be synchronized from the slave node. The [master_log_file] and [master_log_pos] are the two field information obtained from the previous step. Execute the following statement
change master to master_host='192.168.2.151',master_user='mycentos1',master_password='maluole',master_log_file='mysql_bin.000015',master_log_pos=413;
Parameter interpretation: MASTER_HOST: set the ip address of the master server to be connected_ User: sets the user name of the primary server to connect to
MASTER_PASSWORD: sets the password of the master server to connect to_ LOG_ FILE :
Set the log name of the bin log of the primary server to be connected, that is, the information master obtained in step 3_ LOG_ POS :
Set the recording location of the bin log of the primary server to be connected, that is, the information obtained in step 3. (note here that the last item does not need quotation marks. Otherwise, the configuration fails.)
--------
Note: master_host is the ip address of the primary node, and master_user
And master_password is the account and password created by the master server in the previous steps to connect to the master server_ log_ File and master_log_pos needs to query after entering the Mysql database from the master node
Step 6
Start master-slave on slave server
start slave;#Start master-slave
stop slave;#Pause master-slave
Note: if starting the slave node fails, a reset needs to be performed.
stop slave;
reset slave;
Step 7
In this mode, data loss and truncation will not be caused, because this value only allows the conversion of similar small data types to large data types, and 1677 errors will occur in the conversion of other modes. This value is recommended for production environments
set global slave_type_conversions ='ALL_NON_LOSSY';
Step 8
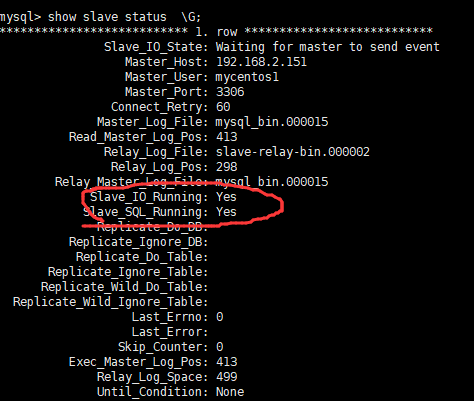
Check the master-slave synchronization status, no error is reported, and the startup is successful
show slave status \G;
OR
show slave status;
As shown in the figure below, Yes indicates success.
