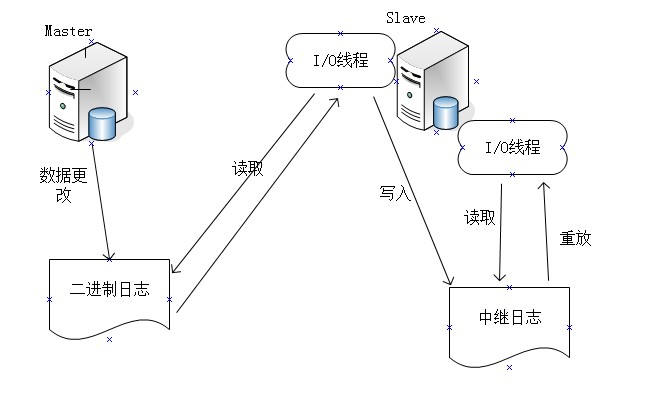
Type of MySQL master-slave replication
Statement-based replication (default)
- Statements executed on the primary server, same statements executed from the server
Row-based replication
- Copy changes to from server
Mixed type replication
- Row-based replication is used when statement-based replication is found to be inaccurate
Master-slave duplicated past
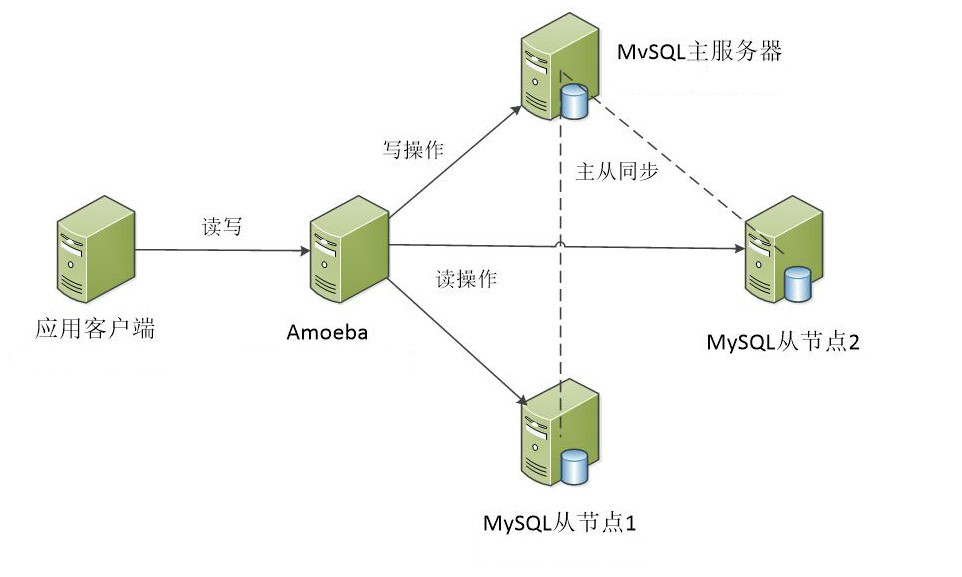
MySQL Read-Write Separation Principle
- Separating read from write means writing only on the primary server and reading only from the server
- The primary database handles transactional queries, while the select query is handled from the database
- Database replication is used to synchronize changes from transactional queries to out-of-database in a cluster
The process of separating read from write
Practice Operations
Experimental environment
amoeba server IP address: 192.168.144.160
 master server IP address: 192.168.144.151
 Slve1 server IP address: 192.168.144.163
 Slve2 server IP address: 192.168.144.145
 client Client
Install ntp time server on master server
[root@ameoba ~]# Yum install ntp-y //install time server
[root@master1 ~]# vim /etc/ntp.conf
##Add under server
server 127.127.144.0      //Local is the time source
fudge 127.127.144.0 stratum 8   //Set the time level to 8

[root@master1 ~]# systemctl start ntpd //start time service
[root@master1 ~]# systemctl stop firewalld //close firewall
[root@master1 ~]# setenforce 0
Install ntp, ntpdate service on slave1
[root@slave1 ~]# yum install ntp ntpdate -y
[root@slave1 ~]# systemctl start ntpd
[root@slave1 ~]# systemctl stop firewalld
[root@slave1 ~]# setenforce 0
[root@slave1 ~]# /usr/sbin/ntpdate 192.168.144.151 //Synchronize master server time
29 Nov 16:58:43 ntpdate[4932]: the NTP socket is in use, exiting
Install ntp, ntpdate service on slave2
[root@slave2 ~]# yum install ntp ntpdate -y
[root@slave2 ~]# systemctl start ntpd
[root@slave2 ~]# systemctl stop firewalld
[root@slave2 ~]# setenforce 0
[root@slave2 ~]# /usr/sbin/ntpdate 192.168.144.151
29 Nov 17:02:08 ntpdate[4850]: the NTP socket is in use, exiting
Install MySQL-5.5.24 on master, slave1, and slave2, respectively
[root@master1 ~]# Mkdir/abc //Create mount point
[root@master1 ~]# Mount.cifs //192.168.100.8/LNMP-C7/abc///remote mount
Password for root@//192.168.100.8/LNMP-C7:
[root@master1 ~]# cd /abc/
[root@master1 abc]# ls
mysql-5.5.24
[root@master1 abc]# Tar zxvf mysql-5.5.24.tar.gz-C/opt/ //decompression
[root@master1 opt]# yum install -y \
> gcc gcc-c++ \
> ncurses \
> ncurese-devel \    //Library for controlling terminal screen display
> bison \                 //Grammatical Analysis
> make
> cmake                 //cmake tool
> libaio-devel         //System calls to implement asynchronous IO

[root@slave1 opt]# Useradd-s/sbin/nologin mysql //Add a mysql user that is not logged in
[root@slave1 opt]# cd /opt/mysql-5.5.24/
[root@slave1 mysql-5.5.24]# Mkdir/usr/local/mysql //Create installation directory
[root@slave1 mysql-5.5.24]# cmake \ //Configuration
> -DCMAKE_INSTALL_PREFIX=/usr/local/mysql \    //Installation Path
> -DMYSQL_UNIX_ADDR=/home/mysql/mysql.sock \   //sock file path
> -DDEFAULT_CHARSET=utf8 \      //character set
> -DDEFAULT_COLLATION=utf8_general_ci \
> -DWITH_EXTRA_CHARSETS=all \
> -DWITH_MYISAM_STORAGE_ENGINE=1 \     //Storage Engine
> -DWITH_INNOBASE_STORAGE_ENGINE=1 \
> -DWITH_MEMORY_STORAGE_ENGINE=1 \
> -DWITH_READLINE=1 \
> -DENABLED_LOCAL_INFILE=1 \
> -DMYSQL_DATADIR=/home/mysql \     //Data File Path
> -DMYSQL_USER=mysql \      //user
> -DMYSQL_TCP_PORT=3306    //port

[root@slave1 mysql-5.5.24]# Make & & make install //compile and install
[root@master1 mysql-5.5.24]# Chown-R mysql.mysql/usr/local/mysql //Set MySQL ownership group
[root@master1 mysql-5.5.24]# Vim/etc/profile//Configure environment variables for system identification
export PATH=$PATH:/usr/local/mysql/bin/
[root@master1 mysql-5.5.24]# Source/etc/profile//refresh profile
[root@master1 mysql-5.5.24]# CP support-files/my-medium.cnf/etc/my.cnf //main profile
cp: Whether to Overwrite"/etc/my.cnf"? yes
[root@master1 mysql-5.5.24]# CP support-files/mysql.server/etc/init.d/mysql d//startup file
[root@master1 mysql-5.5.24]# Chmod 755/etc/init.d/mysqld //Set permissions
[root@master1 mysql-5.5.24]# Chkconfig --add/etc/init.d/mysqld//add to service management
[root@master1 mysql-5.5.24]# chkconfig mysqld --level 35 on //boot-up self-start
[root@master1 mysql-5.5.24]# /usr/local/mysql/scripts/mysql_install_db \ //initialize database
> --user=mysql \
> --ldata=/var/lib/mysql \
> --basedir=/usr/local/mysql \
> --datadir=/home/mysql

[root@master1 mysql-5.5.24]# Vim/etc/init.d/mysqld //Edit startup script file
basedir=/usr/local/mysql   //Find here to add a path
datadir=/home/mysql
[root@master1 mysql-5.5.24]# service mysqld start //start MySQL
Starting MySQL.. SUCCESS!
[root@master1 mysql-5.5.24]# Mysqladmin-u root password'abc123'//Set password
Configure master master master server
[root@master1 mysql-5.5.24]# vim /etc/my.cnf
server-id       = 11     //Service ID Number
log-bin=master-bin                         //Primary Server Log Files
log-slave-updates=true                   //Update binary logs from server
[root@master1 mysql-5.5.24]# service mysqld restart //restart MySQL service
Shutting down MySQL. SUCCESS!
Starting MySQL.. SUCCESS!
[root@master1 ~]# Mysql-uroot-pabc123 //Enter database

mysql> GRANT REPLICATION SLAVE ON *.* TO 'myslave'@'192.168.144.%' IDENTIFIED BY '123456';    //Give copying privileges from the server, named myslave password 123456 for 144 segments
Query OK, 0 rows affected (0.01 sec)

mysql> FLUSH PRIVILEGES;    ##Refresh Title
Query OK, 0 rows affected (0.00 sec)

mysql> show master status;   ##View Master Server Status
+-------------------+----------+--------------+------------------+
| File              | Position | Binlog_Do_DB | Binlog_Ignore_DB |
+-------------------+----------+--------------+------------------+
| master-bin.000002 |      338 |              |                  |
+-------------------+----------+--------------+------------------+
1 row in set (0.00 sec)
Configure slave1 slave server
[root@slave1 mysql-5.5.24]# vim /etc/my.cnf
server-id       = 22              //The other is 23

relay-log=relay-log-bin                         //Synchronize log files from primary server to local
relay-log-index=slave-relay-bin.index           //Define the location and name of relay-log
[root@slave1 mysql-5.5.24]# service mysqld restart //re-service
Shutting down MySQL. SUCCESS!
Starting MySQL.. SUCCESS!
[root@slave1 mysql-5.5.24]# mysql -uroot -pabc123

mysql> change master to master_host='192.168.144.151',master_user='myslave',master_password='123456',master_log_file='master-bin.000002',master_log_pos=338;    //Synchronize master server binaries and locations using authorized account passwords
Query OK, 0 rows affected (0.00 sec)

mysql> start slave;     //Turn on synchronization
Query OK, 0 rows affected (0.01 sec)

mysql> show slave status\G;   ##View Status
                            Master_Log_File: master-bin.000002
                    Read_Master_Log_Pos: 338
                             Relay_Log_File: relay-log-bin.000001
                                Relay_Log_Pos: 4
                Relay_Master_Log_File: master-bin.000002
                         Slave_IO_Running: Yes
                        Slave_SQL_Running: Yes
Configure slave2 slave server
[root@slave2 mysql-5.5.24]# vim /etc/my.cnf
server-id       = 23

relay-log=relay-log-bin                         //Synchronize log files from primary server to local
relay-log-index=slave-relay-bin.index           //Define the location and name of relay-log
[root@slave2 mysql-5.5.24]# service mysqld restart //re-service
Shutting down MySQL. SUCCESS!
Starting MySQL.. SUCCESS!
[root@slave2 mysql-5.5.24]# mysql -uroot -pabc123

mysql> change master to master_host='192.168.144.151',master_user='myslave',master_password='123456',master_log_file='master-bin.000002',master_log_pos=338;    //Synchronize master server binaries and locations using authorized account passwords
Query OK, 0 rows affected (0.00 sec)

mysql> start slave;    //Turn on synchronization
Query OK, 0 rows affected (0.01 sec)

mysql> show slave status\G;    //View Status
                            Master_Log_File: master-bin.000002
                    Read_Master_Log_Pos: 338
                             Relay_Log_File: relay-log-bin.000001
                                Relay_Log_Pos: 4
                Relay_Master_Log_File: master-bin.000002
                         Slave_IO_Running: Yes
                        Slave_SQL_Running: Yes
Test Synchronization
Master
mysql> create database school;    //Create a school database
Query OK, 1 row affected (0.00 sec)
Slave1
mysql> show databases;   //View database for master-slave synchronization
+--------------------+
| Database           |
+--------------------+
| information_schema |
| #mysql50#.mozilla  |
| mysql              |
| performance_schema |
| school             |
| test               |
+--------------------+
6 rows in set (0.01 sec)
Slave2
mysql> show databases;   //View database for master-slave synchronization
+--------------------+
| Database           |
+--------------------+
| information_schema |
| #mysql50#.mozilla  |
| mysql              |
| performance_schema |
| school             |
| test               |
+--------------------+
6 rows in set (0.01 sec)
Configure amoeba server
[root@amoeba ~]# systemctl stop firewalld.service //close firewall
[root@amoeba ~]# setenforce 0
[root@amoeba ~]# Mount.cifs //192.168.100.8/LNMP-C7/mnt/ //mount
Password for root@//192.168.100.8/LNMP-C7:
[root@amoeba ~]# cd /mnt/
[root@amoeba mnt]# ls
[root@amoeba mnt]# CP jdk-6u14-linux-x64.bin/usr/local/ //copy JDK binaries to/usr/local
[root@amoeba mnt]# cd /usr/local/
[root@amoeba local]# . /jdk-6u14-linux-x64.bin //Perform installation directly
Do you agree to the above license terms? [yes or no]
yes                //Select yes to install
Press Enter to continue.....
##Enter to continue
[root@amoeba local]# mv jdk1.6.0_14/ /usr/local/jdk1.6//simplified file name
[root@amoeba local]# Vim/etc/profile//Set environment variables
...
export JAVA_HOME=/usr/local/jdk1.6            //Home catalog
export CLASSPATH=$CLASSPATH:$JAVA_HOME/lib:$JAVA_HOME/jre/lib            //class environment variable
export PATH=$JAVA_HOME/lib:$JAVA_HOME/jre/bin/:$PATH:$HOME/bin           //environment variable
export AMOEBA_HOME=/usr/local/amoeba                  //amoeba home directory
export PATH=$PATH:$AMOEBA_HOME/bin                //environment variable
[root@amoeba local]# Source/etc/profile//refresh profile
[root@amoeba local]# Mkdir/usr/local/amoeba //Create amoeba directory
[root@amoeba local]# cd /mnt/
[root@amoeba mnt]# Tar zxvf amoeba-mysql-binary-2.2.0.tar.gz-C/usr/local/amoeba //decompress amoeba package
[root@amoeba mnt]# Chmod-R 755/usr/local/amoeba/ //Set permissions
[root@amoeba mnt]# /usr/local/amoeba/bin/amoeba //Check for successful installation
amoeba start|stop
Authorize amoeba access on master, slave1, slave2
grant all on *.* to test@'192.168.144.%' identified by '123.com'; //Give amoeba access user test password 123.com
Go back to amoeba server and modify the configuration file
[root@amoeba conf]# vim amoeba.xml //Modify the main configuration file
---30 That's ok--
 <property name="user">amoeba</property>        //Synchronize master server user passwords from server
----32 That's ok---------
 <property name="password">123456</property>
---117-Remove comments-
 <property name="defaultPool">master</property>
 <property name="writePool">master</property>
 <property name="readPool">slaves</property>
:wq
[root@amoeba conf]# vim conf/dbServers.xml //Configure database configuration file
--26-29--Remove comments--
 <property name="user">test</property>

 <property name="password">123.com</property>
-----42-Primary Server Address---
<dbServer name="master"  parent="abstractServer">
 <property name="ipAddress">192.168.144.151</property>
--52-From Server Host Name-
<dbServer name="slave1"  parent="abstractServer">
 <property name="ipAddress">192.168.144.163</property>
 ##Copy 6 lines to add slave2
 <dbServer name="slave2"  parent="abstractServer">
 <property name="ipAddress">192.168.144.145</property>
--65 Row around--
 <dbServer name="slaves" virtual="true">
 <poolConfig class="com.meidusa.amoeba.server.MultipleServerPool">
--End--
<property name="poolNames">slave1,slave2</property>
 </poolConfig>
[root@amoeba conf]# /usr/local/amoeba/bin/amoeba start & //Open amoeba service
[root@amoeba ~]# Netstat-anpt | grep Java //Open another terminal to view the opening
tcp6       0      0 127.0.0.1:26268         :::*                    LISTEN      40925/java
tcp6       0      0 :::8066                 :::*                    LISTEN      40925/java
tcp6       0      0 192.168.144.160:34090    192.168.144.151:3306     ESTABLISHED 40925/java
tcp6       0      0 192.168.144.160:33866    192.168.144.145:3306     ESTABLISHED 40925/java
tcp6       0      0 192.168.144.160:55984    192.168.144.163:3306     ESTABLISHED 40925/java
Testing Read-Write Separation on Client
[root@client ~]# Yum install mysql-y //install test database
client Create Table
[root@client ~]# Mysql-u amoeba-p123456-h 192.168.144.160-P8066 //Log on to amoeba using the amoeba account password
MySQL [(none)]> show databases;   //view the database
+--------------------+
| Database           |
+--------------------+
| information_schema |
| #mysql50#.mozilla  |
| mysql              |
| performance_schema |
| school             |
| test               |
+--------------------+
6 rows in set (0.00 sec)

MySQL [(none)]> use school;        //Use database
Database changed
MySQL [school]> create table info (         //Create Table
        -> id int(4) not null primary key,
        -> name varchar(10) not null,
        -> score decimal(4,1) not null);
Query OK, 0 rows affected (0.02 sec)
See if there are tables created on the master-slave server
mysql> use school;    ##Use database
Database changed
mysql> show tables;  ##View Table
+------------------+
| Tables_in_school |
+------------------+
| info             |
+------------------+
1 row in set (0.00 sec)
Turn off synchronous slave s on both servers
mysql> stop slave;
Query OK, 0 rows affected (0.01 sec)
Writing table data on client
MySQL [school]> insert into info (id,name,score) values (1,'zhangsan',88);  //Insert Data Content
Query OK, 1 row affected (0.03 sec)
View on Master
mysql> select * from info;
+----+----------+-------+
| id | name     | score |
+----+----------+-------+
|  1 | zhangsan |  88.0 |
+----+----------+-------+
1 row in set (0.00 sec)
View from Server
mysql> select * from info;  //No write on slave
Empty set (0.00 sec)
View in client
mysql> insert into info (id,name,score) values (2,'lisi',70);
Query OK, 1 row affected (0.00 sec)
Writing in slave2
mysql> insert into info (id,name,score) values (3,'wuwang',60);
Query OK, 1 row affected (0.00 sec)
View info table data on the tester (polling mode)
MySQL [school]> select * from info;
+----+--------+-------+
| id | name   | score |
+----+--------+-------+
|  3 | wuwang |  60.0 |
+----+--------+-------+
1 row in set (0.00 sec)

MySQL [school]> select * from info;
+----+------+-------+
| id | name | score |
+----+------+-------+
|  2 | lisi |  70.0 |
+----+------+-------+
1 row in set (0.00 sec)