1, Introduction to MySQL master-slave replication
- Introduction: the master-slave replication of MySQL is to obtain the log content of the bin log file of the master server from the server, parse the SQL statement and update it to the slave server, so as to make the data of the master and slave servers consistent.
- Mode: MySQL database supports the replication of different business scenarios such as one-way (A → B or A → B, A → C), two-way (A ⇋ b), chain cascade (A → B → C), ring (A → B → C → A).
- Advantages: it makes it possible for MySQL database to support large-scale and high concurrent reading and writing, and effectively protects the data backup in the scenario of physical server downtime.
- Application: the slave server serves as the real-time data backup of the master server, and the master-slave switch when necessary; The master-slave server realizes the separation of reading and writing, and the slave server realizes load balancing; Split multiple slave servers according to business importance to reduce the pressure on the master server.
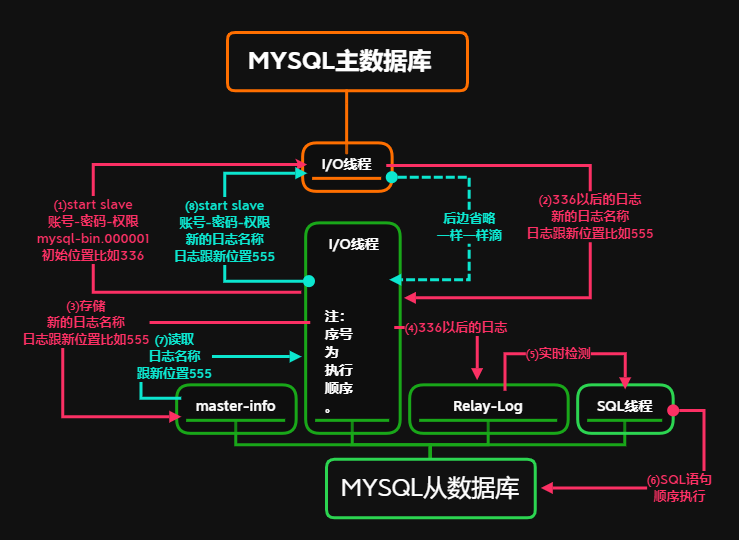
2, MySQL master-slave replication principle: type A → type B
-
Execute the start slave command on the Slave server to turn on the master-Slave copy switch and start the master-Slave copy.
-
At this time, the I/O thread of the Slave server will connect to the Master server through the replication user permission authorized on the Master, and request to send the binlog log content from the specified location of the specified binlog log file (the log file name and location are specified by executing the change master command when configuring the Master-Slave replication service).
-
After the Master server receives the request from the I/O thread of the Slave server, the I/O thread responsible for replication on it will read the binlog log information after the specified location of the specified binlog log file in batches according to the information requested by the I/O thread of the Slave server, and then return it to the I/O thread of the Slave end. In addition to the contents of the binlog log, the returned information also includes the name of the new binlog file recorded on the Master server and the next specified update location in the new binlog.
-
After the I/O thread of the Slave server obtains the log contents, log files and location points sent by the I/O thread on the Master server, it will write the binlog contents to the end of the Relay Log (i.e. Relay Log) file (MySQL-relay-bin.xxxxxx) of the Slave end in turn, and record the new binlog file name and location in the Master info file, So that the next time the Master side and the new biolog log are read, the Master server can be told to request the new binlog contents from the specified file and location of the new binlog log.
-
The SQL thread on the Slave server will detect the newly added log content of the I/O thread in the local Relay Log in real time, and then parse the content in the Relay Log file into SQL statements in time, and execute these SQL statements on its own Slave server according to the sequence of parsing SQL statements, and apply them in the Relay Log Info records the file name and location of the current application Relay Log.
Reference: learning Linux operation and maintenance from old boys: actual combat of Web Cluster
3, MySQL multi instance configuration master-slave replication: type A → type B
| Database instance | IP | port |
|---|---|---|
| Master database | 192.168.10.10 | 3306 |
| From database | 192.168.10.10 | 3307 |
1. Start stop login test of master-slave Library
[root@bbs ~]# /data/3306/mysql start|/data/3307/mysql start
Starting MySQL...
[root@bbs ~]# netstat -lntup | grep 330
tcp        0      0 0.0.0.0:3306                0.0.0.0:*                   LISTEN      2266/m       ysqld
tcp        0      0 0.0.0.0:3307                0.0.0.0:*                   LISTEN      2988/m       ysqld
[root@bbs ~]# mysql -u root -pxxxxxx -S /data/3306/mysql.sock
[root@bbs ~]# mysql -u root -pxxxxxx -S /data/3307/mysql.sock
[root@bbs ~]# /data/3306/mysql stop|/data/3307/mysql stop
Stoping MySQL...
2. Configure my CNF file
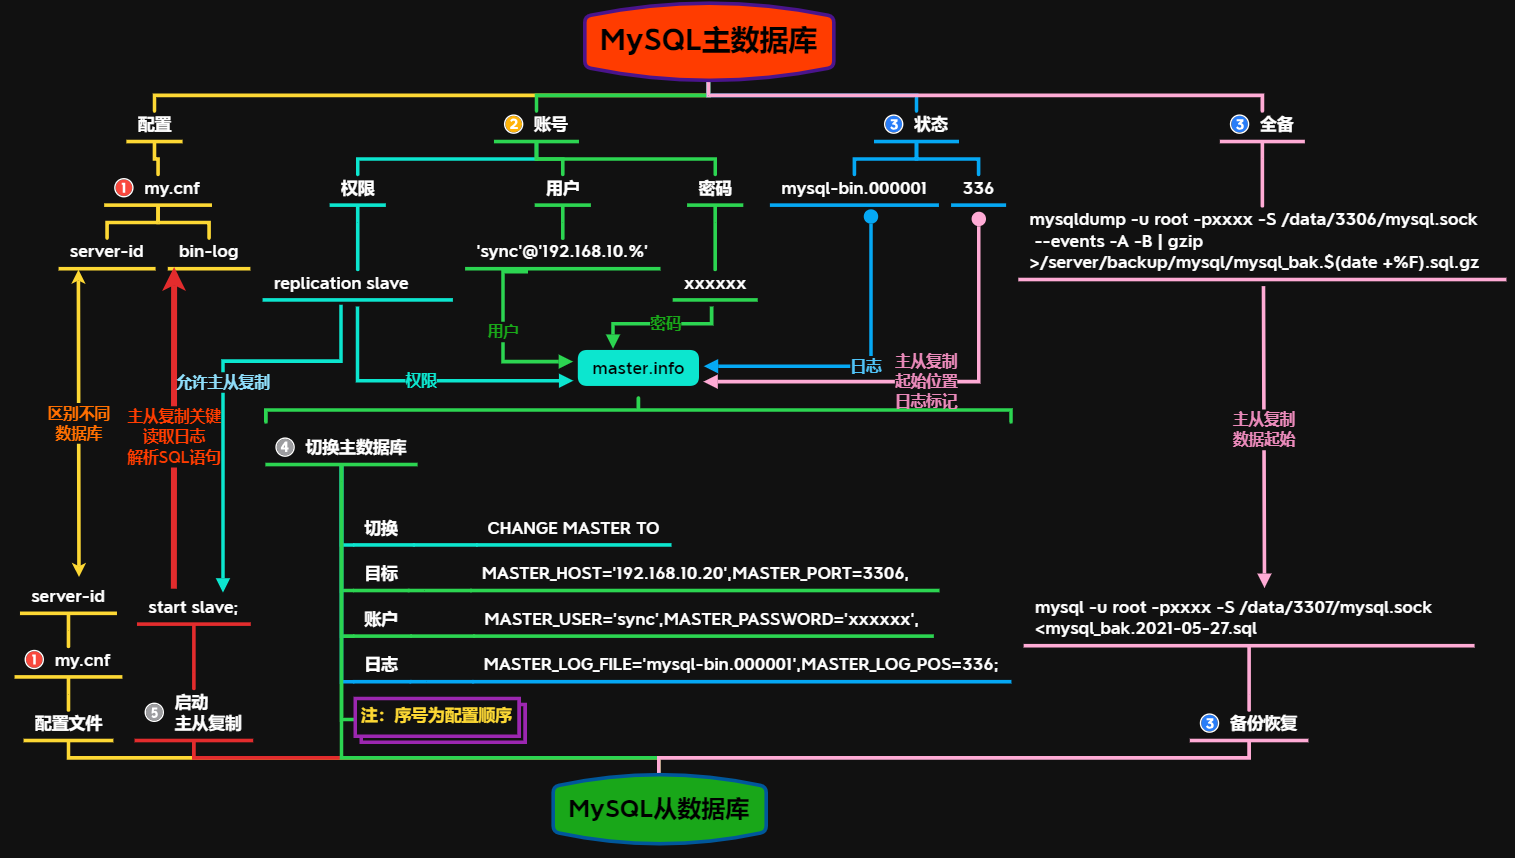
(1) configure log bin and server ID parameters for the main database
- Server ID generally uses the last bit of the server IP address. The purpose is to avoid duplication of different machine or instance IDs. That is, the ID card of the server.
- Log bin log file path. The key of master-slave replication. It contains executed MySQL statements. When the database data is lost, it can even be used to recover the database. reference resources: Database failure and handling method.
[root@bbs ~]# vim /data/3306/my.cnf
[mysqld]
server-id=6
log-bin=/data/3306/mysql-bin
(2) configure the server ID parameter from the database
- Type A → B: the log function of slave library is turned off to reduce the disk I/O reading and writing pressure.
[root@bbs ~]# vim /data/3307/my.cnf
[mysqld]
server-id=7
(3) check the configuration of log bin and server ID
[root@bbs ~]# /data/3306/mysql restart | /data/3307/mysql restart
Restarting MySQL...
Stoping MySQL...
Starting MySQL...
[root@bbs ~]# mysql -u root -pxxxxxx -S /data/3306/mysql.sock

mysql> show variables like 'server_id';
+---------------+-------+
| Variable_name | Value |
+---------------+-------+
| server_id     | 6     |
+---------------+-------+
1 row in set (0.00 sec)

mysql> show variables like 'log_bin';
+---------------+-------+
| Variable_name | Value |
+---------------+-------+
| log_bin       | ON    |
+---------------+-------+
1 row in set (0.00 sec)

mysql> quit
Bye

[root@bbs ~]# mysql -u root -pxxxxxx -S /data/3307/mysql.sock

mysql> show variables like 'server_id';
+---------------+-------+
| Variable_name | Value |
+---------------+-------+
| server_id     | 7     |
+---------------+-------+
1 row in set (0.00 sec)

mysql> quit
Bye
3. Main library
(1) create synchronization account and grant permission
- Log in to the main library
- Create an account 'sync'@'192.168.1.%' for master-slave replication, Grant synchronization permission replication slave
- grant replication slave on *.* to 'sync'@'192.168.1.%' identified by 'xxxxxx';
- flush privileges;
[root@bbs ~]# mysql -u root -pxxxxxx -S /data/3306/mysql.sock

mysql> grant replication slave on *.* to 'sync'@'192.168.1.%' identified by 'xxxxxx';
Query OK, 0 rows affected (0.00 sec)

mysql> flush privileges;
Query OK, 0 rows affected (0.00 sec)

mysql> select user,host from mysql.user;
+------+-------------+
| user | host        |
+------+-------------+
| root | 127.0.0.1   |
| sync | 192.168.1.% |
| root | localhost   |
+------+-------------+
3 rows in set (0.00 sec)

mysql> show grants for 'sync'@'192.168.1.%';
+---------------------------------------------------------------------------------------------------------------------------+
| Grants for sync@192.168.1.%                                                                                               |
+---------------------------------------------------------------------------------------------------------------------------+
| GRANT REPLICATION SLAVE ON *.* TO 'sync'@'192.168.1.%' IDENTIFIED BY PASSWORD '*BA7B54CEC4FB683F159C06C527E7135DE8086625' |
+---------------------------------------------------------------------------------------------------------------------------+
1 row in set (0.00 sec)
(2) lock table
- flush table with read lock; After the lock, the table is read-only.
- After the window is closed, the lock table becomes invalid. When the time set by the timeout parameter (show variables like '%timeout%'; 28800s) is up, the lock table becomes invalid.
- Check the bin log file name and binary log bin log offset show master status;
- The binary log bin log offset 336 is the starting position of master-slave replication after importing all standby from the library.
- If the original window is not closed, create a new SSH window
mysql> flush table with read lock;
Query OK, 0 rows affected (0.00 sec)

mysql> show variables like '%timeout%';
+----------------------------+----------+
| Variable_name              | Value    |
+----------------------------+----------+
| connect_timeout            | 10       |
| delayed_insert_timeout     | 300      |
| innodb_lock_wait_timeout   | 120      |
| innodb_rollback_on_timeout | OFF      |
| interactive_timeout        | 28800    |
| lock_wait_timeout          | 31536000 |
| net_read_timeout           | 30       |
| net_write_timeout          | 60       |
| slave_net_timeout          | 3600     |
| wait_timeout               | 28800    |
+----------------------------+----------+
10 rows in set (0.00 sec)

mysql> show master status;
+------------------+----------+--------------+------------------+
| File             | Position | Binlog_Do_DB | Binlog_Ignore_DB |
+------------------+----------+--------------+------------------+
| mysql-bin.000001 |      336 |              |                  |
+------------------+----------+--------------+------------------+
1 row in set (0.00 sec)
(4) backup data
- If the original window is not closed, the new SSH window
- Backup master database data mysqldump - U root - pxxxxxx - S / data / 3306 / MySQL sock --events -A -B | gzip >/server/backup/mysql/mysql_ bak.$ (date +%F). sql. gz
- A means to back up all libraries
- B means adding use DB, drop, etc. (the original will be directly overwritten when importing the Library)
- If the amount of database data is large and downtime is allowed, you can stop packaging and backup faster.
- Check the log offset to ensure that the database data has not been changed during the backup. MySQL - U root - pxxxxxx - S / data / 3306 / MySQL sock -e "show master status;"
Last login: Thu May 27 18:55:20 2021 from desktop-onnhvgf
[root@bbs ~]# mkdir -p /server/backup/mysql
[root@bbs ~]# mysqldump -u root -pxxxxxx -S /data/3306/mysql.sock --events -A -B | gzip >/server/backup/mysql/mysql_bak.$(date +%F).sql.gz
[root@bbs ~]# ls -l /server/backup/mysql
total 144
-rw-r--r--. 1 root root 144302 May 27 19:00 mysql_bak.2021-05-27.sql.gz
[root@bbs ~]# mysql -u root -pxxxxxx -S /data/3306/mysql.sock -e "show master status;"
+------------------+----------+--------------+------------------+
| File             | Position | Binlog_Do_DB | Binlog_Ignore_DB |
+------------------+----------+--------------+------------------+
| mysql-bin.000001 |      336 |              |                  |
+------------------+----------+--------------+------------------+
[root@bbs ~]#
(5) unlocking
- Unlock the main write library and unlock the tables;
mysql> unlock tables;
Query OK, 0 rows affected (0.00 sec)
4. Slave Library
(1) restore backup
- Restore data to MySQL - U root - pxxxxxx - S / data / 3307 / MySQL sock <mysql_ bak. 2021-05-27. sql
[root@bbs ~]# cd /server/backup/mysql/
[root@bbs mysql]# gzip -d mysql_bak.2021-05-27.sql.gz
[root@bbs mysql]# mysql -u root -pxxxxxx -S /data/3307/mysql.sock <mysql_bak.2021-05-27.sql
(2) connect to the main warehouse
- Configure the parameters for connecting the slave library to the master library and reading the log of the master library:
- Connect the main library CHANGE MASTER TO
- Ipmaster of master library_ HOST='192.168.10.20',
- Main library port MASTER_PORT=3306,
- Connect user MASTER_USER='sync',
- User password MASTER_PASSWORD='xxxxxx',
- Log file MASTER_LOG_FILE='mysql-bin.000001',
- Log offset MASTER_LOG_POS=336;
- Generated information record / data / 3307 / data / master info
[root@bbs mysql]# mysql -u root -pxxxxxx -S /data/3307/mysql.sock << EOF
> CHANGE MASTER TO
> MASTER_HOST='192.168.10.20',
> MASTER_PORT=3306,
> MASTER_USER='sync',
> MASTER_PASSWORD='xxxxxx',
> MASTER_LOG_FILE='mysql-bin.000001',
> MASTER_LOG_POS=336;
> EOF
[root@bbs mysql]# ll /data/3307/data/master.info
-rw-rw----. 1 mysql mysql 80 May 27 20:19 /data/3307/data/master.info
[root@bbs mysql]# head -n 10 /data/3307/data/master.info
18
mysql-bin.000001
336
192.168.10.20
sync
xxxxxx
3306
60
0
(3) start master-slave replication and check the status
- Start the master-slave copy start slave from the library;
- Check the synchronization status show slave status\G;
- Through the MySQL thread synchronization status, you can see whether the synchronization is normal and what the location of the fault is. In addition, you can also check whether the database synchronization is completed. It can be used for the main database downtime switching database or manual database master-slave switching migration.
[root@bbs mysql]# mysql -uroot -pxxxxxx -S /data/3307/mysql.sock -e "start slave;"
[root@bbs mysql]# mysql -uroot -pxxxxxx -S /data/3307/mysql.sock -e "show slave status\G;"
*************************** 1. row ***************************
               Slave_IO_State: Waiting for master to send event
                  Master_Host: 192.168.10.20
                  Master_User: sync
                  Master_Port: 3306
                Connect_Retry: 60
              Master_Log_File: mysql-bin.000001
          Read_Master_Log_Pos: 336
               Relay_Log_File: relay-bin.000002
                Relay_Log_Pos: 253
        Relay_Master_Log_File: mysql-bin.000001
             Slave_IO_Running: Yes
            Slave_SQL_Running: Yes
              Replicate_Do_DB:
          Replicate_Ignore_DB: mysql
           Replicate_Do_Table:
       Replicate_Ignore_Table:
      Replicate_Wild_Do_Table:
  Replicate_Wild_Ignore_Table:
                   Last_Errno: 0
                   Last_Error:
                 Skip_Counter: 0
          Exec_Master_Log_Pos: 336
              Relay_Log_Space: 403
              Until_Condition: None
               Until_Log_File:
                Until_Log_Pos: 0
           Master_SSL_Allowed: No
           Master_SSL_CA_File:
           Master_SSL_CA_Path:
              Master_SSL_Cert:
            Master_SSL_Cipher:
               Master_SSL_Key:
        Seconds_Behind_Master: 0
Master_SSL_Verify_Server_Cert: No
                Last_IO_Errno: 0
                Last_IO_Error:
               Last_SQL_Errno: 0
               Last_SQL_Error:
  Replicate_Ignore_Server_Ids:
             Master_Server_Id: 6
(4) update test
- Update test in the main database: build a database in the main database and import data; View slave library; Automatic data synchronization.
[root@bbs mysql]# cd /server/data/mysql
[root@bbs mysql]# ls -l
total 4
-rw-r--r--. 1 root root 1777 Mar 10 21:20 wuxia.sql
[root@bbs mysql]# mysql -uroot -pxxxxxx -S /data/3306/mysql.sock << EOF
> create database wuxia;
> use wuxia;
> source wuxia.sql;
> show tables;
> EOF
Tables_in_wuxia
character_tbl
skill_tbl
[root@bbs mysql]# mysql -uroot -pxxxxxx -S /data/3307/mysql.sock << EOF
> use wuxia;
> show tables;
> EOF
Tables_in_wuxia
character_tbl
skill_tbl
[root@bbs mysql]#
appendix
1. Master-slave deployment
- mysqldump -u root -pxxxxxx -S /data/3306/mysql.sock -A --events -B -x --master-data=1|gzip >/server/backup/mysql/mysql_bak.$(date +%F).sql.gz
- --Master data = 1 parameter will add master in the backup_ LOG_ FILE='mysql-bin. 000002', MASTER_ LOG_ POS=107;
- At this time, the master-slave relationship is established, and there is no need to add this parameter.
Day1:

#Install slave Library
tar
cmake
make
make install

#Configure log bin and server ID
vim /data/3306/my.cnf

#Log in to the main database to establish account authorization
mysql -u root -pxxxxxx -S /data/3306/mysql.sock << EOF
grant replication slave on *.* to 'sync'@'192.168.1.%' identified by 'xxxxxx';
flush privileges;
show grants for 'sync'@'192.168.1.%';
EOF

# Scheduled tasks or staying up late for backup
mysqldump -u root -pxxxxxx -S /data/3306/mysql.sock -A --events -B -x --master-data=1|gzip >/server/backup/mysql/mysql_bak.$(date +%F).sql.gz

Day2:
#decompression
gzip -d mysql_bak.2021-05-27.sql.gz
#Import backup
mysql -u root -pxxxxxx -S /data/3307/mysql.sock <mysql_bak.2021-05-27.sql
#Create master-slave contact
mysql -u root -pxxxxxx -S /data/3307/mysql.sock << EOF
CHANGE MASTER TO
MASTER_HOST='192.168.10.20',
MASTER_PORT=3306,
MASTER_USER='sync',
MASTER_PASSWORD='xxxxxx',
EOF
#open
mysql -uroot -pxxxxxx -S /data/3307/mysql.sock -e "start slave;"
#inspect
mysql -uroot -pxxxxxx -S /data/3307/mysql.sock -e "show slave status\G;"
2. Thread status description
- Check the I/O thread status of the master-slave database show processlist\G;
- I/O thread status description:
| Main library I/O thread status | explain |
|---|---|
| Sending binlog event to slave | The thread has read an event from the binary binlog log and is sending it to the slave server |
| Finished reading one binlog; switching to next binlog | The thread has read the binary binlog file and is opening the next binlog file to be sent to the slave server |
| Has sent all binlog to slave; waiting for binlog to be updated | The thread has read all updates from the binlog log and sent them to the slave database server. The thread is currently idle, waiting to be updated by new events in the binary binlog log on the primary server. |
| Waiting to finalize tennination | A very simple state that occurs when a thread stops |
| From library I/O thread status | explain |
|---|---|
| Connecting to master | The thread is trying to connect to the master server |
| Checking master version Registering slave on master | A temporary state that occurs after a connection is established with the primary server |
| Requesting binlog dump | A temporary state that occurs after a connection is established with the primary server. The thread sends a request to the master server for the binary binlog log content starting from the requested binary binlog log file name and location |
| Waiting to reconnect after a failed binlog dump request | If the binary binlog log dump request fails, the thread goes to sleep and then periodically tries to reconnect. You can use the – master connect retry option to specify the interval between retries |
| Reconnecting after a failed binlog dump request | Thread is trying to reconnect to the main service |
| Waiting for master to send event | The thread has connected to the primary server and is waiting for binary binlog log events to arrive |
| Queueing master event to tbe relay log | The thread has read an event and is copying it to the relay log for processing by the SQL thread |
| Waiting to reconnect after a failed master event read | An error occurred while reading because there is no connection. The thread will sleep for – master connect retry seconds before attempting to reconnect |
| Reconnecting after a failed master event read | The thread is attempting to reconnect to the primary server. When the connection is re established, the status changes to Waiting for master to send event |
[root@bbs mysql]# mysql -uroot -pxxxxxx -S /data/3306/mysql.sock -e "show processlist\G;"
*************************** 1. row ***************************
     Id: 2
   User: sync
   Host: 192.168.10.20:58084
     db: NULL
Command: Binlog Dump
   Time: 7848
  State: Master has sent all binlog to slave; waiting for binlog to be updated
   Info: NULL
*************************** 2. row ***************************
     Id: 13
   User: root
   Host: localhost
     db: NULL
Command: Query
   Time: 0
  State: NULL
   Info: show processlist
[root@bbs mysql]# mysql -uroot -pxxxxxx -S /data/3307/mysql.sock -e "show processlist\G;"
*************************** 1. row ***************************
     Id: 2
   User: system user
   Host:
     db: NULL
Command: Connect
   Time: 8283
  State: Waiting for master to send event
   Info: NULL
*************************** 2. row ***************************
     Id: 15
   User: system user
   Host:
     db: NULL
Command: Connect
   Time: 6934
  State: Slave has read all relay log; waiting for the slave I/O thread to update it
   Info: NULL
*************************** 3. row ***************************
     Id: 18
   User: root
   Host: localhost
     db: NULL
Command: Query
   Time: 0
  State: NULL
   Info: show processlist
reference resources
Learning Linux operation and maintenance from old boys: actual combat of Web Cluster