Content Essentials
1. Introduction to MHA:
2. Deploy MHA:
Step 1: Install mysql on three master-slave servers
Step 2: Modify mysql's main configuration file: /etc/my.cnf, note that the server-id s of the three servers cannot be the same
Step 3: Start the mysql service with three servers
Step 4: Configure Mysql master-slave synchronization (one master-two slaves)
Step 5: Install MHA
Step 6: Start MHA
1. Introduction to MHA:
MHA(Master High Availability)
(1) At present, MySQL is a relatively mature solution for high availability. It was developed by youshimaton, a Japanese DeNA company (now working for Facebook), and is an excellent high availability software for failover and master-slave promotion in MySQL high availability environment.During the MSQL failover process, MHA can automatically complete the database failover operation within 0-30 seconds, and during the failover process, MHA can ensure the data consistency to the maximum extent to achieve a true high availability.
(2) The software consists of two parts: MHA Manager (management node) and MHA Node (data node).MHA Manager can be deployed separately on a single machine to manage multiple master-slave clusters or on a single slave node.MHA Node runs on each MySQL server, and the MHA Manager periodically detects the master node in the cluster. When the master fails, it automatically upgrades the slave of the latest data to the new master, and then redirects all other slaves to the new master.The entire failover process is fully transparent to the application.
(3) How it works:
1. During the automatic failover of the HA, MHA tries to save the binary logs from the downtime master server to ensure that the data is not lost to the maximum extent, but this is not always possible.For example, if the primary server hardware fails or is not accessible through ssh, MHA cannot save binary logs, failover only and lose the latest data.Using MySQL 5.5 semi-synchronous replication can greatly reduce the risk of data loss.MHA can be combined with semi-synchronous replication.If only one slave has received the latest binary logs, MHA can apply the latest binary logs to all other slave servers, thereby ensuring data consistency for all nodes.
2. Order:
(1) Binary log events are saved from the downtime master;
(2) Identify slave s with the latest updates;
(3) Applying the relay log of differences to other slave s;
(4) Apply binlog events saved from master;
Promote a slave to a new master;
Make other slave s connect to the new master for replication
2. Deploy MHA:
| role | Packages to be installed |
| master (192.168.220.131) | mha4mysql-node |
| slave1 (192.168.220.140) | mha4mysql-node |
| slave2 (192.168.220.136) | mha4mysql-node |
| manager (192.168.220.170) | mha4mysql-manager,mha4mysql-node |
(1) Demand:
This case requires that MySQL databases be monitored through MHA for automatic switching in case of failure, without affecting business.
(2) Ideas:
1. Install MySQL database
2. Configure MySQL with one master and two slaves
3. Install MHA software
4. Configure Password-Free Authentication
5. Configure MySQL, MHA High Availability
6. Analog master failover
(3) Operating system: Cent0S7...Version 6, MHA version 0.57
Step 1: Install mysql on three master-slave servers
(MySQL version 5.6.36; cmake version 2.8.6) because the three installations are identical, this demonstrates the sequence of installations on the master.
1,Install compilation dependency packages:
yum -y install ncurses-devel gcc-c++ perl-Module-Install

2,install gmake Compile the software (decompress directly, then./configure,gmake && gmake install That's all)

3,install Mysql Database:
//Unzip;
//Compile: cmake \
-DCMAKE_INSTALL_PREFIX=/usr/local/mysql \
-DDEFAULT_CHARSET=utf8  \
-DDEFAULT_COLLATION=utf8_general_ci \
-DWITH_EXTRA_CHARSETS=all \
-DSYSCONFDIR=/etc
//Installation: make && make install

4,Establish mysql User and authorize:
groupadd mysql
useradd -M -s /sbin/nologin mysql -g mysql
chown -R mysql.mysql /usr/local/mysql

5,Set environment variables:
cp support-files/my-default.cnf /etc/my.cnf
cp support-files/mysql.server /etc/rc.d/init.d/mysqld
chmod +x /etc/rc.d/init.d/mysqld
chkconfig --add mysqld
echo "PATH=$PATH:/usr/local/mysql/bin" >> /etc/profile
source /etc/profile   //Make environment variables valid
Step 2: Modify mysql's main configuration file: /etc/my.cnf, note that the server-id s of the three servers cannot be the same
---Configure the master server:
vim /etc/my.cnf
[mysql]
server-id = 1
log_bin = master-bin
log-slave-updates = true

---Configure slave server 1:
vim /etc/my.cnf
[mysql]
server-id = 2
log_bin = master-bin
relay-log = relay-log-bin
relay-log-index = slave-relay-bin.index

---Configure slave server 2:
vim /etc/my.cnf
[mysql]
server-id = 3
log_bin = master-bin
relay-log = relay-log-bin
relay-log-index = slave-relay-bin.index
Step 3: Start the mysql service with three servers
(1) Create soft connections:
ln -s /usr/local/mysql/bin/mysql /usr/sbin/
ln -s /usr/local/mysql/bin/mysqlbinlog /usr/sbin/
(2) Open services:
systemctl stop firewalld.service
setenforce 0

/usr/local/mysql/bin/mysqld_safe --user=mysql &        //Open Service
[root@s01 mysql-5.6.36]#netstat-natp | grep 3306 //Check if the port is properly developed
tcp6       0      0 :::3306                 :::*                    LISTEN      40105/mysqld
Step 4: Configure Mysql master-slave synchronization (one master-two slaves)
(1) mysql master-slave configuration, note authorization:
Two users are authorized on all database nodes, one is user myslave, which is used synchronously from the library, with the password set to 123; the other is manager, which uses monitor user mha, with the password set to manager.
mysql -uroot -p      //Enter database

mysql> grant replication slave on *.* to 'myslave'@'192.168.220.%' identified by '123';
mysql> grant all privileges on *.* to 'mha'@'192.168.220.%' identified by 'manager';
mysql> flush privileges;  //Refresh Database

//The following three add (theoretically unnecessary) as appropriate to authorize by hostname (MHA checks are in the form of hostname):
mysql> grant all privileges on *.* to 'mha'@'master' identified by 'manager';
mysql> grant all privileges on *.* to 'mha'@'slave1' identified by 'manager';
mysql> grant all privileges on *.* to 'mha'@'slave2' identified by 'manager';
(2) View binaries and synchronization points on the Mysql master server:
mysql> show master status;

(3) Next, synchronize on slave1 and slave2:
slave1:
change master to master_host='192.168.220.131',master_user='myslave',master_password='123',master_log_file='master-bin.000001',master_log_pos=1215;

slave2:
change master to master_host='192.168.220.131',master_user='myslave',master_password='123',master_log_file='master-bin.000001',master_log_pos=1215;
1. Open slave on both servers to see if IO and SQL threads are yes, indicating that synchronization is normal:
mysql> start slave;
mysql> show slave status\G;

2. Two slave servers must be set to read-only mode:
mysql> set global read_only=1;
Step 5: Install MHA
(1) All servers must have MHA-dependent environment packages installed, starting with the epel source:
yum install epel-release --nogpgcheck -y

yum install -y perl-DBD-MYSQL \
perl-Config-Tiny \
perl-Log-Dispatch \
perl-Parallel-ForkManager \
perl-ExtUtils-CBuilder \
perl-ExtUtils-MakeMaker \
perl-CPAN
(2) The mode l component must be installed on all servers, and finally the manager component must be installed on the MHA-manager node, because the manager relies on the node component. The following is a demonstration of how to install the node component on the master.
1,install node Components (required for all four servers):
tar zvxf mha4mysql-node-0.57.tar.gz -C /opt/
cd /opt/mha4mysql-node-0.57/
perl Makefile.PL
make && make install

2,manager Install on Server manager Component (this only has manager Server needs:
tar zvxf mha4mysql-manager-0.57.tar.gz -C /opt/
cd /opt/mha4mysql-manager-0.57/
perl Makefile.PL
make && make install
(3) After the manager server is installed, several tools are generated under the usr/local/bin directory:

masterha_check_ssh: Check the SHH configuration of MHA;
masterha_check_repl: Check MYSQL replication status;
masterha_manager: Start the script for manager;
masterha_check_status: Check the current MHA status;
masterha_master_monitor: Detect if master is down;
masterha_master_switch: Start failover (automatic or manual);
masterha_conf_host: Add or delete server information for configuration;
masterha_stop: Turn off manager;.
(4) At the same time, several tools will be generated under the usr/local/bin directory after the node is installed (these tools are usually triggered by MHA manager's scripts and do not require human action):

apply_diff_relay_logs: Identify differences in relay log events and apply their differences to other slave s;
save_binary_logs: Save and copy master's binary logs;
filter_mysqlbinlog: Remove unnecessary ROLLBACK events (MHA no longer uses this tool);
purge_relay_logs: Clears the relay log (does not block the SQL thread);
(5) Configure passwordless authentication:
1,stay manager Password-free authentication configured on all database nodes:
ssh-keygen -t rsa  //Since you are logged in without a password, you can always return at this step (a key will appear)
ssh-copy-id 192.168.220.131
ssh-copy-id 192.168.220.140
ssh-copy-id 192.168.220.136
//Enter yes; enter the password again

2,stay master Configure to database node on slave1 and slave2 Password-free authentication:
ssh-keygen -t rsa
ssh-copy-id 192.168.220.140
ssh-copy-id 192.168.220.136
//Enter yes; enter the password again

3,stay slave1 Configure to database node on master and slave2 Password-free authentication:
ssh-keygen -t rsa
ssh-copy-id 192.168.220.131
ssh-copy-id 192.168.220.136
//Enter yes; enter the password again

4,stay slave2 Configure to database node on master and slave1 Password-free authentication:
ssh-keygen -t rsa
ssh-copy-id 192.168.220.131
ssh-copy-id 192.168.220.140
//Enter yes; enter the password again
(6) Configure MHA:
1. Copy the script on the manager node to the / usr/local/bin directory:
cp -ra /opt/mha4mysql-manager-0.57/samples/scripts/ /usr/local/bin/

ls scripts/
master_ip_failover: script managed by VIP when switching automatically;
master_ip_online_change: Management of VIP during online switching;
power_manager: A script that shuts down the host after a failure occurs;
send_report: A script that sends an alarm after failover;

Copy the VIP-managed scripts for auto-switch to the /usr/local/bin/directory:
cp /usr/local/bin/scripts/master_ip_failover /usr/local/bin/
2. Rewrite the master_ip_failover script:
vim /usr/local/bin/master_ip_failover

#!/usr/bin/env perl
use strict;
use warnings FATAL => 'all';

use Getopt::Long;

my (
$command, $ssh_user, $orig_master_host, $orig_master_ip,
$orig_master_port, $new_master_host, $new_master_ip, $new_master_port
);
#############################Add Content Section#########################################
my $vip = '192.168.220.100';
my $brdc = '192.168.220.255';
my $ifdev = 'ens33';
my $key = '1';
my $ssh_start_vip = "/sbin/ifconfig ens33:$key $vip";
my $ssh_stop_vip = "/sbin/ifconfig ens33:$key down";
my $exit_code = 0;
#my $ssh_start_vip = "/usr/sbin/ip addr add $vip/24 brd $brdc dev $ifdev label $ifdev:$key;/usr/sbin/arping -q -A -c 1 -I $ifdev $vip;iptables -F;";
#my $ssh_stop_vip = "/usr/sbin/ip addr del $vip/24 dev $ifdev label $ifdev:$key";
##################################################################################
GetOptions(
'command=s' => \$command,
'ssh_user=s' => \$ssh_user,
'orig_master_host=s' => \$orig_master_host,
'orig_master_ip=s' => \$orig_master_ip,
'orig_master_port=i' => \$orig_master_port,
'new_master_host=s' => \$new_master_host,
'new_master_ip=s' => \$new_master_ip,
'new_master_port=i' => \$new_master_port,
);

exit &main();

sub main {
print "\n\nIN SCRIPT TEST====$ssh_stop_vip==$ssh_start_vip===\n\n";

if ( $command eq "stop" || $command eq "stopssh" ) {

my $exit_code = 1;
eval {
print "Disabling the VIP on old master: $orig_master_host \n";
&stop_vip();
$exit_code = 0;
};
if ($@) {
warn "Got Error: $@\n";
exit $exit_code;
}
exit $exit_code;
}
elsif ( $command eq "start" ) {

my $exit_code = 10;
eval {
print "Enabling the VIP - $vip on the new master - $new_master_host \n";
&start_vip();
$exit_code = 0;
};
if ($@) {
warn $@;
exit $exit_code;
}
exit $exit_code;
}
elsif ( $command eq "status" ) {
print "Checking the Status of the script.. OK \n";
exit 0;
}
else {
&usage();
exit 1;
}
}
sub start_vip() {
`ssh $ssh_user\@$new_master_host \" $ssh_start_vip \"`;
}
# A simple system call that disable the VIP on the old_master
sub stop_vip() {
`ssh $ssh_user\@$orig_master_host \" $ssh_stop_vip \"`;
}

sub usage {
print
"Usage: master_ip_failover --command=start|stop|stopssh|status --orig_master_host=host --orig_master_ip=ip --orig_master_port=port --new_master_host=host --new_master_ip=ip --new_master_port=port\n";
}
3. Create the MHA software catalog and copy the configuration file:
mkdir /etc/masterha
cp /opt/mha4mysql-manager-0.57/samples/conf/app1.cnf /etc/masterha/

//Edit profile:
vim /etc/masterha/app1.cnf

[server default]
manager_log=/var/log/masterha/app1/manager.log
manager_workdir=/var/log/masterha/app1
master_binlog_dir=/usr/local/mysql/data
master_ip_failover_script=/usr/local/bin/master_ip_failover
master_ip_online_change_script=/usr/local/bin/master_ip_online_change
password=manager
remote_workdir=/tmp
repl_password=123
repl_user=myslave
secondary_check_script=/usr/local/bin/masterha_secondary_check -s 192.168.220.140 -s 192.168.220.136
shutdown_script=""
ssh_user=root
user=mha

[server1]
hostname=192.168.220.131
port=3306

[server2]
candidate_master=1
hostname=192.168.220.140
check_repl_delay=0
port=3306

[server3]
hostname=192.168.220.136
port=3306
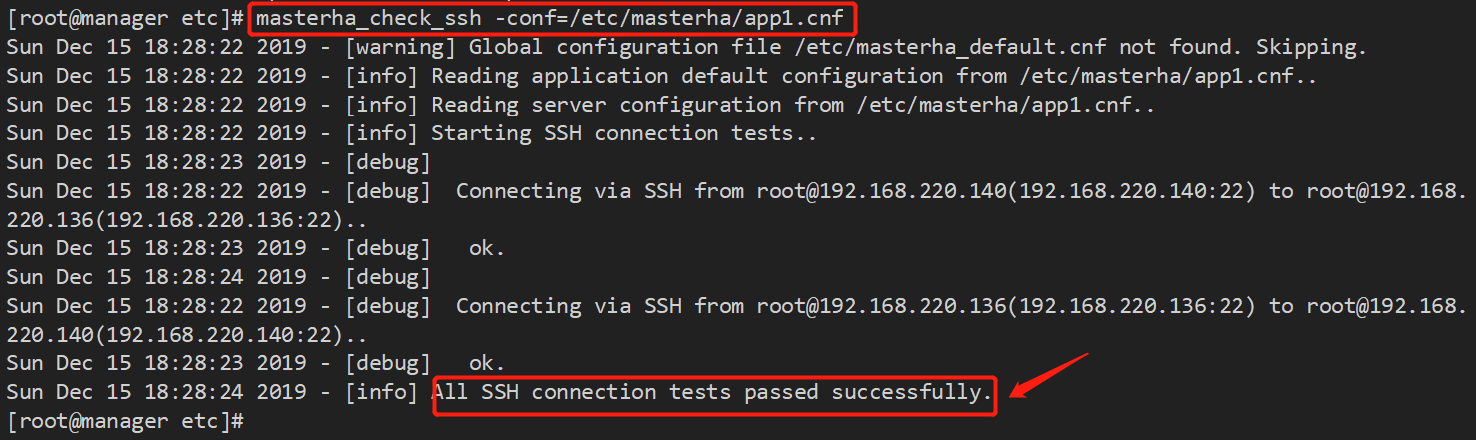
(7) Testing ssh without password authentication, if normal, will eventually output successful:
masterha_check_ssh -conf=/etc/masterha/app1.cnf
masterha_check_repl -conf=/etc/masterha/app1.cnf //Check your health

(8) Note: the first configuration needs to manually turn on virtual IP on the master
/sbin/ifconfig ens33:1 192.168.220.100/24
Step 6: Start MHA
(1) Start MHA:
nohup masterha_manager --conf=/etc/masterha/app1.cnf --remove_dead_master_conf --ignore_last_failover < /dev/null > /var/log/masterha/app1/manager.log 2>&1 &
(2) Looking at the MHA status, you can see that the current master is mysql1 node:
masterha_check_status --conf=/etc/masterha/app1.cnf

(3) Fault simulation:
1. Enable monitoring observation logging first:
tailf /var/log/masterha/app1/manager.log
2. Now close the mysql service on the main library:
pkill -9 mysql
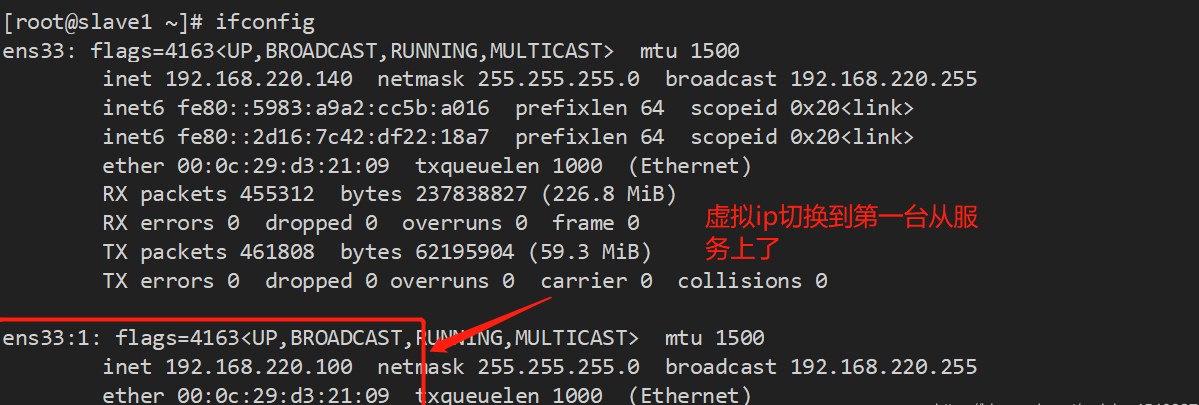
You can see the state of the slave library, and vip switches to one of the slave libraries:
Clients can also connect to the database via virtual ip:
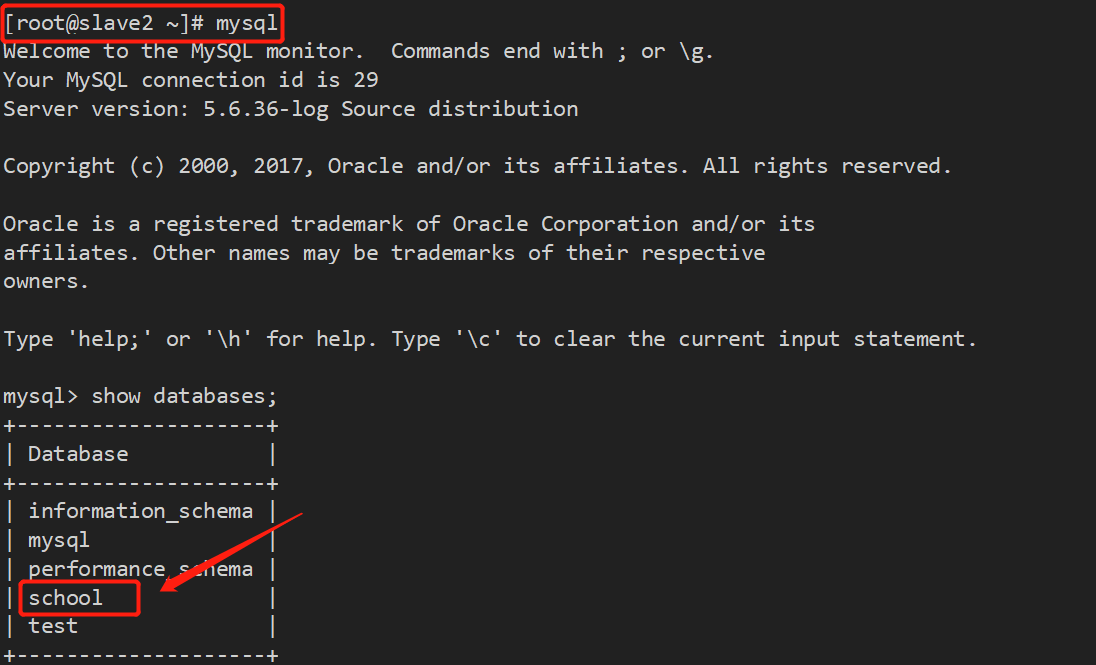
mysql -h 192.168.220.100 -u root -p
For example, now create a new database in the database:

1. We can see this new library created on the first slave server that becomes the new master library:
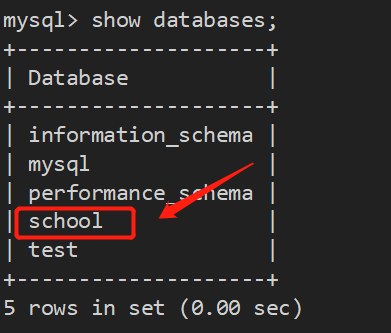
2. This new library can also be seen on the second slave server due to master-slave synchronous deployment: