- Environmental Science
192.168.2.118 mysql-master/mycat
192.168.2.119 mysql-slave
- Configure jdk
tar  -zxf  jdk-8u151-linux-i586.tar.gz
mv jdk1.8.0_151 /usr/java/
Configure environment variables and take effect
vim /etc/profile
export JAVA_HOME=/usr/java/
export CLASSPATH=$CLASSPATH:$JAVA_HOME/lib:$JAVA_HOME/jre/lib
export PATH=$JAVA_HOME/bin:$JAVA_HOME/jre/bin:$PATH:$HOMR/bin
source /etc/profile
View the java version and content indicates that java was installed successfully
[root@leeclient java]# java -version
java version "1.8.0_151"
Java(TM) SE Runtime Environment (build 1.8.0_151-b12)
Java HotSpot(TM) Client VM (build 25.151-b12, mixed mode)
- mycat deployment
wget http://dl.mycat.io/1.6-RELEASE/Mycat-server-1.6-RELEASE-20161028204710-linux.tar.gz
tar -zxvf Mycat-server-1.6-RELEASE-20161028204710-linux.tar.gz
mv mycat /usr/local/
- mycat parameter configuration
1) Set the following parameters under /usr/local/mycat/conf/server.xml
<user name="lee1">
                <property name="password">123456</property>
                <property name="schemas">testdb</property>
</user>
<user name="lee2">
                <property name="password">123456</property>
                <property name="schemas">testdb</property>
                <property name="readOnly">true</property>
        </user>
Lee1 and lee2 set passwords to connect mycat, lee1 to read and write, lee2 to read-only, and testdb to logical Libraries
2) under / usr/local/mycat/conf/schema.xml (backup cp schema.xml schema.xml.bak first)
<?xml version="1.0"?>
<!DOCTYPE mycat:schema SYSTEM "schema.dtd">
<mycat:schema xmlns:mycat="http://io.mycat/">
<schema name="testdb" checkSQLschema="false" sqlMaxLimit="1000" dataNode="dn1">
</schema>
<dataNode name="dn1" dataHost="localhost1" database="ultrax" />
<dataHost name="localhost1" maxCon="2000" minCon="1" balance="0" writeType="1" dbType="mysql" dbDriver="native" switchType="1"  slaveThreshold="100">
<heartbeat>select  user()</heartbeat>
<writeHost host="hostM1" url="192.168.2.118:3306" user="root"  password="123456">
<readHost host="hostS1" url="192.168.2.119:3306" user="root" password="123456" />
</writeHost>
</dataHost>
</mycat:schema>
among
The schema name needs to match the database name testdb set by server.xml, set the data node dn1
dataHost is the name of the data node and database is the real database name, discuz's background database ultrax
balance
0 means no read-write separation will be enabled and read-write operations will be performed on the master
1 means they all participate in the select ion
2 means that all read requests are randomly shared between readhost and writehost
3 means that all read requests correspond to readhost
writeType
0, all writes sent to the first writeHost configured
1, all write operations are randomly sent to the configured writeHost
2, do not write.
switchType
-1, do not switch automatically
1, default, auto-switch
2, decide whether to switch based on the status of MySQL master-slave synchronization
3, switch mechanism based on MySQL galary cluster (suitable for cluster) (1.4.1), with a heartbeat statement of show status like'wsrep%'
WteHost and readHost configure mysql master-slave real user passwords for the corresponding background, respectively
3) Authorize on mysql master-slave server
Master and slave: grant all on *. * to'root'@'192.168.2.118'identified by'123456';
Main: grant all on *. * to'root'@'192.168.2.119'identified by'123456';
perhaps
 Master and slave: grant all on *. * to'root'@'192.168.2.%'identified by'123456';
mycat service startup and view startup (note database port mapping)
/usr/local/mycat/bin/mycat start
tail -f /usr/local/mycat/logs/wrapper.log

tail -f /usr/local/mycat/logs/mycat.log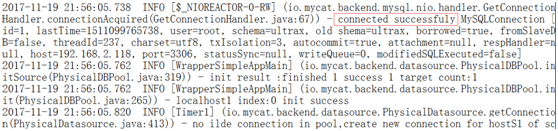
[root@mysqlm logs]# netstat -tunl | grep -E "8066|9066"
tcp        0      0 :::8066                     :::*                        LISTEN
tcp        0      0 :::9066                     :::*                        LISTEN
among
8066 is the management port, web connection mycat
9066 is the port to connect back-end db, default is 9066, log on to the port and use show @@datasource directly; statement can query the read and write status of master and slave Libraries
Ports are set in server.xml, if you want to modify, add a statement to change the port
<property name="serverPort">8066</property>
<property name="managerPort">9066</property>
Log in to mycat 8066, here is to view the database after mycat is connected to the web, etc.
mysql -h 192.168.2.118 -P8066 -ulee1 -p123456mysql> show databases;
+----------+
| DATABASE |
+----------+
| testdb |
+----------+
1 row in set (0.04 sec)
mysql>
The testdb above is mycat's logical library, which corresponds to the ultrax Library in the real database mysql
- Common mycat commands
Enter 9066 Connection Port
mysql -h 192.168.2.118 -P9066 -ulee1 -p1234561) View node status
show @@datanode;
Name denotes the datanode name, dn1,
datahost data node name
Active represents the number of active connections
Idle denotes the number of idle connections
size represents the total number of connections
2) Check the state of your heart beat
show @@heartbeat;
3) Check the status of the front-end connection, and kill the connection kill @@connection ID directly based on the obtained id,
show @@connection\G;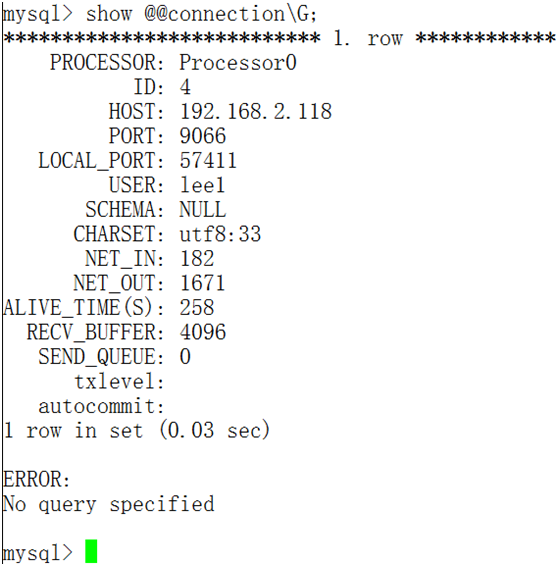
4) View backend connection status
show @@backend\G;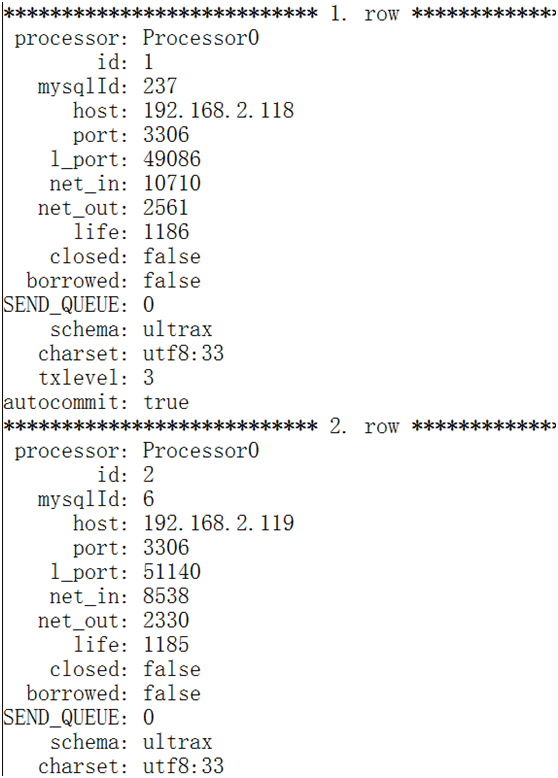
5) View database resources
show @@database;
Other related directives include
show @@help;
show @@version;
- Test mycat
1) Set balance="0" in schema.xml above
A. Test Read
Log on to port 9066 of mycat to view database resources
mysql -h 192.168.2.118 –P9066 -ulee1 -p123456
show @@datasource;

You can see that the read_load column is the master increasing
Login to port 8066 of mycat
mysql -h 192.168.2.118 -P8066 -ulee1 -p123456Then do a query
use testdb;
select * from pre_common_member;
After you log in to 9066, you can see the read_load column, master has been increasing, slave has been zero 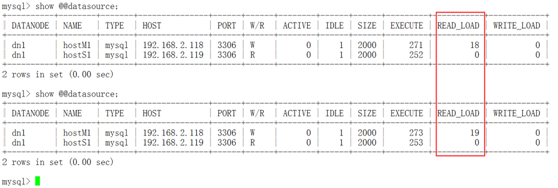
That is, in the case of balance="0", all the reads are on the master
B. Test Writing
Next, log in to mycat on port 8066 and create a table under testdb
use testdb;
create table mycatlee (id int,name varchar(20));
insert into mycatlee values (1,'lee1');
Then log on to port 9066 to view
show @@datasource;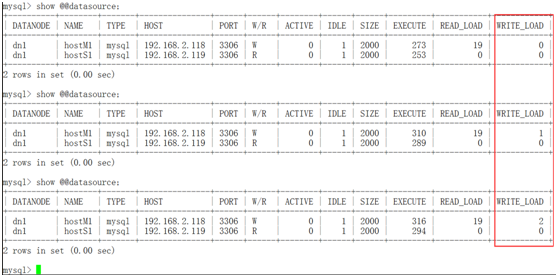
You can see that master is increasing under write_load
That is, in the case of balance="0", all writes are on master
2) Set balance="1" in schema.xml
A. Test Read
Log on to 9066 to view database resources
show @@datasource;
Read data after landing 8066
use testdb;
select * from pre_common_member;
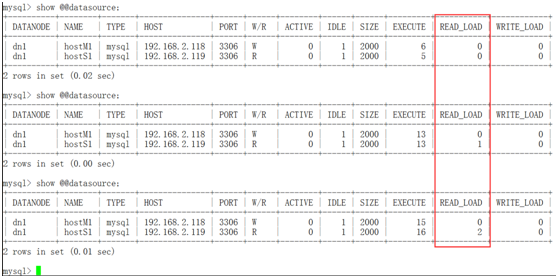
You can see that all the operations are read on slave
That is, in the case of balance="1", the reads are all on slave
B. Test Writing
Log on to port 8066 to insert data
insert into mycatlee values(2,'lee2');
insert into mycatlee values(3,'lee3');
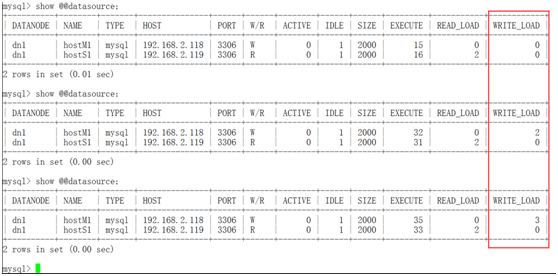
You can see the write operation on the master (Note: Even if a write operation fails due to a similar grammar problem, the write_load value here will always increase, such as insert, because it is a write operation itself, so it goes from 0 to 2 instead of 1 because the grammar error has been written once)
That is, in the case of balance="1", all writes are on master
3) When creating a table, if the table is not synchronized from the library, mycat query mycattest at 118 will prompt that it does not exist, then directly stop the mysql service from the library and re-query it to query the contents of the table just inserted
Through the above tests, the read-write separation function is implemented
Remarks:
1) When starting mycat, viewing wrapper.log may encounter problems with jvm that prevent MYCAT from starting. You need to lower the Xmx equivalent under / usr/local/mycat/conf/wrapper.conf
For example: wrapper.java.additional.10=-Xmx4G