mysql pxc high availability
1, pxc introduction
PXC (Percona XtraDB Cluster) is an open source MySQL high availability solution. He integrates Percona Server and XtraBackup with the Galera library for synchronous multi master replication. The high availability solutions based on Galera mainly include MariaDB Galera Cluster and Percona XtraDB Cluster. At present, PXC architecture is more and more mature on the production line. Compared with those traditional cluster architectures based on master-slave mode MHA and dual master, the most prominent feature of Galera Cluster is to solve the long criticized replication delay problem and basically achieve real-time synchronization. And the relationship between nodes is equal. Galera Cluster itself is also a multi master architecture. PXC implements synchronous replication in the storage engine layer, not asynchronous replication, so its data consistency is quite high.
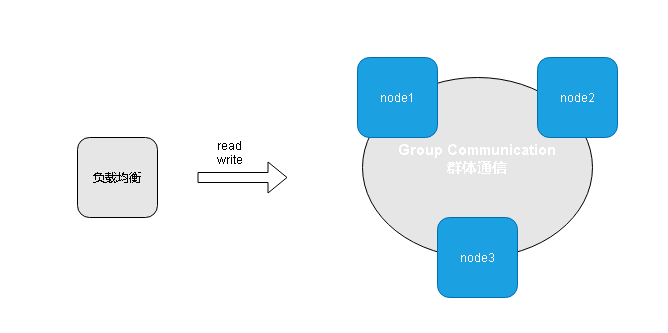
Advantages and disadvantages of PXC
advantage:
- It realizes the high availability of MySQL Cluster and strong data consistency;
- Complete the real multi node read-write cluster scheme;
- The problem of master-slave replication delay is improved, and real-time synchronization is basically achieved;
- The newly added nodes can be deployed automatically without submitting manual backup, which is convenient for maintenance;
- Since it is a multi node write, DB failover is easy.
Disadvantages:
- Adding new nodes is expensive. When you add a new node, you must copy the full dataset from one of the existing nodes. If 100GB, copy 100GB.
- Any updated transaction needs to pass the global verification before it can be executed on other nodes. The cluster performance is limited by the node with the worst performance, that is, the wooden bucket law.
- Because of the need to ensure data consistency, PXC uses real-time storage engine layer to realize synchronous replication. Therefore, when multiple nodes write concurrently, the problem of lock conflict is more serious.
- There is a problem of write expansion. Therefore, write operations occur on all nodes. PXC is not recommended for scenarios with excessive write load.
- Only InnoDB storage engine is supported.
2, PXC installation
In this paper, docker is used for installation, and the hosts communicate through docker swarm network. If you don't understand docker, please read the following tutorial online to get started. There is no in-depth knowledge of docker here. Just follow the command.
docker is installed on all three hosts:
| host | IP |
|---|---|
| node1 | 192.168.56.100 |
| node2 | 192.168.56.101 |
| node3 | 192.168.56.102 |
1. Configure swarm on 3 hosts
- Install docker on 3 hosts
curl -sSL https://get.daocloud.io/docker | sh
- Execute on node1:
docker swarm init --advertise-addr 192.168.56.100
Return something similar to the following:
docker swarm join --token SWMTKN-1-614xi9dvksycykobgifxb4pgopc1wwgczwqct5wqkq8zao6tmx-0ds4jj3ozclrr2wukcaoakxso 192.168.56.100:2377
*Review the token
Execute on node1
docker swarm join-token worker

- Execute the above returned results on node2 and node3:
shell docker swarm join --token SWMTKN-1-2c2xopn2rld8oltcof24sue370681ijhbo3bwcqarjlhq9lkea-2g53o5qn2anre4j9puv4hecrn 192.168.0.101:2377
- View the joining status in node1
docker node ls [View cluster nodes]
docker node rm Node [force removal of running nodes]
docker swarm leave -f  [Force dissolution of current swarm colony]

2. Create swarm network
Execute the following command on node1:
docker network create -d overlay --attachable pxc_swarm
To view the network on node1:
docker network ls

3. Download PXC image
Here is pxc5 For version 7 installation, we pull the docker image file:
docker pull percona/percona-xtradb-cluster:5.7
4. Create files
Execute the following commands on the three servers:
mkdir -p /home/pxc/vol-pxc-n1 && chmod +777 /home/pxc/vol-pxc-n1
mkdir -p /home/pxc/vol-pxc-n2 && chmod +777 /home/pxc/vol-pxc-n2
mkdir -p /home/pxc/vol-pxc-n3 && chmod +777 /home/pxc/vol-pxc-n3
5. Install the first node
First, we install and start the first node on node1, and pay attention to installing and starting other nodes after the first node is started successfully, otherwise it will fail.
cd /home/pxc && vi /home/pxc/docker-compose.yml
version: '3'
services:
  node1:
    image: percona/percona-xtradb-cluster:5.7
    hostname: node1
    container_name: node1
    restart: always
    networks:
      - pxc_swarm
    environment:
      - CLUTER_NAME=scsdm_pxc
      - MYSQL_ROOT_PASSWORD=123456
      - MYSQL_DATABASE=scsdm
      - MYSQL_USER=scsdm
      - MYSQL_PASSWORD=scsdm123
    volumes:
      - /home/pxc/vol-pxc-n1:/var/lib/mysql
    privileged: true

networks:
  pxc_swarm:
   driver: overlay
docker run -d -v /home/pxc/vol-pxc-n1:/var/lib/mysql --name node1 -e CLUTER_NAME=scsdm_pxc -e MYSQL_ROOT_PASSWORD=123456 -e MYSQL_DATABASE=scsdm -e MYSQL_USER=scsdm -e MYSQL_PASSWORD=scsdm123 --net=pxc_swarm --privileged percona/percona-xtradb-cluster:5.7
Pay attention to changing the password by yourself. Don't use too simple password. Parameter Description:
CLUTER_NAME: cluster name
MYSQL_ROOT_PASSWORD: root password
MYSQL_DATABASE: default initialization database name
MYSQL_USER: default initialization account
MYSQL_PASSWORD: default initialization password
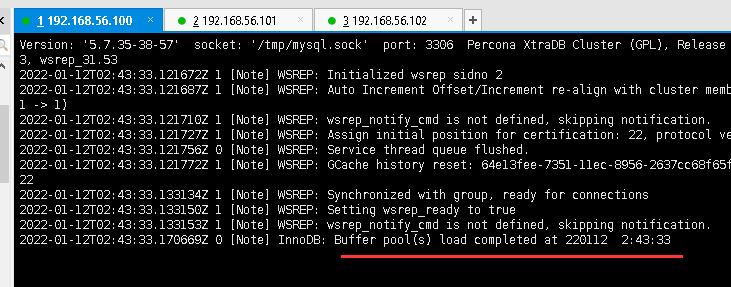
docker logs -f node
The appearance of this indicates that the full startup is successful
6. Add other nodes
Add node2:
- When we directly run docker compose up, an error will be reported, which is roughly that the specified network cannot be found. This is because the network previously created on nodeDB will not be automatically displayed on the new node (official statement), so we need to run a container on nodeService to join the network "pxc_swarm", for example:
cd /home/pxc && vi /home/pxc/docker-compose.yml
version: '3'
services:
  node2:
    image: percona/percona-xtradb-cluster:5.7
    hostname: node2
    container_name: node2
    restart: always
    networks:
      - pxc_swarm
    environment:
      - CLUTER_NAME=scsdm_pxc
      - CLUSTER_JOIN=node1
      - MYSQL_ROOT_PASSWORD=123456
      - MYSQL_DATABASE=scsdm
      - MYSQL_USER=scsdm
      - MYSQL_PASSWORD=scsdm123
    volumes:
      - /home/pxc/vol-pxc-n2:/var/lib/mysql
    privileged: true

networks:
  pxc_swarm:
   driver: overlay
docker run -d -v /home/pxc/vol-pxc-n2:/var/lib/mysql --name node2 -e CLUTER_NAME=scsdm_pxc -e CLUSTER_JOIN=node1 -e MYSQL_ROOT_PASSWORD=123456 -e MYSQL_DATABASE=scsdm -e MYSQL_USER=scsdm -e MYSQL_PASSWORD=scsdm123 --net=pxc_swarm --privileged percona/percona-xtradb-cluster:5.7
Add node3:
cd /home/pxc && vi /home/pxc/docker-compose.yml
version: '3'
services:
  node3:
    image: percona/percona-xtradb-cluster:5.7
    hostname: node3
    container_name: node3
    restart: always
    networks:
      - pxc_swarm
    environment:
      - CLUTER_NAME=scsdm_pxc
      - CLUSTER_JOIN=node1
      - MYSQL_ROOT_PASSWORD=123456
      - MYSQL_DATABASE=scsdm
      - MYSQL_USER=scsdm
      - MYSQL_PASSWORD=scsdm123
    volumes:
      - /home/pxc/vol-pxc-n3:/var/lib/mysql
    privileged: true


networks:
  pxc_swarm:
   driver: overlay
docker run -d -v /home/pxc/vol-pxc-n3:/var/lib/mysql --name node3 -e CLUTER_NAME=scsdm_pxc -e CLUSTER_JOIN=node1 -e MYSQL_ROOT_PASSWORD=123456 -e MYSQL_DATABASE=scsdm -e MYSQL_USER=scsdm -e MYSQL_PASSWORD=scsdm123 --net=pxc_swarm --privileged percona/percona-xtradb-cluster:5.7
Node status and meaning:
When a node is in the cluster, it will switch states due to the addition or failure of a new node, synchronization failure, etc. the meaning of these States is listed below: open: the node is started successfully and attempts to connect to the cluster. primary: the node is already in the cluster. When a new node is added to the cluster, it will generate a state when selecting host for data synchronization. joiner: the node is waiting to receive the synchronization data file. Joined: the node has completed data synchronization. Try to keep the progress with other nodes in the cluster. synced: the status of the node providing services normally, indicating that the synchronization has been completed and is consistent with the cluster progress. doner: the node is in the state when providing all satellite data for the newly joined node.
3, Important configuration parameters in PXC
In the process of setting up PXC, you need to Set the following parameters in CNF:
- wsrep cluster _name: Specifies the logical name of the cluster. For all nodes in the cluster, the cluster name must be the same.
- wsrep_ cluster _address: Specifies the address of each node in the cluster
- wsrep node name: Specifies the logical name of the current node in the cluster
- wsrep node address: Specifies the IP address of the current node
- wsrep_ provider: Specifies the path to the Galera library
- wsrep sst _method: in the mode, PXC uses XtraBackup for SST transmission. It is strongly recommended that this parameter refer to xtrabackup-v2
- wsrep sst *auth: specify the authentication credential as:. This user must be created and assigned after the first node is booted
- Necessary permissions.
- pxc_ _strict mode: strict mode. It is officially recommended that the parameter value be enforced.
Another particularly important module in PXC is Gcache. Its core function is to cache the latest write set of each node. If a new node joins the cluster, it can transfer the new data to the new node waiting for star addition without using SST. This allows nodes to join the cluster faster.
The GCache module involves the following parameters:
- gcache.size represents the size used to cache write set increment information. Its default size is 128MB, which is set through the wsrep provider options variable parameter. It is recommended to adjust the range to 2G and 4G, with enough space to cache more incremental information.
- gcache.mem_ size represents the size of the memory cache in Gcache. Moderately increasing it can improve the performance of the whole cluster.
- gcache. page_ size can be understood as writing the write set directly to the disk file if the memory is insufficient (Gcache is insufficient).
PXC cluster status monitoring
After the cluster is built, you can view the status of each node in the cluster through the following status variable '% wsrep%'. Here are some important parameters to find problems.
-
wsrep local**state uid: the status value of all nodes in the cluster should be the same. If there are nodes with different values, it indicates that they have not joined the cluster.
-
wsrep_ last _committed: number of last committed transactions.
-
wsrep cluster _size: the number of nodes in the current cluster.
-
wsrep_ cluster _status: status of cluster composition. If it is not "Primary", it indicates that there is brain fissure.
-
wsrep local state: current node state. A value of 4 indicates normal. The status has four values:
-
- Joining: indicates that the node is joining the cluster
-
- doner: the node is in the state of providing full data for the newly joined node.
-
- Joined: the current node has successfully joined the cluster.
-
- synced: the current node is synchronized with each node in the cluster.
-
- wsrep_ ready: ON indicates that the current node can provide services normally. If it is OFF, the node may have brain fissure or network problems.
4, Migrate MySQL to PXC
Data is priceless. Please backup it before operation! Be sure to back up before operation!! Be sure to back up before operation!!!
There are three methods to migrate MySQL to a cluster:
- After exporting the SQL file using mysqldump, import it directly into the PXC cluster that has been installed and configured. This method does not require consistent database versions before and after import, but it is slow.
- Using percona xtrabackup for backup and recovery is efficient, but the database version is required to be consistent.
- When migrating native MySQL or Percona Server to pxc, you can directly stop the original MySQL and directly install pxc using the original database directory. After startup, the migration will be completed automatically. Remind you to back up again!
5, Haproxy front end
According to the previous installation steps, we have a complete three PXC clusters. Because all three databases can be read and written, the program can connect to any one. However, there is no way to load balance. Even if the server database to which the program is connected hangs, it cannot be switched automatically.
Therefore, let's assume that a haproxy is used as a proxy, and the application connects to haproxy, which is distributed to three PXC databases through the haproxy strategy.
1. Edit the haproxy configuration file
mkdir -p /home/pxc/haproxy && chmod +777 /home/pxc/haproxy
vi /home/pxc/haproxy/haproxy.cfg
haproxy. The contents of CFG are as follows:
global
    maxconn     4000

defaults
        log     global
        log 127.0.0.1 local3
        mode    http
        option  tcplog
        option  dontlognull
        retries 10
        option redispatch
        maxconn         2000
        timeout connect         10s
        timeout client          1m
        timeout server          1m
        timeout http-keep-alive 10s
        timeout check           10s

listen  mysql
        bind 0.0.0.0:3306
        mode tcp
        balance roundrobin #Using polling
        option mysql-check
        server s1 node1:3306 check
        server s2 node2:3306 check
        server s3 node3:3306 check
2. Start the haproxy service
Run the following commands on three servers:
docker run -it -d -p 3306:3306 -v /home/pxc/haproxy/haproxy.cfg:/usr/local/etc/haproxy/haproxy.cfg --name haproxy01 --net=pxc_swarm --privileged haproxy:alpine
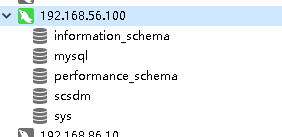
You can connect 192.168.56.100 3306 for database operation
6, Testing
1. Stop node1 container (192.168.56.100)
docker stop node1
View the haproxy log (192.168.56.100)
docker logs -f haproxy01

The test database can still be connected
2. Stop node2 container (192.168.56.101)
docker stop node2
View the haproxy log (192.168.56.100)
docker logs -f haproxy01

The test database can still be connected
3. Stop node3 container (192.168.56.102)
docker stop node3
View the haproxy log (192.168.56.100)
docker logs -f haproxy01

Test database, unable to connect
4. Restart node1
docker start node1
view log
docker logs -f node1
It was found that the report was wrong
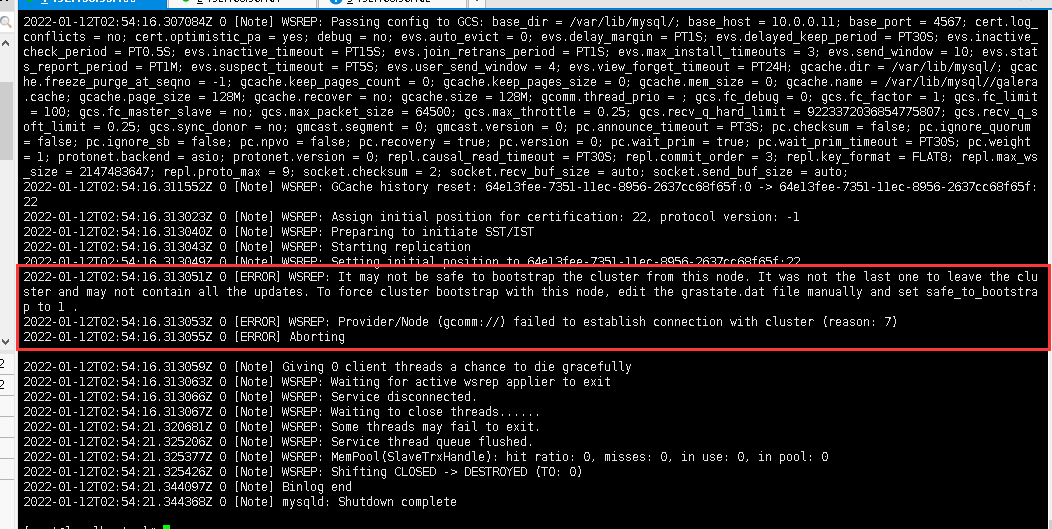
Modify the configuration file edit the grastate dat file manually and set safe_ to_ bootstrap to 1 .
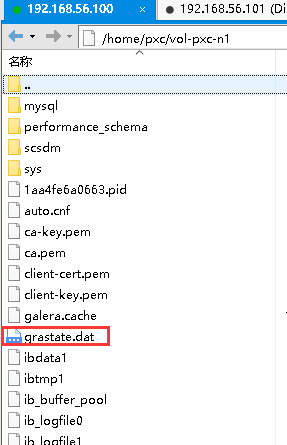
After modification
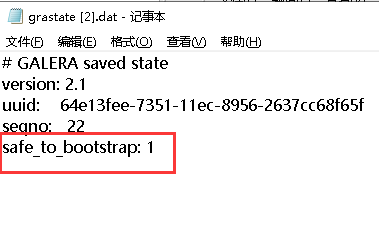
Restart node1 again

success
Restart node2, node3, haproxy01
Restore database access
Streamline steps
Deploy pxc across hosts
In this paper, docker is used for installation, and the hosts communicate through docker swarm network. If you don't understand docker, please read the following tutorial online to get started. There is no in-depth knowledge of docker here. Just follow the command.
docker is installed on all three hosts:
| host | IP |
|---|---|
| node1 | 192.168.56.100 |
| node2 | 192.168.56.101 |
| node3 | 192.168.56.102 |
1. Configure swarm on 3 hosts
- Install docker on 3 hosts
curl -sSL https://get.daocloud.io/docker | sh
- Execute on node1:
docker swarm init --advertise-addr 192.168.56.100
Return something similar to the following:
docker swarm join --token SWMTKN-1-614xi9dvksycykobgifxb4pgopc1wwgczwqct5wqkq8zao6tmx-0ds4jj3ozclrr2wukcaoakxso 192.168.56.100:2377
- Execute the above returned results on node2 and node3:
shell docker swarm join --token SWMTKN-1-2c2xopn2rld8oltcof24sue370681ijhbo3bwcqarjlhq9lkea-2g53o5qn2anre4j9puv4hecrn 192.168.0.101:2377
2. Create swarm network
Execute the following command on node1:
docker network create -d overlay --attachable pxc_swarm
3. Download PXC image
Here is pxc5 For version 7 installation, we pull the docker image file:
docker pull percona/percona-xtradb-cluster:5.7
4. Create files
Execute the following commands on the three servers:
mkdir -p /home/pxc/vol-pxc-n1 && chmod +777 /home/pxc/vol-pxc-n1
mkdir -p /home/pxc/vol-pxc-n2 && chmod +777 /home/pxc/vol-pxc-n2
mkdir -p /home/pxc/vol-pxc-n3 && chmod +777 /home/pxc/vol-pxc-n3
5. Install the first node
node1 execution
docker run -d -v /home/pxc/vol-pxc-n1:/var/lib/mysql --name node1 -e CLUTER_NAME=scsdm_pxc -e MYSQL_ROOT_PASSWORD=123456 -e MYSQL_DATABASE=scsdm -e MYSQL_USER=scsdm -e MYSQL_PASSWORD=scsdm123 --net=pxc_swarm --privileged percona/percona-xtradb-cluster:5.7
Pay attention to changing the password by yourself. Don't use too simple password. Parameter Description:
CLUTER_NAME: cluster name
MYSQL_ROOT_PASSWORD: root password
MYSQL_DATABASE: default initialization database name
MYSQL_USER: default initialization account
MYSQL_PASSWORD: default initialization password
6. Add other nodes
node2:
docker run -d -v /home/pxc/vol-pxc-n2:/var/lib/mysql --name node2 -e CLUTER_NAME=scsdm_pxc -e CLUSTER_JOIN=node1 -e MYSQL_ROOT_PASSWORD=123456 -e MYSQL_DATABASE=scsdm -e MYSQL_USER=scsdm -e MYSQL_PASSWORD=scsdm123 --net=pxc_swarm --privileged percona/percona-xtradb-cluster:5.7
node3:
docker run -d -v /home/pxc/vol-pxc-n3:/var/lib/mysql --name node3 -e CLUTER_NAME=scsdm_pxc -e CLUSTER_JOIN=node1 -e MYSQL_ROOT_PASSWORD=123456 -e MYSQL_DATABASE=scsdm -e MYSQL_USER=scsdm -e MYSQL_PASSWORD=scsdm123 --net=pxc_swarm --privileged percona/percona-xtradb-cluster:5.7
7.Haproxy front end editing haproxy configuration file
mkdir -p /home/pxc/haproxy && chmod +777 /home/pxc/haproxy
vi /home/pxc/haproxy/haproxy.cfg
haproxy. The contents of CFG are as follows:
global
    maxconn     4000

defaults
        log     global
        log 127.0.0.1 local3
        mode    http
        option  tcplog
        option  dontlognull
        retries 10
        option redispatch
        maxconn         2000
        timeout connect         10s
        timeout client          1m
        timeout server          1m
        timeout http-keep-alive 10s
        timeout check           10s

listen  mysql
        bind 0.0.0.0:3306
        mode tcp
        balance roundrobin #Using polling
        option mysql-check
        server s1 node1:3306 check
        server s2 node2:3306 check
        server s3 node3:3306 check
8. Start the haproxy service
Run the following commands on three servers:
docker run -it -d -p 3306:3306 -v /home/pxc/haproxy/haproxy.cfg:/usr/local/etc/haproxy/haproxy.cfg --name haproxy01 --net=pxc_swarm --privileged haproxy:alpine
9. Connect to the database
You can connect 192.168.56.100 3306 for database operation
Stand alone deployment pxc
1. Install docker
curl -sSL https://get.daocloud.io/docker | sh
2. Install docker compose
curl -L "https://github.com/docker/compose/releases/download/1.14.0-rc2/docker-compose-$(uname -s)-$(uname -m)" -o /usr/local/bin/docker-compose 2>&1 | tee -a ${CURRENT_DIR}/install.log
chmod +x /usr/local/bin/docker-compose
ln -s /usr/local/bin/docker-compose /usr/bin/docker-compose
docker-compose -version
3. Create files
mkdir -p /home/pxc/vol-pxc-n1 && chmod +777 /home/pxc/vol-pxc-n1
mkdir -p /home/pxc/vol-pxc-n2 && chmod +777 /home/pxc/vol-pxc-n2
mkdir -p /home/pxc/vol-pxc-n3 && chmod +777 /home/pxc/vol-pxc-n3
mkdir -p /home/pxc/haproxy && chmod +777 /home/pxc/haproxy
4. Prepare configuration file
vi /home/pxc/haproxy/haproxy.cfg
haproxy. The contents of CFG are as follows:
global
    maxconn     4000

defaults
        log     global
        log 127.0.0.1 local3
        mode    http
        option  tcplog
        option  dontlognull
        retries 10
        option redispatch
        maxconn         2000
        timeout connect         10s
        timeout client          1m
        timeout server          1m
        timeout http-keep-alive 10s
        timeout check           10s

listen  mysql
        bind 0.0.0.0:3306
        mode tcp
        balance roundrobin #Using polling
        option mysql-check
        server s1 node1:3306 check
        server s2 node2:3306 check
        server s3 node3:3306 check
5. Prepare docker compose YML file
cd /home/pxc && vi /home/pxc/docker-compose.yml
version: '3'
services:
  node1:
    image: percona/percona-xtradb-cluster:5.7
    hostname: node1
    container_name: node1
    restart: always
    environment:
      - CLUTER_NAME=scsdm_pxc
      - MYSQL_ROOT_PASSWORD=123456
      - MYSQL_DATABASE=scsdm
      - MYSQL_USER=scsdm
      - MYSQL_PASSWORD=scsdm123
    volumes:
      - /home/pxc/vol-pxc-n1:/var/lib/mysql
    privileged: true
  node2:
    image: percona/percona-xtradb-cluster:5.7
    hostname: node2
    container_name: node2
    restart: always
    depends_on:
      - node1
    environment:
      - CLUTER_NAME=scsdm_pxc
      - CLUSTER_JOIN=node1
      - MYSQL_ROOT_PASSWORD=123456
      - MYSQL_DATABASE=scsdm
      - MYSQL_USER=scsdm
      - MYSQL_PASSWORD=scsdm123
    volumes:
      - /home/pxc/vol-pxc-n2:/var/lib/mysql
    privileged: true

  node3:
    image: percona/percona-xtradb-cluster:5.7
    hostname: node3
    container_name: node3
    restart: always
    depends_on:
      - node1
    environment:
      - CLUTER_NAME=scsdm_pxc
      - CLUSTER_JOIN=node1
      - MYSQL_ROOT_PASSWORD=123456
      - MYSQL_DATABASE=scsdm
      - MYSQL_USER=scsdm
      - MYSQL_PASSWORD=scsdm123
    volumes:
      - /home/pxc/vol-pxc-n3:/var/lib/mysql
    privileged: true

  haproxy:
    image: haproxy:alpine
    hostname: haproxy
    container_name: haproxy
    restart: always
    depends_on:
      - node1
      - node2
      - node3
    ports:
      - "3306:3306"
    volumes:
      - /home/pxc/haproxy/haproxy.cfg:/usr/local/etc/haproxy/haproxy.cfg
    privileged: true
6. Start docker compose
docker-compose up -d
7. Modification of documents
Modify the configuration file edit the grastate dat file manually and set safe_ to_ bootstrap to 1 .
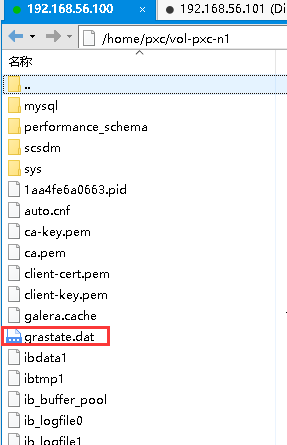
After modification
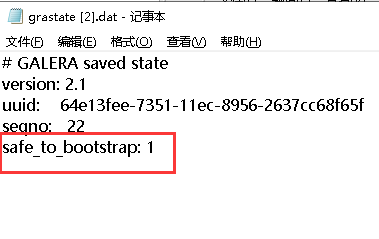
8. Restart docker compose
docker-compose down
docker-compose up -d
7. Connect to the database
You can connect 192.168.56.100 3306 for database operation