1. Preface
Nacos has many grammars. Combined with different technologies, it has different grammars:
This article is about the usage of Nacos Spring Cloud.
2. Quick start of Nacos spring cloud
2.1 preconditions
You need to download Nacos and start the Nacos server first.
2.2 start configuration management
Configuration management is to manage parameters and place them in the public configuration center. Specific businesses can access the configuration center and read concerned parameters.
After starting the Nacos server, you can refer to the following example code to start the Nacos configuration management service for your Spring Cloud application. For a complete example code, refer to: nacos-spring-cloud-config-example
nacos-examples/nacos-spring-cloud-example/nacos-spring-cloud-config-example/
1. Add dependency:
<dependency>
    <groupId>com.alibaba.cloud</groupId>
    <artifactId>spring-cloud-starter-alibaba-nacos-config</artifactId>
    <version>${latest.version}</version>
</dependency>
Note: version 2.1 x. Release corresponds to spring boot 2.1 X version. Version 2.0 x. Release corresponds to spring boot 2.0 X version, version 1.5 x. Release corresponds to spring boot 1.5 X version.
2. In bootstrap Configure the address and application name of the Nacos server in properties
spring.cloud.nacos.config.server-addr=127.0.0.1:8848

spring.application.name=example
Note: the reason why you need to configure spring application. Name, because it is part of the Nacos configuration management dataId field.
In the Nacos Spring Cloud, the complete format of dataId is as follows:
${prefix}-${spring.profiles.active}.${file-extension}
- prefix defaults to spring application. The value of name can also be set through the configuration item spring cloud. nacos. config. prefix to configure.
- spring.profiles.active is the profile corresponding to the current environment. For details, please refer to the Spring Boot documentation. Note: when spring profiles. When active is empty, the corresponding connector - will not exist, and the splicing format of dataId will become ${prefix}$ {file-extension}
- File exception is the data format of the configuration content, which can be configured through the configuration item spring cloud. nacos. config. File extension. Currently, only properties and yaml types are supported.
4. Realize automatic configuration update through Spring Cloud native annotation @ RefreshScope:
@RestController
@RequestMapping("/config")
@RefreshScope
public class ConfigController {

    @Value("${useLocalCache:false}")
    private boolean useLocalCache;

    @RequestMapping("/get")
    public boolean get() {
        return useLocalCache;
    }
}
2.1. 1 test
1. First, publish the configuration to the Nacos Server by calling the Nacos Open API: the dataId is example Properties with useLocalCache=true
That is, set the value of the property to true
curl -X POST "http://127.0.0.1:8848/nacos/v1/cs/configs?dataId=example.properties&group=DEFAULT_GROUP&content=useLocalCache=true"
2. Run NacosConfigApplication and call curl http://localhost:8080/config/get , the returned content is true.
Sure enough, the property is found to be true
3. Call the Nacos Open API again to publish the configuration to the Nacos server: the dataId is example Properties with useLocalCache=false
The value of the modified property is false
curl -X POST "http://127.0.0.1:8848/nacos/v1/cs/configs?dataId=example.properties&group=DEFAULT_GROUP&content=useLocalCache=false"
4. Revisit http://localhost:8080/config/get At this time, the returned content is false, indicating that the useLocalCache value in the program has been dynamically updated.
The modified value is also read, indicating that it is automatically updated.
2.2 start service discovery
Service discovery is that each service registers itself in the registry, and then each service can perceive other services from the registry.
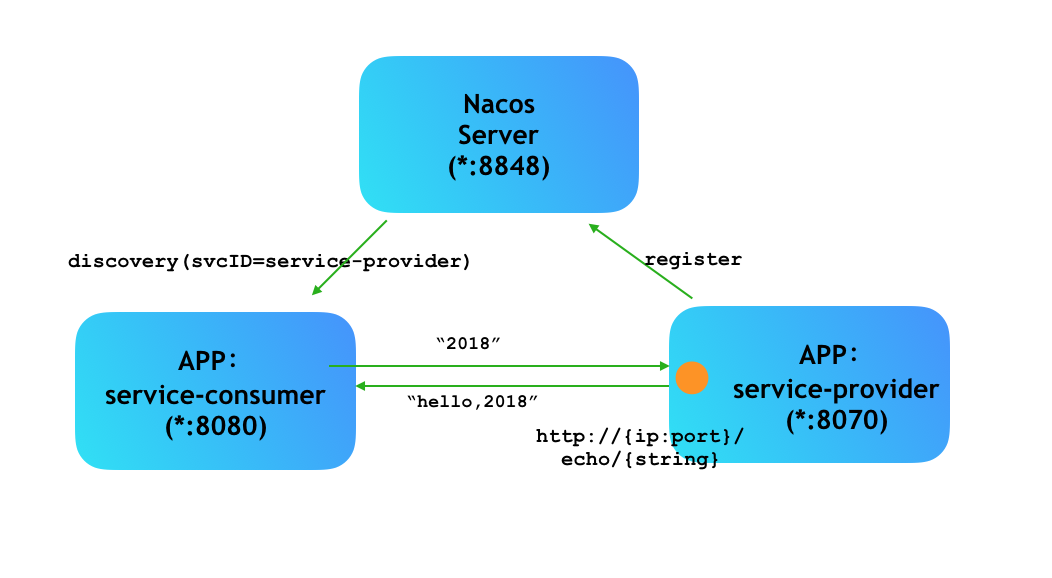
This section demonstrates how to enable the service discovery function of Nacos in your Spring Cloud project by implementing a simple echo service, as shown below:
For a complete example code, refer to: nacos-spring-cloud-discovery-example
1. Add dependency:
<dependency>
    <groupId>com.alibaba.boot</groupId>
    <artifactId>nacos-discovery-spring-boot-starter</artifactId>
    <version>${latest.version}</version>
</dependency>
Note: version 2.1 x. Release corresponds to spring boot 2.1 X version. Version 2.0 x. Release corresponds to spring boot 2.0 X version, version 1.5 x. Release corresponds to spring boot 1.5 X version.
2. Configure the service provider so that the service provider can register its services on the Nacos server through the service registration discovery function of Nacos.
2.1. In application Configure the address of Nacos server in properties:
server.port=8070
spring.application.name=service-provider

spring.cloud.nacos.discovery.server-addr=127.0.0.1:8848
2.2 enable the service registration discovery function through the Spring Cloud native annotation @ EnableDiscoveryClient:
@SpringBootApplication
@EnableDiscoveryClient
public class NacosProviderApplication {

	public static void main(String[] args) {
		SpringApplication.run(NacosProviderApplication.class, args);
	}

	@RestController
	class EchoController {
		@RequestMapping(value = "/echo/{string}", method = RequestMethod.GET)
		public String echo(@PathVariable String string) {
			return "Hello Nacos Discovery " + string;
		}
	}
}
3. Configure the service consumer so that the service consumer can obtain the service it wants to call from the Nacos server through the service registration and discovery function of Nacos.
3.1 in application Configure the address of Nacos server in properties:
server.port=8080
spring.application.name=service-consumer

spring.cloud.nacos.discovery.server-addr=127.0.0.1:8848
3.2 enable the service registration discovery function through the Spring Cloud native annotation @ EnableDiscoveryClient. Add @ LoadBalanced annotation to the RestTemplate instance to enable the integration of @ LoadBalanced and Ribbon:
@SpringBootApplication
@EnableDiscoveryClient
public class NacosConsumerApplication {

    @LoadBalanced
    @Bean
    public RestTemplate restTemplate() {
        return new RestTemplate();
    }

    public static void main(String[] args) {
        SpringApplication.run(NacosConsumerApplication.class, args);
    }

    @RestController
    public class TestController {

        private final RestTemplate restTemplate;

        @Autowired
        public TestController(RestTemplate restTemplate) {this.restTemplate = restTemplate;}

        @RequestMapping(value = "/echo/{str}", method = RequestMethod.GET)
        public String echo(@PathVariable String str) {
            return restTemplate.getForObject("http://service-provider/echo/" + str, String.class);
        }
    }
}
2.2. 1 test
Start ProviderApplication and ConsumerApplication, and call http://localhost:8080/echo/2018 , the returned content is Hello Nacos Discovery 2018.