Introduction to basic concepts
Namespace
XML namespaces provide a way to avoid element naming conflicts.
For example, there is a student named Lin Xiaoming in School A and a student named Lin Xiaoming in School B. How can we identify these two students with the same name? Namespace will come in handy at this time. A and B can then be considered namespaces. In other words, the namespace contains a collection of specific attributes.
Common Namespaces in Android
The following sections introduce android, tools, and app (custom namespaces), which are common namespaces.
1,android
xmlns:android="http://schemas.android.com/apk/res/android"
In the Android layout file, we all have to define such a namespace on the root element. Next, we will explain this line of code one by one.
xmlns: xml namespace, declaring that we are going to start defining a namespace
The string in which android is located, which we call namespace-prefix, actually means giving the namespace a name.
http://schemas.android.com/apk/res/android This looks like a URL, but this address is not accessible. In fact, this is a URI (Unified Resource Identifier), so its value is fixed, equivalent to a constant.
With him, you will be prompted to enter something, which can also be understood as a grammar file.
So what does this line of code do? The attributes in the namespace that we write in the code for the root element can be referenced, such as:
<LinearLayout xmlns:android="http://schemas.android.com/apk/res/android"
    android:layout_width="match_parent"
    android:layout_height="match_parent">
    <TextView
        android:layout_width="wrap_content"
        android:layout_height="wrap_content"
        android:layout_gravity="center"
        android:text="New Text"
        android:id="@+id/textView" />
</LinearLayout>
In this layout, as long as the attribute begins with android: it refers to the attribute in the namespace. As mentioned above, Android gives the namespace a name, just like we usually define variables, so the name can also be taken as our favorite. For example, if I take it as myns, then the code above We can also write as follows:
<LinearLayout xmlns:myns="http://schemas.android.com/apk/res/android"
    myns:layout_width="match_parent"
    myns:layout_height="match_parent" >
    <TextView
        myns:layout_width="wrap_content"
        myns:layout_height="wrap_content"
        myns:layout_gravity="center"
        myns:text="New Text"
        myns:id="@+id/textView" />
</LinearLayout>
2,tools
xmlns:tools="http://schemas.android.com/tools"
Next, I will introduce three ways to use tools, which are also his characteristics.
2.1. tools only works at the development stage
We can think of him as a tool namespace, a tool to help developers. It only works at the development stage. When an app is packaged, all tools attributes will be discarded!
For example, basically in the android namespace, we want to test the effect of a component on the screen at the coding stage, and when app is installed on the phone, discard this code, then we can replace android with tools namespace:
<?xml version="1.0" encoding="utf-8"?>
<LinearLayout xmlns:android="http://schemas.android.com/apk/res/android"
xmlns:tools="http://schemas.android.com/tools"
android:orientation="vertical"
android:layout_width="match_parent"
android:layout_height="match_parent">
<TextView
tools:layout_gravity="center"
android:layout_width="wrap_content"
android:layout_height="wrap_content"
android:text="Hello,World"/>
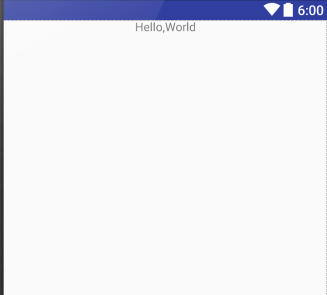
</LinearLayout>This is the layout in the layout. When we switch to the view window (Design), we see that the top of the label is centered.
Then, when we run it on our mobile phone, it's like this:
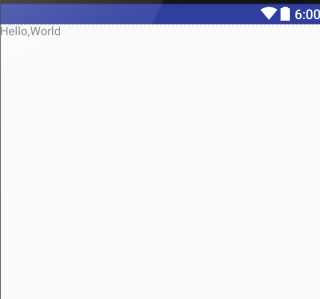
As shown above, tools:layoutgravity= "center" is indeed abandoned behind the runtime!
2.2. Viewing Activity Layout Effect in tools:context Development
The use of context is followed by the full package name of an Activty. What does it do?
When we set an Activity theme, it is set in AndroidManifest.xml, and the effect of the theme can only be displayed in Activty after running. With the help of context attribute, we can see the effect of the theme set in Activity in the layout in the development stage.
tools:context="com.littlehan.myapplication.MainActivity"
By adding this line of code to the layout, you can see the effect of binding the theme to MainActivity in the design view.
2.3. Viewing fragment layout effect in tools:layout development
When we load a fragment on Activity, we need to see the effect after loading after running. Is there a way to display it in the layout preview window during the testing phase? The answer is yes, with the help of the layout attribute, for example,
Add such a line of code to the layout:
tools:layout=@layout/yourfragmentlayoutname
In this way, your fragment layout will be previewed on the specified main layout.
3. Customizing Namespaces
If you use DataBinding, you will use the app attribute in xml, which is actually a custom namespace.
xmlns:app="http://schemas.android.com/apk/res-auto"
Some friends may ask, where is the reflection of self-definition?
In fact, it can also be written as follows:
xmlns:app="http://schemas.android.com/apk/res/ Complete package name"
Just fill in our package name after res/ However, in my own Android Studio 2.0, this is not recommended, so it is more recommended that you use the first naming method.
Usually custom namespaces are inseparable from custom views. When Android's own controls can't meet our needs, we will draw some views ourselves. When we add custom attributes to these customized views, we need to create our own namespaces.
As I said at the beginning, the namespace contains a collection of specific attributes, so the idea is clear, that is to say, the actual process of customizing a namespace is to customize attributes.
We learn about custom namespaces through a simple custom TextView. The process of customizing the View can be divided into the following steps:
Inheriting View Class
Create a class named CustomTextView Inheritance View
(View is the parent class of all views) and implements its three constructions
public class CustomTextView extends View {
    private Paint mPaint = new Paint(Paint.ANTI_ALIAS_FLAG);//Paint brush
    public CustomTextView(Context context) {
        super(context);
    }
    public CustomTextView(Context context, AttributeSet attrs){
        this(context, attrs, 0);//Note that it is not super(context,attrs,0);
    }
    public CustomTextView(Context context, AttributeSet attrs, int defStyleAttr){
        super(context,attrs,defStyleAttr);
    }
}
Drawing Views
Overload the onDraw() method to draw a paragraph of text
@Override
    protected void onDraw(Canvas canvas) {
        super.onDraw(canvas);
        canvas.drawText("I am a CustomTextView",100, 100, mPaint);
    }
Use custom layout
Introducing custom controls into layout
<?xml version="1.0" encoding="utf-8"?>
<RelativeLayout xmlns:android="http://schemas.android.com/apk/res/android"
android:layout_width="match_parent"
android:layout_height="match_parent"
android:background="#ffffff"
>
<com.littlehan.customtextview.CustomTextView
android:layout_width="wrap_content"
android:layout_height="wrap_content" />
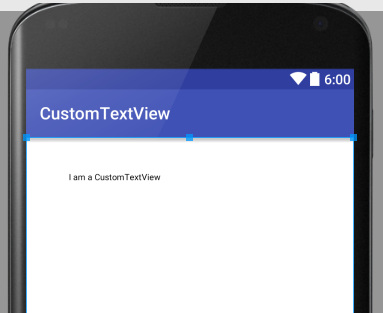
</RelativeLayout>Here, a custom control is introduced into the layout, and we can switch to the view window to see the effect.
But this custom control can not change the font color, font size, custom text and so on in xml. The implementation of this function is actually the process of creating custom attributes in XML and parsing attributes in custom View s.
Custom Properties
Create a new xml file named attrs under the values root directory to customize our attributes (the attributes defined here are the attributes in our custom namespace)
<?xml version="1.0" encoding="utf-8"?>
<resources>
    <declare-styleable name="CustomTextView">
    <attr name="customColor" format="color"/>
    <attr name="customText" format="string"/>
    </declare-styleable>
</resources>
Name defines the name of an attribute
format defines the type of attribute
Parsing attributes
Resolve these attributes in CustomeTextView
public class CustomTextView extends View {
    private int mColor = Color.RED;//Default red
    private String mText="I am a Custom TextView";//Display the text by default
    private Paint mPaint = new Paint(Paint.ANTI_ALIAS_FLAG);//Paint brush
    public CustomTextView(Context context) {
        super(context);
//        init();
    }
    public CustomTextView(Context context, AttributeSet attrs){
        this(context, attrs, 0);//Note that it is not super(context,attrs,0);
        init();
    }
    public CustomTextView(Context context, AttributeSet attrs, int defStyleAttr){//Resolving Custom Properties
        super(context,attrs,defStyleAttr);
        TypedArray typedArray = context.obtainStyledAttributes(attrs,R.styleable.CustomTextView);
        mColor = typedArray.getColor(R.styleable.CustomTextView_customColor, Color.RED);
//        If no judgment is made, loading the property app without specifying it will crash.
        if(typedArray.getText(R.styleable.CustomTextView_customText) != null ){
            mText = typedArray.getText(R.styleable.CustomTextView_customText).toString();
        }
        typedArray.recycle();//Releasing resources
        init();
    }
    private void init(){
        mPaint.setColor(mColor);// Adding color to the brush
    }

    @Override
    protected void onDraw(Canvas canvas) {
        super.onDraw(canvas);
        canvas.drawText(mText, 100, 100, mPaint);
    }
}
Use custom properties
To use custom attributes, you need to customize the attribute namespace by inserting such a line of code under the root element of the layout file:
xmlns:app="http://schemas.android.com/apk/res-auto"
So we can use custom attributes:
<?xml version="1.0" encoding="utf-8"?>
<RelativeLayout xmlns:android="http://schemas.android.com/apk/res/android"
xmlns:app="http://schemas.android.com/apk/res-auto"
android:layout_width="match_parent"
android:layout_height="match_parent"
android:background="#ffffff"
>
<com.littlehan.customtextview.CustomTextView
app:customColor="@color/colorAccent"
app:customText="Test Message"
android:layout_width="wrap_content"
android:layout_height="wrap_content" />
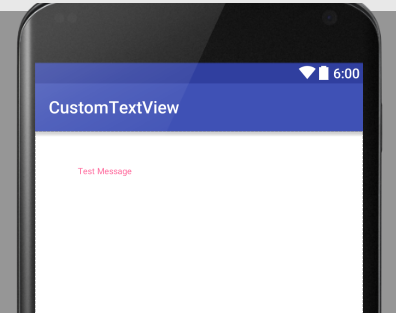
</RelativeLayout>Switch to the view preview window and you can see that the custom properties are in effect:
summary
In Android, namespaces can be divided into three categories:
- xmlns:android="http://schemas.android.com/apk/res/android"
- xmlns:tools="http://schemas.android.com/tools"
- xmlns:app="http://schemas.android.com/apk/res-auto"
Among them, the attributes in 1 and 2 namespaces are encapsulated by the system, and the attributes in the third namespace are user-defined.
The Role and Customization of Android xmlns
Namespaces in Android