1, Environment construction
First, developers need to build a good development environment according to the construction process of native Android and iOS. Then, go Flutter official website Download the latest SDK, and then unzip it to the user-defined directory. If there is a download problem, you can use the temporary image officially built by fluent for Chinese developers.
export PUB_HOSTED_URL=https://pub.flutter-io.cn
export FLUTTER_STORAGE_BASE_URL=https://storage.flutter-io.cn
In order to facilitate the use of the command line, additional environment variables need to be configured. First, open the terminal using the vim command.
vim ~/.bash_profile
Then, add the following code to bash_ In the profile file and use source ~ / bash_ The profile command takes the file changes into effect.
export PATH=/Users/mac/Flutter/flutter/bin:$PATH
//Refresh bash_profile
source ~/.bash_profile
After completing the above operations, next use the fluent doctor command to check whether the environment is correct. If successful, the following information will be output.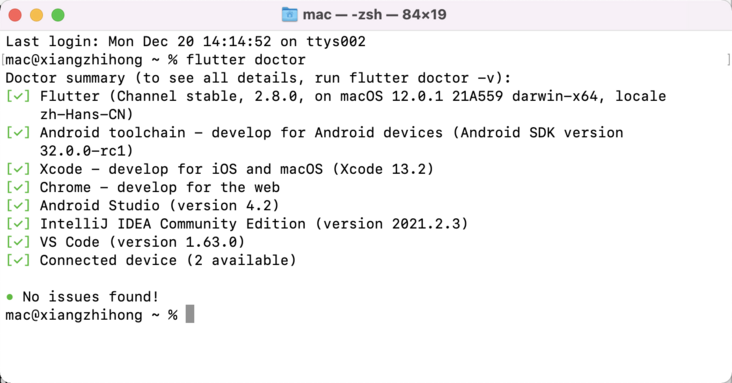
2, Create a fluent AAR package
There are two main ways to integrate native Android with fluent. One is to create a fluent module and then rely on it as a native module; Another way is to package the fluent module into aar, and then rely on the aar package in the native project. The official recommends aar access.
There are two ways to create a fluent AAR: one is to use Android Studio for generation, and the other is to use the command line directly. Use the command line to create the shuttle module as follows:
flutter create -t module flutter_module
Then, go to the shutter_ Module, execute the fluent build aar command to generate the aar package. If there is no error, it will be displayed in / fluent_ module/. Generate the corresponding aar package in the Android / fluent / build / outputs directory, as shown in the following figure.
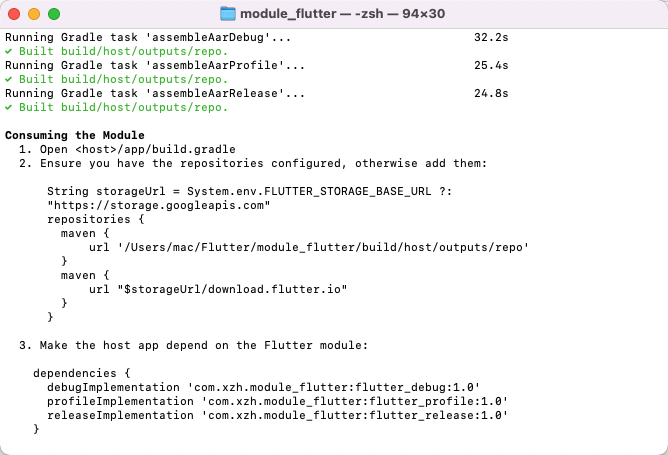
build/host/outputs/repo
└── com
    └── example
        └── my_flutter
            ├── flutter_release
            │   ├── 1.0
            │   │   ├── flutter_release-1.0.aar
            │   │   ├── flutter_release-1.0.aar.md5
            │   │   ├── flutter_release-1.0.aar.sha1
            │   │   ├── flutter_release-1.0.pom
            │   │   ├── flutter_release-1.0.pom.md5
            │   │   └── flutter_release-1.0.pom.sha1
            │   ├── maven-metadata.xml
            │   ├── maven-metadata.xml.md5
            │   └── maven-metadata.xml.sha1
            ├── flutter_profile
            │   ├── ...
            └── flutter_debug
                └── ...
Of course, we can also use Android Studio to generate aar packages. Select File - > New - > New shutter project - > shutter module to generate a shutter module project.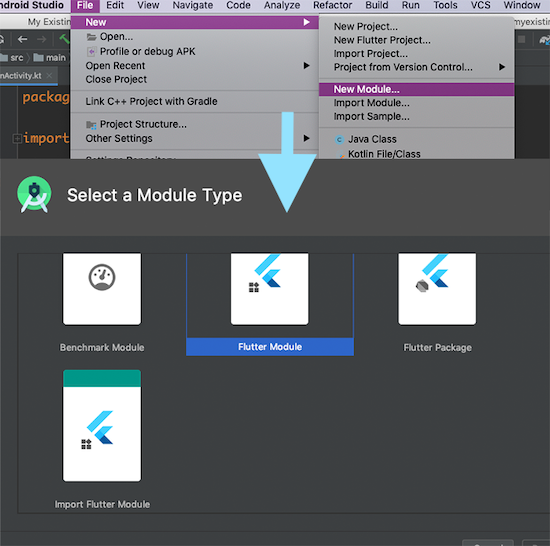
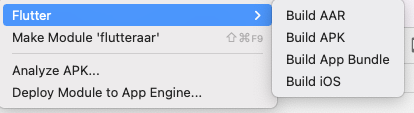
Then we select build - > fluent - > build aar to generate aar package.
Next, you can integrate aar in the native Android project.
3, Add fluent dependency
3.1 adding aar dependencies
Official recommendation method
The way to integrate aar packages is as large as the way to integrate ordinary aar packages. First, create a new libs folder in the app directory and create it in build. Exe Add the following configuration to gradle.
android {
    ...

buildTypes {
        profile {
          initWith debug
        }
      }

    String storageUrl = System.env.FLUTTER_STORAGE_BASE_URL ?:
      "https://storage.googleapis.com"
      repositories {
        maven {
            url '/Users/mac/Flutter/module_flutter/build/host/outputs/repo'
        }
        maven {
            url "$storageUrl/download.flutter.io"
        }
      }

}

dependencies {
      debugImplementation 'com.xzh.module_flutter:flutter_debug:1.0'
      profileImplementation 'com.xzh.module_flutter:flutter_profile:1.0'
      releaseImplementation 'com.xzh.module_flutter:flutter_release:1.0'
    }
Local Libs mode
Of course, we can also copy the generated aar package to the local libs, and then open app / build Add local dependencies to grade, as shown below.
repositories {
    flatDir {
        dirs 'libs'
    }
}

dependencies {
    ...
    //Add local dependency
    implementation fileTree(dir: 'libs', include: ['*.jar'])
    implementation(name: 'flutter_debug-1.0', ext: 'aar')
    implementation 'io.flutter:flutter_embedding_debug:1.0.0-f0826da7ef2d301eb8f4ead91aaf026aa2b52881'
    implementation 'io.flutter:armeabi_v7a_debug:1.0.0-f0826da7ef2d301eb8f4ead91aaf026aa2b52881'
    implementation 'io.flutter:arm64_v8a_debug:1.0.0-f0826da7ef2d301eb8f4ead91aaf026aa2b52881'
    implementation 'io.flutter:x86_64_debug:1.0.0-f0826da7ef2d301eb8f4ead91aaf026aa2b52881'
}
io. flutter:flutter_ embedding_ Where does debug come from? In fact, it is the flutter when build/host/outputs/repo is generated_ release-1.0. In the POM file,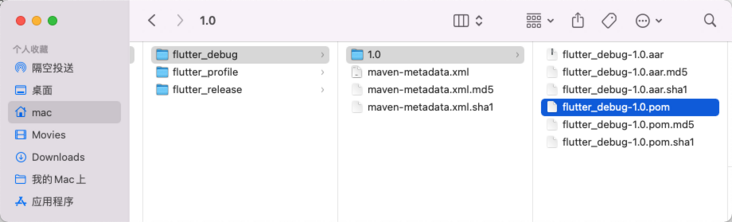
  <groupId>com.example.flutter_library</groupId>
  <artifactId>flutter_release</artifactId>
  <version>1.0</version>
  <packaging>aar</packaging>
  <dependencies>
  <dependency>
  <groupId>io.flutter.plugins.sharedpreferences</groupId>
  <artifactId>shared_preferences_release</artifactId>
  <version>1.0</version>
  <scope>compile</scope>
  </dependency>
  <dependency>
  <groupId>io.flutter</groupId>
  <artifactId>flutter_embedding_release</artifactId>
  <version>1.0.0-626244a72c5d53cc6d00c840987f9059faed511a</version>
  <scope>compile</scope>
  </dependency>
When copying, pay attention to the environment of our local aar package. They correspond to each other one by one. Next, in order to correctly rely on, you also need to build in the outer layer Add the following dependencies to gradle.
buildscript {
repositories {
    google()
    jcenter()
    maven {
        url "http://download. flutter. IO "/ / fluent dependency
    }
  }
dependencies {
    classpath 'com.android.tools.build:gradle:4.0.0'
  }
}
If the native Android project uses the idea of component-based development, it usually depends on a module/lib, such as module_flutter to add.
 stay module_flutter build.gradle Lower configuration
  repositories {
      flatDir {
        dirs 'libs'   // aar directory
      }
    }

In the Lord App Lower configuration
repositories {
//  Detailed path
flatDir {
    dirs 'libs', '../module_flutter/libs'
  }
}
3.2 source code dependency
In addition to aar, we can also rely on the source code of the fluent module. First, we create a module in the native Android project, as shown in the following figure.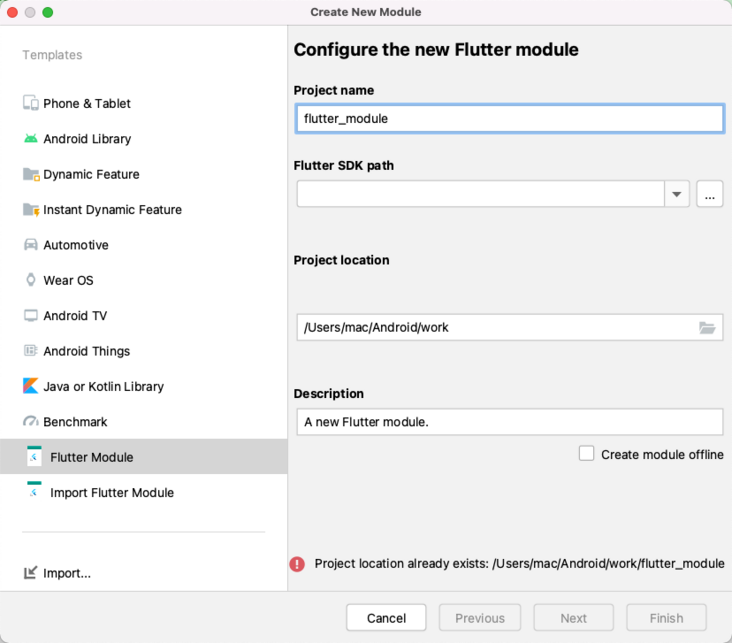
After adding successfully, the system will default to settings The following code is generated in the gradle file.
include ':app'
setBinding(new Binding([gradle: this]))
evaluate(new File(
  settingsDir.parentFile,
  'my_flutter/.android/include_flutter.groovy'
))
Then, in APP / build Add source dependencies to the gradle file.
dependencies {
  implementation project(':flutter')
}
3.3 compiling aar using fat aar
If some third-party libraries are introduced into fluent, many projects need to use fat AAR when using fluent. First, in android/build. Add fat AAR dependency to gradle.
 dependencies {
        ...
        com.github.kezong:fat-aar:1.3.6
    }
Then, in android/Flutter/build. Add the following plugin s and dependencies to gradle.
dependencies {
    testImplementation 'junit:junit:4.12'

    // Add fluent_ embedding. jar debug
    embed "io.flutter:flutter_embedding_debug:1.0.0-eed171ff3538aa44f061f3768eec3a5908e8e852"
    // Add fluent_ embedding. jar release
    embed "io.flutter:flutter_embedding_release:1.0.0-e1e6ced81d029258d449bdec2ba3cddca9c2ca0c"
    // Add each cpu version of fluent so
    embed "io.flutter:arm64_v8a_debug:1.0.0-eed171ff3538aa44f061f3768eec3a5908e8e852"
    embed "io.flutter:armeabi_v7a_debug:1.0.0-eed171ff3538aa44f061f3768eec3a5908e8e852"
    embed "io.flutter:x86_64_debug:1.0.0-eed171ff3538aa44f061f3768eec3a5908e8e852"
    embed "io.flutter:x86_debug:1.0.0-eed171ff3538aa44f061f3768eec3a5908e8e852"
At this time, if we run the project, we may report an error of Cannot fit requested classes in a single dex file. This is a very old subcontracting problem, which means that the dex exceeds 65k. One dex can no longer be installed, and multiple dex are required. The solution is to just use app / build Add multidex to gradle.
android {
    defaultConfig {
            ···
        multiDexEnabled true
    }
}

dependencies {
    //Android x supports the multidex library
    implementation 'androidx.multidex:multidex:2.0.1'
}
5, Jump to fluent
5.1 start fluteractivity
After integrating Flutter, let's go to androidmanifest Register fluteractivity in XML to achieve a simple jump.
<activity
  android:name="io.flutter.embedding.android.FlutterActivity"
  android:theme="@style/LaunchTheme"
  android:configChanges="orientation|keyboardHidden|keyboard|screenSize|locale|layoutDirection|fontScale|screenLayout|density|uiMode"
  android:hardwareAccelerated="true"
  android:windowSoftInputMode="adjustResize"
  android:exported="true"  />
Then add a jump code to any page, such as.
myButton.setOnClickListener(new OnClickListener() {
  @Override
  public void onClick(View v) {
    startActivity(
      FlutterActivity.createDefaultIntent(this)
    );
  }
});
However, when I run the project and execute the jump, I still report an error. The error information is as follows.
   java.lang.RuntimeException: Unable to start activity ComponentInfo{com.snbc.honey_app/io.flutter.embedding.android.FlutterActivity}: java.lang.IllegalStateException: ensureInitializationComplete must be called after startInitialization
        at android.app.ActivityThread.performLaunchActivity(ActivityThread.java:2946)
        at android.app.ActivityThread.handleLaunchActivity(ActivityThread.java:3081)
        at android.app.servertransaction.LaunchActivityItem.execute(LaunchActivityItem.java:78)
        at android.app.servertransaction.TransactionExecutor.executeCallbacks(TransactionExecutor.java:108)
        at android.app.servertransaction.TransactionExecutor.execute(TransactionExecutor.java:68)
        at android.app.ActivityThread$H.handleMessage(ActivityThread.java:1831)
        at android.os.Handler.dispatchMessage(Handler.java:106)
        at android.os.Looper.loop(Looper.java:201)
        at android.app.ActivityThread.main(ActivityThread.java:6806)
        at java.lang.reflect.Method.invoke(Native Method)
        at com.android.internal.os.RuntimeInit$MethodAndArgsCaller.run(RuntimeInit.java:547)
        at com.android.internal.os.ZygoteInit.main(ZygoteInit.java:873)
The error reading should be the initialization problem, but the official document does not mention any code related to the initialization steps. Check the official issue of fluent, indicating that a line of initialization code should be added:
public class MyApplication extends Application {
    @Override
    public void onCreate() {
        super.onCreate();
        FlutterMain.startInitialization(this);
    }
}
Then, I ran again and found the following error.
java.lang.NoClassDefFoundError: Failed resolution of: Landroid/arch/lifecycle/DefaultLifecycleObserver;
        at io.flutter.embedding.engine.FlutterEngine.<init>(FlutterEngine.java:152)
        at io.flutter.embedding.android.FlutterActivityAndFragmentDelegate.setupFlutterEngine(FlutterActivityAndFragmentDelegate.java:221)
        at io.flutter.embedding.android.FlutterActivityAndFragmentDelegate.onAttach(FlutterActivityAndFragmentDelegate.java:145)
        at io.flutter.embedding.android.FlutterActivity.onCreate(FlutterActivity.java:399)
        at android.app.Activity.performCreate(Activity.java:7224)
        at android.app.Activity.performCreate(Activity.java:7213)
        at android.app.Instrumentation.callActivityOnCreate(Instrumentation.java:1272)
        at android.app.ActivityThread.performLaunchActivity(ActivityThread.java:2926)
        at android.app.ActivityThread.handleLaunchActivity(ActivityThread.java:3081)
        at android.app.servertransaction.LaunchActivityItem.execute(LaunchActivityItem.java:78)
        at android.app.servertransaction.TransactionExecutor.executeCallbacks(TransactionExecutor.java:108)
        at android.app.servertransaction.TransactionExecutor.execute(TransactionExecutor.java:68)
        at android.app.ActivityThread$H.handleMessage(ActivityThread.java:1831)
        at android.os.Handler.dispatchMessage(Handler.java:106)
        at android.os.Looper.loop(Looper.java:201)
        at android.app.ActivityThread.main(ActivityThread.java:6806)
        at java.lang.reflect.Method.invoke(Native Method)
        at com.android.internal.os.RuntimeInit$MethodAndArgsCaller.run(RuntimeInit.java:547)
        at com.android.internal.os.ZygoteInit.main(ZygoteInit.java:873)
     Caused by: java.lang.ClassNotFoundException: Didn't find class "android.arch.lifecycle.DefaultLifecycleObserver" on path: DexPathList[[zip file "/data/app/com.example.myapplication-kZH0dnJ-qI1ow1NqGOB2ug==/base.apk"],nativeLibraryDirectories=[/data/app/com.example.myapplication-kZH0dnJ-qI1ow1NqGOB2ug==/lib/arm64, /data/app/com.example.myapplication-kZH0dnJ-qI1ow1NqGOB2ug==/base.apk!/lib/arm64-v8a, /system/lib64, /vendor/lib64]]
The last log indicates that the lifecycle is missing, so you can add lifecycle dependencies, as shown below.
implementation 'android.arch.lifecycle:common-java8:1.1.0'
Then run it again and there's no problem.
5.2 starting with FlutterEngine
By default, a FlutterEngine is created when each FlutterActivity is created, and each FlutterEngine has an initialization operation. This means that there is a delay in starting a standard fluteractivity. To reduce this delay, we can create a FlutterEngine in advance before starting the FlutterActivity, and then use the FlutterEngine when jumping to the FlutterActivity. The most common way is to initialize the FlutterEngine in the Application, for example.
class MyApplication : Application() {

    lateinit var flutterEngine : FlutterEngine

    override fun onCreate() {
        super.onCreate()
        flutterEngine = FlutterEngine(this)
        flutterEngine.dartExecutor.executeDartEntrypoint(
            DartExecutor.DartEntrypoint.createDefault()
        )
        FlutterEngineCache
            .getInstance()
            .put("my_engine_id", flutterEngine)
    }
}
Then, we can use the buffered FlutterEngine when jumping to FlutterActivity, because the engine has been added when the FlutterEngine is initialized_ ID, so you need to use this engine when starting_ ID to start.
myButton.setOnClickListener {
  startActivity(
    FlutterActivity
      .withCachedEngine("my_engine_id")
      .build(this)
  )
}
Of course, at startup, we can also jump to a default route. We only need to call the setInitialRoute method at startup.
class MyApplication : Application() {
  lateinit var flutterEngine : FlutterEngine
  override fun onCreate() {
    super.onCreate()
    // Instantiate a FlutterEngine.
    flutterEngine = FlutterEngine(this)
    // Configure an initial route.
    flutterEngine.navigationChannel.setInitialRoute("your/route/here");
    // Start executing Dart code to pre-warm the FlutterEngine.
    flutterEngine.dartExecutor.executeDartEntrypoint(
      DartExecutor.DartEntrypoint.createDefault()
    )
    // Cache the FlutterEngine to be used by FlutterActivity or FlutterFragment.
    FlutterEngineCache
      .getInstance()
      .put("my_engine_id", flutterEngine)
  }
}
6, Communication with Flutter
After the above operations, we have been able to complete the jump from native Android to fluent. How can we realize the jump from fluent to native Activity or how can fluent destroy itself and return to the native page? At this time, the communication mechanism of fluent and native Android, namely Channel, is used, which are MethodChannel, EventChannel and BasicMessageChannel respectively.
- MethodChannel: used to transfer method calls. It is a commonly used PlatformChannel.
- EventChannel: used to deliver events.
- BasicMessageChannel: used to transfer data.
For this simple jump operation, you can directly use MethodChannel. First of all, we're in flutter_ Create a new PluginManager class in module, and then add the following code.
import 'package:flutter/services.dart';

class PluginManager {
  static const MethodChannel _channel = MethodChannel('plugin_demo');

  static Future<String> pushFirstActivity(Map params) async {
    String resultStr = await _channel.invokeMethod('jumpToMain', params);
    return resultStr;
  }

}
Then, when we click the return button on the fluent entry page, we add a return method, mainly calling PluginManager to send messages, as shown below.
Future<void> backToNative() async {
    String result;
    try {
      result = await PluginManager.pushFirstActivity({'key': 'value'});
    } on PlatformException {
      result = 'fail';
    }
    print('backToNative: '+result);
  }
Next, recompile the aar package with fluent build aar, and add the following code in the configureFlutterEngine method of the native Android's fluent entry page.
class FlutterContainerActivity : FlutterActivity() {

    private val CHANNEL = "plugin_demo"

    override fun onCreate(savedInstanceState: Bundle?) {
        super.onCreate(savedInstanceState)

    }


    override fun configureFlutterEngine(flutterEngine: FlutterEngine) {
        GeneratedPluginRegistrant.registerWith(flutterEngine)
        MethodChannel(flutterEngine.dartExecutor, CHANNEL).setMethodCallHandler { call, result ->
            if (call.method == "jumpToMain") {
                val params = call.argument<String>("key")
                Toast.makeText(this,"Return to native PAGE",Toast.LENGTH_SHORT).show()
                finish()
                result.success(params)
            } else {
                result.notImplemented()
            }
        }
    }

}
When rerunning the native project, click the return button in the upper left corner of fluent to return to the native page. Other mixed jumps can also be solved in this way.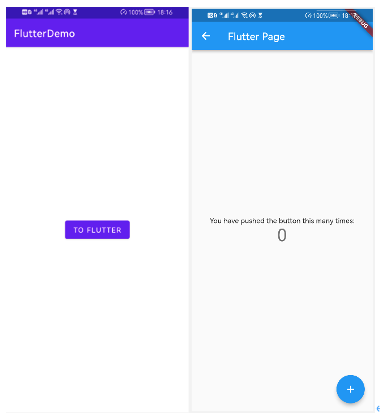
For the problems of hybrid routing and multiple instances of FlutterEngine in hybrid development, you can refer to FlutterBoost.