If you don't want to write it yourself, you can use it directly Serial port finished product library
1, Google official demo
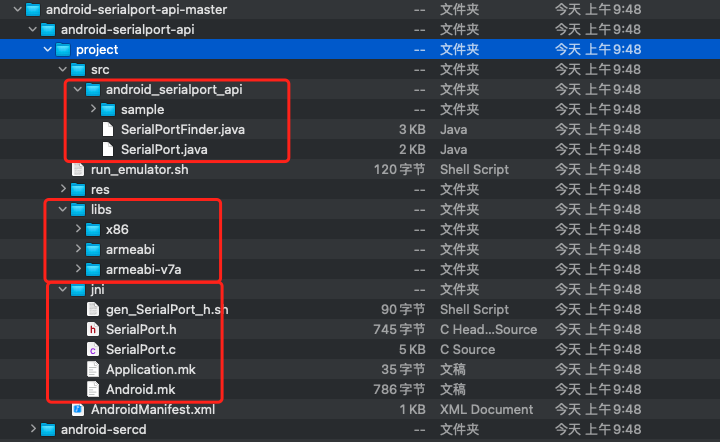
Note that the files in the directory are mainly divided into three Android blocks in the figure_ serialport_ api,libs,jni
After referring to google's project, we began to write it into our project.
2, Install and download NDK and CMake first

3, Start your own project
The whole process is operated in Project view
1. First, create a new package in the Java directory under your project main and name it android_serialport_api (must be this name), and Android in google project_ serialport_ Serialport. In the API directory java,SerialPortFinder. Copy Java
2. Move the libs and jni copies in Google to the main directory of your project. After I copy them here, I rename libs to jniLibs, so there is no need to configure dir in the sourceSet
3. Create a cmakelists in the app directory Txt file, as follows
# For more information about using CMake with Android Studio, read the
# documentation: https://d.android.com/studio/projects/add-native-code.html

# Sets the minimum version of CMake required to build the native library.

cmake_minimum_required(VERSION 3.4.1)

# Creates and names a library, sets it as either STATIC
# or SHARED, and provides the relative paths to its source code.
# You can define multiple libraries, and CMake builds them for you.
# Gradle automatically packages shared libraries with your APK.

#Set the path of the last output of the generated so dynamic library
#set(CMAKE_LIBRARY_OUTPUT_DIRECTORY ${PROJECT_BINARY_DIR}/..jniLibs/${CMAKE_ANDROID_ARCH_ABI})
set(CMAKE_LIBRARY_OUTPUT_DIRECTORY ${PROJECT_SOURCE_DIR}/jniLibs/${ANDROID_ABI})

add_library( # Sets the name of the library.
        SerialPort

        # Sets the library as a shared library.
        SHARED

        # Provides a relative path to your source file(s).
        src/main/jni/SerialPort.c)

# Searches for a specified prebuilt library and stores the path as a
# variable. Because CMake includes system libraries in the search path by
# default, you only need to specify the name of the public NDK library
# you want to add. CMake verifies that the library exists before
# completing its build.

find_library( # Sets the name of the path variable.
        log-lib

        # Specifies the name of the NDK library that
        # you want CMake to locate.
        log)

# Specifies libraries CMake should link to your target library. You
# can link multiple libraries, such as libraries you define in this
# build script, prebuilt third-party libraries, or system libraries.

target_link_libraries( # Specifies the target library.
        SerialPort

        # Links the target library to the log library
        # included in the NDK.
        ${log-lib})
4. In build Add the following configuration to the android node in gradle
android {
    // ... Default configuration omitted
    defaultConfig{
        //... Default configuration omitted
        ndk {
          //abiFilters "armeabi", "armeabi-v7a", "x86"
          abiFilters "arm64-v8a", "armeabi-v7a"
        }
        externalNativeBuild {
            cmake {
                cppFlags ""
            }
        }
    }
    externalNativeBuild {
//        ndkBuild {/ / use this to generate the ndkBuild directory in the form of ndk
//            path 'src/main/jni/Android.mk '/ / this is Android Path to MK file
//        }
        cmake {
            path "CMakeLists.txt"    //This is Android Path to MK file
        }
    }
    sourceSets {
        main {
            jni.srcDirs = []
//            jniLibs.srcDirs = ['libs'] because it is named jnilibs, no additional introduction is required
        }
    }
}
"arm64-v8a" / / is the latest 64 bit cpu support
"armeabi-v7a" / / is currently the mainstream cpu support
So I only introduced these two.
The official didn't give arm64-v8a it So file, so I generate it through cmake based on the c file in jni. (mainly. c and. h files)
5. Modify Build After gradle, synchronize, and then click Build Make Project on the toolbar. After success, the directory model file as shown in the figure will be moved to your missing jniLibs.

6. Use and receive data
protected void onCreate(Bundle savedInstanceState) {
    super.onCreate(savedInstanceState);
    setContentView(R.layout.activity_main);

    String[] arr = new SerialPortFinder().getAllDevices();
    //Get all serial port addresses of the current device

    SerialPort mSerialPort = new SerialPort(
       new File("/dev/ttyS2"),//It can be seen from the above arr that the device has multiple ports. Which one should be monitored
       9600,0);
    final InputStream inputStream = mSerialPort.getInputStream();
//  this.mOutputStream = mSerialPort.getOutputStream();// This can be used to write
    this.mInputStream = mSerialPort.getInputStream();
    this.mReadThread = new ReadThread();
    this.mReadThread.start();
}

private class ReadThread extends Thread {
        @Override
        public void run() {
            super.run();
            while (!isInterrupted()) {
                try {
                    if (mInputStream == null) {
                        return;
                    }
                    int available = mInputStream.available();
                    if (available > 0) {
                        byte[] buffer = new byte[available];
                        int size = mInputStream.read(buffer);
                        if (size > 0) {
                            Log.e(TAG, "Data received: "+new String(buffer, "UTF-8"));
                        }
                    } else {
                        SystemClock.sleep(50);
                    }
                } catch (Throwable e) {
                    Log.e("Receive error", e.getMessage());
                    return;
                }
            }
        }
}
Attached:
1. View mac connected serial ports
ls /dev | grep tty.usb
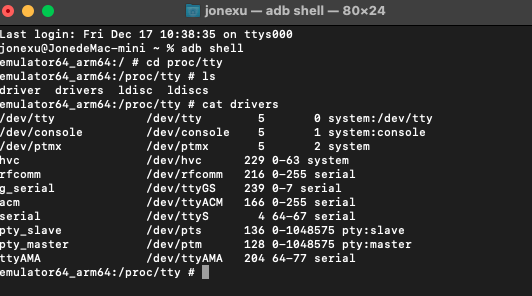
2. Get all serial ports in the simulator. You can view the names of all serial ports in the simulator through the adb command
adb shell
cd proc/tty
cat drivers
error
1. If an error is reported, the serial cannot be found_ port. So two questions,
1) build. sourceSets is not configured in gradle,
2) Or armeabi in jniLibs, etc The so file is incomplete. You can go to This project Download more models from
2,Install Failed Insufficient Storage
If it's a real phone, it's trying to free up the memory space of the phone,
Simulator, 1) open simulator management, then right-click the current simulator and select Wipe Data
Or 2) right click simulator Edit and select Show Advanced Settings to modify Memory and Storage
3,No implementation found for java.io.FileDescriptor
SerialPort. The java file is not placed in main -- Java -- android_serialport_api directory with the same name
4,java.io.IOException: Cannot run program "/system/bin/su": error=13, Permission denied
If you do not have root permission and AVD simulator, use the command line cd to your Android sdk directory. The MAC is as follows. Refer to Blog
 cd /Users/jonexu/Library/Android/sdk/tools
 adb root
//Get restarting adbd as root
 adb shell setenforce 0
You have to brush the real machine. According to the truth, you have to have a professional industrial board to debug the serial port, which is generally root
5,libserial_port.so text relocations
The reason for the error is that there is no readability above Android 6.0 So file, you need to add the arm64-v8a directory and add the corresponding The so file can be downloaded from the project mentioned in point 1.
6,Unknown host CPU architecture: arm64
The NDK in the M1 chip in Mac OS does not recognize arm64 temporarily. Temporary solution: modify the NDK build file in the NDK in your Android sdk directory
#!/bin/sh
#DIR="$(cd "$(dirname "$0")" && pwd)"
#$DIR/build/ndk-build "$@"
# New script“
DIR="$(cd "$(dirname "$0")" && pwd)"
arch -x86_64 /bin/bash $DIR/build/ndk-build "$@"
End
Recommended Android models arm64-v8a Etc. introduction