

preface
Interacting with machines through voice can improve efficiency in many scenarios, and it is also one of the research hotspots in the field of artificial intelligence. The application scenarios of speech recognition technology can be divided into vehicle scenarios taking vehicle voice assistant as an example, home scenarios taking smart home devices, etc. In order to realize the voice interaction between people and machines, the machine needs to be able to recognize the voice content first, but the general voice recognition service can not fully meet the needs of different scenarios, so customers need to train the model according to their own needs.
This article will show you how to use Amazon SageMaker service to train your speech recognition model. We chose an open source speech recognition project WeNet as an example.
Amazon SageMaker is a fully hosted machine learning service, covering basic processes such as data tagging, data processing, model training, hyper parameter tuning, model deployment and continuous model monitoring; It also provides high-order functions such as automatic labeling, automatic machine learning, monitoring model training and so on. Through fully managed machine learning infrastructure and support for mainstream frameworks, it can reduce the overall cost of ownership of customer machine learning.
WeNet is an open source end-to-end speech recognition solution for industrial products. It supports both streaming and non streaming recognition, and can run efficiently in the cloud and embedded. In the training process of the model, a lot of computing resources are needed. We can easily start the training instance cluster containing multiple fully managed instances with the help of Amazon SageMaker to accelerate the training process.
📢 To learn more about the latest technology release and practical innovation of Amazon cloud technology, please pay attention to the 2021 Amazon cloud technology China Summit held in Shanghai, Beijing and Shenzhen! Click the picture to sign up ~
preparation
Before starting the training model, we need to make some preparations, including preparing the FSx file system to store the data in the training process, creating the Amazon SageMaker Notebook as the experimental environment, mounting the FSx file system in the notebook, and preparing the experimental code, And prepare the running environment for data processing and model training (Docker image) and push the image to Amazon ECR(Elastic Container Registry).
The experiment contents in this article are completed by using the services in the us-east-1 area. You can use other areas by yourself.
Create FSx for Lustre storage
In the past, Amazon Simple Storage Service (Amazon S3) was generally used for training models in Amazon SageMaker. Now, Amazon SageMaker supports a variety of data sources for model training, such as Amazon FSx for Lustre and Amazon Elastic File System (EFS). Amazon SageMaker can directly read the data stored on EFS or FSX for cluster to speed up the data loading progress during training model.
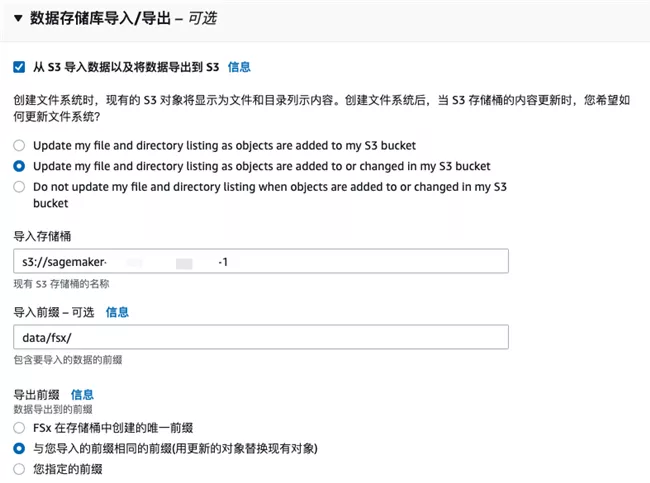
FSx for Lustre supports importing data from Amazon S3 and exporting data to Amazon S3. If your data has been stored in Amazon S3, FSx for Lustre displays the object as a file in a transparent manner. The same FSx file system can also be used for multiple Amazon SageMaker training tasks, eliminating the time of repeatedly downloading training data sets.
Here, we will choose to use FSx for Lustre as the main data storage. Next, we will create an FSx for Lustre storage.
Create FSx for Lustre based on Amazon S3
Set VPC, subnet group and security group in "network and security", and confirm whether the inbound rule of security group allows the traffic of port 998.
Select "import data from Amazon S3 and export data to Amazon S3" in "data repository import / export" and specify the bucket and path where Amazon S3 training data is located.
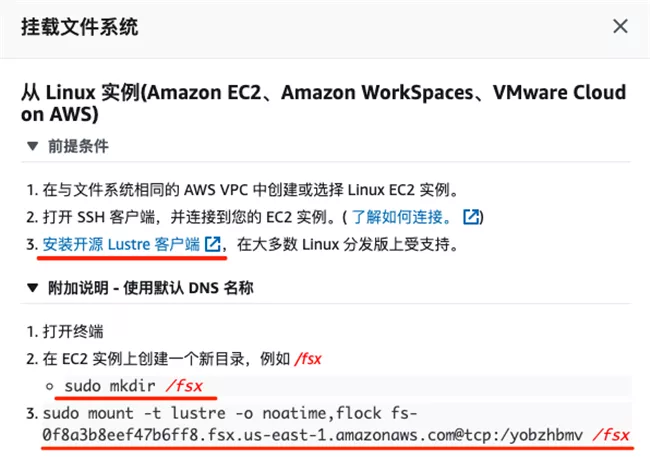
After creation, click the "Mount" button to pop up the steps of mounting this file system, which will be used in Amazon SageMaker Notebook later.

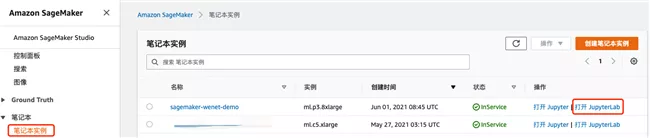
Create Amazon SageMaker Notebook
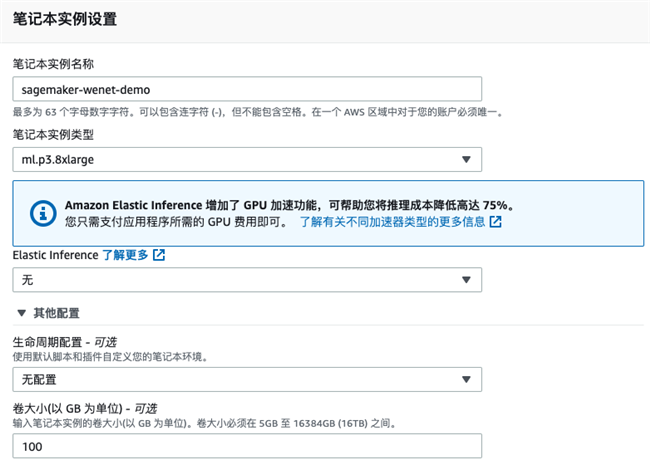
Select the notebook instance type. Here we select a ml.p3 8xlarge machine, which contains 4 Tesla V100 GPU cards. You can select other GPU machines or CPU machines if you do not need a GPU card.
In addition, you can decide the volume size of the notebook instance. For example, 100GB storage is selected for this instance. You can resize this storage later.
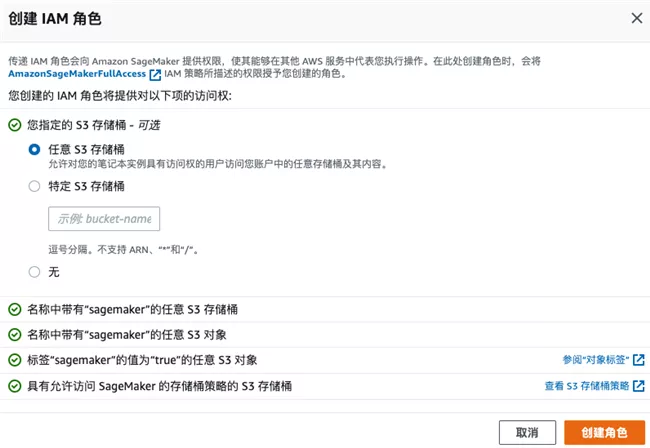
Select the new IAM role, including the required permissions, as shown in the following figure:
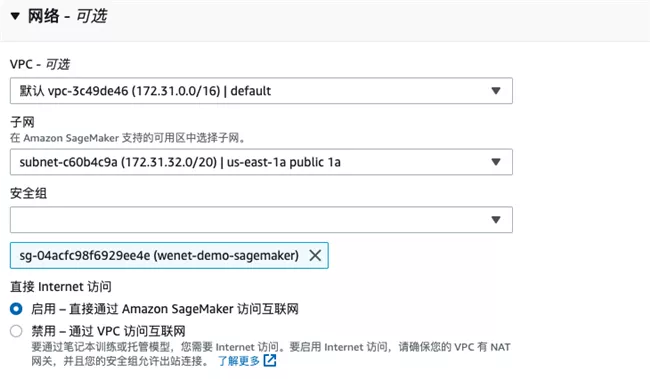
In the network part, select the VPC and public subnet where FSx is located. The security group needs to allow Amazon SageMaker to access FSx.
Mount FSx storage in notebook
On the notebook console page, click "open JupyterLab".
On the Launcher page, click "Terminal" to create a new command line Terminal. Install the Lustre client in the command Terminal and execute the mount command according to the steps prompted in the chapter "creating an Amazon S3 based FSx".
In addition, you can also configure the Notebook life cycle policy to automatically mount the FSx file system when creating or starting a Notebook instance. Refer to document [2].
Download WeNet source code
At the command line terminal in the previous step, execute the following command to complete the code download.
1sudo chown ec2-user.ec2-user /fsx
2
3ln -s /fsx /home/ec2-user/SageMaker/fsx
4
5cd ~/SageMaker/fsx
6
7git clone -b sagemaker https://github.com/chen188/wenet
Here, we recommend that you place all the test related files in the ~ / Amazon SageMaker directory. The data in this directory can still exist independently after the Notebook instance is shut down.
You can open a Notebook file
/fsx/wenet/examples/aishell/s0/SM-WeNet.ipynb,
Subsequent commands can be found in this notebook.
Prepare Docker image
In Amazon SageMaker, many tasks are implemented based on Docker image, such as data preprocessing, model training and model hosting. Using Docker image can greatly ensure the consistency of the environment and reduce the operation and maintenance cost of the preset environment.
Next, we need to build our own Docker image to realize data format conversion and model training. Amazon Web Service has provided some general Deep Learning Container(DLC) environments. For the specific list, please refer to [6]. However, the TorchAudio package has not been included. At this time, we can choose to build the running environment based on the open source version.
The image is built on Ubuntu and pytorch 1.8.0 is installed 1. torchaudio and other related dependencies.
File / fsx/wenet/Dockerfile:
1FROM ubuntu:latest
2ENV DEBIAN_FRONTEND=noninteractive
3ENV PATH /opt/conda/bin:$PATH
4
5RUN apt-get update --fix-missing && \
6    apt-get install -y gcc net-tools && \
7    apt-get install -y --no-install-recommends wget bzip2 ca-certificates libglib2.0-0 libxext6 libsm6 libxrender1 git mercurial subversion && \
8    apt-get clean && \
9    rm -rf /var/lib/apt/lists/* && \
10    wget --quiet https://repo.anaconda.com/archive/Anaconda3-2021.05-Linux-x86_64.sh -O ~/anaconda.sh && \
11    /bin/bash ~/anaconda.sh -b -p /opt/conda && \
12    rm ~/anaconda.sh && \
13    ln -s /opt/conda/etc/profile.d/conda.sh /etc/profile.d/conda.sh && \
14    echo ". /opt/conda/etc/profile.d/conda.sh" >> ~/.bashrc && \
15    echo "conda activate base" >> ~/.bashrc && \
16    find /opt/conda/ -follow -type f -name '*.a' -delete && \
17    find /opt/conda/ -follow -type f -name '*.js.map' -delete && \
18    /opt/conda/bin/conda clean -afy
19
20COPY ./requirements.txt /tmp/
21
22RUN pip install -r /tmp/requirements.txt && \
23    pip install torch==1.8.1+cu111 torchvision==0.9.1+cu111 torchaudio==0.8.1 -f https://download.pytorch.org/whl/lts/1.8/torch_lts.html && \
24    pip install sagemaker-training && \
25rm /tmp/requirements.txt
You can notice that we have additionally installed the Amazon SageMaker training package to provide image support for Amazon SageMaker training functions.
Build image and push to ECR
ECR is a container registry service fully hosted by Amazon. We can push the constructed image to ECR. Later, Amazon SageMaker will download the corresponding image from here when training or hosting the model.
1import boto3
2account_id = boto3.client('sts').get_caller_identity().get('Account')
3region = boto3.Session().region_name
4ecr_repository = 'sagemaker-wenet'
5
6#Log in to ECR service
7!aws ecr get-login-password --region {region} | docker login --username AWS --password-stdin {account_id}.dkr.ecr.{region}.amazonaws.com
8
9#Training image
10training_docker_file_path = '/fsx/wenet'
11!cat $training_docker_file_path/Dockerfile
12
13tag = ':training-pip-pt181-py38'
14training_repository_uri = '{}.dkr.ecr.{}.amazonaws.com/{}'.format(account_id, region, ecr_repository + tag)
15print('training_repository_uri: ', training_repository_uri)
16
17!cd $training_docker_file_path && docker build -t "$ecr_repository$tag" .
18!docker tag {ecr_repository + tag} $training_repository_uri
19!docker push $training_repository_uri
20Python
Using Amazon SageMaker training model
Now that we have completed the preparation of the experimental environment, let's get to the point and use Amazon SageMaker to complete the model training.
WeNet supports various training models, such as Transformer and Transformer. Here we will take unified transformer as an example to show the whole training process. For training data, WeNet also supports multiple sources. You only need to sort the data according to the format during training, such as AIShell-1, AIShell-2 and LibriSpeech. Here, we will take AIShell-1 as an example.
Data download
First, we need to download the training data to the local FSx storage and execute the command in the notebook:
1cd /fsx/wenet/examples/aishell/s0 && \
2bash run.sh --stage -1 --stop_stage -1 --data /fsx/asr-data/OpenSLR/33
3Bash
The data will be automatically downloaded to the / FSX / ASR data / openslr / 33 directory. After downloading, the status is:
1sh-4.2$ ls /fsx/asr-data/OpenSLR/33
2data_aishell  data_aishell.tgz  resource_aishell  resource_aishell.tgz
3Bash
Data preprocessing
Next, we need to organize the data into the format required by WeNet. Here we use Amazon SageMaker to perform the logic of data preprocessing.
Mount the FSx file system to the data preprocessing container
As mentioned earlier, the data required for model training has been stored in the FSx file system. When processing data through Amazon SageMaker, we need to mount the FSx file system into the container. The code for mounting the file system is as follows:
1from sagemaker.inputs import FileSystemInput
2from sagemaker.pytorch.estimator import PyTorch
3
4file_system_id = 'fs-0f8a3xxxxf47b6ff8'
5file_system_path = '/yobzhbmv'
6file_system_access_mode = 'rw'
7file_system_type = 'FSxLustre'
8
9security_group_ids = ['sg-04acfcxxxx929ee4e']
10subnets= ['subnet-07ce0abxxxxcfeb25']
11
12file_system_input_train = FileSystemInput(file_system_id=file_system_id,
13                                  file_system_type=file_system_type,
14                                  directory_path=file_system_path,
15                                  file_system_access_mode=file_system_access_mode)
16Python
Note that the subnet specified in the subnets parameter needs the ability to access Amazon S3 and other services. You can choose to use a private subnet and specify the default route to the NAT gateway for the subnet.
security_ group_ The security group specified by IDS will be bound to the instance started by Amazon SageMaker. You need the ability to access FSx services.
Start data preprocessing job
So far, we have defined the file system to be mounted by specifying the id of the file system, the path of the file system, the read-write mode and other information. Next, you can set the running environment and parameter information to be transmitted during data processing. The code is as follows:
1hp= {
2    'stage': 0, 'stop_stage': 3, 'train_set':'train',
3    'trail_dir':'/opt/ml/input/data/train/sm-train/trail0',
4    'data': '/opt/ml/input/data/train/asr-data/OpenSLR/33',
5    'shared_dir': '/opt/ml/input/data/train/shared'
6}
7
8estimator=PyTorch(
9    entry_point='examples/aishell/s0/sm-run.sh',
10    image_uri=training_repository_uri,
11    instance_type='ml.c5.xlarge',
12    instance_count=1,
13    source_dir='.',
14    role=role,
15    hyperparameters=hp,
16
17    subnets=subnets,
18    security_group_ids=security_group_ids,
19
20    debugger_hook_config=False,
21    disable_profiler=True
22)
23Python
We passed the image_ The URI parameter specifies the container environment in which the data processing code runs, instance_type specifies the required instance type, instance_count specifies the number of instances to be passed, and hyperparameters specifies the super parameters to be passed.
Next, you can start the specified computing resources and execute the data processing logic through one line of command.
1estimator.fit(inputs={'train': file_system_input_train})
2Python
We set the data input information of the container runtime through the inputs parameter. Amazon SageMaker supports a variety of data sources, such as local file (file: / /), Amazon S3 path (s3://bucket/path) and file system (FSx or EFS). Here, our FSx file system will be mapped to the / opt/ml/input/data/train directory of the container. Train is a custom channel name. Other common channels include test, validation, etc. Refer to [1] for specific path mapping rules in Amazon SageMaker.
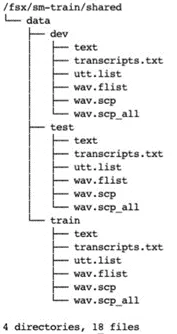
View processed data
After processing, it will be displayed in the trail_dir and shared_ Create corresponding files in dir directory. Execute the command on the Notebook instance as follows:
tree -L 3 /fsx/sm-train/trail0
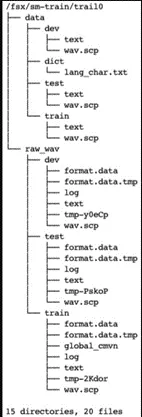
tree -L 3 /fsx/sm-train/shared
Start model training job
So far, we have prepared the training data. Next, we can enter the model training stage. We will show two training modes: local training and fully managed instance training.
Local training mode
In the process of model development, algorithmic personnel need to repeatedly adjust the code logic. It is very troublesome to package a docker image for each code adjustment. Therefore, you can debug the code through the local training mode of Amazon SageMaker. The local training mode will directly start the corresponding container in the instance where the Notebook is located, execute the training logic, and automatically map the data to the container. For details of local mode training, please refer to the document [3]. The local training code we use here is as follows:
1instance_type='local_gpu'
2instance_count = 1
3CUDA_VISIBLE_DEVICES='0'
4
5hp= {
6    'stage': 4, 'stop_stage': 4, 'train_set':'train',
7    'data': data_dir, 'trail_dir': trail_dir, 'shared_dir': shared_dir,
8    'CUDA_VISIBLE_DEVICES': CUDA_VISIBLE_DEVICES,
9    'num_nodes': instance_count
10}
11
12estimator=PyTorch(
13    entry_point='examples/aishell/s0/sm-run.sh',
14    image_uri=training_repository_uri,
15    instance_type =instance_type,
16    instance_count=instance_count,
17    source_dir='.',
18    role=role,
19    hyperparameters=hp,
20
21    subnets=subnets,
22    security_group_ids=security_group_ids,
23
24    debugger_hook_config=False,
25    disable_profiler=True
26)
27
28
29estimator.fit({'train': 'file:///fsx'})
30Python
The output of the code is as follows:
1Creating 2n0im72bz3-algo-1-tpyyu ...
2Creating 2n0im72bz3-algo-1-tpyyu ... done
3Attaching to 2n0im72bz3-algo-1-tpyyu
4...
52n0im72bz3-algo-1-tpyyu | Invoking script with the following command:
62n0im72bz3-algo-1-tpyyu |
72n0im72bz3-algo-1-tpyyu | /bin/sh -c ./examples/aishell/s0/sm-run.sh --CUDA_VISIBLE_DEVICES 0 --data /opt/ml/input/data/train/asr-data/OpenSLR/33 --num_nodes 1 --shared_dir /opt/ml/input/data/train/sm-train/shared --stage 4 --stop_stage 4 --trail_dir /opt/ml/input/data/train/sm-train/trail0 --train_set train
8...
92n0im72bz3-algo-1-tpyyu | algo-1-tpyyu: 2021-06-24 15:50:09,408 INFO     [checkpoint.py:33] Checkpoint: save to checkpoint /opt/ml/input/data/train/sm-train/trail0/exp/unified_transformer/init.pt
102n0im72bz3-algo-1-tpyyu | algo-1-tpyyu: 2021-06-24 15:50:09,669 INFO     [train.py:228] Epoch 0 TRAIN info lr 8e-08
112n0im72bz3-algo-1-tpyyu | algo-1-tpyyu: 2021-06-24 15:50:09,670 INFO     [executor.py:32] using accumulate grad, new batch size is 1 timeslarger than before
122n0im72bz3-algo-1-tpyyu | algo-1-tpyyu: 2021-06-24 15:50:12,560 DEBUG    [executor.py:103] TRAIN Batch 0/7507 loss 417.150146 loss_att 148.725983 loss_ctc 1043.473145 lr 0.00000008 rank 0Python
Among the above parameters, source_ The path specified by dir will be packaged and uploaded to Amazon S3, and then downloaded to the container instance. In this way, every code change can be directly reflected in the container.
In addition, when using the local training mode, Amazon SageMaker will start the corresponding training tasks with the help of the local docker compose. You can find the relevant docker compose files in the / tmp directory,
For example, / tmp/tmp6y009akq, we can observe the following:
1sh-4.2$ tree /tmp/tmp6y009akq
2/tmp/tmp6y009akq
3├── artifacts
4├── docker-compose.yaml
5├── model
6└── output
7    └── data
8Bash
Among them, docker compose Yaml contains relevant configuration information as follows:
1sh-4.2$ cat /tmp/tmp6y009akq/docker-compose.yaml
2networks:
3  sagemaker-local:
4    name: sagemaker-local
5services:
6  algo-1-tpyyu:
7    command: train
8    container_name: 2n0im72bz3-algo-1-tpyyu
9    environment:
10    - AWS_REGION=us-east-1
11    - TRAINING_JOB_NAME=sagemaker-wenet-2021-06-24-15-49-58-018
12    image: <your-aws-account-id>.dkr.ecr.us-east-1.amazonaws.com/sagemaker-wenet:training-pip-pt181-py38
13    networks:
14      sagemaker-local:
15        aliases:
16        - algo-1-tpyyu
17    stdin_open: true
18    tty: true
19    volumes:
20    - /tmp/tmp6y009akq/algo-1-tpyyu/output:/opt/ml/output
21    - /tmp/tmp6y009akq/algo-1-tpyyu/output/data:/opt/ml/output/data
22    - /tmp/tmp6y009akq/algo-1-tpyyu/input:/opt/ml/input
23    - /tmp/tmp6y009akq/model:/opt/ml/model
24    - /opt/ml/metadata:/opt/ml/metadata
25    - /fsx:/opt/ml/input/data/train
26version: '2.3'
27Bash
It can be seen that docker compose maps the local path to the directory in the container through the volumes parameter, without performing secondary replication of training data.
Trusteeship training mode
After confirming that the code logic is correct, we can easily use the managed instance to start the real training task by modifying the parameters.
Here, we only need to adjust the instance type, the number of instances required and the data input method. We use 2 ml.p3 The example of 8xlarge includes 4 Tesla V100 graphics cards and 8 graphics cards in total.
The training code is as follows:
1instance_type='ml.p3.8xlarge'
2instance_count = 2
3CUDA_VISIBLE_DEVICES='0,1,2,3'
4
5hp= {
6    'stage': 4, 'stop_stage': 4, 'train_set':'train',
7    'data': data_dir, 'trail_dir': trail_dir, 'shared_dir': shared_dir,
8    'CUDA_VISIBLE_DEVICES': CUDA_VISIBLE_DEVICES,
9    'ddp_init_protocol': 'tcp',
10    'num_nodes': instance_count
11}
12
13estimator=PyTorch(
14    entry_point='examples/aishell/s0/sm-run.sh',
15    image_uri=training_repository_uri,
16    instance_type =instance_type,
17    instance_count=instance_count,
18    source_dir='.',
19    role=role,
20    hyperparameters=hp,
21
22    subnets=subnets,
23    security_group_ids=security_group_ids,
24
25    debugger_hook_config=False,
26    disable_profiler=True,
27    environment={
28        'NCCL_SOCKET_IFNAME': 'eth0',
29        'NCCL_IB_DISABLE': 1
30    }
31)
32
33estimator.fit(inputs={'train': file_system_input_train})
34Python
Where, parameter CUDA_VISIBLE_DEVICES needs to be set as the number of GPU cards of the training instance. If there is only one GPU graphics card, its value is' 0 '.
It should be noted here that at the time of writing this article, Amazon SageMaker training task does not support specifying the mount option flock when mounting FSx, so the file based distributed initialization method cannot be used. Therefore, we simply adjust the training code of WeNet and use the TCP based initialization method to continue the model training.
You can also observe that we passed in the environment parameter, which means to set the corresponding environment variable in the container. Since the training instance pulled up by Amazon SageMaker will contain more than one network card, we need to pass NCCL_SOCKET_IFNAME environment variable, set the network card used by NCCL to eth0.
In addition, Amazon SageMaker supports the use of bidding instances to train models to effectively reduce costs. You can refer to document [4] for usage methods.
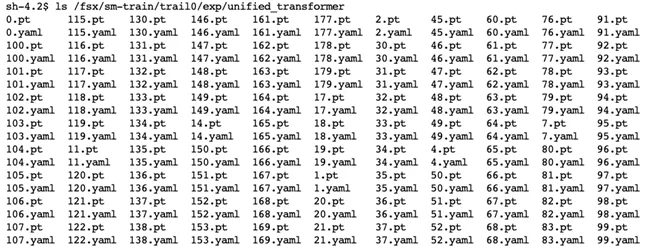
Model file
After the training, the corresponding model file will be generated in the directory you set. This article is / FSX / SM train / trail0 / exp / unified_ Transformer directory.
If you need to export a TorchScript model that supports serialization and optimization, you can adjust the stage and stop in the hp variable_ Stage, execute the training code through the local mode. For TorchScript, refer to [5].
Relevant code logic is as follows:
1instance_type='local_gpu'
2...
3hp= {
4    'stage': 5, 'stop_stage': 6, 'train_set':'train',
5...
6}
7
8estimator=PyTorch(
9...
10)
11
12estimator.fit({'train':'file:///fsx'})
13Python
After execution, the corresponding model file final. Will be generated in the above directory Zip and quantitative model final_quant.zip file.
Now, we have completed a model training. We know that to get a model that meets the current needs, we need to go through many experiments, iterations and training. You can quickly try different super parameters or other algorithms on Amazon SageMaker through the above methods, without considering how to configure the basic environment of machine learning and other operation and maintenance related work.
Model hosting
So far, we have obtained the trained model file. You can deploy the model through Amazon SageMaker or in other ways. In subsequent articles, we will describe in detail how to deploy the trained model in Amazon Web Services.
summary
This paper shows the method of running open source end-to-end speech recognition model WeNet with Amazon SageMaker, covering data processing, Docker running environment construction, model training and so on.
reference material
[1] Amazon SageMaker Toolkits:
https://docs.aws.amazon.com/s...
[2] Notebook auto mount FSx file system:
https://github.com/aws-sample...
[3] Use local mode to train the model:
https://sagemaker.readthedocs...
[4] Train the model using Spot mode:
https://docs.aws.amazon.com/s...
[5] TorchScript compiler:
https://pytorch.org/docs/1.8....
[6] DLC list:
https://github.com/aws/deep-l...
Author of this article

Chen Bin
Amazon cloud technology solution architect
Responsible for the architecture consulting and design of cloud computing solutions based on Amazon cloud technology, with rich experience in solving customers' practical problems, and currently focuses on the research and application of in-depth learning.