NFS networked storage
- brief introduction
- Implement NFS multi host sharing
1. Introduction to NFS
NFS is an abbreviation for Network File System. The main function of NFS is to share files or directories between different host systems through local area network.
NFS system is similar to windows network share and network drive, except that windows is used for LAN and NFS is used in enterprise cluster architecture. For large websites, more complex distributed file systems fastdfs, glusterfs, HDFS and CEPH will be used

2. NFS application
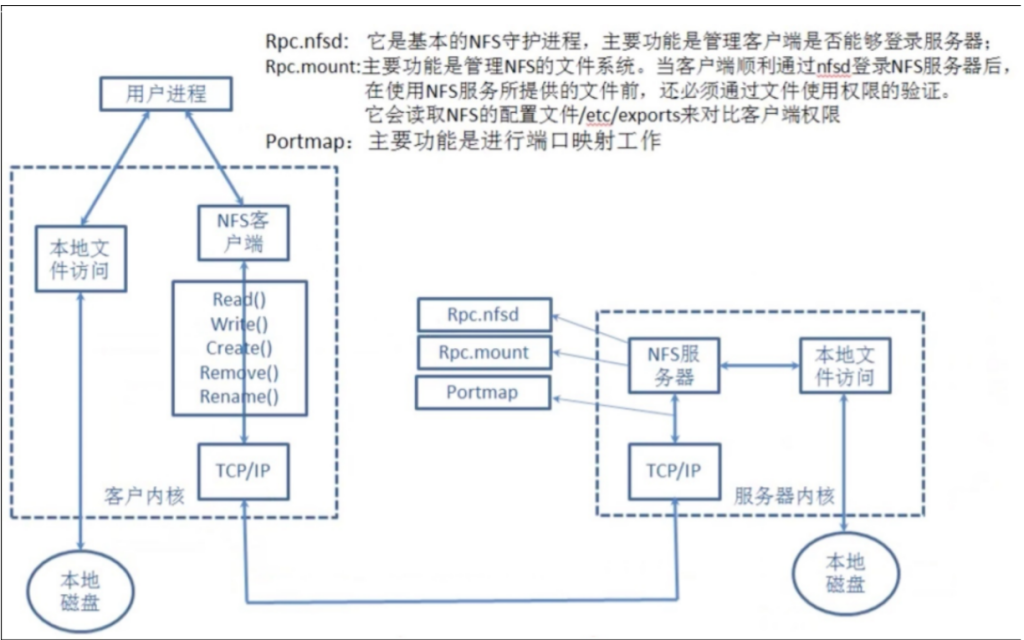
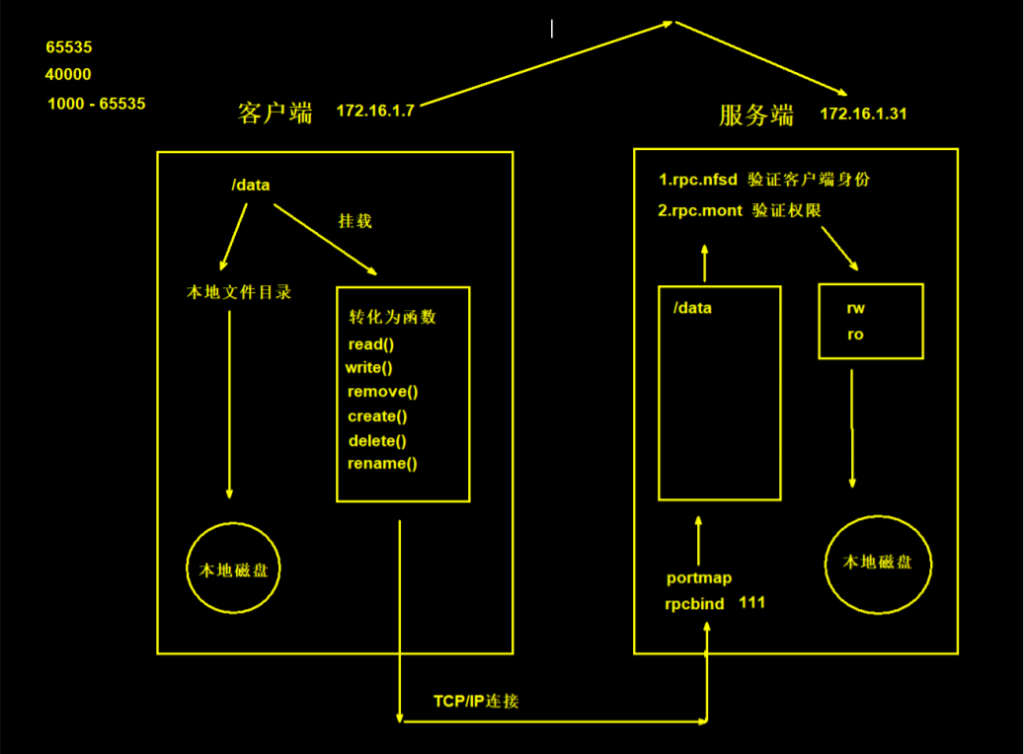
- The user accesses the NFS client and converts the request into a function
- NFS connects to the server through TCP/IP
- When the NFS server receives a request, it will first call the portmap process for port mapping
- Rpc. The NFSD process is used to determine whether the NFS client can connect to the server
- Rpc. The mount process is used to determine the operation permission of the client to the server
- If the permission verification is passed, the server can be operated, modified or read

3. NFS practice
Server
1. install NFS and rpcbind
yum install nfs-utils rpcbind -y
??????"nfs-tools"×

2. Create mount point
mkdir /web/nfs{1..9}

3. Configure mount point
vim /etc/exports
 Format: [Mount point] [Accessible IP]([jurisdiction])
/web/nfs1 172.16.1.0/20(rw,sync,all_squash)

4. close selinux And firewall
setenforce 0
systemctl disable --now firewalld

5. start-up nfs and rpcbind The server
systemctl start nfs-server
systemctl start rpcbind

6. Check whether the server is normal
showmount -e [The address of the server. The default is the local address]

showmount -e
Export list for nfs:
/web/nfs1 172.16.1.0/20
showmount -e 172.16.1.31
Export list for 172.16.1.31:
/web/nfs1 172.16.1.0/20

cat /var/lib/nfs/etab

7. Authorize the mount point
chown -R nfsnobody.nfsnobody /web
client
1. install NFS
yum install -y nfs-utils

2. Create directory
mkdir /opt/nfs/

3. mount  NFS
mount -t nfs 172.16.1.31:/web/nfs1  /opt/nfs/

4. test NFS File synchronization function
4. Detailed explanation of NFS configuration
| NFS share parameters | Parameter action |
|---|---|
| rw | Read and write permissions (common) |
| ro | Read only permission (not commonly used) |
| root_squash | When NFS clients are accessed as root administrators, they are mapped to anonymous users of NFS servers (not commonly used) |
| no_root_squash | When an NFS client is accessed as a root administrator, it is mapped to the root administrator of the NFS server (not commonly used) |
| all_squash | No matter what account the NFS client uses to access, it is mapped to an anonymous user of the NFS server (commonly used) |
| no_all_squash | No matter what account NFS clients use to access, compression is not performed (not commonly used) |
| sync | Write data into memory and hard disk at the same time to ensure no data loss (common) |
| async | Save the data to memory first and then write to the hard disk. This is more efficient, but data may be lost (not commonly used) |
| anonuid | Configure all_squash is used to specify the user UID of NFS, which must exist in the system (common) |
| anongid | Configure all_squash is used to specify the GID of NFS user, and the system must exist (common) |
1. Control reading and writing
rw,ro

2. Control file permissions
root_squash
no_root_squash
all_squash
no_all_squash

3. Control write mode
sync
async

4. Control user
anonuid
anongid

Unified user:

1. Create user
groupadd www-g 666
useradd www -u 666 -g 666 -M -r -s /sbin/nologin

2. Modify mount point permissions
chown -R www.www /web/

3. use
5. Build an examination system
5.1 building web Services
1. install web Software
yum install httpd php php-devel -y

2. Place the code in the root directory of the web site
cd /var/www/html/

# Upload code
yum install lrzsz
 Compressed file kaoshi that
unzip decompression

3. to grant authorization
chown -R www.www /var/www/html

4. close selinux And firewall
setenforce 0
systemctl disable --now firewalld

5. modify web Users of software
vim /etc/httpd/conf/httpd.conf
User www
Group www

6. start-up web Software
systemctl start httpd

7. test
	1.upload
    1_linux.jpg(Naming is exquisite)

    2.visit
    http://172.16.1.7/upload/1_linux.jpg
5.2 file sharing with NFS
1. modify NFS configuration file
vim /etc/exports
/web/upload 172.16.1.0/20(rw.sync,all_squash,anonuid=666,anongid=666)

2. Create mount point
mkdir /web/upload
chown www.www /web/upload

3. restart NFS
systemctl restart nfs-server rpcbind

4. Client installation NFS Software
"web01" yum install nfs-utils -y
"web02" yum install nfs-utils -y
"web03" yum install nfs-utils -y

5. mount
"web01" mount -t nfs 172.16.1.31:/web/upload /var/www/html/upload
"web01" mount -t nfs 172.16.1.31:/web/upload /var/www/html/upload
"web01" mount -t nfs 172.16.1.31:/web/upload /var/www/html/upload

6. test
 use web2 Upload, web3 see