1, Nginx - Architecture
1. Nginx and Tomcat deployment
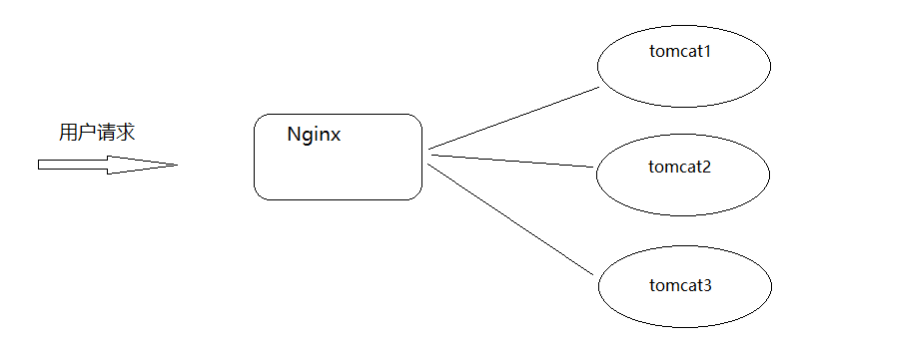
Most of the contents of Nginx have been explained in the previous course. We all know that Nginx has very high performance in high concurrency scenarios and processing static resources. However, in actual projects, in addition to static resources, there are background business code modules. Generally, background businesses will be deployed on Web servers such as Tomcat, weblogic or websphere. So how to use Nginx to receive user requests and forward them to the background web server?
[the external chain picture transfer fails. The source station may have an anti-theft chain mechanism. It is recommended to save the picture and upload it directly (img-bzh49esl-16275413034) (assets / 1604498725652. PNG)]
Step analysis:
1.prepare Tomcat Environment, and in Tomcat Deploy one at the top web project
2.prepare Nginx Environment, use Nginx Receive requests and distribute them to Tomat upper
1.1 environmental preparation (Tomcat)
Browser access:
http://192.168.200.146:8080/demo/index.html

Get the link address of the dynamic resource:
http://192.168.200.146:8080/demo/getAddress
This course will use Tomcat as the background web server
(1) Prepare a Tomcat on Centos
1.Tomcat Official website address:https://tomcat.apache.org/
2.download tomcat,This course uses apache-tomcat-8.5.59.tar.gz
3.take tomcat Decompress
mkdir web_tomcat
tar -zxf apache-tomcat-8.5.59.tar.gz -C /web_tomcat
(2) Prepare a web project and package it as war
1.Transfer the data demo.war Upload to tomcat8 Under directory webapps Bao Xia
2.take tomcat Start and enter tomcat8 of bin Directory
./startup.sh
(3) Start tomcat for access test.
Static resources: http://192.168.200.146:8080/demo/index.html
 dynamic resource: http://192.168.200.146:8080/demo/getAddress
1.2 environmental preparation (Nginx)
(1) Use the reverse proxy of Nginx to forward the request to Tomcat for processing.
upstream webservice {
	server 192.168.200.146:8080;
}
server{
    listen		80;
    server_name localhost;
    location /demo {
    	proxy_pass http://webservice;
    }
}
(2) Start access test

After learning this, you may be confused. You can access it directly through tomcat. Why do you need to add an nginx? Instead, does the complexity of the system become higher?
Next, let's analyze this problem from two convenience points,
The first uses Nginx to realize dynamic and static separation
The second uses Nginx to build a Tomcat cluster
2. Nginx realizes dynamic and static separation
What is dynamic static separation?
Dynamic: business processing of background applications
Static: static resources of the website (html,javaScript,css,images and other files)
Separation: deploy and access the two separately to provide users with access. For example, in the future, all content related to static resources will be handed over to Nginx for deployment and access, and non static content will be handed over to a server similar to Tomcat for deployment and access.
Why the separation of motion and static?
As we mentioned earlier, the efficiency of Nginx in processing static resources is very high, and the concurrent access volume of Nginx is also among the best, while Tomcat is relatively weak. Therefore, after handing over static resources to Nginx, the access pressure of Tomcat server can be reduced and the access speed of static resources can be improved.
After the dynamic and static separation, the coupling between dynamic resources and static resources is reduced. For example, the downtime of dynamic resources will not affect the display of static resources.
How to realize dynamic and static separation?
There are many ways to realize dynamic and static separation. For example, static resources can be deployed to CDN, Nginx and other servers, and dynamic resources can be deployed to Tomcat,weblogic or websphere. This course only needs to use Nginx+Tomcat to realize dynamic and static separation.
2.1 demand analysis

2.2 realization steps of dynamic and static separation
1. Set demo All static resources in the war project are deleted and repackaged to generate a war package, which is provided in the data.
2. Deploy the war package to tomcat and delete the previously deployed content
Enter into tomcat of webapps Under the directory, delete the previous contents
 New war Copy package to webapps lower
 take tomcat start-up
3. Create the following directory on the server where Nginx is located, and put the corresponding static resources in the specified location

Including index The content of the HTML page is as follows:
<!DOCTYPE html>
<html lang="en">
<head>
    <meta charset="UTF-8">
    <title>Title</title>
    <script src="js/jquery.min.js"></script>
    <script>
        $(function(){
           $.get('http://192.168.200.133/demo/getAddress',function(data){
               $("#msg").html(data);
           });
        });
    </script>
</head>
<body>
    <img src="images/logo.png"/>
    <h1>Nginx How to forward requests to back-end servers</h1>
    <h3 id="msg"></h3>
    <img src="images/mv.png"/>
</body>
</html>
4. Configure the access of static and dynamic resources of Nginx
upstream webservice{
   server 192.168.200.146:8080;
}
server {
        listen       80;
        server_name  localhost;

        #dynamic resource
        location /demo {
                proxy_pass http://webservice;
        }
        #Static resources
        location ~/.*\.(png|jpg|gif|js){
                root html/web;
                gzip on;
        }

        location / {
            root   html/web;
            index  index.html index.htm;
        }
}
5. Start the test and visit http://192.168.200.133/index.html

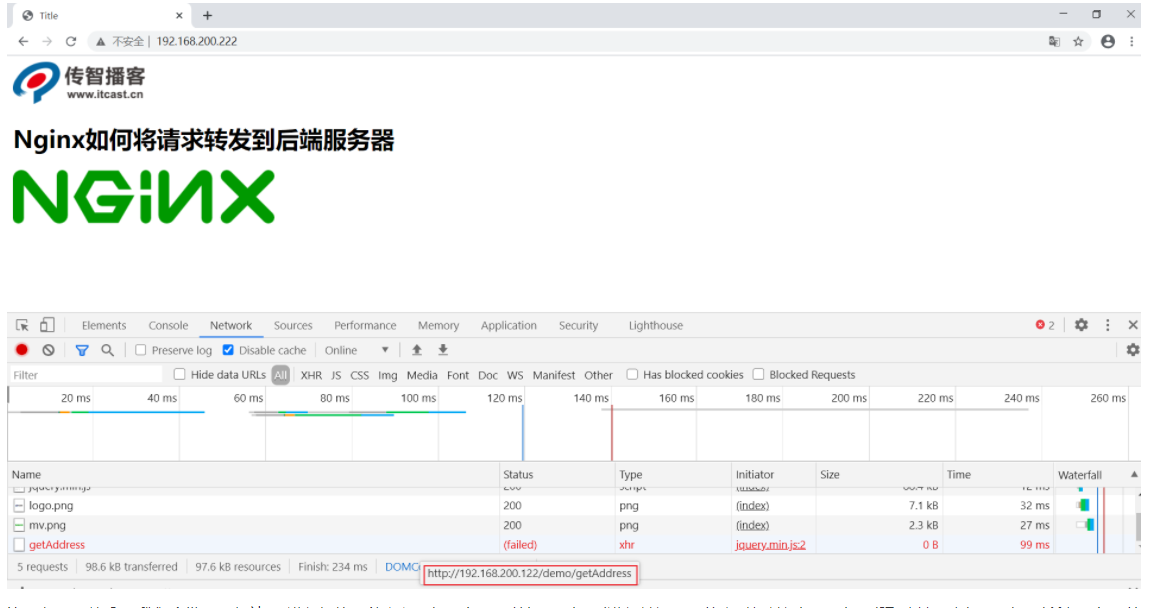
If the server after Tomcat goes down for some reason at a certain point in time, when we visit Nginx again, we will get the following results. The user can still see the page, but the statistics of access times are missing. This is the effect of reducing the coupling between the front and rear ends. The whole request only interacts with the rear server once, and js and images are returned directly from Nginx, It provides efficiency and reduces the pressure on the server.

3. Nginx implements Tomcat cluster construction
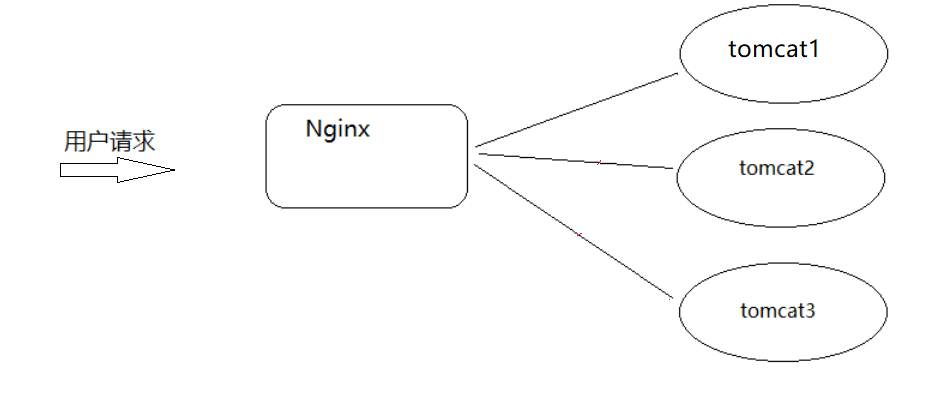
When using Nginx and Tomcat to deploy the project, we use an Nginx server and a Tomcat server. The effect diagram is as follows:

Then the problem comes. If Tomcat goes down, the whole system will be incomplete. So how to solve the above problems? One server is easy to go down, so build more Tomcat servers, so as to improve the availability of the server. This is what we often call a cluster. Building a Tomcat cluster requires the knowledge of Nginx's reverse proxy and assignment balance. How to implement it? Let's analyze the principle first
Environmental preparation:
(1) Prepare three tomcat, use the port to distinguish [the actual environment should be three servers], and modify the server Ml, modify the port to 8081808280 respectively
(2) Start tomcat and access the test,
http://192.168.200.146:8080/demo/getAddress

http://192.168.200.146:8180/demo/getAddress

http://192.168.200.146:8280/demo/getAddress

(3) Add the following content to the configuration file corresponding to Nginx:
upstream webservice{
        server 192.168.200.146:8080;
        server 192.168.200.146:8180;
        server 192.168.200.146:8280;
    }
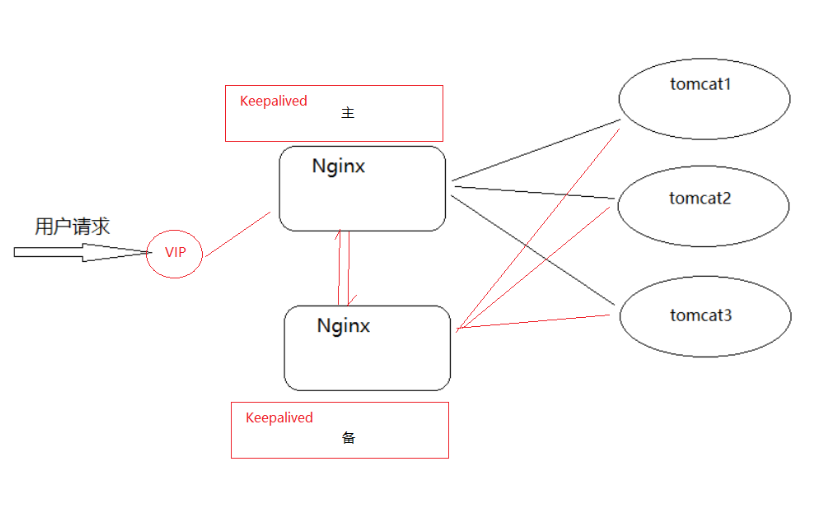
Well, after completing the deployment of the above environment, we have solved the high availability of Tomcat, one server goes down, and the other two provide external services. At the same time, we can also realize the uninterrupted update of background servers. However, new problems arise. In the above environment, if Nginx goes down, the whole system will provide services to the outside world. How to solve this?
4. Nginx high availability solution
In view of the problems mentioned above, let's analyze what problems we need to face in order to solve the above problems?
More than two are required Nginx The server provides external services. In this way, it can solve the problem that one of them is down and the other can provide external services, but if it is two Nginx Server, there will be two IP Address, which server the user should access, and how the user knows which is good and which is down?
4.1 Keepalived
Use Keepalived to solve the problem. The Keepalived software is written by C and originally designed for LVS load balancing software. The Keepalived software mainly realizes the high availability function through VRRP protocol.
4.2 introduction to VRRP
VRRP (Virtual Route Redundancy Protocol) protocol is translated as Virtual Route Redundancy Protocol. VRRP protocol virtualizes two or more router devices into one device and provides virtual router IP externally. Within the router group, if the router actually owns the external IP works normally, it is the MASTER, which realizes various network functions for virtual router IP. Other devices do not own the virtual IP, the status is BACKUP, and do not perform external network functions except receiving the VRRP status notification information from the MASTER. When the host fails, BACKUP will take over the network function of the original MASTER.
The content obtained from the above introduction is that VRRP is a protocol. What is this protocol used for?
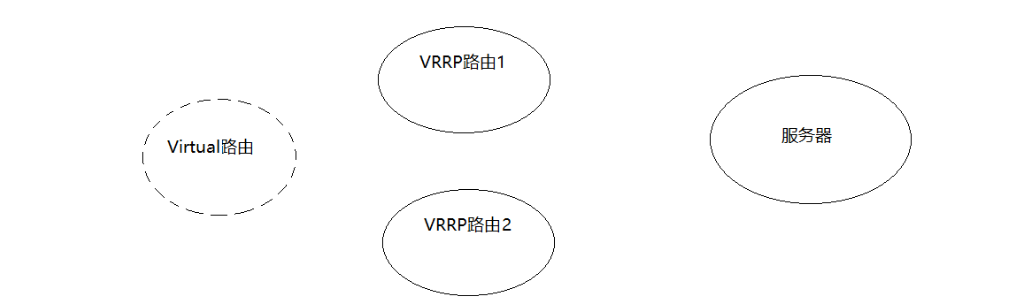
1. Select agreement
VRRP The responsibility of a virtual router can be dynamically assigned to the local area network VRRP One of the routers. The virtual route is Virtual Routing is by VRRP A virtual route created by a routing group that does not really exist also has a corresponding IP Address. and VRRP Route 1 and VRRP There will be competitive selection between routes 2, and one will be generated through selection Master Routing and one Backup route.
2. Routing fault tolerance protocol
Master Routing and Backup There will be a heartbeat detection between routes, Master We will inform you regularly Backup Own status, if within the specified time, Backup This notification was not received, Backup Will replace Master Become new Master. Master A privilege of routing is that both virtual routing and back-end servers pass through Master For data transfer interaction, the backup node will directly discard these requests and data, do not process them, but just listen Master State of
After using Keepalived, the solution is as follows:
4.3 environment construction
Environmental preparation
| VIP | IP | host name | Master / slave |
|---|---|---|---|
| 192.168.200.133 | keepalived1 | Master | |
| 192.168.200.222 | |||
| 192.168.200.122 | keepalived2 | Backup |
keepalived installation
Step 1:Download from official website keepalived,Official website address https://keepalived.org/
Step 2:Upload the downloaded resources to the server
	keepalived-2.0.20.tar.gz
 Step 3:establish keepalived Directory to facilitate resource management
	mkdir keepalived
 Step 4:Decompress the compressed file to the specified directory
	tar -zxf keepalived-2.0.20.tar.gz -C keepalived/
Step 5:yes keepalived Configure, compile, and install
	cd keepalived/keepalived-2.0.20
	./configure --sysconf=/etc --prefix=/usr/local
	make && make install
After the installation, there are two files that we need to know. One is / etc / kept / kept Conf (keepalived system configuration file, which we mainly operate on), one is keepalived in the / usr/local/sbin directory, which is the system configuration script used to start and close keepalived
4.4 introduction to keepalived configuration file
Open keepalived Conf configuration file
This will be divided into three parts. The first part is global configuration, the second part is vrrp related configuration, and the third part is LVS related configuration.
This course mainly uses keepalived to realize high availability deployment without LVS, so we focus on the first two parts
global Global part:
global_defs {
   #Notification email: when keepalived sends a switch, you need to send an email to the specific email address
   notification_email {
     tom@itcast.cn
     jerry@itcast.cn
   }
   #Set sender's mailbox information
   notification_email_from zhaomin@itcast.cn
   #Specify smpt service address
   smtp_server 192.168.200.1
   #Specify smpt service connection timeout
   smtp_connect_timeout 30
   #An identity of the server running keepalived, which can be used as subject information for sending mail
   router_id LVS_DEVEL

   #The default is not to skip the check. Checking all addresses in the received VRRP advertisement may be time-consuming. Setting this command means that if the advertisement comes from the same master router as the last advertisement received, the check will not be performed (skip the check)
   vrrp_skip_check_adv_addr
   #Strictly abide by VRRP protocol.
   vrrp_strict
   #The delay between two free ARP S sent on an interface. It can be accurate to milliseconds. The default is 0
   vrrp_garp_interval 0
   #The delay time between each group of na messages on a network card. The default value is 0
   vrrp_gna_interval 0
}
VRRP This part can include the following four sub modules
1. vrrp_script
2. vrrp_sync_group
3. garp_group
4. vrrp_instance
 We'll use the first and fourth,
#Set the relevant information of the keepalived instance, VI_1 is the VRRP instance name
vrrp_instance VI_1 {
    state MASTER  		#There are two values, MASTER primary BACKUP standby
    interface ens33		#The interface bound to the VRRP instance, which is used to send VRRP packets [network card name used by the current server]
    virtual_router_id 51#Specify the VRRP instance ID in the range of 0-255
    priority 100		#Specify the priority, and the one with higher priority will become the MASTER
    advert_int 1		#Specifies the interval between sending VRRP notifications, in seconds
    authentication {	#Authentication information for communication between vrrp s
        auth_type PASS	#Specify the authentication method. PASS simple password authentication (recommended)
        auth_pass 1111	#Specify the password used for authentication, up to 8 digits
    }
    virtual_ipaddress { #Virtual IP address sets the virtual IP address for user access. You can set multiple, one per line
        192.168.200.222
    }
}
The configuration contents are as follows:
Server 1
global_defs {
   notification_email {
        tom@itcast.cn
        jerry@itcast.cn
   }
   notification_email_from zhaomin@itcast.cn
   smtp_server 192.168.200.1
   smtp_connect_timeout 30
   router_id keepalived1
   vrrp_skip_check_adv_addr
   vrrp_strict
   vrrp_garp_interval 0
   vrrp_gna_interval 0
}

vrrp_instance VI_1 {
    state MASTER
    interface ens33
    virtual_router_id 51
    priority 100
    advert_int 1
    authentication {
        auth_type PASS
        auth_pass 1111
    }
    virtual_ipaddress {
        192.168.200.222
    }
}
Server 2
! Configuration File for keepalived

global_defs {
   notification_email {
        tom@itcast.cn
        jerry@itcast.cn
   }
   notification_email_from zhaomin@itcast.cn
   smtp_server 192.168.200.1
   smtp_connect_timeout 30
   router_id keepalived2
   vrrp_skip_check_adv_addr
   vrrp_strict
   vrrp_garp_interval 0
   vrrp_gna_interval 0
}

vrrp_instance VI_1 {
    state BACKUP
    interface ens33
    virtual_router_id 51
    priority 90
    advert_int 1
    authentication {
        auth_type PASS
        auth_pass 1111
    }
    virtual_ipaddress {
        192.168.200.222
    }
}
4.5 access test
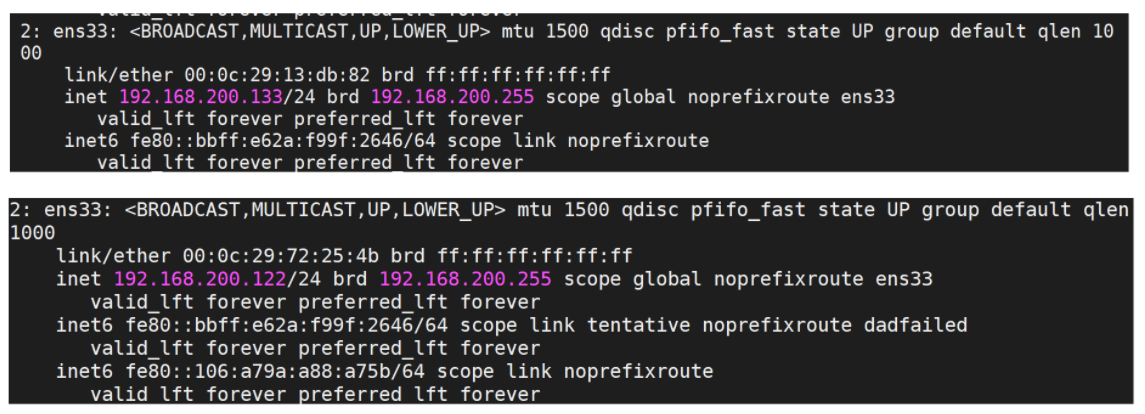
- Before starting keepalived, let's use the command ip a to check the IP status of 192.168.200.133 and 192.168.200.122 servers.
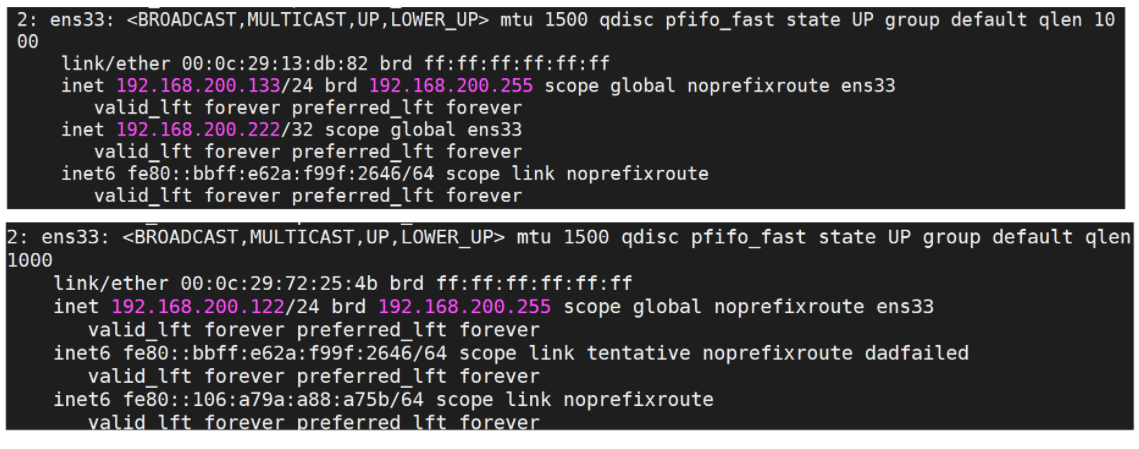
- Start the keepalived of the two servers respectively
cd /usr/local/sbin
./keepalived
View the ip again through ip a
- When keepalived on the 192.168.200.133 server is turned off, check the ip address again
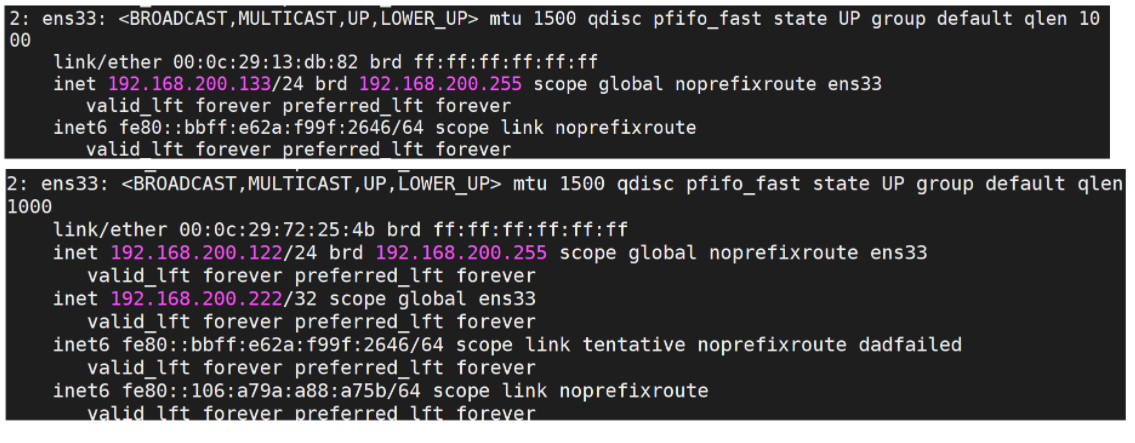
Through the above tests, we will find that the virtual IP(VIP) will be on the MASTER node. When there is a problem with the keepalived on the MASTER node, because BACKUP cannot receive the VRRP status pass information sent by the MASTER, it will be directly promoted to MASTER. VIP will also "drift" to the new MASTER.
What does the above test have to do with Nginx?
We restart the keepalived server of 192.168.200.133. Because its priority is higher than that of 192.168.200.122, it will become the MASTER again, and the VIP will "drift" past. Then we access it again through the browser:
http://192.168.200.222/
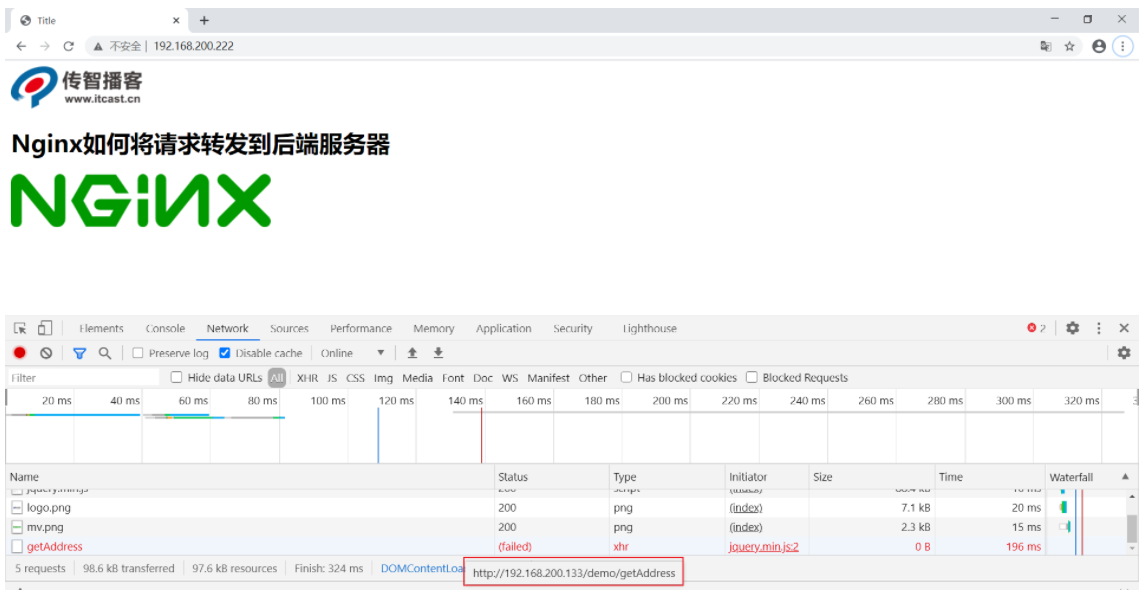
If the keepalived of the 192.168.200.133 server is turned off, access the same address again
After the effect is realized, we will find that in order to switch VIP, we must turn off keepalived on the server. When do we turn off keepalived? It should be that after the nginx of the server where keepalived is in trouble, turn off keepalived to let the VIP execute another server. But now all these operations are done manually. How can we let the system automatically judge whether the nginx of the current server is started correctly? If not, let the VIP automatically "drift", How to solve this problem?
4.6 kept vrrp_script
Keepalived can only monitor network failures and keepalived itself, that is, switch when there is a network failure or a problem with keepalived itself. However, these are not enough. We also need to monitor other services on the server where keepalived is located, such as Nginx. If Nginx is abnormal and keepalived remains normal, the normal operation of the system cannot be completed. Therefore, we need to decide whether to switch between active and standby according to the running state of the business process. At this time, We can detect and monitor business processes by writing scripts.
Implementation steps:
- Add the corresponding configuration image in the keepalived configuration file
vrrp_script Script name
{
    script "Script location"
    interval 3 #Execution interval
    weight -20 #Dynamically adjust VRRP_ Priority of instance
}
- Script
ck_nginx.sh
#!/bin/bash
num=`ps -C nginx --no-header | wc -l`
if [ $num -eq 0 ];then
 /usr/local/nginx/sbin/nginx
 sleep 2
 if [ `ps -C nginx --no-header | wc -l` -eq 0 ]; then
  killall keepalived
 fi
fi
The Linux ps command displays the status of the current process.
-C(command): specify all processes of the command
– no header exclude headers
- Set permissions for script files
chmod 755 ck_nginx.sh
- Add script to
vrrp_script ck_nginx {
   script "/etc/keepalived/ck_nginx.sh" #Where to execute the script
   interval 2		#The cycle of executing the script, in seconds
   weight -20		#Calculation method of weight
}
vrrp_instance VI_1 {
    state MASTER
    interface ens33
    virtual_router_id 10
    priority 100
    advert_int 1
    authentication {
        auth_type PASS
        auth_pass 1111
    }
    virtual_ipaddress {
        192.168.200.111
    }
    track_script {
      ck_nginx
    }
}
- If the effect does not come out, you can use tail -f /var/log/messages to view the log information and find the corresponding error message.
- test
Problem thinking:
Usually, if the master service dies, the backup will become the master, but when the master service is good again, the master will seize the VIP. In this way, two switches will occur, which is not good for busy websites. Therefore, we need to add nopreempt non preemption in the configuration file, but this parameter can only be used when the state is backup. Therefore, when using HA, we'd better set the state of master and backup to backup to compete through priority.
5. Nginx production download site
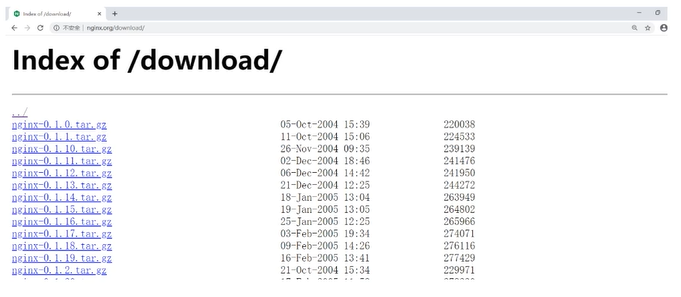
First of all, we need to know what is a download site?
Let's look at a website first http://nginx.org/download/ When we first started learning Nginx, we showed you such a website. This website is mainly used to provide users with websites to download relevant resources, which is called download website.
How to create a download site:
nginx uses the module ngx_http_autoindex_module, which processes requests ending with a slash ("/") and generates a directory list.
The module will be loaded automatically when nginx is compiled, but the module is closed by default. We need to use the following instructions to complete the corresponding configuration
(1) autoindex: enable or disable directory list output
| grammar | autoindex on|off; |
|---|---|
| Default value | autoindex off; |
| position | http,server,location |
(2) autoindex_exact_size: corresponding to HTLM format, specify whether to display the detailed size of the file in the directory list
The default is on, which displays the exact size of the file in bytes.
After it is changed to off, the approximate size of the file is displayed, and the unit is kB or MB or GB
| grammar | autoindex_exact_size on|off; |
|---|---|
| Default value | autoindex_exact_size on; |
| position | http,server,location |
(3) autoindex_format: sets the format of the directory list
| grammar | autoindex_format html|xml|json|jsonp; |
|---|---|
| Default value | autoindex_format html; |
| position | http,server,location |
Note: this directive appears in version 1.7.9 and later
(4) autoindex_localtime: corresponding to HTML format, whether to display the time on the directory list.
The default is off, and the displayed file time is GMT.
When it is changed to on, the displayed file time is the server time of the file
| grammar | autoindex_localtime on | off; |
|---|---|
| Default value | autoindex_localtime off; |
| position | http,server,location |
The configuration method is as follows:
location /download{
    root /usr/local;
    autoindex on;
    autoindex_exact_size on;
    autoindex_format html;
    autoindex_localtime on;
}
XML/JSON format [these two methods are generally not used]

6. User authentication module of Nginx
For access to system resources, we often need to restrict who can access and who can't. This is what we usually call authentication. What authentication needs to do is to determine whether the user is a legal user according to the user name and password entered by the user. If yes, access will be granted, and if not, access will be denied.
The user authentication corresponding to nginx is through ngx_http_auth_basic_module module, which allows to restrict access to resources by verifying the user name and password using the "HTTP basic authentication" protocol. By default, nginx has the module installed. If it is not needed, use – without http_ auth_ basic_ module.
The instructions of this module are relatively simple,
(1)auth_basic: enables authentication of user names and passwords using the HTTP basic authentication protocol
| grammar | auth_basic string|off; |
|---|---|
| Default value | auth_basic off; |
| position | http,server,location,limit_except |
After opening, the server will return 401, and the specified string will be returned to the client to prompt the user, but the content is displayed differently in different browsers.
(2)auth_basic_user_file: Specifies the file where the user name and password are located
| grammar | auth_basic_user_file file; |
|---|---|
| Default value | — |
| position | http,server,location,limit_except |
Specify the file path, the user name and password settings in the file, and the password needs to be encrypted. It can be generated automatically with tools
Implementation steps:
1.nginx.conf add the following
location /download{
    root /usr/local;
    autoindex on;
    autoindex_exact_size on;
    autoindex_format html;
    autoindex_localtime on;
    auth_basic 'please input your auth';
    auth_basic_user_file htpasswd;
}
2. We need to use htpasswd tool to generate
yum install -y httpd-tools
htpasswd -c /usr/local/nginx/conf/htpasswd username //Create a new file to record the user name and password
htpasswd -b /usr/local/nginx/conf/htpasswd username password //Add a user name and password to the specified file
htpasswd -D /usr/local/nginx/conf/htpasswd username //Deletes a user information from the specified file
htpasswd -v /usr/local/nginx/conf/htpasswd username //Verify that the user name and password are correct
Although the above method can verify the user name and password, you can also see that all the user name and password information are recorded in the file. If the number of users is too large, this method will be a little troublesome. At this time, we have to verify the user authority through the background business code.
2, Nginx - module
Nginx is extensible and can be used to handle various usage scenarios. In this section, we will explore extending the functionality of nginx using Lua.
1,Lua
1.1 concept
Lua is a lightweight and compact scripting language, which is written in standard C language and developed in the form of source code. The purpose of the design is to embed it into other applications, so as to provide flexible extension and customization functions for applications.
1.2 characteristics
Compared with other languages, Lua has its own characteristics:
(1) Lightweight
Lua Use standard C Language and developed in the form of source code. After compilation, it is only more than 100 kilobytes, which can be easily embedded in other programs.
(2) Extensible
Lua Provide very rich and easy-to-use extension interfaces and mechanisms by the host language(Usually C or C++)Provide functions, Lua You can use them, just like built-in functions.
(3) Support process oriented programming and functional programming
1.3 application scenarios
Lua has been widely used in different systems. The application scenarios are as follows:
Game development, independent application script, web application script, extension and database plug-in, system security.
1.4 installation of lua
Installing Lua on linux is very simple. You only need to download the source package, decompress and compile it on the terminal.
Lua's official website address is: https://www.lua.org

- Click download to find the download address of the corresponding version. lua-5.3.5 is adopted for this course, and the corresponding resource link address is https://www.lua.org/ftp/lua-5.4.1.tar.gz , you can also use the wget command to download directly:
wget https://www.lua.org/ftp/lua-5.4.1.tar.gz
- Compile and install
cd lua-5.4.1
make linux test
make install
If you fail to execute make linux test, the following error will be reported:

This indicates that the libreadline dev dependency package is missing in the current system and needs to be installed through the command
yum install -y readline-devel
Verify that the installation was successful
lua -v
1.5 Lua's syntax
Lua is very similar to C/C + + syntax, which is clear and concise on the whole. Conditional statements, loop statements and function calls are basically consistent with C/C + +. It doesn't matter if you are not familiar with C/C + +, because the world language is one, and it won't be too difficult to understand. Let's talk a little bit.
1.5.1 first Lua program
What you need to know is that Lua has two interaction modes: interactive and scripted. Let's explain the differences between the two:
Interactive HELLOWORLD
Interactive means that you can enter the program on the command line, and then press enter to see the running effect.
Lua interactive programming mode can be enabled by the command lua -i or Lua:

key in the command line, enter the following command and press enter, and the output will be displayed on the console:

Scripted HELLOWORLD
Scripted is a way to save code to a file with lua extension and execute it.
Mode 1:
We need a file named hello Lua, add the code to execute in the file, and then use the command Lua hello Lua, and the corresponding results will be output on the console.
hello.lua
print("Hello World!!")
Mode 2:
Put hello Lua makes the following changes
#!/usr/local/bin/lua
print("Hello World!!!")
The first line is used to specify that the location of lua interpreter is / usr/local/bin/lua. If it is marked with a # sign, the interpreter will ignore it. Generally #! It is used to specify which program to run this file. But hello Lua is not an executable file. You need to set the executable permissions through chmod. The simplest way is:
chmod 755 hello.lua
Then execute the file
./hello.lua
In addition, if you want to run scripted hello in interactive For the contents in Lua, we can use a dofile function, such as:
dofile("lua_demo/hello.lua")
Note: in Lua language, the separator between consecutive statements is not necessary, that is, there is no need to add a semicolon after it. Of course, adding it will not report an error,
In Lua language, line breaks between expressions also play no role. For example, the following four expressions are actually equivalent
Writing method I
a=1
b=a+2
 Writing method 2
a=1;
b=a+2;
Writing method III
a=1; b=a+2;
Writing method 4
a=1 b=a+2
The fourth method is not recommended, and the readability is too poor.
1.5.2 Lua's notes
There are two types of comments about Lua. The first is a single line comment and the second is a multi line comment.
The syntax of a single line comment is:
--Note Content
The syntax of multiline comments is:
--[[
	Note Content
	Note Content
--]]
If you want to cancel multi line comments, you only need to add a - before the first -, such as:
---[[
	Note Content
	Note Content
--]]
1.5.3 identifier
In other words, the identifier is our variable name. Lua defines the variable name with a letter A to Z or a to Z or underscore_ Add 0 or more letters, underscores and numbers (0 to 9) after the beginning. It is suggested that you should not use the identifier of underline and uppercase letters, because Lua's reserved words are also defined in this way, which is prone to conflict. Note that Lua is case sensitive.
A0
1.5.4 keywords
The following are Lua's keywords. You should avoid using these keywords when defining constants, variables or other user-defined identifiers:
| and | break | do | else |
|---|---|---|---|
| elseif | end | false | for |
| function | if | in | local |
| nil | not | or | repeat |
| return | then | true | until |
| while | goto |
As a general convention, names that begin with an underscore and connect a string of uppercase letters (such as _VERSION) are reserved for Lua internal global variables. This is also the reason why we do not recommend defining identifiers in this way.
1.5.5 operator
Operators supported in Lua include arithmetic operators, relational operators, logical operators and other operators.
Arithmetic operators:
+   addition
-	subtraction
*	multiplication
/	division
%	Surplus
^	Power
-	minus sign
For example:
10+20	-->30
20-10	-->10
10*20	-->200
20/10	-->2
3%2		-->1
10^2	-->100
-10		-->-10
Relational operator
==	be equal to
~=	Not equal to
>	greater than
<	less than
>=	Greater than or equal to
<=	Less than or equal to
For example:
10==10		-->true
10~=10		-->false
20>10		-->true
20<10		-->false
20>=10		-->true
20<=10		-->false
Logical operator
and	Logic and	 A and B     &&
or	Logical or	 A or B     ||
not	Logical negation, if yes true,Then return false  !
The logical operator can be used as the judgment condition of if, and the returned results are as follows:
A = true
B = true

A and B	-->true
A or  B -->true
not A 	-->false

A = true
B = false

A and B	-->false
A or  B -->true
not A 	-->false

A = false
B = true

A and B	-->false
A or  B -->true
not A 	-->true
Other Operators
..	Connect two strings
#	The unary budget method returns the length of a string or table
For example:
> "HELLO ".."WORLD"		-->HELLO WORLD
> #"HELLO"			-->5
1.5.6 Global & local variables
In Lua language, global variables can be used without declaration. By default, the variable is always considered global. If it is not assigned in advance, it defaults to nil:
To declare a local variable, you need to use local
1.5.7 Lua data type
Lua has 8 data types
nil(Invalid value, null)
boolean(Boole, true/false)
number(numerical value)
string(character string)
function(function)
table(Table)
thread(thread )
userdata((user data)
You can use the type function to test the type of a given variable or:
print(type(nil))				-->nil
print(type(true))               --> boolean
print(type(1.1*1.1))             --> number
print(type("Hello world"))      --> string
print(type(io.stdin))			-->userdata
print(type(print))              --> function
print(type(type))               -->function
print(type{})					-->table
print(type(type(X)))            --> string
nil
Nil is a type with only one nil value. Its function can be used to distinguish it from all other values. When you want to remove a variable, you only need to assign the variable name nil, and garbage collection will release the memory occupied by the variable.
boolean
The boolean type has two values, true and false. Boolean type is generally used to judge whether the condition is true or false. In Lua language, only false and nil will be regarded as false, and others will be regarded as true. Especially in condition detection, 0 and empty string will be regarded as true, which is different from most languages we are familiar with.
number
In lua5 Since version 3, Lua language has provided two options for numeric format: integer and float (double precision floating point) [unlike other languages, float does not represent single precision type].
Representation of numeric constants:
>4			-->4
>0.4		-->0.4
>4.75e-3	-->0.00475
>4.75e3		-->4750
Whether it is an integer or a double precision floating-point type, using the type() function to get its type will return number
>type(3)	-->number
>type(3.3)	-->number
Therefore, they can be converted to each other. At the same time, integer values and floating-point values with the same arithmetic value are equal in Lua language
string
Strings in Lua language can represent either a single character or an entire book. In Lua language, it is common to operate a string composed of 100K or 1M letters.
You can declare strings in single or double quotation marks
>a = "hello"
>b = 'world'
>print(a)	-->hello
>print(b) 	-->world
If the declared string is long or has multiple lines, you can declare it in the following way
html = [[
<html>
<head>
<title>Lua-string</title>
</head>
<body>
<a href="http://www.lua.org">Lua</a>
</body>
</html>
]]
table
Table is the most important and powerful data structure in Lua language. Using tables, Lua language can represent arrays, sets, records and many other data structures in a simple, unified and efficient way. The table in Lua language is essentially an auxiliary array. This array is more flexible than arrays in Java. It can be indexed by numeric values, strings or other values of any type (except nil).
The easiest way to create a table:
> a = {}
Create array:
We all know that an array is a collection of elements of the same data type arranged in a certain order. How to create an array using table?
>arr = {"TOM","JERRY","ROSE"}
To get the value in the array, we can get it through the following:
print(arr[0])		nil
print(arr[1])		TOM
print(arr[2])		JERRY
print(arr[3])		ROSE
As can be seen from the above results, the subscript of the array starts from 1 by default. Therefore, the above array can also be created in the following ways
>arr = {}
>arr[1] = "TOM"
>arr[2] = "JERRY"
>arr[3] = "ROSE"
As mentioned above, the index of a table can be either a number or a string, so we can also change the index to a string to create it
>arr = {}
>arr["X"] = 10
>arr["Y"] = 20
>arr["Z"] = 30
Of course, if you want to get the values in these arrays, you can use the following method
Mode 1
>print(arr["X"])
>print(arr["Y"])
>print(arr["Z"])
Mode II
>print(arr.X)
>print(arr.Y)
>print(arr.Z)
The flexibility of the current table is not in this way, and there is a more flexible declaration method
>arr = {"TOM",X=10,"JERRY",Y=20,"ROSE",Z=30}
How do I get the above value?
TOM :  arr[1]
10  :  arr["X"] | arr.X
JERRY: arr[2]
20  :  arr["Y"] | arr.Y
ROESE?
function
In Lua language, Function is the main way to abstract statements and expressions.
The syntax for defining a function is:
function functionName(params)

end
When a function is called and the number of parameters passed in is inconsistent with the number of parameters used to define the function, Lua language will adjust the number of parameters by discarding redundant parameters and setting insufficient parameters to nil.
function  f(a,b)
print(a,b)
end

f()		--> nil  nil
f(2)	--> 2 nil
f(2,6)	--> 2 6
f(2.6.8)	--> 2 6 (8 Discarded)
Variable length parameter function
function add(...)
a,b,c=...
print(a)
print(b)
print(c)
end

add(1,2,3)  --> 1 2 3
Functions can return multiple values, which is different from Java
function f(a,b)
return a,b
end

x,y=f(11,22)	--> x=11,y=22
thread
Thread translates to thread. In Lua, thread is used to represent the independent line of execution and to execute cooperative programs.
userdata
userdata is user-defined data that represents a type created by an application or C/C + + language library.
1.5.8 Lua control structure
Lua language provides a set of concise and commonly used control structures, including certificates for conditional execution and while, repeat and for loops. All control structures have an explicit terminator in Syntax: end is used to terminate if, for and while structures, and until is used to terminate repeat structures.
if then elseif else
if statement tests its condition first, and executes the corresponding then part or else part according to whether the condition is met. The else section is optional.
function testif(a)
 if a>0 then
 	print("a Is a positive number")
 end
end

function testif(a)
 if a>0 then
 	print("a Is a positive number")
 else
 	print("a Is a negative number")
 end
end
If you want to write nested if statements, you can use else if. It is similar to an else followed by an if. Different results are returned according to the age of the incoming, such as
age<=18 teenagers,
age>18 , age <=45 youth
age>45 , age<=60 middle-aged person
age>60 aged

function show(age)
if age<=18 then
 return "teenagers"
elseif age>18 and age<=45 then
 return "youth"
elseif age>45 and age<=60 then
 return "middle-aged person"
elseif age>60 then
 return "aged"
end
end
while Loop
As the name suggests, when the condition is true, the while loop repeats its loop body. Lua language first tests the condition of the while statement. If the condition is false, the loop ends; Otherwise, Lua executes the loop body and repeats the process continuously.
Syntax:
while condition do
  Circulatory body
end
Example: loop array
function testWhile()
 local i = 1
 while i<=10 do
  print(i)
  i=i+1
 end
end
repeat loop
As the name implies, the repeat until statement repeats its loop body until the condition is true. Since the conditional test is executed after the loop body, the loop body will be executed at least once.
grammar
repeat
 Circulatory body
 until condition
function testRepeat()
 local i = 10
 repeat
  print(i)
  i=i-1
 until i < 1
end
for loop
Numeric for loop
grammar
for param=exp1,exp2,exp3 do
 Circulatory body
end
Each loop before the value of param changes from exp1 to exp2 executes the loop body and increases the step exp3 to param at the end of each loop. Optional. If not set, the default value is 1
for i = 1,100,10 do
print(i)
end
Generic for loop
The generic for loop traverses all values through an iterator function, similar to the foreach statement in java.
grammar
for i,v in ipairs(x) do
	Circulatory body
end
i is the array index value, v is the array element value corresponding to the index, ipairs is an iterator function provided by Lua to iterate the array, and x is the array to be traversed.
For example:
arr = {"TOME","JERRY","ROWS","LUCY"}
for i,v in ipairs(arr) do
 print(i,v)
end
The output result of the above example is
1	TOM
2	JERRY
3	ROWS
4	LUCY
However, if you change the value of arr to
arr = {"TOME","JERRY","ROWS",x="JACK","LUCY"}
When the same code is executed, you can only see the same results as before, and if x is JACK, you can't traverse it, and the data is missing. What if you solve it?
We can turn the iterator function into pairs, such as
for i,v in pairs(arr) do
 print(i,v)
end
The output result of the above example is
1	TOM
2	JERRY
3	ROWS
4	LUCY
x	JACK
2,ngx_lua module concept
NGX developed by Taobao_ By integrating the Lua interpreter into Nginx, the Lua module can use the Lua script to realize the business logic. Due to the compact, fast and built-in cooperation process of lua, the implementation cost of business logic is greatly reduced while ensuring the high concurrent service capability.
3,ngx_lua module environment preparation
Method 1: Lua nginx module
- LuaJIT is an interpreter represented by Lua written in C language.
The official website address is: http://luajit.org/
Find the corresponding download address on the official website: http://luajit.org/download/LuaJIT-2.0.5.tar.gz
Use wget on centos to download: wget http://luajit.org/download/LuaJIT-2.0.5.tar.gz
Unzip the downloaded resources: tar -zxf luajit-2.0.5 tar. gz
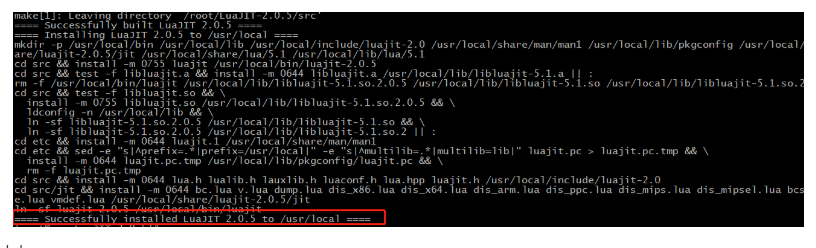
Enter the extracted Directory: cd LuaJIT-2.0.5
Perform compilation and installation: Make & & make install
- Download Lua nginx module
Download address: https://github.com/openresty/lua-nginx-module/archive/v0.10.16rc4.tar.gz
Use wget on centos to download: wget https://github.com/openresty/lua-nginx-module/archive/v0.10.16rc4.tar.gz
Unzip the downloaded resources: tar -zxf lua-nginx-module-0.10.16rc4 tar. gz
Change the directory name: mv lua-nginx-module-0.10.16rc4 lua-nginx-module
Import environment variables and tell Nginx where to find luajit
export LUAJIT_LIB=/usr/local/lib
export LUAJIT_INC=/usr/local/include/luajit-2.0
Enter the directory of Nginx and execute the following command:
./configure --prefix=/usr/local/nginx --add-module=../lua-nginx-module
make && make install
matters needing attention:
(1) If the following error occurs when starting Nginx:

Solution:
To set up a soft link, use the following command
ln -s /usr/local/lib/libluajit-5.1.so.2 /lib64/libluajit-5.1.so.2
(2) If you start Nginx, the following error message appears
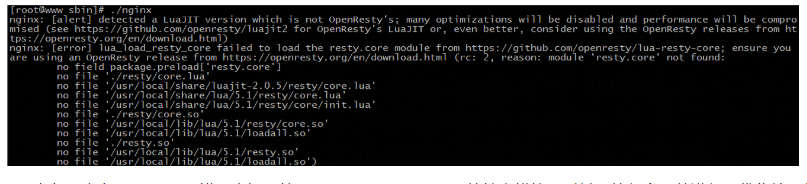
Analysis reason: because Lua nginx module is from openretry, the prompt in the error is rest The core function of opentry is optimized. The previous version will not compile the module by default, so if it needs to be used, we have to install it manually or disable it. However, the latest Lua nginx module has been forcibly installed, so the error message caused by the lack of resty module here.
There are two solutions: one is to download the corresponding module, and the other is to disable the retry module. The disabling methods are as follows:
http{
	lua_load_resty_core off;
}
- test
In nginx Conf is configured as follows:
location /lua{
    default_type 'text/html';
    content_by_lua 'ngx.say("<h1>HELLO,LUA</h1>")';
}
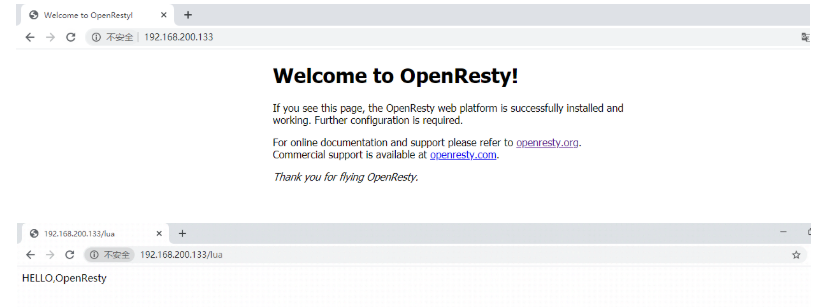
After the configuration is successful, start nginx and access it through the browser. If the following results are obtained, the installation is successful.

Method 2: openretry
summary
As we mentioned earlier, OpenResty is developed by Taobao engineers, so its official website( http://openresty.org/ )It is very convenient for us to read. OpenResty is a high-performance Web platform based on Nginx and Lua. It integrates a large number of sophisticated Lua libraries, third-party modules and most dependencies. It is used to easily build dynamic Web applications, Web services and dynamic gateways that can handle ultra-high concurrency and high scalability. Therefore, OpenResty has integrated Nginx and Lua internally, so it will be more convenient for us to use.
install
(1) download OpenResty: https://openresty.org/download/openresty-1.15.8.2.tar.gz
(2)use wget download: wget https://openresty.org/download/openresty-1.15.8.2.tar.gz
(3)decompression : tar -zxf openresty-1.15.8.2.tar.gz
(4)get into OpenResty catalogue: cd openresty-1.15.8.2
(5) Execute command:./configure
(6) Execute command:make && make install
(7)get into OpenResty Directory, found nginx: cd /usr/local/openresty/nginx/
(8)stay conf Under directory nginx.conf Add the following
location /lua{
    default_type 'text/html';
    content_by_lua 'ngx.say("<h1>HELLO,OpenRestry</h1>")';
}
(9)stay sbin Start under directory nginx
(10)Access tests via browser
4,ngx_ Use of lua
The basic building block for writing Nginx scripts using Lua is instructions. Directives specify when to run user Lua code and how to use the results. The following figure shows the order in which the instructions are executed.
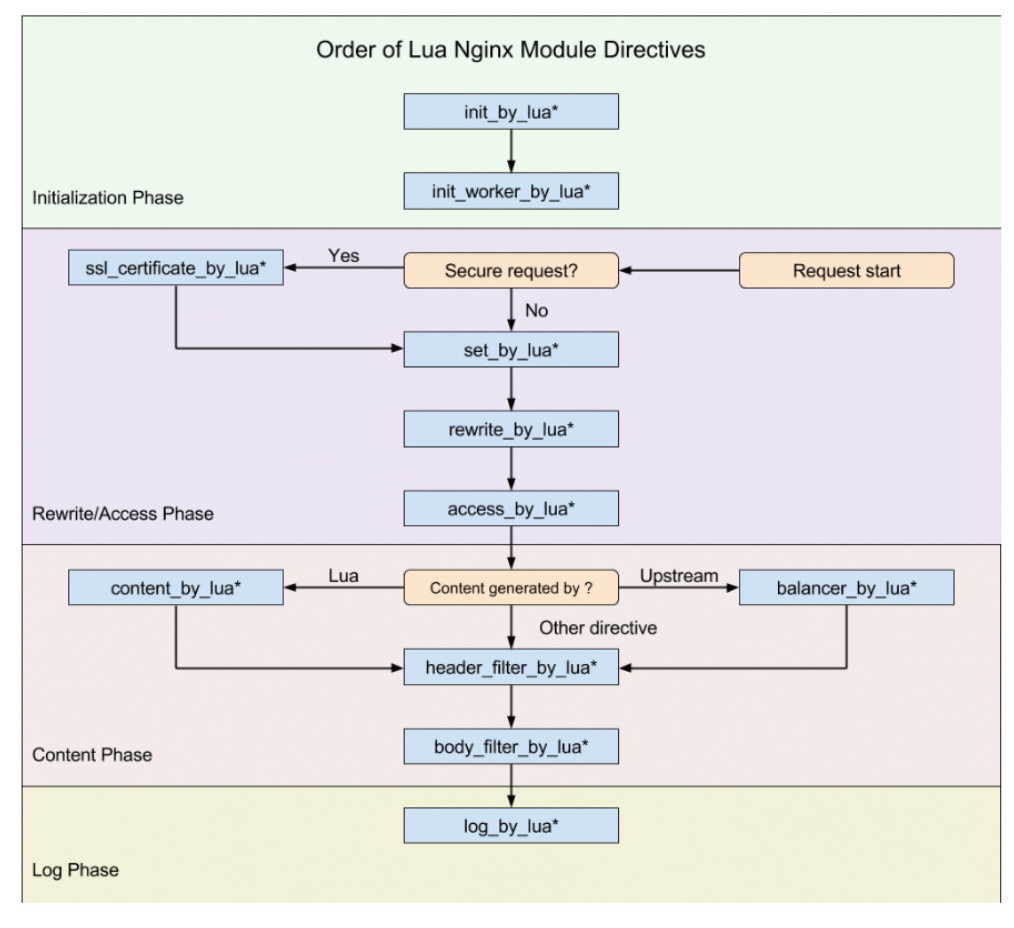
Let's explain the role of * first
*: None, i.e xxx_by_lua ,The command is followed by lua instructions
*:_file,Namely xxx_by_lua_file The command is followed by lua file
*:_block,Namely xxx_by_lua_block At 0.9.17 Post version replacement init_by_lua_file
init_by_lua*
This command is used every time Nginx It is executed when the configuration is reloaded. It can be used to complete the loading of some time-consuming modules or initialize some global configurations.
init_worker_by_lua*
This instruction is used to start some scheduled tasks, such as heartbeat check, scheduled pull server configuration, etc.
set_by_lua*
As long as the instruction is used for variable assignment, this instruction can only return one value at a time and assign the result to Nginx Variable specified in.
rewrite_by_lua*
This instruction is used to execute internal URL Rewriting or external redirection, typically such as pseudo static URL Rewrite, at this stage rewrite The final default execution of the processing phase.
access_by_lua*
This instruction is used for access control. For example, if only intranet is allowed IP visit.
content_by_lua*
This instruction is the most widely used instruction, and most tasks are completed in this stage. Other processes often prepare data for this stage, and the formal processing is basically in this stage.
header_filter_by_lua*
The header information of the instruction is used to set the response message.
body_filter_by_lua*
This instruction is used to filter the response data, such as truncation and replacement.
log_by_lua*
This instruction is used in log Request processing phase, with Lua The code processes the log, but does not replace the original log handle.
balancer_by_lua*
The main function of this instruction is to implement the load balancer algorithm of the upstream server
ssl_certificate_by_*
This command acts on Nginx And downstream services start a SSL The handshake operation will allow the of this configuration item Lua code.
Requirements:
http://192.168.200.133?name = Zhang San & Gender = 1
Nginx After receiving the request, according to gender The value passed in, if gender If 1 is passed in, it will be displayed on the page
 Mr. Zhang San,If gender If 0 is passed in, Ms. Zhang San will be displayed on the page,If no 1 and 2 are transmitted or passed in, three pieces will be displayed on the page.
Implementation code
location /getByGender {
	default_type 'text/html';
	set_by_lua $name "
		local uri_args = ngx.req.get_uri_args()
		gender = uri_args['gender']
		name = uri_args['name']
		if gender=='1' then
			return name..'sir'
		elseif gender=='0' then
			return name..'ma'am'
		else
			return name
		end
	";
	header_filter_by_lua "
		ngx.header.aaa='bbb'
	";
	return 200 $name;
}
5,ngx_lua operation Redis
Redis is often used as data cache and memory database in the system, and plays a very important role in large systems. In the nginx core system, redis is a standing component. Nginx supports three methods to access redis: HttpRedis module, HttpRedis2Module and Lua rest redis library. Among the three methods, the HttpRedis module provides fewer instructions and single function, which is suitable for simple caching. The HttpRedis2Module module is more flexible and powerful than the HttpRedis module. The Lua resty redis library is an interface library provided by OpenResty to operate redis. It can do some logic processing according to its own business conditions, which is suitable for complex business logic. Therefore, this course will be mainly explained by Lua rest redis.
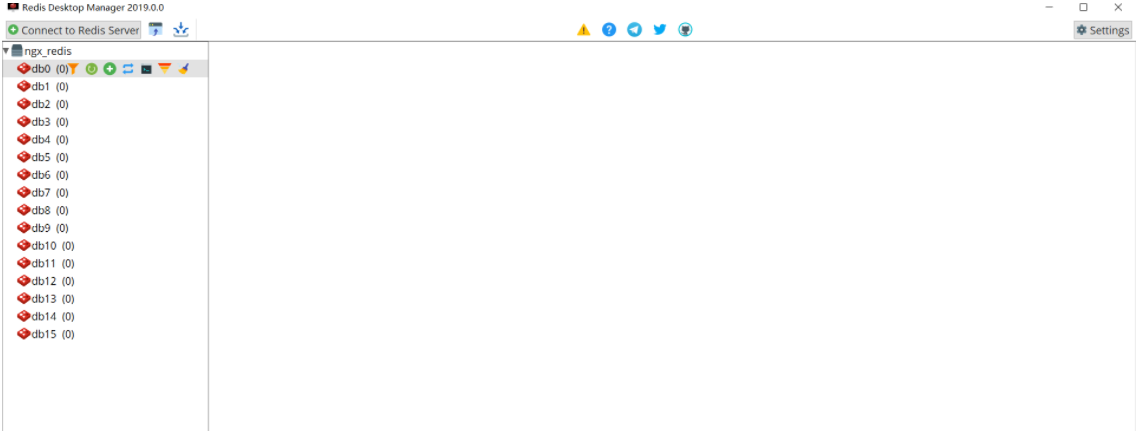
5.1 Lua rest redis environment preparation
Step 1: prepare a Redis environment
Connection address
host= 192.168.200.111
port=6379
Step 2: prepare the corresponding API
lua-resty-redis Provides access Redis Details of API,Including creating docking, connection, operation, data processing, etc. these API Basically with Redis The operations of the are one-to-one.
(1)redis = require "resty.redis"
(2)new
	grammar: redis,err = redis:new(),Create a Redis Object.
(3)connect
	grammar:ok,err=redis:connect(host,port[,options_table]),setup connection Redis Connection information for.
	ok:1 is returned for successful connection and 1 is returned for failed connection nil
	err:Return the corresponding error message
(4)set_timeout
	grammar: redis:set_timeout(time) ,Set request action Redis Timeout for.
(5)close
	grammar: ok,err = redis:close(),Close the current connection. 1 is returned for success and 1 is returned for failure nil And error messages
(6)redis Method corresponding to command
	stay lua-resty-redis In all Redis Commands have their own methods. The method name is the same as the command name, but all are lowercase.
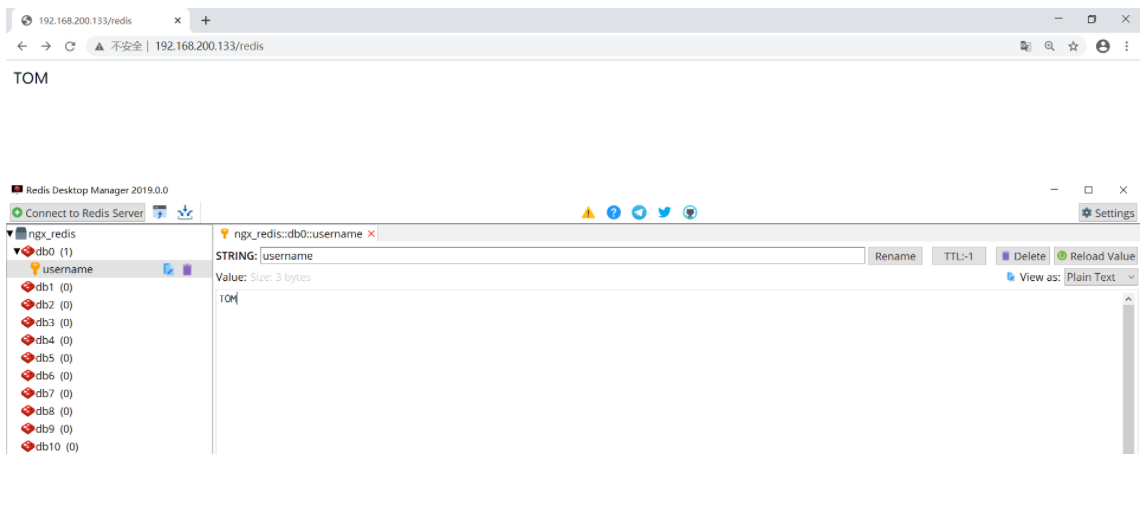
Step 3: effect realization
location / {
    default_type "text/html";
    content_by_lua_block{
        local redis = require "resty.redis" -- introduce Redis
        local redisObj = redis:new()  --establish Redis object
        redisObj:set_timeout(1000) --Set the timeout data to 1 s
        local ok,err = redisObj:connect("192.168.200.1",6379) --set up redis Connection information
        if not ok then --Determine whether the connection is successful
         ngx.say("failed to connection redis",err)
         return
        end
        ok,err = redisObj:set("username","TOM")--Store data
        if not ok then --Judge whether the deposit is successful
         ngx.say("failed to set username",err)
         return
        end
        local res,err = redisObj:get("username") --from redis Get data from
        ngx.say(res)	--Writes data to the message body
        redisObj:close()
    }
}
Step 4: run test results
6,ngx_lua operation Mysql
MySQL is a widely used relational database. In NGX_ In Lua, MySQL has two access modes:
(1) Using ngx_lua module and Lua resty MySQL module: these two modules are installed by default when OpenResty is installed.
(2) Using drizzle_nginx_module(HttpDrizzleModule): it needs to be installed separately. This library is not in OpenResty now.
6.1 lua-resty-mysql
Lua resty MySQL is a module developed by OpenResty. It is flexible and powerful. It is suitable for complex business scenarios and supports the access of stored procedures.
6.1.1 database query using Lua rest MySQL
Step 1:
Preparing MYSQL
host: 192.168.200.111
port: 3306
username:root
password:123456
Create a database table and the data in the table.
create database nginx_db;

use nginx_db;

create table users(
   id int primary key auto_increment,
   username varchar(30),
   birthday date,
   salary double
);

insert into users(id,username,birthday,salary) values(null,"TOM","1988-11-11",10000.0);
insert into users(id,username,birthday,salary) values(null,"JERRY","1989-11-11",20000.0);
insert into users(id,username,birthday,salary) values(null,"ROWS","1990-11-11",30000.0);
insert into users(id,username,birthday,salary) values(null,"LUCY","1991-11-11",40000.0);
insert into users(id,username,birthday,salary) values(null,"JACK","1992-11-11",50000.0);
Four elements of database connection:
driverClass=com.mysql.jdbc.Driver
url=jdbc:mysql://192.168.200.111:3306/nginx_db
username=root
password=123456
Step 2: API learning
(1)introduce"resty.mysql"modular
	local mysql = require "resty.mysql"
(2)new
	Create a MySQL Connect objects. When an error is encountered, db by nil,err Error description information
	grammar: db,err = mysql:new()
(3)connect
	Trying to connect to a MySQL The server
	grammar:ok,err=db:connect(options),options Is a parameter Lua Table structure, which contains information related to database connection
    host:Server host name or IP address
    port:The server listening port is 3306 by default
    user:Login user name
    password:Login password
    database:Database name used
(4)set_timeout
	Set the timeout for the subrequest(ms),include connect method
	grammar:db:set_timeout(time)
(5)close
	Close current MySQL Connect and return status. If successful, 1 is returned; If there are any errors, it will return nil And error description.
	grammar:db:close()
(6)send_query
	Asynchronous to remote MySQL Send a query. If successful, the number of bytes successfully sent is returned; If there is an error, return nil And error description
	grammar:bytes,err=db:send_query(sql)
(7)read_result
	from MySQL The server reads a row of data in the returned result. res Returns a description OK Package or result set package Lua surface,grammar:
	res, err, errcode, sqlstate = db:read_result()
	res, err, errcode, sqlstate = db:read_result(rows) :rows Specifies the maximum value of the returned result set. The default value is 4
	If it is a query, an array containing multiple rows is returned. Each row is a column of data key-value Yes, such as

    {
      {id=1,username="TOM",birthday="1988-11-11",salary=10000.0},
      {id=2,username="JERRY",birthday="1989-11-11",salary=20000.0}
    }
	In case of addition, deletion and modification, the following data on the class will be returned
    {
    	insert_id = 0,
    	server_status=2,
    	warning_count=1,
    	affected_rows=2,
    	message=nil
    }
	Return value:
		res:Result set of operation
		err:error message
		errcode:MySQL Error code, such as 1064
		sqlstate:Returns a standard of 5 characters SQL Error code, such as 42000
Step 3: effect realization
location /{
    content_by_lua_block{
        local mysql = require "resty.mysql"
        local db = mysql:new()
        local ok,err = db:connect{
            host="192.168.200.111",
            port=3306,
            user="root",
            password="123456",
            database="nginx_db"
        }
        db:set_timeout(1000)

        db:send_query("select * from users where id =1")
        local res,err,errcode,sqlstate = db:read_result()
        	ngx.say(res[1].id..","..res[1].username..","..res[1].birthday..","..res[1].salary)
    	db:close()
    }

}
Question:
1.How to get the contents of the returned data
2.How to query multiple data
3.How to add, delete and modify database
6.1.2 processing query results using Lua cjson
Through the above case study, read_ The results obtained by result () are all of table type. If you want to display them on the page, you must know the specific data structure of table before traversing and obtaining them. It's troublesome to handle. Next, we introduce a simple method, cjson, which can convert table type data into json strings and display the json strings on the page. How to use it?
Step 1: import cjson
local cjson = require "cjson"
Step 2: call the encode method of cjson for type conversion
cjson.encode(res)
Step 3: use
location /{
    content_by_lua_block{

        local mysql = require "resty.mysql"
        local cjson = require "cjson"

        local db = mysql:new()

        local ok,err = db:connect{
            host="192.168.200.111",
            port=3306,
            user="root",
            password="123456",
            database="nginx_db"
        }
        db:set_timeout(1000)

        --db:send_query("select * from users where id = 2")
        db:send_query("select * from users")
        local res,err,errcode,sqlstate = db:read_result()
        ngx.say(cjson.encode(res))
         for i,v in ipairs(res) do
       ngx.say(v.id..","..v.username..","..v.birthday..","..v.salary)
        end
    	db:close()
    }

}
6.1.3 Lua resty MySQL realizes the addition, deletion and modification of database
Optimize send_query and read_result
This method is send_query and read_ Shortcut to result combination.
Syntax:
res, err, errcode, sqlstate = db:query(sql[,rows])
With this API, we can optimize the above code, as follows:
location /{
    content_by_lua_block{

        local mysql = require "resty.mysql"

        local db = mysql:new()

        local ok,err = db:connect{
        host="192.168.200.1",
        port=3306,
        user="root",
        password="123456",
        database="nginx_db",
        max_packet_size=1024,
        compact_arrays=false
        }
        db:set_timeout(1000)
        local res,err,errcode,sqlstate = db:query("select * from users")
        --local res,err,errcode,sqlstate = db:query("insert into users(id,username,birthday,salary) values(null,'zhangsan','2020-11-11',32222.0)")
        --local res,err,errcode,sqlstate = db:query("update users set username='lisi' where id = 6")
        --local res,err,errcode,sqlstate = db:query("delete from users where id = 6")
        db:close()
    }

}
6.2 comprehensive small cases
Using ngx_lua module completes Redis cache preheating.
analysis:
(1) There must be a table (users) first
(2) Enter the following address in the browser
http://191.168.200.133?username=TOM
(3) Query the qualified records from the table. At this time, the obtained result is of type table
(4) Use cjson to convert table data into json strings
(5) Store the query result data in Redis
init_by_lua_block{

	redis = require "resty.redis"
    mysql = require "resty.mysql"
    cjson = require "cjson"
}
location /{
			default_type "text/html";
			content_by_lua_block{

				--Get requested parameters username
				local param = ngx.req.get_uri_args()["username"]
				--establish mysql Database connection
				local db = mysql:new()
				local ok,err = db:connect{
					host="192.168.200.111",
					port=3306,
					user="root",
					password="123456",
					database="nginx_db"
				}
				if not ok then
				 ngx.say("failed connect to mysql:",err)
				 return
				end
				--Set connection timeout
				db:set_timeout(1000)
				--Query data
				local sql = "";
				if not param then
					sql="select * from users"
				else
					sql="select * from users where username=".."'"..param.."'"
				end
				local res,err,errcode,sqlstate=db:query(sql)
				if not res then
				 ngx.say("failed to query from mysql:",err)
				 return
				end
				--connect redis
				local rd = redis:new()
				ok,err = rd:connect("192.168.200.111",6379)
				if not ok then
				 ngx.say("failed to connect to redis:",err)
				 return
				end
				rd:set_timeout(1000)
				--Loop through data
				for i,v in ipairs(res) do
				 rd:set("user_"..v.username,cjson.encode(v))
				end
				ngx.say("success")
				rd:close()
				db:close()
			}

		}